• Post Reply Bookmark Topic Watch Topic
  • New Topic
permaculture forums growies critters building homesteading energy monies kitchen purity ungarbage community wilderness fiber arts art permaculture artisans regional education skip experiences global resources cider press projects digital market permies.com pie forums private forums all forums
this forum made possible by our volunteer staff, including ...
master stewards:
  • Nancy Reading
  • Carla Burke
  • r ranson
  • John F Dean
  • paul wheaton
  • Pearl Sutton
stewards:
  • Jay Angler
  • Liv Smith
  • Leigh Tate
master gardeners:
  • Christopher Weeks
  • Timothy Norton
gardeners:
  • thomas rubino
  • Jeremy VanGelder
  • Maieshe Ljin

Raised beds

 
Posts: 254
Location: Virginia
1
  • Mark post as helpful
  • send pies
    Number of slices to send:
    Optional 'thank-you' note:
  • Quote
  • Report post to moderator

solarguy2003 wrote:
I had to make forms for footings (pouring cement).  I bought the cheapest lumber to do it, SPF 2x10's  SPF stands for Spruce, Pine, Fir.  It's the cheapest 2x10 you can buy.

Since I wanted to remove the boards from the cement and reuse them, I used a cheap paint roller to treat them with...

soybean oil.

Used soybean oil in fact.  I collect used fryer oil from restaurants to make biodiesel.  It turns out it makes pretty decent, and very environmentally sound, wood preservative.  They turn dark, but they don't rot. that was almost five years ago, and they're still going strong.

2x10's make a pretty decent raised bed, and not terribly heavy.

I'm not a huge fan of the fakie wood composite deck materials, even though it looks nice, for a while.  It is definitely not as strong as wood wood.

HTH,

troy


just so i understand this correctly.  these 2X10 were plain ol white board,  untreated....not ACQ?  and putting a coating of soybean oil has preserved them for 5 yrs?? 

have you experimented with other types of cooking oil?  other than the soybean oil?  im not to familiar with what type most places generally use.

for what its worth.  im forming more of a neg. opinion  of composite decking all the time.  i havent been back to see some of the ones ive personally built.  but today i was doing some maintence work on a fellas house and he had composite decking installed on his covered porch.  the outside board and the skirt boards that caught sun most all day long looked awful.  some hellacious deteriotion going on.  you could scrub your fingers across it and tear up fibers.  the other boards were in beautiful shape.  these were covered by the porch roof.  and the boards werent but about 4 yrs old. 
 
Posts: 69
Location: Maricopa, AZ
3
  • Likes 1
  • Mark post as helpful
  • send pies
    Number of slices to send:
    Optional 'thank-you' note:
  • Quote
  • Report post to moderator

solarguy2003 wrote:
I had to make forms for footings (pouring cement).  I bought the cheapest lumber to do it, SPF 2x10's  SPF stands for Spruce, Pine, Fir.  It's the cheapest 2x10 you can buy.

Since I wanted to remove the boards from the cement and reuse them, I used a cheap paint roller to treat them with...

soybean oil.

Used soybean oil in fact.  I collect used fryer oil from restaurants to make biodiesel.  It turns out it makes pretty decent, and very environmentally sound, wood preservative.  They turn dark, but they don't rot. that was almost five years ago, and they're still going strong.

2x10's make a pretty decent raised bed, and not terribly heavy.

I'm not a huge fan of the fakie wood composite deck materials, even though it looks nice, for a while.  It is definitely not as strong as wood wood.

HTH,

troy


I've figured out that fake wood is not a good idea. The fact is that dumb ideas can sound great until someone tells you the facts! 
SPF 2x10's do sound like the best thing to use. The fact that it's also inexpensive is a big plus. I've been told that raising beds in the southwest is not a good idea, so I'm going to go with ground level beds with about a 10" edging to keep the mulch from blowing around. I'll probably have one bed that I raise about 15" for my salad crops. That seems to be the thing I spend the most time bending over for and I'll just give it a little more water to compensate for the increased drainage. Thanks for the advice!
 
Posts: 632
31
  • Mark post as helpful
  • send pies
    Number of slices to send:
    Optional 'thank-you' note:
  • Quote
  • Report post to moderator
Dear T. Pierce,

Yes, plain old cheap white, untreated 2x10's.

No, I have not experimented with other kinds of cooking oils, but have reason to believe that would all perform similarly.

HTH,

troy
 
pollinator
Posts: 940
Location: Stevensville, MT
37
  • Mark post as helpful
  • send pies
    Number of slices to send:
    Optional 'thank-you' note:
  • Quote
  • Report post to moderator
Paul and Kelda continue reviewing Sepp Holzer's Permaculture (the book), chapter 1 part 5 in this podcast: podcast

They talk about the difference between hugelkultur and raised beds.
 
Posts: 52
Location: north Georgia
  • Mark post as helpful
  • send pies
    Number of slices to send:
    Optional 'thank-you' note:
  • Quote
  • Report post to moderator
I grow north of Atlanta and use raised beds mainly in the winter. I find the sun heats the sides and the soil, which helps winter growing, and drainage is better so less chance of rotting. In the summer more irrigation is required. I seem to have fewer weeds and bugs in my raised beds. I do not use pressure treated wood and non PT wood succumbs to termites and deterioration within a few years. I have had good success with composite decking - it is considerably more expensive than lumber but does not need maintenance and, as far as I can observe, has not deteriorated from the sun exposure, notwithstanding Georgia temperatures. It does bow somewhat but this is not a problem.

I cover the beds with agribon row cover when the temperature falls below 30 degrees, and to keep it simple I placed two cedar posts across the bed and fastened a pvc pipe to the posts (as shown in the 'photo) over which I drape the row cover, when needed. More details at www.nutrac.info.
1118d-veg-bed.jpg
[Thumbnail for 1118d-veg-bed.jpg]
a raised bed with composite sides and simple structure for supporting row cover
 
Posts: 19
  • Mark post as helpful
  • send pies
    Number of slices to send:
    Optional 'thank-you' note:
  • Quote
  • Report post to moderator
here's the start of our gopher proof (hardware cloth nailed to bottom) non PT wood raised lasagna layered bed. I'm using my son's used biodegradable g diaper inserts also for moisture conservation in the layers
plus cardboard feet from our new spyridon vibrams! love them
IMG_20150905_095927646.jpg
[Thumbnail for IMG_20150905_095927646.jpg]
 
Posts: 30
Location: Switzerland, zone 6b
  • Mark post as helpful
  • send pies
    Number of slices to send:
    Optional 'thank-you' note:
  • Quote
  • Report post to moderator


I'm using metal slug barrier fences as edges of my vegetable beds, as we have a huge slug problem (or a duck deficiency... ). The bed in the picture is still in the process of being filled with organic matter. The goal is to fill it all the way up to the edge of the slug fence, so the bed will be about one foot high.
 
Posts: 166
Location: Kentucky 6b
3
  • Likes 1
  • Mark post as helpful
  • send pies
    Number of slices to send:
    Optional 'thank-you' note:
  • Quote
  • Report post to moderator
Cinder blocks here. Initially expensive, and a pain to move/transport, but they'll last for a veryyyy long time, are easily available, even free if you look enough, easy to form to shape, and the holes can be used for planting as well.
 
steward
Posts: 21553
Location: Pacific Northwest
12040
11
hugelkultur kids cat duck forest garden foraging fiber arts sheep wood heat homestead
  • Likes 4
  • Mark post as helpful
  • send pies
    Number of slices to send:
    Optional 'thank-you' note:
  • Quote
  • Report post to moderator
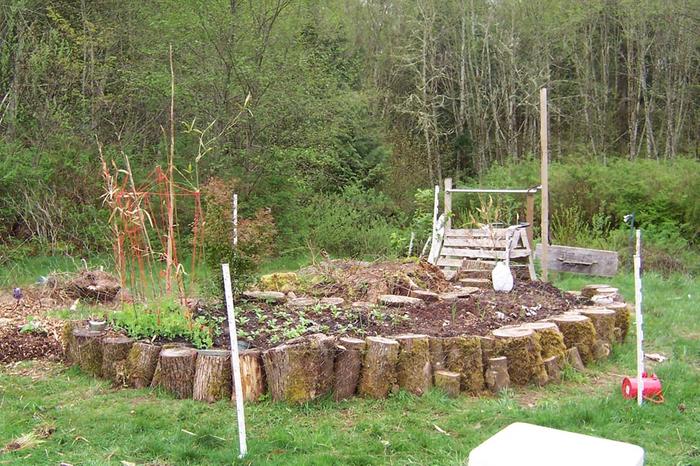
My current favorite way to edge a bed is logs standing on edge. These make a great place to sit, and they're really forgiving about how you put them down. AND, my kids love walking from one log to another. My garden bed is a place to grow food, and a place to sit, and a playground!

Here's my son's garden bed, edged with logs (thread)


And, my apple tree garden bed, also edged with logs (thread)


I made my keyhole garden the same way, too!


I've also edged beds with cinderblocks and bricks that I had lying around &/or got for free. I'll try to take a picture tomorrow and post it!
 
pollinator
Posts: 116
Location: SW Washington
32
3
duck forest garden chicken
  • Likes 3
  • Mark post as helpful
  • send pies
    Number of slices to send:
    Optional 'thank-you' note:
  • Quote
  • Report post to moderator
Use what you've got if you can. My beds are built from rock out of necessity,  since the sunny spot of land in front of our house was stripped of the already thin topsoil when they built, leaving a hill of clay and rock.
We moved the rocks around into terraces and started building soil. The tops of the beds don't really need rock since they are level with the path above but some have little rocks lining them just because there are rocks everywhere and like others have mentioned, it keeps the mulch inside the bed.
Today I fixed up one of the beds that didn't have any rocks (just piled dirt) with old log pieces. It does have logs on top since they were already there for the project and I wasn't hauling them back uphill. I expect any logs I put around beds will rot pretty quickly here but I'm expecting that and will just let them rot in place and add fresh ones or add them to a hugel bed in a couple years. I love having rotted logs for layering in a hugel mound since I can stomp on them and they break up, fillling in the gaps. It's the best way I know how to get rid of cottonwood! Turning a problem into a solution..
I have considered swales above the terraces but I have read (I think from Paul) that swales aren't always a good idea in cold climates so I feel like that needs more research before I pickax a ditch into bedrock.
I have hugels on the side yard, and in the back where it's kinda flat and the soil wasn't stripped, there are no beds.
If I lived on flat land without a lot of trees around,  i don't think I'd mess with raised beds at all, but they make a lot of sense in certain situations, especially on hills and/or if the soil is poor/compacted and you need to build up. Or for making hugels if you have a lot of trees.
Another note, when I lived in Alaska, I had raised beds because the soil in them warmed up faster (I assume it does here as well, though it's not as big a concern). My beds were made of plain untreated 2x6 pine boards and were still going strong 10 years later. When we first moved here to the rainforest, I built some identical beds and they were rotting by the second year. 90+ inches of rain a year will do that!
20180505_183133.jpg
[Thumbnail for 20180505_183133.jpg]
20180505_183124.jpg
[Thumbnail for 20180505_183124.jpg]
 
pollinator
Posts: 845
Location: 10 miles NW of Helena Montana
504
hugelkultur chicken seed homestead
  • Likes 2
  • Mark post as helpful
  • send pies
    Number of slices to send:
    Optional 'thank-you' note:
  • Quote
  • Report post to moderator
I had to thin out my strawberry bed and saw a video by someone in Australia that built a raised bed out of pallets.
I made one this past Monday.
Cut the slats out of pallets and stained them from stain I had.
Took a few hours but turned out pretty nice I think.
No cost because I used materials I had on hand.
Lined the bottom with small branches, compost, some "clay dirt" I had and a few inches of good soil on top.

thumbnail_IMG_20180524_114807854.jpg
[Thumbnail for thumbnail_IMG_20180524_114807854.jpg]
raised bed from pallets
 
Posts: 45
22
  • Mark post as helpful
  • send pies
    Number of slices to send:
    Optional 'thank-you' note:
  • Quote
  • Report post to moderator
In my experience, ants love particle board (aka 'chipboard' or 'composition wood').  The ones I've seen consistently go for it are the tiny little ones.  We call them sugar ants, here.  I think it's the adhesive they use to make it that is so appealing.  Not only do they break it down very quickly, you have to work with teeming ant nests amongst your plants.  We can also have massive pillbug infestations using logs or other wood for bed sides, but this is the Pacific Northwest, so maybe in a drier climate there would not be so many.  I still use wood or whatever is handy to shore up beds, but keep an eye out for known problems.  Rocks work well, but can be high maintenance if there are many small cracks to host weeds.  

My garden is on a slope, so I tend to terrace the flatter parts gently by digging out the paths on the lower side and throwing the dirt up onto the bed, so at the top edge of the bed there is little rise, but on the lower edge it's eight inches or more.  Then I weed and throw trimmings as I harvest etc right onto the paths, which mulches them and tends to keep things from sliding down the slope.  Beds are reconfigured every year, depending on what I'm growing.  Only beds in the steeper parts get real shoring up, and also they tend to be more permanent plantings.  

We have lots of rats, and I have learned the hard way to make hugelkultur mounds nice and tightly packed!  They can become excellent rat condos.  
 
pollinator
Posts: 1350
Location: zone 4b, sandy, Continental D
382
  • Mark post as helpful
  • send pies
    Number of slices to send:
    Optional 'thank-you' note:
  • Quote
  • Report post to moderator

maria McCoy wrote:Besides hugelkulture, how have you made raised beds?


Our soil is very sandy, so very poor and without doubling the thickness of the little bit of 'soil' we have [like 2.5" inches] it would be hard to get anything out of the garden. Straws goes in the bed around the plants to keep the weeds down and the roots cool. Also, I get chips from our county crew when I can for the alleys. After a few years, it is rotted well enough that I can add some of it to the bed. I also irrigate with 6 barrels that I fill with water and comfrey. I fitted them with a valve to empty them by gravity. After 3 weeks or so, it is very stinky but oh so great for the plants! I've also used Milorganite in a nylon sack soaking in there but discontinued this year because I heard that there are some heavy metals in the stuff. [I'm not sure, but why take the risk]?
To those who fear treated lumber, many lumber yards no longer treat their wood with the toxic stuff, [chromated copper arsenate]. They swear this new treatment isn't toxic, and from the looks of it, it isn't, and folks say it is safe for raised beds. At the corners of the bed, I use a short 4"X 4" standing vertically, but I do not plant them because I like to be able to move my beds if the fancy takes me. In the 4 corners posts, I drill a hole for a rebar, then put a PVC sleeve over it: This way, I can drag hoses from the barrels of good stinky stuff to the beds where I need it without dragging the hose over my plants. The proof is in the pudding, as they say, and my garden is growing better and better every year. In a cold zone 4 where earthworms struggle to outlive the winter, I now have some! Yeah!
 
gardener & hugelmaster
Posts: 3694
Location: Gulf of Mexico cajun zone 8
1970
cattle hugelkultur cat dog trees hunting chicken bee woodworking homestead ungarbage
  • Likes 1
  • Mark post as helpful
  • send pies
    Number of slices to send:
    Optional 'thank-you' note:
  • Quote
  • Report post to moderator
I have used normal rocks, landscape rocks, & logs. Once I used an old waterbed frame after sanding off the remnants of varnish & stain. That one eventually was surrounded by garden expansion & ultimately decayed. So yes, I ate my waterbed:)

Next spring I intend to try a wattle-ish border. Not so much to raise the height but to minimize soil loss. My new places here in the mountains are rather sloped.
 
Dennis Barrow
pollinator
Posts: 845
Location: 10 miles NW of Helena Montana
504
hugelkultur chicken seed homestead
  • Likes 3
  • Mark post as helpful
  • send pies
    Number of slices to send:
    Optional 'thank-you' note:
  • Quote
  • Report post to moderator
Tried to edit my post, but all thumbs.

Here is my strawberry patch today.  It really likes this raised bed.
thumbnail_IMG_20180911_073759965.jpg
[Thumbnail for thumbnail_IMG_20180911_073759965.jpg]
 
Posts: 6
Location: Martha’s Vineyard MA
2
hugelkultur cat food preservation
  • Likes 5
  • Mark post as helpful
  • send pies
    Number of slices to send:
    Optional 'thank-you' note:
  • Quote
  • Report post to moderator
We used locust logs on end and raw edge pine boards our arborist buddy cut for us.  I also have one lined w rocks from the land.
A3FF4650-DB5D-44F6-8957-4025164BE0E2.jpeg
[Thumbnail for A3FF4650-DB5D-44F6-8957-4025164BE0E2.jpeg]
Top view
DDC92106-380F-44FD-BE46-9730C5854487.jpeg
[Thumbnail for DDC92106-380F-44FD-BE46-9730C5854487.jpeg]
 
Posts: 35
Location: Willamette valley, Oregon.
9
3
  • Likes 5
  • Mark post as helpful
  • send pies
    Number of slices to send:
    Optional 'thank-you' note:
  • Quote
  • Report post to moderator
I used this technique creating an annual garden on a slope with thin soil- logs on contour, spaced wide enough to allow a row and a path. Broadfork one pass upslope of the log.  Cover that with nitrogen rich mulch. Layer cardboard on the whole row.  Just uphill of the logs is the bed area.  Layer on some soil and nitrogen rich compost.  Uphill of the bed area, cover the path with nitrogen-poor mulch like fresh sawdust or wood chips. This path becomes a thin composting area for next year's bed.  Plant your pre-started annuals or direct seed through holes made in the cardboard. Throw the weeds and garden waste in the path and walk on it as you garden.
IMG_5133.jpeg
[Thumbnail for IMG_5133.jpeg]
IMG_5216.jpeg
[Thumbnail for IMG_5216.jpeg]
IMG_5227.jpeg
[Thumbnail for IMG_5227.jpeg]
IMG_5232.jpeg
[Thumbnail for IMG_5232.jpeg]
IMG_5342.jpeg
[Thumbnail for IMG_5342.jpeg]
 
Hal Hurst
Posts: 35
Location: Willamette valley, Oregon.
9
3
  • Likes 7
  • Mark post as helpful
  • send pies
    Number of slices to send:
    Optional 'thank-you' note:
  • Quote
  • Report post to moderator
I regret not stripping the plastic tape off of the repurposed cardboard boxes.  The cardboard is gone after several years, but I still am getting strips of plastic that surface when I hoe and/or rake.
 
pollinator
Posts: 187
Location: Northern UK
87
  • Likes 3
  • Mark post as helpful
  • send pies
    Number of slices to send:
    Optional 'thank-you' note:
  • Quote
  • Report post to moderator
Hal, I did the same the first time I used old cardboard boxes on my garden having read that it was "easy to remove the plastic tape once the cardboard had rotted away". I learned my lesson and always make sure to remove any plastic before getting outside.
 
gardener
Posts: 5436
Location: Southern Illinois
1487
transportation cat dog fungi trees building writing rocket stoves woodworking
  • Likes 4
  • Mark post as helpful
  • send pies
    Number of slices to send:
    Optional 'thank-you' note:
  • Quote
  • Report post to moderator
Hal,

I love your picture of your log moving contraption above for the simplicity if nothing else.  I don’t suppose you could tell us how you made it and how you load a log onto it could you?

Eric
 
Posts: 49
16
  • Likes 4
  • Mark post as helpful
  • send pies
    Number of slices to send:
    Optional 'thank-you' note:
  • Quote
  • Report post to moderator
There’s a great Japanese method of preserving wood that involves nothing toxic.

https://urbanlegacy.us/blog/what-is-the-shou-sugi-ban-wood-preservation-process/

Charring the exterior of the wood with a torch makes it nearly rot proof. Bonus is that it’s beautiful, but a power wire wheel to remove some surface charcoal helps you from getting black when handling it.

I helped my son and his wife build a garden at their new house, and they treated all of their raised beds and fenceposts with this method. Big bonus is that common untreated lumber is much cheaper than PT!

I will be trying it when I replace some rotting fenceposts.

In keeping with the original topic, every raised bed I ever made had wood in the bottom. I actually dismantled all of mine because I greatly expanded my garden last fall in preparation for this year. Can’t eat grass was my excuse. I realized I’d get a lot more efficient use of space with in ground beds and narrow wood chip paths. But I used granite blocks and built one long raised bed outside of the garden fence for herbs and plants that attract pollinators and repel pests. It’s about 25 feet by five feet, and about a foot high because I ran out of those rocks.
IMO, the biggest problem with above ground raised beds is filling them. I’m not going to buy soil, that goes against my grain. So first, I laid down cardboard to kill the grass. Then I took my wheelbarrow into my woods and scrounged up rotting wood. That went on the bottom follwed by plant stems and sticks. Then, I dumped in a bunch of wood chips to fill in all the air pockets to reduce future settling. And of course, to eventually become soil. That left only about half the depth to fill with compost.

I’ve used this same method for years, and the beds I dismantled revealed that most of the wood and chips had become humus.
 
Jeff Peter
Posts: 49
16
  • Likes 3
  • Mark post as helpful
  • send pies
    Number of slices to send:
    Optional 'thank-you' note:
  • Quote
  • Report post to moderator

Irene Kightley wrote:I make them from chestnut poles cut on site and as our land is on a slope I terrace, working around the tree roots


I've also made them from tree roots dug up by the pigs and too beautiful to burn. (This bed has a hugelkultur base and is now seven years old and I didn't water it at all last year.)


Paul I've just made more growing space which covers a lawn and after we put the new poles down I pull the stones and wood towards the edges and more and more compost (helped by the chickens) makes it's way by gravity down the slope to the raised bed. I'll mulch just before planting.


The mulch also goes on the paths and the chickens clean them regularly so the lawn will disappear completely between raised beds.


Just beautiful, Irene! Very creative and picturesque as a fancy gardening magazine.
 
Do not threaten THIS beaver! Not even with this tiny ad:
Back the BEL - Invest in the Permaculture Bootcamp
https://permies.com/w/bel-fundraiser
reply
    Bookmark Topic Watch Topic
  • New Topic