• Post Reply Bookmark Topic Watch Topic
  • New Topic
permaculture forums growies critters building homesteading energy monies kitchen purity ungarbage community wilderness fiber arts art permaculture artisans regional education skip experiences global resources cider press projects digital market permies.com pie forums private forums all forums
this forum made possible by our volunteer staff, including ...
master stewards:
  • Nancy Reading
  • Carla Burke
  • r ranson
  • John F Dean
  • paul wheaton
  • Pearl Sutton
stewards:
  • Jay Angler
  • Liv Smith
  • Leigh Tate
master gardeners:
  • Christopher Weeks
  • Timothy Norton
gardeners:
  • thomas rubino
  • Jeremy VanGelder
  • Maieshe Ljin

Rocket stove - hot plate.

 
Rocket Scientist
Posts: 791
Location: Guernsey a small island near France.
299
  • Likes 2
  • Mark post as helpful
  • send pies
    Number of slices to send:
    Optional 'thank-you' note:
  • Quote
  • Report post to moderator
Hi everybody, I am new to theses pages.
I would like to build a rocket stove hot plate for my outdoor cooking area.
I almost built one from steel pipe via the many YouTube vids, but, luckily I found this site!
So what I would like to have is an approx 2’ round hot plate that I can cook on.
Can anyone help me with a basic working design and suitable material lists?
I built a cast, refactory wood fired over last year so I am looking forward to complementing it with a hot plate.
Thank you Fox.
 
Fox James
Rocket Scientist
Posts: 791
Location: Guernsey a small island near France.
299
  • Mark post as helpful
  • send pies
    Number of slices to send:
    Optional 'thank-you' note:
  • Quote
  • Report post to moderator
I have spent a few hours searching the forum but I can’t find anything about a basic rocket stove cooking plate?
I don’t intend to use it that much, maybe 20 times a year for a couple of hours each time.
 
gardener
Posts: 1236
360
7
trees wofati rocket stoves
  • Mark post as helpful
  • send pies
    Number of slices to send:
    Optional 'thank-you' note:
  • Quote
  • Report post to moderator
Hi there! Paul put up a video about Tim's 3-in-1 rocket oven/griddle/water heater on YouTube:  


Matt Walker has designed a cook stove/oven as well:  


The Cob Cottage Company has a simple rocket stove with an oven rack over the top of the heat riser, and it worked great for cooking up 5 gallons of apple sauce when I was there last fall (all the apples all needed to be used!.

I think you can create a standard rocket stove (not out of metal, use brick or refractory material that won't break down like metal will) and place a cooking surface over the exhaust. It can be tweaked so your output serves your needs. Tim's design is more like a "pizza oven" look, and Matt's design would fit a lot of the high end, back yard, covered grill areas you see at the home and garden shows.
 
Fox James
Rocket Scientist
Posts: 791
Location: Guernsey a small island near France.
299
  • Likes 1
  • Mark post as helpful
  • send pies
    Number of slices to send:
    Optional 'thank-you' note:
  • Quote
  • Report post to moderator
Thanks, I will have a good look at the vids...
This is what I have at the moment...

8F670F90-CE82-4C5F-8A3C-D5E47F4C9714.jpeg
[Thumbnail for 8F670F90-CE82-4C5F-8A3C-D5E47F4C9714.jpeg]
 
Rocket Scientist
Posts: 4527
Location: Upstate NY, zone 5
574
5
  • Mark post as helpful
  • send pies
    Number of slices to send:
    Optional 'thank-you' note:
  • Quote
  • Report post to moderator
I have done a simple, all-cob except for the hot plate, rocket stove which worked well enough in initial tests. Unfortunately I have not had the chance to tweak and further test it.

https://permies.com/t/52509/Clay-Rocket-core-Bell-RMH#428887
 
gardener
Posts: 3471
Location: Southern alps, on the French side of the french /italian border 5000ft elevation
194
  • Likes 1
  • Mark post as helpful
  • send pies
    Number of slices to send:
    Optional 'thank-you' note:
  • Quote
  • Report post to moderator
You can use metal for a cooking one, well, firebrick feed tube and burn tunnel, start of the heat riser with the firebricks, and finish with a stainless tube. They last long enough to be used as a hotplate. I insulate this with rockwool. And fit all this in gas bottles. So the thing is self contained and tough. So it can be moved around. Make the bottom heavy, so it doesn't tip.
 
Fox James
Rocket Scientist
Posts: 791
Location: Guernsey a small island near France.
299
  • Mark post as helpful
  • send pies
    Number of slices to send:
    Optional 'thank-you' note:
  • Quote
  • Report post to moderator
So the fire bricks should be standard high density or low density insulating type?
I have quite a bit of castable refactory cement but it is only rated for 1400c is that good enough to cast a fire box?
 
Satamax Antone
gardener
Posts: 3471
Location: Southern alps, on the French side of the french /italian border 5000ft elevation
194
  • Likes 1
  • Mark post as helpful
  • send pies
    Number of slices to send:
    Optional 'thank-you' note:
  • Quote
  • Report post to moderator
1400, plenty good enough, as long as you don't go batch.
 
Fox James
Rocket Scientist
Posts: 791
Location: Guernsey a small island near France.
299
  • Likes 1
  • Mark post as helpful
  • send pies
    Number of slices to send:
    Optional 'thank-you' note:
  • Quote
  • Report post to moderator
Ah ok, so I could possibly  cast the whole thing with refactory cement, I made my own mould to cast my pizza oven so perhaps I could do something similar?

 
Satamax Antone
gardener
Posts: 3471
Location: Southern alps, on the French side of the french /italian border 5000ft elevation
194
  • Likes 1
  • Mark post as helpful
  • send pies
    Number of slices to send:
    Optional 'thank-you' note:
  • Quote
  • Report post to moderator
Make it several pieces, so you have less cracking problems.

Searching for casting a J tube should bring a fair bit of results.
 
Fox James
Rocket Scientist
Posts: 791
Location: Guernsey a small island near France.
299
  • Mark post as helpful
  • send pies
    Number of slices to send:
    Optional 'thank-you' note:
  • Quote
  • Report post to moderator
I am still trying to gain more info by reading through the forum post but can someone help me clear a few thing up...
The most common topic seems to be about the unsuitability of metals in rocket fire construction but I am finding it differcult to discover what the best materials actually are?
I would like to know if there is a minimum or maximum formula of dimension. For my purpose I would not like to have my cooking surface above 3’ high, what would be a good size fire box and riser diameter.
I don’t think I I’ll need a huge amount of heat to cook on but I realise for the system to work and burn off impurities, the temp in the riser has to be high, what temperature would that be?
Thanks Fox.
 
Glenn Herbert
Rocket Scientist
Posts: 4527
Location: Upstate NY, zone 5
574
5
  • Likes 1
  • Mark post as helpful
  • send pies
    Number of slices to send:
    Optional 'thank-you' note:
  • Quote
  • Report post to moderator
The best material for a combustion core is anything refractory... firebrick (dense or insulating), old red brick, castable refractory cement, clay mixed with perlite, vermiculite, sawdust, fine straw or grass clippings...

A J-tube style rocket core works best with proportions for feed tube to burn tunnel to heat riser like 1:2:3 or 1:2:4 or 1:1.5:3. The "1" is usually made at least twice the nominal diameter. Having "1" equal the length of firewood you will use helps with fire control. An 8" diameter system would be large for a cooking rocket, good for feeding several cooking stations. A 6" system would probably be plenty for a single cooktop. The cooking rocket I built (6" system) had proportions measured along the outer edges about 12" x 17" x 34". It draws great, with a 2' x 6" stovepipe chimney attached beneath the cooktop, and would probably cook better with a slightly shorter riser, maybe 30" total plus 2" gap to the cooktop.

Maximum combustion temperature in a decent rocket core will be at least 1500F, which burns up essentially all smoke.
 
Fox James
Rocket Scientist
Posts: 791
Location: Guernsey a small island near France.
299
  • Mark post as helpful
  • send pies
    Number of slices to send:
    Optional 'thank-you' note:
  • Quote
  • Report post to moderator
Thank you, I was thinking about making a removable core from expanded sheet foam and then cast refactotory cement around the core.
Useing this method a I can shape the foam into any complex shape required, perhaps forming a vortex into the heat riser.
I was thinking about casting the fire box 2” thick and then surronding with insulation but I assume the heat riser would work best with a much thinner dense fire proof lining with more insulation.
I will get going with my project pretty soon and will post some pictures while asking more questions...
Fox.
 
Satamax Antone
gardener
Posts: 3471
Location: Southern alps, on the French side of the french /italian border 5000ft elevation
194
  • Mark post as helpful
  • send pies
    Number of slices to send:
    Optional 'thank-you' note:
  • Quote
  • Report post to moderator
James, no ned to shape a vortex in th heat riser. Read this thread.

http://donkey32.proboards.com/thread/355/small-scale-development

There is a fair bit of casting examples on that site too.

 
Fox James
Rocket Scientist
Posts: 791
Location: Guernsey a small island near France.
299
  • Mark post as helpful
  • send pies
    Number of slices to send:
    Optional 'thank-you' note:
  • Quote
  • Report post to moderator
There does seem to be quite a lot of mixed views on induceing a vortex, in fact there seems to be lots of conflicting  advice about most aspects of rocket stoves, ovens and mass heaters!
I am sort of concluding that the finer details and design featured are not that significant compared to the correct basic design.
What happens to any ash collected in the bottom of the fire box? I see many designs do not have access to the fire box other than through the feed chamber.
 
Satamax Antone
gardener
Posts: 3471
Location: Southern alps, on the French side of the french /italian border 5000ft elevation
194
  • Likes 1
  • Mark post as helpful
  • send pies
    Number of slices to send:
    Optional 'thank-you' note:
  • Quote
  • Report post to moderator
Well, conflicting advice.

You'll see that most of the time, advice about doing unnecessary things is given by newbs, who think because they have watched few youtube videos, , they have reinvented the wheel.

Best advice i can give.

I you want to build only one, follow Peter's plans, with the trip wire, P channel and kick tail. That should do the trick.

On the other hand, if you want to get better at it, and get the hang of how they work, build, build and build. All of what crosses your mind.

Regarding the ashes, on J tubes, most rake the ashes, every now and then, with a piece of bent sheet metal of some sort.
 
Fox James
Rocket Scientist
Posts: 791
Location: Guernsey a small island near France.
299
  • Mark post as helpful
  • send pies
    Number of slices to send:
    Optional 'thank-you' note:
  • Quote
  • Report post to moderator
Than you for your support, I like to do plenty of revision before I start a project but ..... inevitably end up building what turns out to be a prototype

I am still working on the subject before I ask more involved questions.
In fact I might be asking too much from a basic rocket to achieve my goal as I am looking for something to replace my fire pit in my outdoor party house (firehouse).

One of the beauty’s of an open fire pit is the actual visual effects of a naked flame, the main disadvantages of my present fire are the huge amount of fuel it burns and also the safety aspect.
I can see the huge benefits of a rocket mass heater but I want to save the atmosphere of naked flames! (even a small visible flame)
I also require a great cooking surface!

I have a few crazy ideas but I need to get a really good grasp of the rocket stove concept before I can put them together.
 
Mark Brunnr
gardener
Posts: 1236
360
7
trees wofati rocket stoves
  • Likes 1
  • Mark post as helpful
  • send pies
    Number of slices to send:
    Optional 'thank-you' note:
  • Quote
  • Report post to moderator
If you have some spare bricks sitting around or can pick some up, you can build a basic j-tube from that and you are ready to start testing/playing immediately. Make up some cheap cob to fill in the joints and you will get good performance right away. You can turn that into great performance as you swap out the cheap bricks for insulated bricks/refractory materials and add the extras like the p channel.
 
Fox James
Rocket Scientist
Posts: 791
Location: Guernsey a small island near France.
299
  • Mark post as helpful
  • send pies
    Number of slices to send:
    Optional 'thank-you' note:
  • Quote
  • Report post to moderator
Hi Mark, great idea however I have around one ton of refactory casting mix in storage, so I will build a base model to work with over the next few days.
I live on a very small island just off the coast of France and nothing is cheap, I would love to assemble some bricks but of course they are not cheap to buy and not a common building material.
Many years ago I trained as a boatbuilder so I am familiar with making moulds and I am quite well kitted out with concrete moulding equipment.
I am sort of retired now but I build wood fired ovens when asked, just a few a year nowadays.
 
Fox James
Rocket Scientist
Posts: 791
Location: Guernsey a small island near France.
299
  • Likes 2
  • Mark post as helpful
  • send pies
    Number of slices to send:
    Optional 'thank-you' note:
  • Quote
  • Report post to moderator
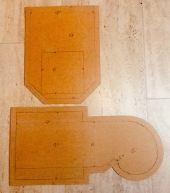
Well I don’t really know what I am doing but no 1 is cast, I made the plug from polyurethane foam, the shuttering box from MDF, filled it with refactory casting mix and sat it on my vibrating table for a few mins.
We will see how it looks tomorrow....
EF79D523-C094-490E-9880-602F1D20A9CC.jpeg
[Thumbnail for EF79D523-C094-490E-9880-602F1D20A9CC.jpeg]
6B28944A-8464-4455-9F30-B8EF23619621.jpeg
[Thumbnail for 6B28944A-8464-4455-9F30-B8EF23619621.jpeg]
 
Satamax Antone
gardener
Posts: 3471
Location: Southern alps, on the French side of the french /italian border 5000ft elevation
194
  • Likes 1
  • Mark post as helpful
  • send pies
    Number of slices to send:
    Optional 'thank-you' note:
  • Quote
  • Report post to moderator
Well, you did shallow and wide burn tunnel.

This have proved to work less efficiently than narrow and tall.

I hope you have kept your cross sectional area (CSA)  the same throughout the different parts.

And what is the vertical piece between the feed and heat riser?   A sort of turbulence chamber?
 
Fox James
Rocket Scientist
Posts: 791
Location: Guernsey a small island near France.
299
  • Mark post as helpful
  • send pies
    Number of slices to send:
    Optional 'thank-you' note:
  • Quote
  • Report post to moderator
Hi, thank you for your interest:-)
Luckily for me the photo angle is just causeing an illusion because i have made the sections 6x6” .. feed chamber and burn channel are 6x6” the heat riser has a 6x6”base tapering to a 6” ID round.
I found one 3/4 bag of 2000c castable and I mixed that with my standard 1400c castable, total use was approx 35kg.
There are no visible voids and the iinside looks smooth.

So useing the 124 formula my heat riser only needs to be 24” long making a total length on 32” from the burn tunnel base?  
ECC9D5F1-A31F-4A6B-9205-D4E4B92A4453.jpeg
[Thumbnail for ECC9D5F1-A31F-4A6B-9205-D4E4B92A4453.jpeg]
7D7A2369-5386-40CE-9196-9420CC148656.jpeg
[Thumbnail for 7D7A2369-5386-40CE-9196-9420CC148656.jpeg]
 
Satamax Antone
gardener
Posts: 3471
Location: Southern alps, on the French side of the french /italian border 5000ft elevation
194
  • Mark post as helpful
  • send pies
    Number of slices to send:
    Optional 'thank-you' note:
  • Quote
  • Report post to moderator
Good you kept the section the same throughout.

Still, i am wondering what is the little hole between feed and heat riser.
 
Fox James
Rocket Scientist
Posts: 791
Location: Guernsey a small island near France.
299
  • Mark post as helpful
  • send pies
    Number of slices to send:
    Optional 'thank-you' note:
  • Quote
  • Report post to moderator
Ha Ha, nothing exciting, not really a hole either, I just added a piece of foam that sits 30mm above the fire box so the wall thickness is consistent.
I like to leave expansion gaps where an unequal thickness appears due to design.
I want to build the heat riser tomorrow, I will most likely use the refactory cement but I don’t have any more 2000c left!

 
Fox James
Rocket Scientist
Posts: 791
Location: Guernsey a small island near France.
299
  • Mark post as helpful
  • send pies
    Number of slices to send:
    Optional 'thank-you' note:
  • Quote
  • Report post to moderator
So I have cast the heat riser & done a few curing test runs... works fine at this stage.
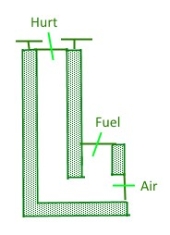
As I will be useing it outside and primarily for cooking, I wonder if a basic design like in my drawing will work best?
I assume insulating under the plate is a good idea?
I thought I could just vent the gasses from around the side of the round top plate?
A2D50E0E-7D1B-4393-936B-727A8E7325CB.jpeg
[Thumbnail for A2D50E0E-7D1B-4393-936B-727A8E7325CB.jpeg]
 
Glenn Herbert
Rocket Scientist
Posts: 4527
Location: Upstate NY, zone 5
574
5
  • Likes 2
  • Mark post as helpful
  • send pies
    Number of slices to send:
    Optional 'thank-you' note:
  • Quote
  • Report post to moderator
For visible flame, an L shaped instead of J shaped combustion core is good - it gives a view for a good arc around the front of the feed. A J-tube core like you built would work better with a feed as tall as the length of the wood you plan to use. If the wood sticks far out of the top, there is a strong chance of it burning up on the bottom and the top part falling over and out, unless all the wood is smooth and vertical. You might be able to incorporate some thermal glass (neoceram, or woodstove window glass) into the front of the feed tube so more flames are visible from directions beside the top.

For the hot plate, you might have enough chimney height by making holes around the plate, but it would probably work better with an exit to a stovepipe just below the cooktop; this will also let the exhaust gases get above head height to eliminate hot air and smoke hazards. I would offset the plate a bit, so one side gets more direct heat and the hot gases flow across the rest of the plate to the exit.
 
Fox James
Rocket Scientist
Posts: 791
Location: Guernsey a small island near France.
299
  • Mark post as helpful
  • send pies
    Number of slices to send:
    Optional 'thank-you' note:
  • Quote
  • Report post to moderator
Thanks, it is nice to have support with a new venture.
I have so many designs in my head but until I can ctually get one working I am just guessing what or won’t work for me.
My partyhouse (firehouse) is actually at the bottom of my garden, the central fire has given us many years of entertainment but I spend half my time piling in wood!
I would like to be able to expose the top of the heat riser on occasions so I can place a burning log over the heat. I want to do this just for the atmosphere.
I already have a chimney in place that I might be able to utilise in some way.
B52F6937-C01E-4429-B93E-B96E660E7168.jpeg
[Thumbnail for B52F6937-C01E-4429-B93E-B96E660E7168.jpeg]
 
Fox James
Rocket Scientist
Posts: 791
Location: Guernsey a small island near France.
299
  • Mark post as helpful
  • send pies
    Number of slices to send:
    Optional 'thank-you' note:
  • Quote
  • Report post to moderator
I have insulated the fire box with 4” of vermiculite 4-1 fondue cement mix and I will do the heat riser tomorrow, I migh just surround it with ceramic insulating mat.
In the mean time I am wondering what sort of results I might achieve?
I really can’t find much info on rocket stove hot plates, there are some vids and some written info but most is based on a non insulated steel construction rather than a purpose built insulated hot plate!?
 
Satamax Antone
gardener
Posts: 3471
Location: Southern alps, on the French side of the french /italian border 5000ft elevation
194
  • Mark post as helpful
  • send pies
    Number of slices to send:
    Optional 'thank-you' note:
  • Quote
  • Report post to moderator
 
Fox James
Rocket Scientist
Posts: 791
Location: Guernsey a small island near France.
299
  • Mark post as helpful
  • send pies
    Number of slices to send:
    Optional 'thank-you' note:
  • Quote
  • Report post to moderator
I have lit a couple of short burns but there is still a lot of moisture steaming out and I don’t seem to be getting above 850f in the centre of the heat riser...
3C6D1594-051E-4B48-8BFD-077A2A0AC73E.jpeg
[Thumbnail for 3C6D1594-051E-4B48-8BFD-077A2A0AC73E.jpeg]
 
Satamax Antone
gardener
Posts: 3471
Location: Southern alps, on the French side of the french /italian border 5000ft elevation
194
  • Mark post as helpful
  • send pies
    Number of slices to send:
    Optional 'thank-you' note:
  • Quote
  • Report post to moderator
Not that astonishing for a vast build. Some advise far longer curing/drying times for cast elements. Two weeks. But that is if the mortar mixture requires it. Usually specified on the bag.

Few solutions,

carry on burning, until all the moisture is gone.

Throw it in a bonfire to cure it from the outside.

Let it dry naturally.


Anyway, because it's cast, you can't modify it now. So there isn't many options regarding the functioning of it.

If you choose to fire it to cure it. Use your driest wood, it will help.
 
Fox James
Rocket Scientist
Posts: 791
Location: Guernsey a small island near France.
299
  • Mark post as helpful
  • send pies
    Number of slices to send:
    Optional 'thank-you' note:
  • Quote
  • Report post to moderator
It is the same with the wood ovens I build, the refactory requires 4lt of water per 25kg, that is a very dry mix but it still takes many fires to dry a 32” oven.(about 14 fires over 7days)
I will keep lighting fires building up the duration, there is only 60kg of refactory used but the vermiculite is going to take longer.

For the actually hot plate, what would you suggest I use?
The ring around my open fire pit is made from 4mm mild steel and works very well but also rust quite badly. I could use stainless but I worry about it warping?
 
Satamax Antone
gardener
Posts: 3471
Location: Southern alps, on the French side of the french /italian border 5000ft elevation
194
  • Likes 1
  • Mark post as helpful
  • send pies
    Number of slices to send:
    Optional 'thank-you' note:
  • Quote
  • Report post to moderator
I usually use whatever cast iron i can find.

Actually, old woodworking machinery tables can do nice cooktops.

 
Fox James
Rocket Scientist
Posts: 791
Location: Guernsey a small island near France.
299
  • Mark post as helpful
  • send pies
    Number of slices to send:
    Optional 'thank-you' note:
  • Quote
  • Report post to moderator
Ha ha that is great!
I got a little more done today, thing is, I am making this up as I go along and I am not even sure where it is all heading but moving falward is good ... I think?
DB3772A2-C75C-4E2B-8503-E338DC644207.jpeg
[Thumbnail for DB3772A2-C75C-4E2B-8503-E338DC644207.jpeg]
D8A478DB-E4DB-444E-9E71-26ACE78BF8D2.jpeg
[Thumbnail for D8A478DB-E4DB-444E-9E71-26ACE78BF8D2.jpeg]
 
Fox James
Rocket Scientist
Posts: 791
Location: Guernsey a small island near France.
299
  • Mark post as helpful
  • send pies
    Number of slices to send:
    Optional 'thank-you' note:
  • Quote
  • Report post to moderator
My plan is too surrounded the base and top of the barrel with concrete mass, also to surround the chimney with mass.
I need a way to seal the hot plate onto the concrete ring, I am not sure how yet, but I would like it to self seal, so I can lift out the steel plate for any maintenance required.
I also plan to encase the chimney and vent it into my existing chimney, then out through the roof.
I am hoping I can use the hot plate to burn a small open fire on top, so we can maintain some of our party house atmosphere.  

84892AFC-CC86-4883-91C2-AE488EB7E279.jpeg
[Thumbnail for 84892AFC-CC86-4883-91C2-AE488EB7E279.jpeg]
 
Satamax Antone
gardener
Posts: 3471
Location: Southern alps, on the French side of the french /italian border 5000ft elevation
194
  • Mark post as helpful
  • send pies
    Number of slices to send:
    Optional 'thank-you' note:
  • Quote
  • Report post to moderator
Fox, is this outside, or semi outside, in a open to air pergola/patio or else?

If yes, you don't even need to seal that plate, four firebricks on the corners, for the riser gap, and you're done, they don't smoke, except at startup.

When you want to use it as a sort of fireplace, you remove the steel plate, and let the flames out mostly you would have the glow from the flames at the bottom, and the heat. Welders gloves are a must.

In the video with sausages above, you can see the flames throwing out of the heat riser, and the heat riser gap. One thing thought, if your metal is too thin, you will cook in the middle, but not very far from the place where the flames hit the metal.

HTH.

Max.
 
Satamax Antone
gardener
Posts: 3471
Location: Southern alps, on the French side of the french /italian border 5000ft elevation
194
  • Mark post as helpful
  • send pies
    Number of slices to send:
    Optional 'thank-you' note:
  • Quote
  • Report post to moderator
What do i see in the back, some sort of tenor guitar with no bridge. Another one with no strings. Do you repair? Build?
 
Fox James
Rocket Scientist
Posts: 791
Location: Guernsey a small island near France.
299
  • Likes 1
  • Mark post as helpful
  • send pies
    Number of slices to send:
    Optional 'thank-you' note:
  • Quote
  • Report post to moderator
Thanks for the tips..
The stove will be in side my fire house which is just made from fence panels and a plastic roof.
Yes I build and restore guitars but I specialise with tenor guitars (well spotted).
I also build and sell didgeridoos..
85CB3B9B-7EDD-4915-9FFA-60A3CA8CFFA0.jpeg
[Thumbnail for 85CB3B9B-7EDD-4915-9FFA-60A3CA8CFFA0.jpeg]
 
Satamax Antone
gardener
Posts: 3471
Location: Southern alps, on the French side of the french /italian border 5000ft elevation
194
  • Mark post as helpful
  • send pies
    Number of slices to send:
    Optional 'thank-you' note:
  • Quote
  • Report post to moderator
Well, if you used to hang around the mimf, we might have encountered before. Tho, i'm not much there since my career change. I have been trained to make guitars. Did a city and guilds of guitarmaking in UK. But now i went back to bigger woodworking.  I found dealing with stingy skint musicians, very unpleasant.  Since 2005, i haven't done much, besides repairing valve amps.
 
Fox James
Rocket Scientist
Posts: 791
Location: Guernsey a small island near France.
299
  • Likes 2
  • Mark post as helpful
  • send pies
    Number of slices to send:
    Optional 'thank-you' note:
  • Quote
  • Report post to moderator
Fantastic!
There is not much money to be made building guitars but so much fun....
I recently finished this one, it now belongs to a pretty famous pop star!
I used an unusual wood for the sound board, Monterey Cypress.
067D20FA-7107-4415-B481-D3A099EED150.jpeg
[Thumbnail for 067D20FA-7107-4415-B481-D3A099EED150.jpeg]
A8CD973A-FAAD-4632-83B5-3DE56641F104.jpeg
[Thumbnail for A8CD973A-FAAD-4632-83B5-3DE56641F104.jpeg]
 
Been there. Done that. Went back for more. But this time, I took this tiny ad with me:
GAMCOD 2025: 200 square feet; Zero degrees F or colder; calories cheap and easy
https://permies.com/wiki/270034/GAMCOD-square-feet-degrees-colder
reply
    Bookmark Topic Watch Topic
  • New Topic