• Post Reply Bookmark Topic Watch Topic
  • New Topic
permaculture forums growies critters building homesteading energy monies kitchen purity ungarbage community wilderness fiber arts art permaculture artisans regional education skip experiences global resources cider press projects digital market permies.com pie forums private forums all forums
this forum made possible by our volunteer staff, including ...
master stewards:
  • Carla Burke
  • Nancy Reading
  • r ransom
  • John F Dean
  • paul wheaton
  • Jay Angler
stewards:
  • Timothy Norton
  • Pearl Sutton
  • Tereza Okava
master gardeners:
  • Christopher Weeks
  • M Ljin
gardeners:
  • Jeremy VanGelder
  • Matt McSpadden
  • thomas rubino

It works... heat exchanger added to existing heater...

 
Posts: 6
1
  • Likes 1
  • Mark post as helpful
  • send pies
    Number of slices to send:
    Optional 'thank-you' note:
  • Quote
  • Report post to moderator
Hey all,
First post here as I just ran across the permies forums. This last January we re located our business from San Diego to Licking Missouri. As a result in a few days time we went from 70* weather to 6* weather. Not having experienced this low of temp reading in So Cal it did get my attention. The existing shop wood burning heater became my obsession very quickly. Problem being that no matter how much wood I fed it not enough heat would get transfered into the 4000 sq. ft. Building to do any good. It was impressive looking, and processed a large amount of wood very quickly, but produced very little radiant heat. I was determined not to spend another winter in that work environment.

Not knowing a thing about wood burning stoves I searched the internet and learned a lot,  but not too much on the size and scale that I was thinking about. So I guessed and hoped that logic would prevail. The old existing stove / heater...

So I chopped it up and built a heat exchanger for the top of it. Lit it off for the first time a few nights ago and raised the shop temps from 38* to 62* in just over an hour. Im so happy this thing works and that the effort was worth it. Now that I know it works im anxious to do some sheet metal shroud work to make it more efficient. Im always looking for improvements so dont be quiet! Any advice from you wood stove Gurus? Appreciated in advance!
9A450CB7-E118-46BD-ADBA-66175EFC45AD.jpeg
wood burning heater
wood burning heater
25BDF985-BB17-43A5-957B-79A22FE6EE1C.jpeg
building a wood stove heat exchanger
wood-stove-heat-exchanger.jpeg
wood stove heat exchanger
79067020-DB3E-4273-A4D8-25E4F86673AA.jpeg
modifying wood stove
F6DFA19B-E9A5-4D11-A503-BA2EB0C9CB37.jpeg
wood stove with heat exchanger
 
steward
Posts: 16073
Location: Northern WI (zone 4)
5179
9
hunting trees books food preservation solar woodworking
  • Likes 2
  • Mark post as helpful
  • send pies
    Number of slices to send:
    Optional 'thank-you' note:
  • Quote
  • Report post to moderator
Nice work!  And welcome to Permies!  What were the mickey mouse ears for on the original?

Does you heat exchanger have a fan pushing air through it?
 
Robert Engel
Posts: 6
1
  • Likes 1
  • Mark post as helpful
  • send pies
    Number of slices to send:
    Optional 'thank-you' note:
  • Quote
  • Report post to moderator

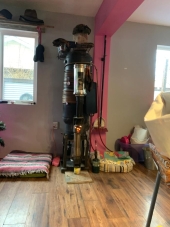
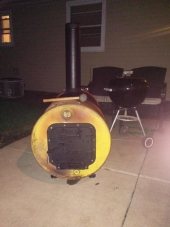
Mike Haasl wrote:Nice work!  And welcome to Permies!  What were the mickey mouse ears for on the original?

Does you heat exchanger have a fan pushing air through it?


Im not sure what the thinking was there? They were tapped into the main stove body through a 6” tube towards the back. I capped them off. Then the exhaust was T’ed off of them at the front and ran down the center if of the stove parallel to the ground where it attached to the chimney. Think they were thinking more surface area to radiate heat from?  

I have a squirrel cage in the back that works very well and moves a lot of air. Im thinking about building a shroud around the heater and ducting that to the fan inlet to pre heat the air before being blown into the exchanger.
image.jpg
fan blowing heat through wood stove heat exchanger
 
Mike Haasl
steward
Posts: 16073
Location: Northern WI (zone 4)
5179
9
hunting trees books food preservation solar woodworking
  • Likes 1
  • Mark post as helpful
  • send pies
    Number of slices to send:
    Optional 'thank-you' note:
  • Quote
  • Report post to moderator
Ahh, I see now.  They were probably just giving extra surface area.

I'm not sure if sending warmer air into the fan would give you more heat overall into the shop or not.  I guess it would let less air rise up and heat the ceiling and put more downwind of the fan.

Another thought would be to put something in each pipe so that the air flows turbulently down the pipe.  That should give a bit better heat transfer.  1%, 10%, I don't know...
 
Robert Engel
Posts: 6
1
  • Mark post as helpful
  • send pies
    Number of slices to send:
    Optional 'thank-you' note:
  • Quote
  • Report post to moderator
The temp in the oven was close to 300* and with the fan on for about 5 minutes I could touch the inlet tubes in the back and they were cool to the touch.. couldnt get close to the outlet end of the tube... only 5’ long. Amazing how much heat is transfered.
Seems like any type of restriction of flow would help. The fan is on a dimmer pot, low speed the heat is greater longer, high speed= cooler and quicker dissipation of heat? And at what point is it good enough? But it is fun goofing around with it... 👍


Robert Engel
Posts: 6
1
  • Mark post as helpful
  • send pies
    Number of slices to send:
    Optional 'thank-you' note:
  • Quote
  • Report post to moderator
I didnt want to use a 50 gallon drum as I was hoping to find something heavier and thicker. Found this lawn roller at a local flea market and it worked out just fine. 16ga. Around 18ga on the ends.
ACD16825-F6A5-4418-95EB-6D844FD28464.jpeg
[Thumbnail for ACD16825-F6A5-4418-95EB-6D844FD28464.jpeg]
 
Robert Engel
Posts: 6
1
  • Mark post as helpful
  • send pies
    Number of slices to send:
    Optional 'thank-you' note:
  • Quote
  • Report post to moderator
Because of the poor design of the existing stove I couldn't reload the wood without filling the shop with smoke! There was no way to avoid this problem!  I did add a few dampers and sealed up the doors as well as redirected the exhaust straight out of the burning chamber. Just that helped a great deal! But I still had open door smoke issues. After some thought,  I cut in a fresh air injector tube into the chimney just past the T in. Found a $20.00 blower unit at the same flea market and gave it a try. I was pleased with the results so i did the permeant mount to it. Now to remember to open the damper and turn on the fan prior to reloading! LOL
9CE2CF69-9E19-4074-96A5-61CF190967A0.jpeg
[Thumbnail for 9CE2CF69-9E19-4074-96A5-61CF190967A0.jpeg]
8C77BDC7-EBED-40B6-BAC4-83393E5C8F83.jpeg
[Thumbnail for 8C77BDC7-EBED-40B6-BAC4-83393E5C8F83.jpeg]
 
Posts: 97
Location: Eastern Washington
26
  • Mark post as helpful
  • send pies
    Number of slices to send:
    Optional 'thank-you' note:
  • Quote
  • Report post to moderator
Looks like you've got some good improvements going on. I'd be interested to hear how your chimney looks at the end of the season.
 
Robert Engel
Posts: 6
1
  • Mark post as helpful
  • send pies
    Number of slices to send:
    Optional 'thank-you' note:
  • Quote
  • Report post to moderator

Grady Houger wrote:Looks like you've got some good improvements going on. I'd be interested to hear how your chimney looks at the end of the season.


In terms of?
Im almost willing to bet its never been cleaned. 30' or so tall its not an easy task to clean it.
I was really surprised at how much soot was in the mouse ears when I lopped those off. They were 1/4 full of soot. The horizontal section of the exhaust tube that runs to the chimney was half way full with soot. There is a clean out on the bottom of the chimney. Once I cleaned it out It really starting drawing air!

One would think that an ex government building would of been maintained a bit better?
 
Posts: 1
  • Likes 1
  • Mark post as helpful
  • send pies
    Number of slices to send:
    Optional 'thank-you' note:
  • Quote
  • Report post to moderator
What grade of pipe did you use in the heat exchanger? I'm looking at doing something similar in my shop.
gift
 
Native Bee Guide by Crown Bees
will be released to subscribers in: soon!
reply
    Bookmark Topic Watch Topic
  • New Topic