• Post Reply Bookmark Topic Watch Topic
  • New Topic
permaculture forums growies critters building homesteading energy monies kitchen purity ungarbage community wilderness fiber arts art permaculture artisans regional education skip experiences global resources cider press projects digital market permies.com pie forums private forums all forums
this forum made possible by our volunteer staff, including ...
master stewards:
  • r ranson
  • Nancy Reading
  • Carla Burke
  • John F Dean
  • Jay Angler
  • paul wheaton
stewards:
  • Nicole Alderman
  • Pearl Sutton
  • Anne Miller
master gardeners:
  • Christopher Weeks
  • Timothy Norton
gardeners:
  • Nina Surya
  • Matt McSpadden
  • thomas rubino

bank duct manhole cover suggestions

 
  • Mark post as helpful
  • send pies
    Number of slices to send:
    Optional 'thank-you' note:
  • Quote
  • Report post to moderator
regards

I'm about to start building I have compiled almost all the material. minus the manhole covers or doors for the thermal bank. It will be a bell type brick bench.

Do you have any suggestions for building the registration spaces for the hood?

Thank you
 
rocket scientist
Posts: 6525
Location: latitude 47 N.W. montana zone 6A
3394
cat pig rocket stoves
  • Likes 1
  • Mark post as helpful
  • send pies
    Number of slices to send:
    Optional 'thank-you' note:
  • Quote
  • Report post to moderator
Hi Diego;  Big Welcome to Permies and the wonderful world of rocket science.

So your building a Rocket Mass Heater.  I assume it will be a J tube.  
You are using brick to surround your mass.  
I am guessing that the "manhole cover" that you are referring too are the cleanout spots in your mass?
If that is correct, then standard practice is to put a short section of stove pipe thru the brick wall and then use a stove pipe cap to seal it off.

As far as the "hood"  and "registration space"   I am afraid I do not understand your question.  
Maybe you are referring to the 55 gallon barrel over your riser?
And maybe you are wondering how to get the heat from the barrel down into your mass?

Give us some more information, maybe even with pictures or drawings so we understand your question.
 
Diego Herranz Velázquez
Posts: 14
4
  • Mark post as helpful
  • send pies
    Number of slices to send:
    Optional 'thank-you' note:
  • Quote
  • Report post to moderator
Hello Thomas. thanks for your answer.

Yes, I'm going to build a 6 "J tube.

The "capo" must have been a mistake by the translator.

I wanted to ask for any suggestions to make the registration spaces for the mass. The thermal mass that I am going to build is a solid brick hood approximately 70 cm long by 70 cm wide by 45 cm high. the gas outlet to the outside or chimney I will also build in solid brick.

Thank you
 
thomas rubino
rocket scientist
Posts: 6525
Location: latitude 47 N.W. montana zone 6A
3394
cat pig rocket stoves
  • Likes 1
  • Mark post as helpful
  • send pies
    Number of slices to send:
    Optional 'thank-you' note:
  • Quote
  • Report post to moderator
Hi Diego;
Well I'm slow but we are getting closer to my understanding.
I now know that you are building , a 6" J tube with all brick bell 70 x 70 x 45 cm   and brick chimney.  Correct?

I'm still not sure what you are referring to as a register?

Are you be asking what size the exhaust port would be before your 6" chimney?
Or are you asking about space over your riser?
Or perhaps you mean the transition from the riser down into the bell?

Sorry I am not getting this, but we will figure it out.


Diego Herranz Velázquez
Posts: 14
4
  • Mark post as helpful
  • send pies
    Number of slices to send:
    Optional 'thank-you' note:
  • Quote
  • Report post to moderator
[quote=thomas rubino]Hi Diego;
Well I'm slow but we are getting closer to my understanding.
I now know that you are building , a 6" J tube with all brick bell 70 x 70 x 45 cm   and brick chimney.  Correct?


[/quote]

Hi Thomas, yes this is correct

It is not slow, I use a Spanish English translator and there are times when the translation is not correct. In your first message you answered my question with the tube pieces and their cover, but I was looking for a cheaper way to solve the problem, here these pieces are somewhat expensive for my economy.

You can still help me with another question that has arisen. The refractory brick that I can get for the construction of the core is oven brick of 1200 ° C up to 29% alumina, this is light and from what I understand it is thermal insulating. is it still necessary for the nucleus to be isolated? Or I can line the combustion tube with cob and the heat riser set it free of cob  only with the light brick?


Thank you
 
thomas rubino
rocket scientist
Posts: 6525
Location: latitude 47 N.W. montana zone 6A
3394
cat pig rocket stoves
  • Likes 1
  • Mark post as helpful
  • send pies
    Number of slices to send:
    Optional 'thank-you' note:
  • Quote
  • Report post to moderator
Hi, good day Diego;  
Ok , we are communicating better now.
Lets step back to your first question.    You can use anything you like as a cleanout cover.   An old metal sauce pan lid comes to mind, or any metal piece with a handle.  Simply form cob around your lid.   When you need to remove that lid for cleaning ash. Some of the cob will come off with the lid. Simply pack more mud around and seal it back in.
Now for today's question. It sounds like you have insulated fire brick  good for 1200 C  !  These are perfect!
If I understand your question correct.   You can build your core and your riser with these bricks. You would only need clay/sand as a mortar to stick them together.
You would still want to cover the core with a clay cob mix,to eliminate any chance of air leaks. You want all the air rushing down the feed tube not being pulled into cracks.
 
Diego Herranz Velázquez
Posts: 14
4
  • Likes 1
  • Mark post as helpful
  • send pies
    Number of slices to send:
    Optional 'thank-you' note:
  • Quote
  • Report post to moderator
Thanks Thomas!!

I think the casserole lid is a good solution, I like it!

Mentions clay / sand to stick the bricks, I understood that the ideal was to stick them with a somewhat liquid clay without sand so that there are no possible gaps between the bricks.

Then It is better to add sand as if it were a mortar, in what proportion sand / clay 1/3?

Greetings
 
thomas rubino
rocket scientist
Posts: 6525
Location: latitude 47 N.W. montana zone 6A
3394
cat pig rocket stoves
  • Likes 1
  • Mark post as helpful
  • send pies
    Number of slices to send:
    Optional 'thank-you' note:
  • Quote
  • Report post to moderator
Hi Diego;  
What type of clay are you using?  A local clay dug from the ground?
Or have you bought a sack of dry fire clay?
Standard mortar mix is 3 part sand to one part clay. But depends on the clay you are using.
Using just clay as a slip does work but it will not hold up very long. The quick temperature changes from cold to rocket hot causes plain clay to crack.
Sand has thermal propertys that when mixed with clay create a strong heat resistant bond.
Your sand must be clean and of equal consistency.  (no rocks)
Buying sacks of builders sand and fire clay is the easiest way to make a solid mortar.
Yes you can use local  clay and local free sand but they will need to be screened for rock.

EDIT)  I want to mention how important soaking your bricks in water for a few minutes is!   All brick should spend 2-5 minutes under water before putting mortar on.
Failure to so, will create a very poor bond that will fall apart with any bump.
 
Diego Herranz Velázquez
Posts: 14
4
  • Mark post as helpful
  • send pies
    Number of slices to send:
    Optional 'thank-you' note:
  • Quote
  • Report post to moderator
Thanks Thomas for your advice and attention !!

I have wet clay, which is used for modeling in sculpture, I know that its firing temperature is 950 ° C

Maybe in addition to mixing with sand, I can crush some common brick and add to the mix? I don't know if right now I can get refractory clay

Greetings
 
thomas rubino
rocket scientist
Posts: 6525
Location: latitude 47 N.W. montana zone 6A
3394
cat pig rocket stoves
  • Likes 1
  • Mark post as helpful
  • send pies
    Number of slices to send:
    Optional 'thank-you' note:
  • Quote
  • Report post to moderator
Hey Diego;
I love helping people to build their Rocket mass heaters.  The more folks who have one, the more they will tell other people!
Soon,  world wide everyone will have an RMH and our air will be cleaner and everyone will be warm!

Potters clay mixed with sand will be fine.
If you crumble some brick ,be sure to grind it fine. nothing larger than 1/8".
Also adding wood ash will help as well.
 
Diego Herranz Velázquez
Posts: 14
4
  • Mark post as helpful
  • send pies
    Number of slices to send:
    Optional 'thank-you' note:
  • Quote
  • Report post to moderator

thomas rubino wrote:Hey Diego;
I love helping people to build their Rocket mass heaters.  The more folks who have one, the more they will tell other people!
Soon,  world wide everyone will have an RMH and our air will be cleaner and everyone will be warm!

]I'm very happy to read this! ....

Thank you very much Thomas.

Together we make it possible to improve.

The proportion to be maintained with these materials is 1/3 clay / (sand, ash, crushed brick). Is it necessary that it be a part of each or can it be more sand than ash and brick?

 
thomas rubino
rocket scientist
Posts: 6525
Location: latitude 47 N.W. montana zone 6A
3394
cat pig rocket stoves
  • Likes 1
  • Mark post as helpful
  • send pies
    Number of slices to send:
    Optional 'thank-you' note:
  • Quote
  • Report post to moderator
Hi Diego;    When you are sticking bricks together for your core I would leave out the crushed brick,   Use clay/sand & ash.  Just a few handful's of ash in to the 1/3 mix will do.
Add the crushed brick and some chopped short pieces of straw when you are plastering cob over the outside.

Remember when you are building we would like to see photo's
 
Diego Herranz Velázquez
Posts: 14
4
  • Likes 1
  • Mark post as helpful
  • send pies
    Number of slices to send:
    Optional 'thank-you' note:
  • Quote
  • Report post to moderator
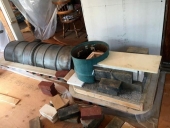
For the base I have a question, I am doing it as I show in the photo, a common brick perimeter filled with bottles, sand and pieces of brick then leveled with cob or I do not know if it would be better instead of using the bottles to use only brick, That is, perimeter and area brick and finished with mud?
IMG_20200821_204523.jpg
possible base
possible base
 
Diego Herranz Velázquez
Posts: 14
4
  • Likes 1
  • Mark post as helpful
  • send pies
    Number of slices to send:
    Optional 'thank-you' note:
  • Quote
  • Report post to moderator
here is a photo of a construction that I made with common brick to see the volume and space of the rocket and make sure it fit in my little hut
IMG_20200818_214631.jpg
[Thumbnail for IMG_20200818_214631.jpg]
 
thomas rubino
rocket scientist
Posts: 6525
Location: latitude 47 N.W. montana zone 6A
3394
cat pig rocket stoves
  • Mark post as helpful
  • send pies
    Number of slices to send:
    Optional 'thank-you' note:
  • Quote
  • Report post to moderator
Hi Diego;
What is the floor in your building made of?
Myself, I would choose to not use the bottles.  
I have no good reason to say that, other than I would not use them on mine.
I would worry the heat might cause those bottles to break.
Instead I would fill and level the cavity with an insulating cob  (cut straw or perlite)
Your heat radiate's in all directions. You want to avoid having it go down and try to heat the earth under your stove.
As wonderful as rocket stoves are they can not heat the earth... only the home on top of that little section of earth.
 
Diego Herranz Velázquez
Posts: 14
4
  • Likes 3
  • Mark post as helpful
  • send pies
    Number of slices to send:
    Optional 'thank-you' note:
  • Quote
  • Report post to moderator
ok Thomas.

The floor of the hut is made of NHL 5 hydraulic lime. To build the building I made a hole about 50cm deep. I covered it with NHL5 hydraulic lime mortar then waterproofed it with linseed oil then filled it all with etch, first a layer of thin etch then a layer of thick etch, sealed it with NHL5 hydraulic lime mortar and gave it again linseed. I built the hut on that, it is made of stone and lime up to approximately one meter in height, the roof is a dome that I first made in a chestnut branch and then lined with NHL5 hydraulic lime mixed with raw esparto. the branch structure was later removed, where possible.
IMG_20191010_175941.jpg
Así quedó
Así quedó
 
Diego Herranz Velázquez
Posts: 14
4
  • Likes 3
  • Mark post as helpful
  • send pies
    Number of slices to send:
    Optional 'thank-you' note:
  • Quote
  • Report post to moderator
The picture
IMG_20200821_160504.jpg
[Thumbnail for IMG_20200821_160504.jpg]
 
Rocket Scientist
Posts: 4574
Location: Upstate NY, zone 5
599
5
  • Likes 1
  • Mark post as helpful
  • send pies
    Number of slices to send:
    Optional 'thank-you' note:
  • Quote
  • Report post to moderator
I think the layer of bottles, encased in cob, will work fine and give decent insulation from the ground. As long as the bottles are not directly exposed to the fire they will not melt or break.
 
Diego Herranz Velázquez
Posts: 14
4
  • Mark post as helpful
  • send pies
    Number of slices to send:
    Optional 'thank-you' note:
  • Quote
  • Report post to moderator

Glenn Herbert wrote:I think the layer of bottles, encased in cob, will work fine and give decent insulation from the ground. As long as the bottles are not directly exposed to the fire they will not melt or break.


Thank Glenn
 
Diego Herranz Velázquez
Posts: 14
4
  • Likes 3
  • Mark post as helpful
  • send pies
    Number of slices to send:
    Optional 'thank-you' note:
  • Quote
  • Report post to moderator
some photos of the stove construction process to where it is now
IMG_20200830_195009.jpg
[Thumbnail for IMG_20200830_195009.jpg]
IMG_20200831_115830.jpg
[Thumbnail for IMG_20200831_115830.jpg]
IMG_20200831_200350.jpg
[Thumbnail for IMG_20200831_200350.jpg]
IMG_20200907_175547.jpg
[Thumbnail for IMG_20200907_175547.jpg]
IMG_20200909_090428.jpg
[Thumbnail for IMG_20200909_090428.jpg]
gift
 
PIP Magazine - Issue 19: Ideas and Inspiration for a Positive Future
will be released to subscribers in: soon!
reply
    Bookmark Topic Watch Topic
  • New Topic