posted 5 years ago
Automatic chicken water has been the best thing in the world for me, so since it’s chicken week, I’ll share my approach! In the heat of the summer, the birds drink a LOT and I couldn’t see the water level in my old opaque nipple bucket so they ran out a couple times. So I opted to automate. This is not an all year solution, but it will get you by outside of freezing weather.
Parts list:
-Chicken nipple bucket. I chose to upgrade my upcycled 5 gallon bucket for a purchased version. This Harris Farms model has threaded holes in the bottom that keep it leak free, and feet so you can set it down without smashing the nipples into the mud (features my bucket did not have.) Plus, square sides make for better attachment.
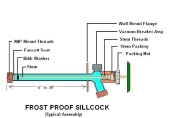
-Hose adapter. Assuming your water source is an outdoor hydrant, this Sharkbite product is an easy way to adapt to a small poly line.
- Polyethylene tubing. 3/8 exterior, ¼ interior, however many feet you need. I got 100 feet for $22.
- Float valve. These tend to come built to receive ¼ EXTERIOR hose size, but some have an adapter that takes your 3/8 exterior down to the ¼ exterior size. So unless you can find one that receives the 3/8 exterior hose, you’ll need a couple inches of ¼ exterior tubing, which is easy to find at the hardware store. Usually used in freezer ice makers.
It was super simple to drill a hole in the side of the bucket and hook up the water line. The floats are usually adjustable and easy to figure out. My finished picture has a lot of other fittings involved but you can ignore those. That’s just extra stuff I had on hand which I used to make a stub with a valve on the end for whatever random rinsing needs I might have when I’m in the bird run. All in, around $70 is a huge labor saver and gives me piece of mind that I did not forget to provide water to the layers.
Tube.JPG
![[Thumbnail for Tube.JPG]](/t/163895/a/147784/thumb-Tube.JPG "Filename: Tube.JPG
Description:")
Bucket.jpg
![[Thumbnail for Bucket.jpg]](/t/163895/a/147785/Bucket.jpg "Filename: Bucket.jpg
Description:")
Float.JPG
![[Thumbnail for Float.JPG]](/t/163895/a/147786/thumb-Float.JPG "Filename: Float.JPG
Description:")
Elbow.JPG
![[Thumbnail for Elbow.JPG]](/t/163895/a/147787/thumb-Elbow.JPG "Filename: Elbow.JPG
Description:")
I don't own the plants, they own me.


 1
1


![[Thumbnail for Tube.JPG]](/t/163895/a/147784/Tube.JPG "Filename: Tube.JPG
Description:")
![[Thumbnail for Float.JPG]](/t/163895/a/147786/Float.JPG "Filename: Float.JPG
Description:")
![[Thumbnail for Elbow.JPG]](/t/163895/a/147787/Elbow.JPG "Filename: Elbow.JPG
Description:")