• Post Reply Bookmark Topic Watch Topic
  • New Topic
permaculture forums growies critters building homesteading energy monies kitchen purity ungarbage community wilderness fiber arts art permaculture artisans regional education skip experiences global resources cider press projects digital market permies.com pie forums private forums all forums
this forum made possible by our volunteer staff, including ...
master stewards:
  • Nancy Reading
  • Carla Burke
  • r ranson
  • John F Dean
  • paul wheaton
  • Pearl Sutton
stewards:
  • Jay Angler
  • Liv Smith
  • Leigh Tate
master gardeners:
  • Christopher Weeks
  • Timothy Norton
gardeners:
  • thomas rubino
  • Jeremy VanGelder
  • Maieshe Ljin

High tunnel in high winds input needed

 
pollinator
Posts: 97
Location: 3,000 ft up in the mountains of the Mid Atlantic, USA
49
trees books cooking ungarbage
  • Likes 5
  • Mark post as helpful
  • send pies
    Number of slices to send:
    Optional 'thank-you' note:
  • Quote
  • Report post to moderator
In addition to our large veg garden where I harvest year-round winter veges in a cold winter part of the US, I would love to also have a high tunnel. Two things holding me back. 75+ mph winds and my husband who questions I will be able to tolerate what he thinks will be very nasty chem smells in the tunnel as the plastic off gasses at different heat points during the year. So, my questions to all are:

Is the person who posted about 85+ mph hour winds vs their still standing high tunnel (possibly in Britain?) still on here? (Couldn't find your post again, but it stuck in my mind.) How are you even able to keep your high tunnel anchored at gale force? Photos?

Anyone else contending with high winds and able to successfully keep the tunnel structure anchored down, not to mention the plastic covering? What are the tricks to doing this? Photos if a special technique?

Posted this question on another gardening blog site and was flooded with people who said, oh, shouldn't be a problem anywhere in any conditions. Beg to differ. Until you live through massive windstorms, and even the weirdly odd single massive gust that silently comes out of nowhere and about knocks you down, you don't know wind. There are tons of abandoned wind tunnels in our area. A state program apparently helped with the cost. I've never seen a single one in gardening use (the program's intended purpose), other than storing tractors and mowers. The only answer I get when asking why they are still not in use, even though most are in smaller valley wind protected areas, is "too much work." Well, if work = fresh, organic veges = good health, then I'm up for it.

Clearly the plastic covering is going to smell for a bit after being unrolled. I'm well versed in how to offgas manmade products in all walks of life. The question is does the smell ever go away? Or, maybe, how fast before it goes away? Say you put it up in spring. Does the smell go away in a few days...weeks? Is it back for more off gassing in summer heat of 90 degrees with high humidity? I'm not being prissy about a smell. The chems are a health issue for me.

Lastly, how long are high wind tunnel users able to keep their plastic intact? Obviously, a local wind question, but still.  Is there a trick for greater longevity? A tip of on what grade plastic to buy, or are they all pretty much the same?
Staff note (Jay Angler) :

Molly, I changed your subject title to include the wind issue in the hopes that permies with wind experience will give you input. Is that OK with you?

 
steward and tree herder
Posts: 8368
Location: Isle of Skye, Scotland. Nearly 70 inches rain a year
3970
4
transportation dog forest garden foraging trees books food preservation woodworking wood heat rocket stoves ungarbage
  • Likes 8
  • Mark post as helpful
  • send pies
    Number of slices to send:
    Optional 'thank-you' note:
  • Quote
  • Report post to moderator
Hi Molly,
It might have been me with a high tunnel in high winds? I'm based on Skye and we get 70 mph winds most winters - I don't worry too much unless it's going over 90 which happens every few years.
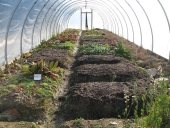
This is a picture of inside my tunnel in Aug 2020:

source

The plastic was already damaged at that point: partly started by our cat climbing up the hoops making "tear along the dotted line" holes, partly from my apricot growing through the plastic, and partly propagated by the creases in the plastic. This started after storms of about 80mph on a repaired tunnel. I've managed to patch it with special polytunnel tape and duct tape and got two more seasons out of it, but it has now completely torn so my tunnel is naked just now.
The previous cover had lasted from about 2005 (before we came up) till about 2015 (?). I think that we did not do a very good job of fitting the new cover then either. I've decided that the anti hot spot tape I got was not to spec. (I think I got it cheap off ebay rather than paying more from a polytunnel supplier) so this had disintegrated in the heat, we maybe didn't cover the joints in the frame well (I had some 'help' with this that wasn't as helpful as it could have been) lots of different factors led to the plastic not being a taut as it should be: creases and flappy bits lead to fatigue and tears.

So to answer some of your questions:
Chemical off gassing smells: I can't say I ever noticed this. There may have been a "new plastic" smell  when the cover was unrolled, but I don't even remember that. I will add that my sense of smell is not the best however. The plastic is basically polythene, so there are no uncured nasties like there would be in polyurethane for example.

Keeping the plastic anchored: There are several different ways of attaching the plastic at the bottom and mine is 'trenched in'. Basically the plastic is buried in the ground and the weight of the soil stretches and anchors the plastic. If you don't do this, the alternative way is to use a base rail and stretch the plastic and attach to the base rail using battens. You would also need to make sure the feet of the polytunnel frame are anchored by setting the feet in concrete for example.

source
This picture show my typically messy growing style and the lack of a base rail. You can also see the plastic is a bit creased - this is not what you want.

"Too much work": I love my tunnel. I like the indoor gardening aspect of it in a rainy climate, and the ability to try some crops that just can't take the outside weather (grapes, japanese yams, sweetcorn, tomatoes, olive). The main factor that causes work is watering. It never rains in the tunnel, so you have to organise this. You can get overhead spray watering systems which can be fit and forget if you have a source of moderately high pressure water. I use a trickle system under the soil surface, combined with some spot watering to get plants established, because I think the water on the leaves can cause damage in the sun and humidity. I also use a very messy gardening technique of "chop and drop" in the tunnel. I'm convinced that this has protected the soil from high heat in the summer and made it healthier, but many gardening experts say the plant debris could lead to disease. You'll have to do what works for you. The other labour is to arrange ventilation by opening the doors/vents to avoid the temperature getting too hot and cooking the plants. I often tend to leave them open in summer since our daylight is so long.
Plastic grades: I've only replaced the plastic once, and was confused then by the variety on offer. You can get more or less transparent plastic, different thicknesses and anti condensation coatings. Logically the thicker the plastic, the stronger it will be, but the harder it is to stretch into place.

Alternatives:
polycrub: These have become popular on the outer islands, and I have heard of ones that have lasted several decades. They are made of thick plastic hoops (often reclaimed from fish farms) and covered with curved rigid plastic sheeting. They are quite a bit more expensive, but do seem to hold up well to the winds (they get even windier on the western isles than we do here - nothing between them and the US coast to slow the winds).

I got a little depressed that my second cover lasted so little time, and although I think this is down to poor workmanship, you will expect to have to replace your cover at between 5 and 15 years as normal. I'm going to do this this time, but would like to work towards a more "sustainable" future option: a rather smaller greenhouse tucked into the hill. If you consider all the benefits of extending the season and growing warm climate crops the polytunnel is still a good thing over all.

Just a few last points: Generally here polytunnels are built on flat ground. Mine was put on sloped ground. This means that the two doors could be opened and a little thermal draft flows from the downhill to the uphill door which is quite nice. My tunnel has it's long dimension East-West so the sun is more on one side than the other, I just adjust my planting to take this into account. I would highly recommend getting sliding doors, rather than hinged doors. They are so much more compact and don't catch the wind so much. I bought a sliding door kit when I recovered the tunnel and really appreciated the difference. My tunnel is also sideways on to the usual wind direction. I can't make up my mind as to whether this is a good thing or not. The whole thing flexes in the wind in quite an alarming manner, but that doesn't seem to do any harm. (Edit - that's another advantage of the sliding doors - they hang outside the door frame, so any flex in the frame doesn't stress the doors as is the case with hinged ones).  I may have a video of inside the tunnel on a windy day I'll see whether I can find it for you. Other than wear and tear, flying debris is the most likely cause of damage, which if you are in a windy area you will already be well aware of. It's probably worth getting as strong a frame as you can justify, even if it means you have a slightly smaller tunnel (which would be stronger anyhow) The hoops come in different diameters and gauges, and you would want crop bars and bracing to give a bit more stability.

I hope this helps. I would certainly go for a polytunnel than a normal frame glasshouse anyhow!


pollinator
Posts: 3756
Location: 4b
1358
dog forest garden trees bee building
  • Likes 4
  • Mark post as helpful
  • send pies
    Number of slices to send:
    Optional 'thank-you' note:
  • Quote
  • Report post to moderator
Just a quick addition.  I have a very sensitive nose, and I've never noticed any smells or evidence or off-gassing from my high tunnels.  My chickens basically live in one all winter with no ill-effects and several of them are more than 6 years old now.
 
gardener
Posts: 3248
Location: Cascades of Oregon
815
  • Likes 2
  • Mark post as helpful
  • send pies
    Number of slices to send:
    Optional 'thank-you' note:
  • Quote
  • Report post to moderator
What I have seen, and my brother uses is bailing twine crossing over the tunnels, either creating a cross or zig zagging over the film between hoops. The jelly fish effect disappears, and the tunnels shed wind admirably. I can't say that I have noticed an offensive off gassing of the greenhouse skin.
 
Nancy Reading
steward and tree herder
Posts: 8368
Location: Isle of Skye, Scotland. Nearly 70 inches rain a year
3970
4
transportation dog forest garden foraging trees books food preservation woodworking wood heat rocket stoves ungarbage
  • Likes 6
  • Mark post as helpful
  • send pies
    Number of slices to send:
    Optional 'thank-you' note:
  • Quote
  • Report post to moderator
I found the video for you.  This is my tunnel in Jan 2018, you can see the antihotspot tape is already coming loose. I looked up the weather history and it says the winds on that day were about 60 mph.


I personally wouldn't think anything touching the plastic would be the best idea, since it may lead to chafing. However if it stops loose plastic flapping that would be a good idea, but not having loose plastic better. I think the flexibility of the tunnel is actually it's strength.
 
Robert Ray
gardener
Posts: 3248
Location: Cascades of Oregon
815
  • Likes 3
  • Mark post as helpful
  • send pies
    Number of slices to send:
    Optional 'thank-you' note:
  • Quote
  • Report post to moderator
I suggest looking at episode 23 of "Gardening with Leon" on you tube. https://www.youtube.com/watch?v=4UQ4OkYX9qc
The only wiggle wire he uses is at the top on the ends. I have much higher snow loads where I am, so I'd need purlins, but he has success with his commercial greenhouses and this type of securing the plastic from huffing.
 
pollinator
Posts: 2339
Location: Denmark 57N
598
fungi foraging trees cooking food preservation
  • Likes 8
  • Mark post as helpful
  • send pies
    Number of slices to send:
    Optional 'thank-you' note:
  • Quote
  • Report post to moderator
Tunnels here just went through a full hurricane, it took out my barn wall but I've not seen any damaged tunnels at all. So long as they are properly constructed and SHUT when the wind hits they will be fine.  Remember to get the extra bracing. the plastic can be expected to last about 10 years, it may get to cloudy to use before then if it's a cheaper type and you get strong sunlight.
 
gardener
Posts: 2186
Location: Central Maine (Zone 5a)
894
homeschooling kids trees chicken food preservation building woodworking homestead
  • Likes 6
  • Mark post as helpful
  • send pies
    Number of slices to send:
    Optional 'thank-you' note:
  • Quote
  • Report post to moderator
Hi Molly,
My high tunnel is currently in pieces on the ground, so I don't know that I have a whole lot of suggestions as to what to do... but I can suggest some things I did wrong that might help you or someone else.

First, don't leave only 1 end open if it is windy. I did this, and it caught the wind and popped a bunch of poles out and ripped the plastic off.

Keep the plastic tight. If the plastic is not tight, it causes more chafing from the wind, and therefore more chance for a hole to be made in the plastic. Loose plastic also gives more droop when the snow comes, but that wasn't what you were asking about :)

In my experience, plastic supports seem to have more springy-ness than metal, and so can take more without breaking.

Lastly, how much space do you really need? Could you build a smaller but stronger wooden greenhouse with solid plastic panels that should hold up much better and for longer than plastic?

Good luck and share what works for you.
 
Molly Gordon
pollinator
Posts: 97
Location: 3,000 ft up in the mountains of the Mid Atlantic, USA
49
trees books cooking ungarbage
  • Likes 3
  • Mark post as helpful
  • send pies
    Number of slices to send:
    Optional 'thank-you' note:
  • Quote
  • Report post to moderator
Nancy: Yes, you!

Thank you so very much for your info packed post. A lot to digest here so it may take me awhile to unpack it all and I may be commenting and questioning you for awhile. Something you said prompted me to think about what more I should have asked in my initial post. A question to U.S. high tunnel owners who have rather recently bought a system:  Any recommendations on a particular company to use...or not to use?

"Polycrub". Drooling. Please follow Nancy's link or google. Is something like this available in the U.S.? Looks so incredibly strong. Would buy in a heartbeat but for the fact shipping from Scotland might be a wee $$$$!

Ok, Nancy, here goes:

"tear along the dotted line" holes from your cat. Still recovering from laughing hard at this! Astounded your cat can climb metal posts. Maybe I'm missing the point and you mean the wooden ones? Of all the dangers to high tunnel plastic, that one would never have occurred to me. No cat just yet but definitely something to think about as I've had some crazy acrobatic cats in the past.

Fitting plastic on well and taut, your high wind vs tunnel success, watering issues, sliding vs hinged doors--especially in relation to flexing for wind, biggest tunnel vs smaller/stronger..all this and more is such good info and food for thought.

Tunnel orientation: I'm still chewing on this one. We never get east winds, always get west winds, north and south ones are usually only 4-5 winter months. Since west winds are most prevalent, think I'm best off facing a short end to the west and best planting practice be hanged. Come to think of it, yep, that direction works best for hot and humid summer breezes blowing through and cooling things off. Well, check that question off my list, one problem solved!

I can see where flying debris would be an issue. Fortunately, we are in the middle of a 35 acre natural prairie grass pasture. However, it does point out to me I should be careful of where to plant orchard or shade trees which we will be doing thi summer.

Frame and plastic anchoring. YES: concrete planted feet. Came up with that conclusion the other day, too. As far as plastic, which do you think is stronger, base rail or trenched in? Seems to me as if trenching in would be more difficult to avoid creases, but what do I know.

Sloped ground: Confused why you think this is an advantage? Wouldn't you get wind coming through no matter what if wind blowing direction of door? I have a choice of flat or sloped, so very interested.

Greenhouse vs tunnel: We have ($adly) brand new windows from a botched first attempt of a house by a contractor that will become a small greenhouse/garden shed. I just need more growing room to keep us in veges year round, thus my high tunnel craving.

Hot summer soil/Chop and drop: Never gave this a great deal of thought. Does the ground really heat up that much more in a tunnel.? Guess it would as it never freezes--even at 18 below--under my tubs. Great advantage when planting in early spring or late fall, no? We have a lot of summer humidity which means lots of bugs, and more tropical new ones coming up from South America, so the news says. Unless end of harvest, I haul away anything the buggies have been on.
 
Molly Gordon
pollinator
Posts: 97
Location: 3,000 ft up in the mountains of the Mid Atlantic, USA
49
trees books cooking ungarbage
  • Likes 2
  • Mark post as helpful
  • send pies
    Number of slices to send:
    Optional 'thank-you' note:
  • Quote
  • Report post to moderator

Robert Ray wrote:What I have seen, and my brother uses is bailing twine crossing over the tunnels, either creating a cross or zig zagging over the film between hoops. The jelly fish effect disappears, and the tunnels shed wind admirably. I can't say that I have noticed an offensive off gassing of the greenhouse skin.


Brilliant. Just brilliant on the twine.

 
Molly Gordon
pollinator
Posts: 97
Location: 3,000 ft up in the mountains of the Mid Atlantic, USA
49
trees books cooking ungarbage
  • Likes 2
  • Mark post as helpful
  • send pies
    Number of slices to send:
    Optional 'thank-you' note:
  • Quote
  • Report post to moderator
Doors shut when windy: Agree.

[quote=Skandi Rogers it may get to cloudy to use before then if it's a cheaper type and you get strong sunlight."

Didn't understand this part?
 
Molly Gordon
pollinator
Posts: 97
Location: 3,000 ft up in the mountains of the Mid Atlantic, USA
49
trees books cooking ungarbage
  • Likes 2
  • Mark post as helpful
  • send pies
    Number of slices to send:
    Optional 'thank-you' note:
  • Quote
  • Report post to moderator

Matt McSpadden wrote:Hi Molly,
My high tunnel is currently in pieces on the ground, so I don't know that I have a whole lot of suggestions as to what to do... but I can suggest some things I did wrong that might help you or someone else.

First, don't leave only 1 end open if it is windy. I did this, and it caught the wind and popped a bunch of poles out and ripped the plastic off.

Keep the plastic tight. If the plastic is not tight, it causes more chafing from the wind, and therefore more chance for a hole to be made in the plastic. Loose plastic also gives more droop when the snow comes, but that wasn't what you were asking about :)

In my experience, plastic supports seem to have more springy-ness than metal, and so can take more without breaking.

Lastly, how much space do you really need? Could you build a smaller but stronger wooden greenhouse with solid plastic panels that should hold up much better and for longer than plastic?

Good luck and share what works for you.


All really good points, thanks. So this has helped me realize I want venting at bottom of plastic, not trenching, so I can somewhat keep doors closed in summer if the wind kicks up and I'm not around.

Yes, I need a lot of room. My main focus would be winter greens and root crops that are getting knackered by our hard winter this year. Minus 18 one night, 47  a few nights later, 7 degrees last night. Plants can actually tolerate one kind of bearable, protected temp if it is somewhat continuous. Swing the temp 30 some degrees and they can't survive even with my most ardent efforts. No, it's not spring coming. It's climate change.
 
Molly Gordon
pollinator
Posts: 97
Location: 3,000 ft up in the mountains of the Mid Atlantic, USA
49
trees books cooking ungarbage
  • Likes 3
  • Mark post as helpful
  • send pies
    Number of slices to send:
    Optional 'thank-you' note:
  • Quote
  • Report post to moderator

Nancy Reading wrote:I found the video for you.  This is my tunnel in Jan 2018, you can see the antihotspot tape is already coming loose. I looked up the weather history and it says the winds on that day were about 60 mph.


I personally wouldn't think anything touching the plastic would be the best idea, since it may lead to chafing. However if it stops loose plastic flapping that would be a good idea, but not having loose plastic better. I think the flexibility of the tunnel is actually it's strength.


Oh.My!

Yes, I can fully see all flexible is the way to go.
 
Molly Gordon
pollinator
Posts: 97
Location: 3,000 ft up in the mountains of the Mid Atlantic, USA
49
trees books cooking ungarbage
  • Likes 4
  • Mark post as helpful
  • send pies
    Number of slices to send:
    Optional 'thank-you' note:
  • Quote
  • Report post to moderator

Robert Ray wrote:I suggest looking at episode 23 of "Gardening with Leon" on you tube. https://www.youtube.com/watch?v=4UQ4OkYX9qc


Well, a huge thanks to you as well. "Leon" really knows his high tunnel stuff. Was glued to the video and will have to watch it several times more to write down all his good tips. Plus, he's such a cool, likable "senior" gardener!  Watched someone else's "How our Winter Garden Survived -23" and may be some inside protection ideas from there. Overall, these are a million times more helpful than you tubers I was watching previously on the subject.
 
Posts: 53
Location: Aurora, Colorado zone 5
17
  • Likes 5
  • Mark post as helpful
  • send pies
    Number of slices to send:
    Optional 'thank-you' note:
  • Quote
  • Report post to moderator
When I first put up my high tunnel within a couple days we had sustained 90 mph winds. Needless to say I was a bit worried about it blowing into the neighbor's house and beyond. When morning came I was relieved to see that it remained fully intact.

I used metal conduit that I bent using a hoop bender. At ground level I used 24" rebar about  8"  into the conduit and 16" into the ground. I thought about using concrete but wasn't sure if the site was going to be permanent. Also at ground level we had long row of heavy landscape bricks along the plastic overlap.

Getting the plastic reasonably tight initially is important but it seems after time there winds up being some slack.

Buying greenhouse film is definitely the way to go for UV protection. I believe we purchased from greenhouse megastore .com
 
Molly Gordon
pollinator
Posts: 97
Location: 3,000 ft up in the mountains of the Mid Atlantic, USA
49
trees books cooking ungarbage
  • Likes 2
  • Mark post as helpful
  • send pies
    Number of slices to send:
    Optional 'thank-you' note:
  • Quote
  • Report post to moderator

Gregory Campbell wrote:When I first put up my high tunnel within a couple days we had sustained 90 mph winds. Needless to say I was a bit worried about it blowing into the neighbor's house and beyond. When morning came I was relieved to see that it remained fully intact.

I used metal conduit that I bent using a hoop bender. At ground level I used 24" rebar about  8"  into the conduit and 16" into the ground. I thought about using concrete but wasn't sure if the site was going to be permanent. Also at ground level we had long row of heavy landscape bricks along the plastic overlap.

Getting the plastic reasonably tight initially is important but it seems after time there winds up being some slack.

Buying greenhouse film is definitely the way to go for UV protection. I believe we purchased from greenhouse megastore .com


Interesting info, thanks.

So, are you saying you built entire tunnel yourself? If yes, more details on the rest of structure like the above specifics, please. Photos would be helpful as well.

What would you do differently next time? I like the idea of heavy blocks to hold down plastic at ground level but problematic for me with a wonky back, and think I want vents at bottom to release or let in heat. Although probably difficult to impossible to incorporate if a homemade plan?

When you say "UV protection" you mean protecting against summer heat? We are same zones. Are you growing food in there over winter? I grow and harvest year round under plastic tubs, although this has been a tough winter cold wise. I don't mind just using tunnel for spring and late fall starts and filling it with winter crops like lettuce, spinach other greens and root crops and maybe just building up the soil with compost and cover crop in the summer because too hot.  If I'm doing that, will want as much sun coming in as possible for light and heat in the wintertime. Thoughts?

What altitude are you and how much snow do you get? We're at 3,000 ft but in a small, protected valley with 5,000 ft mountain ranges on both sides that seem to protect us substantially from the massive storms that hit the rest of the Mid Atlantic and East. We haven't seen any more than a couple feet build up in the 5 years we've been here, although who knows for the future with the ongoing wacky weather. How does your film hold up under snow? You tube video (see above) had good tips on crisscrossing above plastic/film with rope that helped keep the plastic down and strengh for snow buildup.
 
Nancy Reading
steward and tree herder
Posts: 8368
Location: Isle of Skye, Scotland. Nearly 70 inches rain a year
3970
4
transportation dog forest garden foraging trees books food preservation woodworking wood heat rocket stoves ungarbage
  • Likes 3
  • Mark post as helpful
  • send pies
    Number of slices to send:
    Optional 'thank-you' note:
  • Quote
  • Report post to moderator
Hi Molly,
To elaborate a bit on some of your questions earlier:
Cat damage. Yes Harry used to climb up the outside of the tunnel - of course his claws dug into the plastic nicely, but the tunnel is more rigid near the hoops, so that was his preferred climbing area. He liked to use the tunnel as a look out spot I think. Coming down as well was damaging to the tunnel: the claws don't dig in going down, but they have been known to slice! We still have Harry's brother, but Loulou prefers trees to climb, so my new cover should be fairly safe. I have heard some people have problems with birds pecking through the plastic. One unfortunate thing that happens is that insects can get trapped in the tunnel and so birds peck at them through the plastic. I've never experienced this myself, but apparently once they learn about the insects it can become very damaging.
Sloped ground I think in hot weather the polytunnel can benefit from some ventilation. Having a flat site would be much easier from a construction point of view, but I just found it isn't a disaster if you have a sloped site too.
Chop and drop If you consider my summer temperatures are in the region of 15 degrees C. On a sunny day the tunnel can easily get up to 35 C, especially if the doors haven't been opened! So the climate inside is like a much hotter region. The soil can bake in there. Before we moved up the tunnel was used by the garden caretaker who planted tomatoes along the edges (or only the ones at the edges survived). The ground was baked hard, dry and lifeless. After a couple of years of my messy cultivation and irrigation I had toadstools fruiting in the tunnel and a resident toad. It works for me!
Baserails and ventilation: This is just what I've picked up from general research and what I've seen. If you want ventilation at the sides then you can fit a wooden baserail and waistrail system. The polythene is secured tautly to the waistrail and below that you can have either a mesh skirt and/or a polythene skirt. So you can have the sides completely opened up for ventilation. I'm not sure how these would hold up in high winds though. I guess if you had plastic skirts that were tightly secured to baserails in the event of high winds then you should be OK. but you may need to think about the design carefully.
Snowloading Again not something I can speak with experience on. We're more likely to get 2" (inches) of snow than 2' (feet)! When we have had snow it's fallen off and not been a problem, but I have heard that people go out and brush the snow off. I found this site: http://akhightunnels.org/ which is an Alaskan polytunnel advice site - it's not associated with a particular manufacturer, so the advice ought to be unbiased and may have information more pertinent to your situation.
Plastic and UV It is the UV light in sunshine that burns our skin and causes mutations leading to skin cancers. It that same energy that degrades the plastic structure and causes it to break down becoming weak and shortening it's life, not just the heat. So yes, get a plastic cover that is designed for long term agricultural use, or you will need to replace it more quickly. Whoever you get it from will have a choice of plastics and should be able to advise on the benefits of each of them. It's not just the labour in replacing it, but the loss of that growing protection until you get round to putting the new cover on. I use my tunnel as a sort of large cold frame from growing on seedlings and a potting shed and a place to chill out and I'm missing all that at the moment!
Hope this helps.
 
Skandi Rogers
pollinator
Posts: 2339
Location: Denmark 57N
598
fungi foraging trees cooking food preservation
  • Likes 5
  • Mark post as helpful
  • send pies
    Number of slices to send:
    Optional 'thank-you' note:
  • Quote
  • Report post to moderator

Gregory Campbell wrote:

Getting the plastic reasonably tight initially is important but it seems after time there winds up being some slack.


One way to avoid to much slack, you need to put the plastic up on a warm day, high summer would be preferred. If not you can put it on loosely and then run heating inside the tunnel to heat it, then do the final stretching and pin it down.

The plastic gets cloudy as it degrades in sunlight, assuming no catastrophes with the wind it will need replacing for this reason before it actually breaks.
 
Molly Gordon
pollinator
Posts: 97
Location: 3,000 ft up in the mountains of the Mid Atlantic, USA
49
trees books cooking ungarbage
  • Likes 1
  • Mark post as helpful
  • send pies
    Number of slices to send:
    Optional 'thank-you' note:
  • Quote
  • Report post to moderator
Nancy:

Cat damage:  Bad, Kitty!

Birds vs insects = plastic damage.  OH.  We have Tons of bugs in our warm, humid summers. Homemade hanging bug catchers here we come. Hadn't thought of that one. Good info.

Sloped ground: We'll see where it eventually ends up, but my preference is flat ground. Watching the deer get creative with winter food in our latest snows, I think it's going to end up inside our fenced garden, just for safety's sake. Too big of an investment for the herd of 25 deer we have roaming around the house nightly to get at the best grass under the snow because the ground that got moved to build new house had to be reseeded.  And, speaking of insects, probably a good idea to have the tunnel in this large enclosed garden area to keep the chickens from pecking at the insects/plastic as well.

Chop & drop: Hear you on the temp. Definitely want bottom vents.

Baserails/vent: Yep, lots for me to think about

Snowloading: Watched a video about the benefits of removing snow, or removing only from the non-sunny side to hold heat in; ie, the "igloo" effect". It's snowing as I type. 17 degrees. 42 mph. Wicked blasts of wind from all directions. Honestly, unloading snow in our winter conditions with an already wonky back is probably only aspirational for me. That's why I'm so interested in initial strength of the system.

UV: Yes, I'm familiar with UV; I'm from sunny California!

And, yes, a very good reminder of plastic breakdown. Of course, I had been to the mountains many times while living in California. Winter skiiing. Summer water skiiing in the lakes. But I gotta tell ya. We lived at almost sea level there. Gardening for a few hours at 3,000 ft at our house here is intense in the summer. Not only the heat but sunburn potential.  Ag grade plastic is in my future. Good point on "loss of growing time" is just as bad as replacement cost and labor.

Excited my husband is laying out his plans on what he will start as soon as winter is over. Building a permanent, nice looking chicken coop for "the girls", an insulated, heated garden shed/greenhouse for me, building an equipment storage shed for him and putting in a large orchard for us. And the deer. Well, that's spring, summer and fall gone. That's ok. I'm taking notes like crazy and will be dialed up for next year. Would rather wait and do it right than have a quick job that isn't going to hold up.
 
Gregory Campbell
Posts: 53
Location: Aurora, Colorado zone 5
17
  • Likes 4
  • Mark post as helpful
  • send pies
    Number of slices to send:
    Optional 'thank-you' note:
  • Quote
  • Report post to moderator


So, are you saying you built entire tunnel yourself? If yes, more details on the rest of structure like the above specifics, please. Photos would be helpful as well.

What would you do differently next time? I like the idea of heavy blocks to hold down plastic at ground level but problematic for me with a wonky back, and think I want vents at bottom to release or let in heat. Although probably difficult to impossible to incorporate if a homemade plan?

When you say "UV protection" you mean protecting against summer heat? We are same zones. Are you growing food in there over winter? I grow and harvest year round under plastic tubs, although this has been a tough winter cold wise. I don't mind just using tunnel for spring and late fall starts and filling it with winter crops like lettuce, spinach other greens and root crops and maybe just building up the soil with compost and cover crop in the summer because too hot.  If I'm doing that, will want as much sun coming in as possible for light and heat in the wintertime. Thoughts?

What altitude are you and how much snow do you get? We're at 3,000 ft but in a small, protected valley with 5,000 ft mountain ranges on both sides that seem to protect us substantially from the massive storms that hit the rest of the Mid Atlantic and East. We haven't seen any more than a couple feet build up in the 5 years we've been here, although who knows for the future with the ongoing wacky weather. How does your film hold up under snow? You tube video (see above) had good tips on crisscrossing above plastic/film with rope that helped keep the plastic down and strengh for snow buildup.

Yes, I built the tunnel myself. Unfortunately the neighbors all hated it and I removed it from this property even though we had HOA approval.

One thing I would do different is use 20 foot pieces of conduit. The only place I could find them is up in Cheyenne. But using the 10 footers has worked up okay. I did have to splice the legs in after bending the upper sections.

Greenhouse film comes with UV protection. If you use ordinary builders plastic it will quickly deteriorate.

Yes I grow plenty of greens during the winter but mostly I'm using cold frames that I built. Neighbors don't seem to complain and even if they do at this point I don't care.

The tunnels shed snow fairly quickly. Piles up on the north side.
IMG_20190215_153546.jpg
[Thumbnail for IMG_20190215_153546.jpg]
IMG_20190215_154007.jpg
[Thumbnail for IMG_20190215_154007.jpg]
MVIMG_20190215_153606.jpg
[Thumbnail for MVIMG_20190215_153606.jpg]
thumbnail.jpg
[Thumbnail for thumbnail.jpg]
 
Nancy Reading
steward and tree herder
Posts: 8368
Location: Isle of Skye, Scotland. Nearly 70 inches rain a year
3970
4
transportation dog forest garden foraging trees books food preservation woodworking wood heat rocket stoves ungarbage
  • Likes 2
  • Mark post as helpful
  • send pies
    Number of slices to send:
    Optional 'thank-you' note:
  • Quote
  • Report post to moderator
Gregory, I like the auto-opening vents for end pieces. (I assume that's what they are)
I did something similar in Solihull where I  had a smaller tunnel, with the hinged end doors, since I was not over every day to open and close them with the weather. Unfortunately the wind caught the door and bent the gas strut (and it isn't even windy there!). I do still have them somewhere, but since I'm taking the dogs out past the tunnel each day now, I can sort the doors then. I've got no plants so precious they won't stand a bit of temperature variation - Just as well at the moment!
 
Molly Gordon
pollinator
Posts: 97
Location: 3,000 ft up in the mountains of the Mid Atlantic, USA
49
trees books cooking ungarbage
  • Likes 1
  • Mark post as helpful
  • send pies
    Number of slices to send:
    Optional 'thank-you' note:
  • Quote
  • Report post to moderator

Gregory Campbell wrote:  Yes, I built the tunnel myself.  


I like these tunnels. Thanks for more info and, most especially, for the photos. Was going to ask how it was put together, but I see they are special fittings.

With each new posting, I glean more gold for my future tunnel. Now tunnels.  After seeing these, I now want a couple of smaller, shorter ones instead of one huge one. Lower to the ground and less catnip for the wind it looks like to me. We are putting in an orchard this spring and only choosing those that can withstand the cold of a zone below since we've had such a cold winter. I admire people who grow trees and vining veges in tunnels, but I want to concentrate on winter vege production in mine

Do you mind giving me a ballpark cost of your small tunnels?  And, I'm assuming that's pre-covid pricing?

Also, what is the height in these tunnels? And was the other end opposite the vent a door, or am missing that it's a vent/door?

 
Gregory Campbell
Posts: 53
Location: Aurora, Colorado zone 5
17
  • Likes 1
  • Mark post as helpful
  • send pies
    Number of slices to send:
    Optional 'thank-you' note:
  • Quote
  • Report post to moderator
Molly, most of the cost of lower tunnels that I built are quite reasonable. You do need to buy the hoop bender tool. As far as remember about ten years ago it was about $45. 10 foot pieces on conduit are about $7. each. One piece of conduit is needed every few feet. A purline (center top) is highly recommended for stability and snow load. I opted to buy the pieces to connect the purline to the hoops from hoopbenders .net and they were a bit pricey but since I have limited welding experience and no equipment I opted to buy. Then you need to buy the greenhouse film

The lower tunnels I've built are about 3.5 feet high. The high tunnel is 6' 8" inside. High enough for a tall person.

The entrance is on the opposite side of the vent. Basically I used plastic clips probably also purchased from hoopbenders or greenhouse megastore or Amazon, I think you can see the green clips in one of the pictures, to hold a sheet of greenhouse film about 60% around. Then I used construction clips for the rest. Those clips sort of look like big clothes pins. The entry side is on the sunny south side because the snow will melt off there first. When entering or moving air I'd remove the construction clips and pin the sheet to the other side.
 
Be the Mr. Rogers of your neighborhood. This tiny ad will help you:
Heat your home with the twigs that naturally fall of the trees in your yard
http://woodheat.net
reply
    Bookmark Topic Watch Topic
  • New Topic