• Post Reply Bookmark Topic Watch Topic
  • New Topic
permaculture forums growies critters building homesteading energy monies kitchen purity ungarbage community wilderness fiber arts art permaculture artisans regional education skip experiences global resources cider press projects digital market permies.com pie forums private forums all forums
this forum made possible by our volunteer staff, including ...
master stewards:
  • Nancy Reading
  • Carla Burke
  • r ranson
  • John F Dean
  • paul wheaton
  • Pearl Sutton
stewards:
  • Jay Angler
  • Liv Smith
  • Leigh Tate
master gardeners:
  • Christopher Weeks
  • Timothy Norton
gardeners:
  • thomas rubino
  • Jeremy VanGelder
  • Maieshe Ljin

Improving first rocket stove

 
Posts: 2
  • Likes 1
  • Mark post as helpful
  • send pies
    Number of slices to send:
    Optional 'thank-you' note:
  • Quote
  • Report post to moderator
Hello everyone,
it's my first post here, although I have been digging through the (rocket stove) forums for  quite a bit.

I recently built my first "camping" rocket stove prototype out of steel tubing.
It is not working as I hoped it would… i.e. fast and hot fire and a rocket sound
Instead it is simmering and probably in the need for air.

I am looking for help to improve this
and would love to hear your inputs, as you probably already can see I did quite a few rookie mistakes

Please let me state in advance that:
+ yes, it's a metal construction without insulation (Metal is doomed, anyone?), so I can't expect the real rocket stove effects

I have used 80x80 mm steel tubing (a bit more than  3" x 3") with 4mm thick walls.
I went for the L design, with the rise:feed/airintake being a ratio of about  2:1, measuring 34cm and 17cm
The feed is also the air intake, with a metal bar approximately welded in the middle.
Please note that I do not have (yet) installed a grid, which would probably help with the air intake not being.

My main question is:
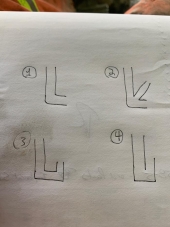
Do I change the current stove into a K design or a J design?
(see pictures of possible routes)

My primary goal would be: being able to boil water quickly and (considering the constraints of unisolated steel) efficiently, with a clean flame.
Fuel: Sticks and pellets.

The current ratio of riser and feed would allow for a recommended J design ratio of 4:2:1 - turning the current feed into the burn chamber, and what I have read in here the J design seems to be "superior" at least for RMH (and I also love the great explanation from this site here https://www.off-grid.rocks/rocket-stove-suderbyn.html which I used to determine my riser height according to material area) but I've read of so many people struggeling with this (smoke back etc.)
Also I am not sure how well this design would work with pellets (using a grid box for example) and maybe an adjustable opening at the bottom right of the feed tube for more air flow (and as a service door)

The K design appears to be very popular (which does not mean it's good or efficient) and it feels like the "safer" road.
But here the fire burns higher up in the riser, which is also the burn chamber with heat going directly up… it already reads less efficient and like a not so clean burn, but what do I know.

Sorry for keeping it so theoretical, as you can clearly see I am having a hard time deciding which way to go for the best results with steel tubing only.
I'd love to simply build both and then compare, but time is scarce (maybe I should cut back the time I put into writing long threads )

Anyone who read till here: Congrats, and thank you

Really looking forward to your inputs!

Best,
Max
Screenshot-2022-03-29-at-21.53.15.png
The tag welded prototype in all its beauty, including its very dangerous legs
Screenshot-2022-03-29-at-22.32.55.png
The measurements of the current setup, all in millimeter (mm)
Screenshot-2022-03-29-at-22.31.01.png
Possible options for improving
 
pollinator
Posts: 610
Location: South East Kansas
204
7
forest garden trees books cooking bike bee
  • Mark post as helpful
  • send pies
    Number of slices to send:
    Optional 'thank-you' note:
  • Quote
  • Report post to moderator
I think the J design would be a good way to go. My first rocket stove was made out of cinder blocks and it was bad. Using insulation will help the burn and direct the heat to the top. Many designs have a air gap in the feed tube to help get air into the fire. I think it is around 10% of the opening but I am not sure if this is right. Here is a link that shows my rocket stove https://permies.com/t/166643/believing
 
Max Wagner
Posts: 2
  • Mark post as helpful
  • send pies
    Number of slices to send:
    Optional 'thank-you' note:
  • Quote
  • Report post to moderator
Thanks!
Yours looks great, and eventually I want to move away from steel for your given reasons, and I really liked how you solved your stove (might copy it later )
But first I want to figure out the right dimensions and ratio, and steel let's me experiment more easily…

I love the J design, everything makes sense to me with this.

My biggest struggle is:
It would not add any more intake than my current design, which I assume is the main problem.

Or I am wrong (very very possible) and the opposite is true:
With no additional air inlet the the air is forced to move through the twigs into the burn chamber, doing this with higher speed, which is exactly what is needed for better burn and higher temperatures?
(I am referring to the J drawin above)

Sorry if I am still a bit confused about the fundamentals here

Thanks!

Screenshot-2022-03-30-at-20.39.39.png
Current design has an extra, separated air inlet... is this too much=
 
pollinator
Posts: 308
Location: Jacksonville, FL
138
tiny house solar woodworking
  • Mark post as helpful
  • send pies
    Number of slices to send:
    Optional 'thank-you' note:
  • Quote
  • Report post to moderator

Max Wagner wrote:
My biggest struggle is:
It would not add any more intake than my current design, which I assume is the main problem.


The stack effect can help cure this problem. I wish I knew exactly where I saw it, but there was a paper from some school that did some testing and they used exhaust stacks of 1, 2, and 3 feet long (~305, 610, and 925mm). The smallest one did the worst by far and the longest did the best. The biggest one worked somewhat better than the middle one. Yours is 300mm. If you could make it at least 500mm I think the extra stack effect would roughly double (or more) the air draw once you get it burning well. The extra airflow creates better combustion which creates more exhaust in the stack and draws even more air, so doubling the size will more than double performance if everything else is working well.

Another issue if the area of the tubing as you look at it from the end. It has a rough area of ~ 6400 square mm which is a hair larger than a 3" (76mm) tube. If you have something smaller than a 4" (102mm) tube (with an area of ~8100 square mm) it doesn't create enough heat to really get air moving which makes it have trouble consuming the wood. Since this is a stove and not a house it wouldn't make sense to go too big, but it you could find find 100mm square or 120mm (~4.72") tube then you could get the type of fire going that is needed to really make it sing. Once you get it close it will start to create a rather uniform wall of flames and no smoke.

With those two things holding you back plus being outdoors it will be a struggle to keep lit and smoke free. Not to mention the smaller size needs even more attention paid to it to keep the fire going. I made a few similar to your K shape above using old cans for the shape and some refractory clay mixture left over from building an aluminum melting furnace. It worked fantastic but was too fragile for long term use. I wish I could make it work better without using steel because the auto wood feed feature, coupled with a sloped bottom so it automatically dumps ash into a bucket was really handy. Many people here use the J tube because it is tried and true. If you are building a mass heater, you definitely don't want to wast a ton of materials on an unproven design. With smaller scale stuff it's not as big of an investment but can be very educational.

One last tip from that paper I can remember is that if you try to choke the air from the bottom it tends to smoke more, but if you restrict it at the top it seems to work better and can burn slower before starting to smoke. Seemed to work that way for me in my experience. I punched a hole in the bottom of a cheap charcoal grill and converted it into a rocket grill with a 4" (102mm) tube and a stack that was 2 feet (610mm) tall. It worked really well except for that you couldn't walk away for more than 5 minutes without it burning out. The insulated combustion chamber I made would stay hot since it has thermal mass from the clay I used. That made it burn hot, but also relight easily if I did let it go out since it stayed hot for a while. I would also save used cooking oil to dip some sticks in and that would help it burn a bit hotter and longer if I needed to step away for a few minutes. I hope that you find something useful here to help with your build.
 
Posts: 80
Location: northern Arkansas
20
cooking medical herbs solar
  • Mark post as helpful
  • send pies
    Number of slices to send:
    Optional 'thank-you' note:
  • Quote
  • Report post to moderator
I'd bought one of these on Amazon last year, but haven't even put it together yet.
https://smile.amazon.com/gp/product/B08QW3N4FZ/ref=ppx_yo_dt_b_asin_title_o00_s00?ie=UTF8&psc=1#customerReviews

I'd say it's the "K design," right?  

I'd bought it in case of electric outage;  guess I oughtta open it up and put it together.  
 
Rocket Scientist
Posts: 4526
Location: Upstate NY, zone 5
574
5
  • Likes 1
  • Mark post as helpful
  • send pies
    Number of slices to send:
    Optional 'thank-you' note:
  • Quote
  • Report post to moderator
Yes, that is a "K" style stove.
One thing that has always bugged me about this general style, and particularly this exact configuration, is that a rocket stove is supposed to give a long flame path to give time for fuller combustion before the flame hits the pot and cools below burning temperature. The K style inherently has only the vertical part for flame travel, and this one with the diagonal feed joining so its centerline points directly at the centerline junction of the vertical and horizontal parts means that the flame has a much shorter run up the riser since the top of the feed at the junction is several inches up from the top of the horizontal, leaving the bottom several inches of the riser mostly unused. This makes a real difference in combustion efficiency and effectiveness, as the test described above showed that a longer riser was significantly better than a short one.

My experience with three different cob and masonry L-tube rockets showed that a horizontal length about equal to the vertical height worked very well. One 6"w x 8"h and two 8"w x 9"h feed legs leading to equal width square risers burn ferociously and with zero smoke from the chimney.

A smaller metal stove would obviously not be as efficient as the heat and flame path would be smaller, but I think a 4" square metal L around 18-24" deep and high would work well for a small cooking stove. The fire creeps back to the mouth, but consumes the far end of the fuel first so that new wood put in pushes the partially burnt sticks deeper. The flame is all confined so there is a long flame path and the sticks burn to ash with no black coals left.

I burn my maple syrup evaporator for up to 12 hours straight without raking ash out while using something like half a face cord (16" x 4' x 4' equivalent) of wood. At the end there is maybe a couple inches of ash in the chamber.
 
Glenn Herbert
Rocket Scientist
Posts: 4526
Location: Upstate NY, zone 5
574
5
  • Likes 1
  • Mark post as helpful
  • send pies
    Number of slices to send:
    Optional 'thank-you' note:
  • Quote
  • Report post to moderator
With the current design of an "L" with shelf for the fuel, if the drawing is to scale I think the shelf is too high. At the small size, you need as much fuel as possible to get closer to a critical mass of heat. Unless the fuel is sawn lumber (no gaps when stacked), there will be plenty of air travel around the sticks, and a very small air channel (1/2" or 10mm+-) below will give plenty of fresh oxygen at the back of the chamber.

I would lower the shelf and lengthen the horizontal leg to match the vertical leg, as a first experiment.
 
Jenn Lumpkin
Posts: 80
Location: northern Arkansas
20
cooking medical herbs solar
  • Likes 2
  • Mark post as helpful
  • send pies
    Number of slices to send:
    Optional 'thank-you' note:
  • Quote
  • Report post to moderator

Would it be a lot of work to lower the shelf?  
I've re-read this thread about 3 times and learned a lot just by re-reading.
So.  Insulation improves the burn by keeping heat in as it flows up the "fire pipe."  ... hunh.
A longer vertical pipe is better because it allows greater combustion before the flame hits the top.  

I don't get the "J" style because I don't see how the sticks reach the vertical part where the fire goes up??

On a side note, I had put cinder blocks under the 55 gallon metal drum we use for a "burn barrel," (two layers of cinder blocks), because the metal drum keeps breaking up at the bottom over time from too much heat, and has been replaced twice or three times in the 20 years we've been burning our "burnable trash."  We get tired of, and it's wasteful to keep, replacing the 55 gal. metal drum, plus they're getting harder to find!  (btw, we don't burn often and usually shortly after a rain, and I do weed-whack around the thing before we burn).

I set up all the cinder blocks with their closed faces sideways so as not to allow air or fire in or out ... except for one cinder block on one side, which I set sideways so air could go in.  I also put a piece of metal across almost the whole "intake" part of that one cinder block, leaving only about an inch (at the top) for air to go in.  (I'd taken this photo several months ago;  the "intake" is the bottom cinder block on the far side, can't see it in the photo, but it has about a 4" wide and a yard long, piece of roofing metal placed horizontally across the bottom of the air intake.)

The thing burns really well!  and fast!  The restricted air intake is quite enough!  Which is the point re. your shelf;  you're probably right about lowering it.
PICT0505-(2).JPG
[Thumbnail for PICT0505-(2).JPG]
 
Glenn Herbert
Rocket Scientist
Posts: 4526
Location: Upstate NY, zone 5
574
5
  • Likes 1
  • Mark post as helpful
  • send pies
    Number of slices to send:
    Optional 'thank-you' note:
  • Quote
  • Report post to moderator
The "J" style of rocket combustion core has the sticks standing upright in the feed tube. The feed should be as tall as the sticks for safety and function. The riser should be at least three times as tall as the feed to give enough draft to overcome the tendency for reverse flow up the feed. With draft established (by a small priming fire at the base of the riser if there is no final chimney to give natural draft), the fire is pulled sideways through the horizontal burn tunnel and up the riser, with the sharp bends causing turbulence that mixes gases for better combustion. A J-tube rocket tends to work much better at 6" diameter equivalent or larger, and 4" J-tubes are tricky to get to function properly.
 
Jenn Lumpkin
Posts: 80
Location: northern Arkansas
20
cooking medical herbs solar
  • Mark post as helpful
  • send pies
    Number of slices to send:
    Optional 'thank-you' note:
  • Quote
  • Report post to moderator
Aha!  Thanks for that;  now I know.  
 
Be the Mr. Rogers of your neighborhood. This tiny ad will help you:
rocket mass heater risers: materials and design eBook
https://permies.com/w/risers-ebook
reply
    Bookmark Topic Watch Topic
  • New Topic