• Post Reply Bookmark Topic Watch Topic
  • New Topic
permaculture forums growies critters building homesteading energy monies kitchen purity ungarbage community wilderness fiber arts art permaculture artisans regional education skip experiences global resources cider press projects digital market permies.com pie forums private forums all forums
this forum made possible by our volunteer staff, including ...
master stewards:
  • Carla Burke
  • John F Dean
  • Timothy Norton
  • Nancy Reading
  • r ranson
  • Jay Angler
  • Pearl Sutton
stewards:
  • paul wheaton
  • Tereza Okava
  • Andrés Bernal
master gardeners:
  • Christopher Weeks
gardeners:
  • Jeremy VanGelder
  • M Ljin
  • Matt McSpadden

36” wide cedar siding on timber frame?

 
Posts: 3
Location: North Olympic Peninsula
7
  • Likes 3
  • Mark post as helpful
  • send pies
    Number of slices to send:
    Optional 'thank-you' note:
  • Quote
  • Report post to moderator
I have about 350sqft of 3/4” to 1” red cedar that I’m hoping to use as the siding on a small timber frame. It was chainsaw milled from a neighbors storm-damaged tree that fell in a storm a couple winters back and milled this past fall. Still very green. Pieces range from 40” to 24” wide and I’d like to keep them as large as possible for a variety of reasons.

I’m worried as they continue to dry and shrink, the pieces may check and warp significantly. I know I could rip them down to narrower panels and minimize some of that concern but really want to keep them wide. Have you used or seen  such large pieces of siding? Is this normal and I haven’t been able to track down the info? Or what do you think would be drawbacks? Best ways to fasten? Thanks for any input!
 
gardener
Posts: 2814
Location: Central Maine (Zone 5a)
1355
homeschooling kids trees chicken food preservation building woodworking homestead
  • Likes 3
  • Mark post as helpful
  • send pies
    Number of slices to send:
    Optional 'thank-you' note:
  • Quote
  • Report post to moderator
Hi G,
I'll bet you could use that stuff vertically in a sort of board and batten look. I have no idea what that large of a piece would do horizontally. Probably be fine... but I would worry about the warping like you.
 
steward
Posts: 17437
Location: USDA Zone 8a
4458
dog hunting food preservation cooking bee greening the desert
  • Mark post as helpful
  • send pies
    Number of slices to send:
    Optional 'thank-you' note:
  • Quote
  • Report post to moderator
I love Matt's suggestion to use the board and batten as I am partial to that method.

Do you have a place where the boards can be air-dried until you plan to use them?

My suggestion would be to spread the boards on a saw horse in an enclosed building such as a garage or barn.

For faster air-drying place the saw horse outside on sunny days.

I hope you will share your project of building the cabin as the process takes place.
 
steward
Posts: 15822
Location: Northern WI (zone 4)
5011
8
hunting trees books food preservation solar woodworking
  • Likes 2
  • Mark post as helpful
  • send pies
    Number of slices to send:
    Optional 'thank-you' note:
  • Quote
  • Report post to moderator
The boards should cup in a predictable direction based on the curve of the grain.  So if you put them up green, put it on the wall so that the center tries to lift away from the wall.  Nail it down the center and then use the battens to hold the edges down.  Don't nail the battens through the edges!  The only nails in the big boards should be down the center (as I understand it).  Otherwise as the big boards shrink, they'll tear themselves apart from the batten nails.

Board and batten is normally done on narrower "big" boards so I'm not sure if these would cup on either side of the center nails.  Maybe some sort of slotted nail holes could be used to hold the rest of the boards down yet allow for expansion and contraction?
 
gardener
Posts: 3132
2095
  • Likes 3
  • Mark post as helpful
  • send pies
    Number of slices to send:
    Optional 'thank-you' note:
  • Quote
  • Report post to moderator
If it's still very green, those 40" boards will shrink about 2", so plan accordingly. I've never seen any siding more than about 12" in my area. I would agree with the board and batten if you wish to try such large boards.
 
pollinator
Posts: 5671
Location: Bendigo , Australia
512
plumbing earthworks bee building homestead greening the desert
  • Likes 3
  • Mark post as helpful
  • send pies
    Number of slices to send:
    Optional 'thank-you' note:
  • Quote
  • Report post to moderator
Normally they would be stacked flat with battens between them in a shed and be allowed to air dry for perhaps 12 months if they are that thin.
I wonder if they should have been cut thicker, dried and then split again?
 
Mike Haasl
steward
Posts: 15822
Location: Northern WI (zone 4)
5011
8
hunting trees books food preservation solar woodworking
  • Likes 3
  • Mark post as helpful
  • send pies
    Number of slices to send:
    Optional 'thank-you' note:
  • Quote
  • Report post to moderator
Here's a silly idea.  Do a hybrid board, batten and cross-ways batten...  So install the big boards vertically and nail them down the center.  Then put horizontal bracing battens on as often as you think they're needed (reddish brown boards).  Only nail them at the center of the big boards and in the gaps between the big boards.  That way the big boards can shrink an inch and not rip themselves apart.  Then put short little vertical battens (orangish boards) between the horizontal ones to hold down the rest of the sides of the big boards and cover the "up to 2 inch shrinkage gaps".  Nail those in the gaps between the boards.

Main downside is that rain landing on those horizontal battens may cause rot so having a good roof overhang would be a good idea.

Upside would be the opportunity for creativity :)
Big-board-and-batten.png
[Thumbnail for Big-board-and-batten.png]
 
pollinator
Posts: 1509
Location: zone 4b, sandy, Continental D
417
  • Likes 2
  • Mark post as helpful
  • send pies
    Number of slices to send:
    Optional 'thank-you' note:
  • Quote
  • Report post to moderator

Mike Haasl wrote:Here's a silly idea.  Do a hybrid board, batten and cross-ways batten...  So install the big boards vertically and nail them down the center.  Then put horizontal bracing battens on as often as you think they're needed (reddish brown boards).  Only nail them at the center of the big boards and in the gaps between the big boards.  That way the big boards can shrink an inch and not rip themselves apart.  Then put short little vertical battens (orangish boards) between the horizontal ones to hold down the rest of the sides of the big boards and cover the "up to 2 inch shrinkage gaps".  Nail those in the gaps between the boards.
Main downside is that rain landing on those horizontal battens may cause rot so having a good roof overhang would be a good idea.

Upside would be the opportunity for creativity :)


Actually, our first house had cedar walls as an outside cover, they were laid vertically with another board of same width to cover the gap.  The overlap was as big as it needed to be to nail/ screw it *on the overlap* [and the overlap was as thin as our wallet would allow]
Looking at the drawing, what if the horizontal batten was on the *inside*.
Then the rain would run down  and not collect on the horizontal? Would that work?
 
Mike Haasl
steward
Posts: 15822
Location: Northern WI (zone 4)
5011
8
hunting trees books food preservation solar woodworking
  • Likes 1
  • Mark post as helpful
  • send pies
    Number of slices to send:
    Optional 'thank-you' note:
  • Quote
  • Report post to moderator
It might but not the way I intended.  This way the horizontal battens would hold down the big boards and keep them from cupping/lifting away from the wall.  If you fasten through the big boards anywhere but the middle, when they shrink and expand they will split where the nails go through them.
 
John C Daley
pollinator
Posts: 5671
Location: Bendigo , Australia
512
plumbing earthworks bee building homestead greening the desert
  • Likes 1
  • Mark post as helpful
  • send pies
    Number of slices to send:
    Optional 'thank-you' note:
  • Quote
  • Report post to moderator
The external battens could have sloped faces to enable rain drain!
 
Mike Haasl
steward
Posts: 15822
Location: Northern WI (zone 4)
5011
8
hunting trees books food preservation solar woodworking
  • Mark post as helpful
  • send pies
    Number of slices to send:
    Optional 'thank-you' note:
  • Quote
  • Report post to moderator
Very true!
 
G Korb
Posts: 3
Location: North Olympic Peninsula
7
  • Likes 1
  • Mark post as helpful
  • send pies
    Number of slices to send:
    Optional 'thank-you' note:
  • Quote
  • Report post to moderator
Thanks all. I've had the boards neatly spaced for a couple months air-drying covered outside in the damp PNW air, but I guess still better than in a puddle. Looking forward to seeing them up on the walls and will share how it goes eventually.

I know the pieces will shrink significantly even though cedar is relatively dimensionally stable, but is there a known amount per species/depth? I'm sure it's very complicated but curious if there is a general rule to guide expectations. Good to know it could be so much with these wide pieces.

Your suggestions confirm the idea to align them vertically, probably batten the gaps, and that it will probably work out. Excited that nobody has said I absolutely shouldn't do it, yet. I'm happy to experiment anyway.

I do really like the idea of slotted nail/screw holes to prevent cupping but allow for contraction/expansion. Of course then there's a series of big slotted holes across the wall, but maybe angling them down to prevent water flowing through would be the most simple compromise. Slotting enough holes also significantly increases the work load for each panel, so I guess the large pieces aren't as simple and fast as expected...
 
J. Graham
gardener
Posts: 3132
2095
  • Mark post as helpful
  • send pies
    Number of slices to send:
    Optional 'thank-you' note:
  • Quote
  • Report post to moderator
The figure I gave is for Western Red Cedar, assuming the 40" boards were cut from the middle of the tree, which is 5%. If plain sawn, the shrinkage along the length of the rings would be less, more like 2%. It is supposed to be one of the better species in this regard, but I have not milled any myself. That's just the figures I looked up online.
 
Mike Haasl
steward
Posts: 15822
Location: Northern WI (zone 4)
5011
8
hunting trees books food preservation solar woodworking
  • Mark post as helpful
  • send pies
    Number of slices to send:
    Optional 'thank-you' note:
  • Quote
  • Report post to moderator
I had another idea G...   Use vertical battens at the edges of the panels (as usual) and at the 25% and 75% marks across the panels.  Those extra vertical battens could be nailed on like normal, just drill big holes in the panel under the batten nails to allow for movement.  So the batten and it's nails would stay in place while the panel slides under it with holes (or slots if you get fancy) to move around the nails.

You wouldn't be able to tell that they are huge panels unless the pattern of the grain gives it away.
 
pollinator
Posts: 469
123
  • Mark post as helpful
  • send pies
    Number of slices to send:
    Optional 'thank-you' note:
  • Quote
  • Report post to moderator
Going with your original question of using these boards as horizontal siding, there's a method* used with any siding boards you don't want to cup. Cedar is very stable wood, but still prone to splitting and cupping, (but not warping). The biggest concern with boards that thin and wide would be splitting. If you are in a damp climate, there's not a huge worry about drying the boards perfectly, depending on what you plan to do for a finish. You've likely seen cedar shingle or shake roofs or siding. Cedar absorbs and releases moisture very well if left as bare wood. That's how cedar shingles work- as it rains they absorb water and swell, staying tight and waterproof. If you plan to stain or seal your boards, you need to do both sides or they will cup from absorbing ambient moisture unevenly.
*Okay, back to siding. The method to prevent any siding boards from cupping is to saw a lengthwise kerf on the backside of the boards, 1/3 deep and every 4-6" of width. So for 1" lumber you'd set the blade depth of your circular saw at about 1/4 to 3/8" and run the length of the boards. For a 24" wide board you'd have about 5 cuts. This is a relief cut, and it works just like expansion joints used in concrete slabs. The board can 'move' and that kerf relieves the internal stresses, whether tension or compression, that would otherwise lead to splitting or cupping.
One last suggestion- I don't know how you have the lumber stored, but it should be stacked, stickered no more than 18" apart spacing with all stickers lining up vertically, heavy weight on top or strapped in a way that can be tightened every week or two as it dries and shrinks, and covered on top only. Definitely keep it out of the sun! Airflow is important to avoid mold growth.
As to fastening, that may be your biggest issue. Horizontal siding (I assume you mean to lap it) is only blind fastened on the top edge. Because these will be heavier than normal 6 or 8 inch siding boards, you may want to consider extra fasteners to keep that top edge from splitting out. Depending on what reveal you use, you might even do a staggered double row of nails.
Good luck, whatever you decide. Sounds like a neat project!
 
G Korb
Posts: 3
Location: North Olympic Peninsula
7
  • Likes 5
  • Mark post as helpful
  • send pies
    Number of slices to send:
    Optional 'thank-you' note:
  • Quote
  • Report post to moderator
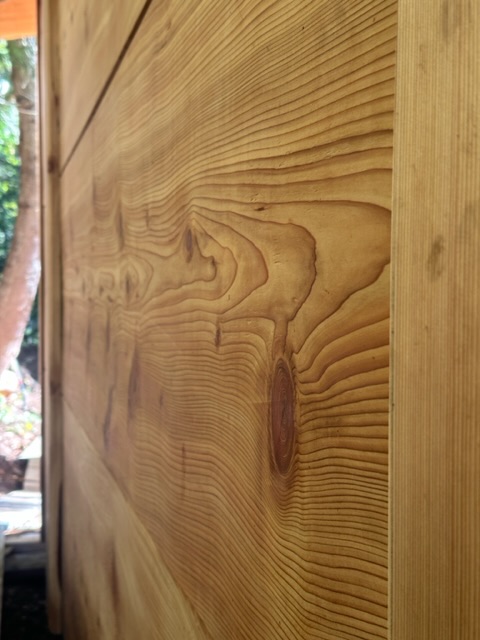
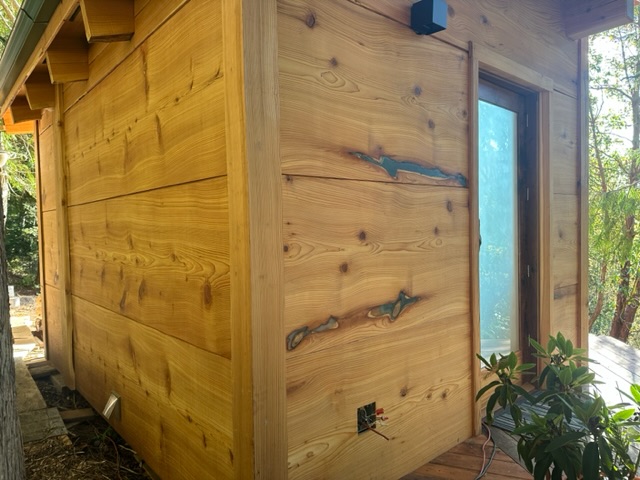
Thought I would follow up on this post from Feb 2023 on what we did and how it is working so far.

Started and finished getting the siding installed almost exactly a year ago at end of September 2023. I installed them horizontally, held at their ends in 1.5” deep channels in the corner siding posts. They rest on a sill, lap over each other 1.5”, and are still flat as the day we installed them. Time will tell if it’s really a good solution but I love how they look and I’m convinced enough to start the next structure with a very similar plan! Pictures are from today.


IMG_3930.jpeg
Massive wood slabs as siding
IMG_3925.jpeg
Gorgeous wood slab siding
 
Anne Miller
steward
Posts: 17437
Location: USDA Zone 8a
4458
dog hunting food preservation cooking bee greening the desert
  • Likes 1
  • Mark post as helpful
  • send pies
    Number of slices to send:
    Optional 'thank-you' note:
  • Quote
  • Report post to moderator
Your cabin looks amazing!  Thanks for sharing/updates.
 
Matt McSpadden
gardener
Posts: 2814
Location: Central Maine (Zone 5a)
1355
homeschooling kids trees chicken food preservation building woodworking homestead
  • Mark post as helpful
  • send pies
    Number of slices to send:
    Optional 'thank-you' note:
  • Quote
  • Report post to moderator
Fantastic looking!
 
pollinator
Posts: 99
Location: South Zone 7/8 - Formerly Deep South, Zone 9
14
home care forest garden fungi
  • Mark post as helpful
  • send pies
    Number of slices to send:
    Optional 'thank-you' note:
  • Quote
  • Report post to moderator
Wow! What great vision and execution. Congratulations!
 
Surfs up space ponies, I'm making gravy without this lumpy, tiny ad:
Learn Permaculture through a little hard work
https://wheaton-labs.com/bootcamp
reply
    Bookmark Topic Watch Topic
  • New Topic