• Post Reply Bookmark Topic Watch Topic
  • New Topic
permaculture forums growies critters building homesteading energy monies kitchen purity ungarbage community wilderness fiber arts art permaculture artisans regional education skip experiences global resources cider press projects digital market permies.com pie forums private forums all forums
this forum made possible by our volunteer staff, including ...
master stewards:
  • Nancy Reading
  • Carla Burke
  • r ranson
  • John F Dean
  • paul wheaton
  • Pearl Sutton
stewards:
  • Jay Angler
  • Liv Smith
  • Leigh Tate
master gardeners:
  • Christopher Weeks
  • Timothy Norton
gardeners:
  • thomas rubino
  • Jeremy VanGelder
  • Maieshe Ljin

New rmh

 
Posts: 15
6
  • Likes 14
  • Mark post as helpful
  • send pies
    Number of slices to send:
    Optional 'thank-you' note:
  • Quote
  • Report post to moderator
Hi all,
I'm Matteo, from Italy, i have to make a new account because i've lost access to the old one.

So, in the past week i made the firebox for my new rmh, tested it outside and left amazed by the complete absence of smoke, also It was nice to see the double vortex forming, even with a small quantity of wood.

Now i have to build the bell, i am not sure how to make it, i was hoping to use regular Red bricks with refractory panels above the riser, will they hold?
IMG_20230807_175224.jpg
Waterjet riser
Waterjet riser
IMG_20230807_181605.jpg
Open firebox with terminal part of the p channel
IMG_20230809_170926.jpg
Testing with ceramic riser in place
IMG_20230808_122554.jpg
P Channel port
P Channel port
 
Rocket Scientist
Posts: 790
Location: Guernsey a small island near France.
299
  • Likes 6
  • Mark post as helpful
  • send pies
    Number of slices to send:
    Optional 'thank-you' note:
  • Quote
  • Report post to moderator
Wow, it looks like you have found some nice materials to work with!
 
Posts: 283
Location: North East Iowa, USA
69
  • Likes 5
  • Mark post as helpful
  • send pies
    Number of slices to send:
    Optional 'thank-you' note:
  • Quote
  • Report post to moderator

Fox James wrote:Wow, it looks like you have found some nice materials to work with!


yes, what is that material, exactly?  Most of the time, I find that the "all cost"  which includes shipping and handling of anything, far exceeds our hard fire brick cost.  (but then again our fire brick cost is very low in comparing to anything)

But please do tell.
 
gardener
Posts: 1054
Location: +52° 1' 47.40", +4° 22' 57.80"
447
woodworking rocket stoves wood heat
  • Likes 5
  • Mark post as helpful
  • send pies
    Number of slices to send:
    Optional 'thank-you' note:
  • Quote
  • Report post to moderator

Matteo Rossi wrote:Now i have to build the bell, i am not sure how to make it, i was hoping to use regular Red bricks with refractory panels above the riser, will they hold?


Yes, the regular red bricks will hold. Refractory panels on all surfaces above the riser, walls included. Start the refractory wall panels some 10 cm below the higest point of the riser. Best to use a construction similar to the Mallorca build. https://batchrocket.eu/en/designs#squarecore
As far as I know, that one being the oldest with this bell construction, it's still in one piece. This example build is followed many times, including one in Bulgaria that experienced some harsh winters and none of those failed.

Interesting way to implement the p-channel although you are not the first one.
Test running the core outside is quite revealing, for sure.
 
Matteo Rossi
Posts: 15
6
  • Likes 6
  • Mark post as helpful
  • send pies
    Number of slices to send:
    Optional 'thank-you' note:
  • Quote
  • Report post to moderator

Scott Weinberg wrote:

Fox James wrote:Wow, it looks like you have found some nice materials to work with!


yes, what is that material, exactly?  Most of the time, I find that the "all cost"  which includes shipping and handling of anything, far exceeds our hard fire brick cost.  (but then again our fire brick cost is very low in comparing to anything)

But please do tell.


Here the catalogue, https://www.unistara.com/categoria-fumisteria/mattoni-refrattari/
The bricks are intended specifically for the use in combustion chambers,  it's pretty high end stuff.
 
rocket scientist
Posts: 6320
Location: latitude 47 N.W. montana zone 6A
3192
cat pig rocket stoves
  • Likes 3
  • Mark post as helpful
  • send pies
    Number of slices to send:
    Optional 'thank-you' note:
  • Quote
  • Report post to moderator
Very nice build Matteo!
Please keep us updated as you continue.
 
Matteo Rossi
Posts: 15
6
  • Likes 4
  • Mark post as helpful
  • send pies
    Number of slices to send:
    Optional 'thank-you' note:
  • Quote
  • Report post to moderator

Peter van den Berg wrote:

Matteo Rossi wrote:Now i have to build the bell, i am not sure how to make it, i was hoping to use regular Red bricks with refractory panels above the riser, will they hold?


Yes, the regular red bricks will hold. Refractory panels on all surfaces above the riser, walls included. Start the refractory wall panels some 10 cm below the higest point of the riser. Best to use a construction similar to the Mallorca build. https://batchrocket.eu/en/designs#squarecore
As far as I know, that one being the oldest with this bell construction, it's still in one piece. This example build is followed many times, including one in Bulgaria that experienced some harsh winters and none of those failed.

Interesting way to implement the p-channel although you are not the first one.
Test running the core outside is quite revealing, for sure.

nice build the Mallorca, i see that you used normal bricks for everything and lined the top of the bell with ceramic blanket.

Later, hopefully, I'm going to post a sketch of how I intend to make the bell.
 
Matteo Rossi
Posts: 15
6
  • Likes 5
  • Mark post as helpful
  • send pies
    Number of slices to send:
    Optional 'thank-you' note:
  • Quote
  • Report post to moderator
So, I made a basic drawing, just to have an idea of the dimensions in the room. I need to make also a chimney that reach the floor, in order to tap into the hole high up.
IMG_20230811_180936.jpg
[Thumbnail for IMG_20230811_180936.jpg]
IMG_20230811_180926.jpg
[Thumbnail for IMG_20230811_180926.jpg]
IMG_20230811_085844.jpg
[Thumbnail for IMG_20230811_085844.jpg]
 
Peter van den Berg
gardener
Posts: 1054
Location: +52° 1' 47.40", +4° 22' 57.80"
447
woodworking rocket stoves wood heat
  • Likes 3
  • Mark post as helpful
  • send pies
    Number of slices to send:
    Optional 'thank-you' note:
  • Quote
  • Report post to moderator

Matteo Rossi wrote: nice build the Mallorca, i see that you used normal bricks for everything and lined the top of the bell with ceramic blanket.


The top of the bell will be expanding and contracting quite a bit. So, there's an external shell that forms the construction. This lined with ceramic blanket and inside that a liner of firebricks. The inside liner can freely grow and shrink this way without cracking the external shell.

Another way to do this is to build two walls, completely separated from each other. This is called a double skin bell, with a liner of ceramic blanket between those skins so the whole of the inner skin has an expansion joint around it as well as a slip joint. The reason for this is that the inner skin will expand in all directions, vertically being the most.

It's up to you what you want. The more mass in the heater the longer it will take to warm up completely. On the other hand, a real heavy heater won't cool off for days when left alone. The Mallorca build is a half-way house, the lower part is single skin and the top part is double skin.
 
Posts: 25
Location: Costa Rica Climate Zone Aw
6
  • Likes 2
  • Mark post as helpful
  • send pies
    Number of slices to send:
    Optional 'thank-you' note:
  • Quote
  • Report post to moderator

Fox James wrote:Wow, it looks like you have found some nice materials to work with!


I second that!

I just finished casting and assembling my own batch rocket that looks a bit "heath-robinson-ey" in comparison - not because of Peter van der berg's design but because of my poor moulding skills.

Here's my first assemble of the two parts of the batch rocket, with the short length risers in position - which I still need to dry out a bit longer. (See photo).

I wonder if those refractory "lego bricks" of yours could be easily cast? Anyone here ever tried?

My batch rocket will soon be "feeling the burn"! I look forward to seeing yours in operation.

Regards

Stephen
P.S Looks like videos can't be submitted - or is it just .mp4 ?
vlcsnap-2023-08-11-23h22m52s327.png
Screenshot of batch rocket from video
 
Fox James
Rocket Scientist
Posts: 790
Location: Guernsey a small island near France.
299
  • Likes 4
  • Mark post as helpful
  • send pies
    Number of slices to send:
    Optional 'thank-you' note:
  • Quote
  • Report post to moderator
Stephen, you could start your own thread so we can discuss your molding?
 
Matteo Rossi
Posts: 15
6
  • Likes 3
  • Mark post as helpful
  • send pies
    Number of slices to send:
    Optional 'thank-you' note:
  • Quote
  • Report post to moderator

stephen wilson wrote:

Fox James wrote:Wow, it looks like you have found some nice materials to work with!


I second that!

I just finished casting and assembling my own batch rocket that looks a bit "heath-robinson-ey" in comparison - not because of Peter van der berg's design but because of my poor moulding skills.

Here's my first assemble of the two parts of the batch rocket, with the short length risers in position - which I still need to dry out a bit longer. (See photo).

I wonder if those refractory "lego bricks" of yours could be easily cast? Anyone here ever tried?

My batch rocket will soon be "feeling the burn"! I look forward to seeing yours in operation.

Regards

Stephen
P.S Looks like videos can't be submitted - or is it just .mp4 ?

sooner or later I want to try the casting method, very interesting  for this one I choosed this type of bricks because they are proven, and i want to be sure to build something reliable the first time.
For the castability of this particular material i can't say, but near me there's a shop that build cooking stoves that ”cast " the bricks and they look similr to mine, on a tour of they're facility i saw a large silo full of refractory sand.
 
Matteo Rossi
Posts: 15
6
  • Likes 3
  • Mark post as helpful
  • send pies
    Number of slices to send:
    Optional 'thank-you' note:
  • Quote
  • Report post to moderator

Peter van den Berg wrote:

Matteo Rossi wrote: nice build the Mallorca, i see that you used normal bricks for everything and lined the top of the bell with ceramic blanket.


The top of the bell will be expanding and contracting quite a bit. So, there's an external shell that forms the construction. This lined with ceramic blanket and inside that a liner of firebricks. The inside liner can freely grow and shrink this way without cracking the external shell.

Another way to do this is to build two walls, completely separated from each other. This is called a double skin bell, with a liner of ceramic blanket between those skins so the whole of the inner skin has an expansion joint around it as well as a slip joint. The reason for this is that the inner skin will expand in all directions, vertically being the most.

It's up to you what you want. The more mass in the heater the longer it will take to warm up completely. On the other hand, a real heavy heater won't cool off for days when left alone. The Mallorca build is a half-way house, the lower part is single skin and the top part is double skin.

i have to make a double skin construction It seems. I was hoping not to. It's necessary to use the ceramic blanket? Here the builders of mass heaters leave about a cm of air between the 2 skins.
 
Peter van den Berg
gardener
Posts: 1054
Location: +52° 1' 47.40", +4° 22' 57.80"
447
woodworking rocket stoves wood heat
  • Likes 5
  • Mark post as helpful
  • send pies
    Number of slices to send:
    Optional 'thank-you' note:
  • Quote
  • Report post to moderator

Matteo Rossi wrote:i have to make a double skin construction It seems. I was hoping not to. It's necessary to use the ceramic blanket? Here the builders of mass heaters leave about a cm of air between the 2 skins.


It's not absolutely necessary to use ceramic blanket, just very handy to ensure not a single patch is making contact between inner and outer skin. Leaving one cm of air between skins sounds doable but in practise it isn't. Somewhere in the process of building the outer skin some mortar will be spilled in the gap. Making sure there's contact and inevitably at some point in time cracks will appear in the outer skin.

Some people use cardboard between skins in order to ensure separation between skins. The cardboard will turn to coal during the first really hot burn. But one have to make very sure there aren't any leaks in the outer skin, otherwise the room will be filled with smoke. I did such a thing once, not to be repeated. I used ceramic blanket about a dozen times with commendable results and I intend to stick with that.
 
stephen wilson
Posts: 25
Location: Costa Rica Climate Zone Aw
6
  • Likes 2
  • Mark post as helpful
  • send pies
    Number of slices to send:
    Optional 'thank-you' note:
  • Quote
  • Report post to moderator

Fox James wrote:Stephen, you could start your own thread so we can discuss your molding?


Will do ...
 
Matteo Rossi
Posts: 15
6
  • Likes 2
  • Mark post as helpful
  • send pies
    Number of slices to send:
    Optional 'thank-you' note:
  • Quote
  • Report post to moderator

Peter van den Berg wrote:

Matteo Rossi wrote:i have to make a double skin construction It seems. I was hoping not to. It's necessary to use the ceramic blanket? Here the builders of mass heaters leave about a cm of air between the 2 skins.


It's not absolutely necessary to use ceramic blanket, just very handy to ensure not a single patch is making contact between inner and outer skin. Leaving one cm of air between skins sounds doable but in practise it isn't. Somewhere in the process of building the outer skin some mortar will be spilled in the gap. Making sure there's contact and inevitably at some point in time cracks will appear in the outer skin.

Some people use cardboard between skins in order to ensure separation between skins. The cardboard will turn to coal during the first really hot burn. But one have to make very sure there aren't any leaks in the outer skin, otherwise the room will be filled with smoke. I did such a thing once, not to be repeated. I used ceramic blanket about a dozen times with commendable results and I intend to stick with that.

 very good i will do like you suggest. Yesterday i sourced the regular bricks for the outer skin, for the inner i plan to use 3 cm thick refractory ones that i forgot to have stashed in a corner, i think that they will do their job.
 
Peter van den Berg
gardener
Posts: 1054
Location: +52° 1' 47.40", +4° 22' 57.80"
447
woodworking rocket stoves wood heat
  • Likes 4
  • Mark post as helpful
  • send pies
    Number of slices to send:
    Optional 'thank-you' note:
  • Quote
  • Report post to moderator

Matteo Rossi wrote:Yesterday i sourced the regular bricks for the outer skin, for the inner i plan to use 3 cm thick refractory ones that i forgot to have stashed in a corner, i think that they will do their job.


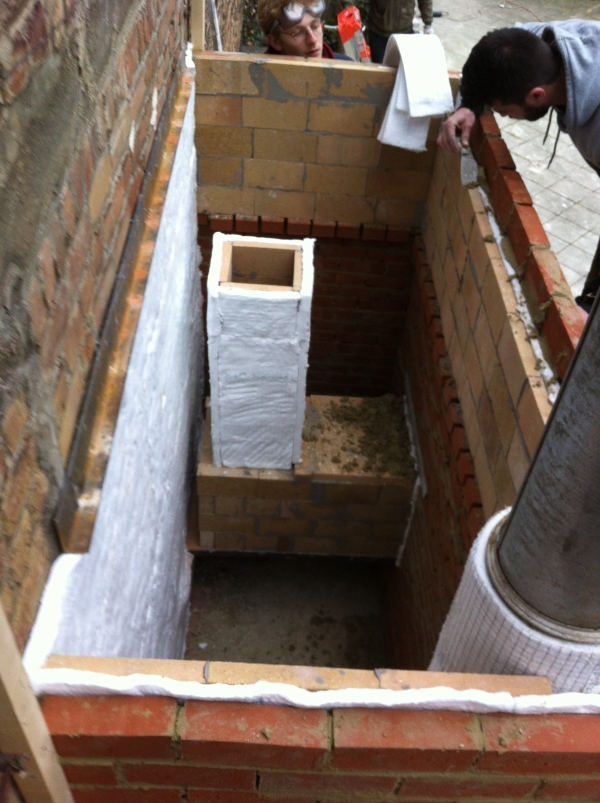
Yes, that 3 cm split firebricks will do the job. Is being used before, in the Brussels build. Have a look, one of the pictures clearly shows the split bricks as the inner liner.

 
Matteo Rossi
Posts: 15
6
  • Likes 4
  • Mark post as helpful
  • send pies
    Number of slices to send:
    Optional 'thank-you' note:
  • Quote
  • Report post to moderator

Peter van den Berg wrote:

Matteo Rossi wrote:Yesterday i sourced the regular bricks for the outer skin, for the inner i plan to use 3 cm thick refractory ones that i forgot to have stashed in a corner, i think that they will do their job.


Yes, that 3 cm split firebricks will do the job. Is being used before, in the Brussels build. Have a look, one of the pictures clearly shows the split bricks as the inner liner.

good, regarding the mortar, for the regular brick i plan to use a mix of sand and lime, for the refractory part, including the firebox, i bought a specific black mortar that is ready to use, no need to add water.
 
Peter van den Berg
gardener
Posts: 1054
Location: +52° 1' 47.40", +4° 22' 57.80"
447
woodworking rocket stoves wood heat
  • Likes 5
  • Mark post as helpful
  • send pies
    Number of slices to send:
    Optional 'thank-you' note:
  • Quote
  • Report post to moderator

Matteo Rossi wrote: good, regarding the mortar, for the regular brick i plan to use a mix of sand and lime, for the refractory part, including the firebox, i bought a specific black mortar that is ready to use, no need to add water.


May I suggest you add a little bit of portland cement to the mortar for the outer shell? This will alow the mortar to set fairly quickly. With only lime as the hydraulic component the mortar will set slowly, the cement part will allow you to keep building. Otherwise, you are able to do four or five layers and wait for a few days so the lime mortar is allowed to be set.
 
Scott Weinberg
Posts: 283
Location: North East Iowa, USA
69
  • Likes 7
  • Mark post as helpful
  • send pies
    Number of slices to send:
    Optional 'thank-you' note:
  • Quote
  • Report post to moderator

Peter van den Berg wrote:

Matteo Rossi wrote:i have to make a double skin construction It seems. I was hoping not to. It's necessary to use the ceramic blanket? Here the builders of mass heaters leave about a cm of air between the 2 skins.


It's not absolutely necessary to use ceramic blanket, just very handy to ensure not a single patch is making contact between inner and outer skin. Leaving one cm of air between skins sounds doable but in practise it isn't. Somewhere in the process of building the outer skin some mortar will be spilled in the gap. Making sure there's contact and inevitably at some point in time cracks will appear in the outer skin.

Some people use cardboard between skins in order to ensure separation between skins. The cardboard will turn to coal during the first really hot burn. But one have to make very sure there aren't any leaks in the outer skin, otherwise the room will be filled with smoke. I did such a thing once, not to be repeated. I used ceramic blanket about a dozen times with commendable results and I intend to stick with that.


Just wondering?

We are often told to use a ceramic blanket to insulate such as a barrier on T Bars, or to wrap our riser,  but then often told to use the ceramic blanket for a spacer such as above, but won't it still be a insulating material?  it would seem we want all our bell to get maximum heat? or perhaps our bottom gets a bit warmer than it would without any blanket involved.    just wondering about the theory, not saying anything is right or wrong.

thank you.
 
Peter van den Berg
gardener
Posts: 1054
Location: +52° 1' 47.40", +4° 22' 57.80"
447
woodworking rocket stoves wood heat
  • Likes 6
  • Mark post as helpful
  • send pies
    Number of slices to send:
    Optional 'thank-you' note:
  • Quote
  • Report post to moderator

Scott Weinberg wrote:We are often told to use a ceramic blanket to insulate such as a barrier on T Bars, or to wrap our riser,  but then often told to use the ceramic blanket for a spacer such as above, but won't it still be a insulating material?  it would seem we want all our bell to get maximum heat? or perhaps our bottom gets a bit warmer than it would without any blanket involved.    just wondering about the theory, not saying anything is right or wrong.


Insulating material slows down the heat dissipation, it won't stop it. The higher the temperature difference the faster the heat will come through. Regarding the 1/2" layer between the inner and outer skin: it slows down the heat, in practise it would make very little difference in the end temperature of the bell's outer surface. The heat will come through somewhat later, that's it.

Having said that, my own red bell heater don't have any superwool between the inner and outer skin. The inner skin is nearly 5" of thickness, the nouter skin just 2". The larger mass is in the inner skin which is also the hottest. It is a completely cast bell, the different parts are able to move a bit relative to each other. So there isn't a problem of cracks and possible leakage.

The difference in construction lies in the brick bell's outer skin: it is in fact a monolith. I know of one guy who's building heaters with a larger gap: upto three or four inch. During construction he's using a piece of wood that is pulled up after every two or three layers. This way, he's able to ensure the skins are absolutely separate. Since the gap is closed off at both ends, radiation from the inner to the outer skin is unhindered by air currents.
 
Scott Weinberg
Posts: 283
Location: North East Iowa, USA
69
  • Likes 5
  • Mark post as helpful
  • send pies
    Number of slices to send:
    Optional 'thank-you' note:
  • Quote
  • Report post to moderator

Peter van den Berg wrote:[ .


Having said that, my own red bell heater don't have any superwool between the inner and outer skin. The inner skin is nearly 5" of thickness, the nouter skin just 2". The larger mass is in the inner skin which is also the hottest. It is a completely cast bell, the different parts are able to move a bit relative to each other. So there isn't a problem of cracks and possible leakage.

The difference in construction lies in the brick bell's outer skin: it is in fact a monolith. I know of one guy who's building heaters with a larger gap: upto three or four inch. During construction he's using a piece of wood that is pulled up after every two or three layers. This way, he's able to ensure the skins are absolutely separate. Since the gap is closed off at both ends, radiation from the inner to the outer skin is unhindered by air currents.

Excellent Peter, thanks for the quick answer.  
 
Matteo Rossi
Posts: 15
6
  • Likes 6
  • Mark post as helpful
  • send pies
    Number of slices to send:
    Optional 'thank-you' note:
  • Quote
  • Report post to moderator
Hi guys, i built the stove, and tested it with small quantities of wood. It's working good It seems, It smoked a little Yesterday when i introduced some not so dry wood, and i noticed some leaks that i'm going to fix. Soon i'll be posting some pictures.
 
Matteo Rossi
Posts: 15
6
  • Likes 5
  • Mark post as helpful
  • send pies
    Number of slices to send:
    Optional 'thank-you' note:
  • Quote
  • Report post to moderator
Here a couple of pics, right now i'm waiting for the soapstone top to arrive, after that i plan to plaster the vertical walls.
IMG_20230905_124322.jpg
[Thumbnail for IMG_20230905_124322.jpg]
IMG_20230919_191917.jpg
[Thumbnail for IMG_20230919_191917.jpg]
 
Posts: 46
Location: Aosta valley, italy
20
  • Likes 5
  • Mark post as helpful
  • send pies
    Number of slices to send:
    Optional 'thank-you' note:
  • Quote
  • Report post to moderator
how is it going? It would be interesting to know how it performed after the first season of use
 
Matteo Rossi
Posts: 15
6
  • Likes 6
  • Mark post as helpful
  • send pies
    Number of slices to send:
    Optional 'thank-you' note:
  • Quote
  • Report post to moderator
The stove performed well, due to the warm winter i did a single burn per day (about 15kg of wood). The only inconvenience is that i couldn't miss even one burn, the penalty was some smoke, so i plan to make a flap that cut the path of the exhaust in the bench, i hope that it ease the starting with a cold chimney.

This week i plan to disassemble it in order to look how it held up, since i haven't plastered it yet because the soapstone top arrived with many month of delay.
 
Matteo Rossi
Posts: 15
6
  • Likes 12
  • Mark post as helpful
  • send pies
    Number of slices to send:
    Optional 'thank-you' note:
  • Quote
  • Report post to moderator
Guys, i'm happy to show you all the almost finished stove, i have to properly install the door and make the wood bench. Now i'm waiting for the plaster to fully cure and the temperatures to go down (today 20°C).
IMG_20241021_191508.jpg
[Thumbnail for IMG_20241021_191508.jpg]
IMG_20241021_191548.jpg
rocket mass heater with plaster in a stone house with a tiled floor
 
Fox James
Rocket Scientist
Posts: 790
Location: Guernsey a small island near France.
299
  • Likes 6
  • Mark post as helpful
  • send pies
    Number of slices to send:
    Optional 'thank-you' note:
  • Quote
  • Report post to moderator
That looks just about as good as you could ever expect!
Lets hope it works as well as it looks. (I am sure it will)
 
Matteo Rossi
Posts: 15
6
  • Likes 6
  • Mark post as helpful
  • send pies
    Number of slices to send:
    Optional 'thank-you' note:
  • Quote
  • Report post to moderator
I tested it the last winter and it worked fairly good, that's why i waited to plaster It (i had It done) and to purchase the soapstone top.
 
thomas rubino
rocket scientist
Posts: 6320
Location: latitude 47 N.W. montana zone 6A
3192
cat pig rocket stoves
  • Likes 6
  • Mark post as helpful
  • send pies
    Number of slices to send:
    Optional 'thank-you' note:
  • Quote
  • Report post to moderator
Well Done Matteo!
That looks superb!
 
Matteo Rossi
Posts: 15
6
  • Likes 3
  • Mark post as helpful
  • send pies
    Number of slices to send:
    Optional 'thank-you' note:
  • Quote
  • Report post to moderator
Thank you, i didn't expect It to turn out so nice 👍

 
No. No. No. No. Changed my mind. Wanna come down. To see this tiny ad:
Rocket Mass Heater Jamboree And Updates
https://permies.com/t/170234/Rocket-Mass-Heater-Jamboree-Updates
reply
    Bookmark Topic Watch Topic
  • New Topic