• Post Reply Bookmark Topic Watch Topic
  • New Topic
permaculture forums growies critters building homesteading energy monies kitchen purity ungarbage community wilderness fiber arts art permaculture artisans regional education skip experiences global resources cider press projects digital market permies.com pie forums private forums all forums
this forum made possible by our volunteer staff, including ...
master stewards:
  • Nancy Reading
  • Carla Burke
  • r ranson
  • John F Dean
  • paul wheaton
  • Pearl Sutton
stewards:
  • Jay Angler
  • Liv Smith
  • Leigh Tate
master gardeners:
  • Christopher Weeks
  • Timothy Norton
gardeners:
  • thomas rubino
  • Jeremy VanGelder
  • Maieshe Ljin

Secondary burn not igniting

 
Posts: 78
1
  • Mark post as helpful
  • send pies
    Number of slices to send:
    Optional 'thank-you' note:
  • Quote
  • Report post to moderator
I am building an outdoor wood boiler to heat my house, and I am trying to get it to produce a secondary burn to produce a clean burn, but I am unable to get it to ignite.

To do some testing, I have piped the exhaust out of the boiler, and tried to light the smoke, but it will not light. At first I thought it may be because the wood is too wet, and it is producing too much steam (I still think that may be it, but I am not sure). I am going to try a burn with dry wood next week, but If anyone has any insight on why it would not burn other than the steam, please let me know.

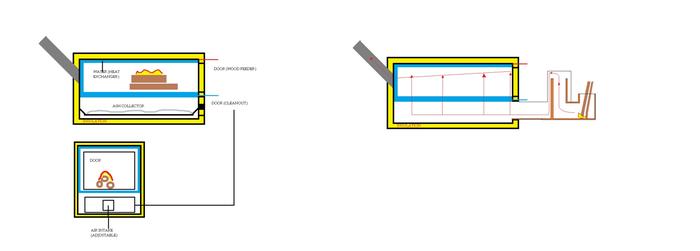
Here is the setup. I have a sealed box where a blower blows air into the bottom, I then have a tube that goes from the top of the box down and out the bottom (this is where the smoke comes out, and I would like to ignite this. I have closed the door, and let it burn for 20 minutes. The whole time it is producing a lot of smoke out the bottom, but it is impossible to ignite.

Here are the possible reasons I can think of

1- too much steam (but wouln't this stop after 20 min)?

2- Too fast of a flow ( I had to reduce it to a 1" pip coming out, and it is flowing fairly fast) Maybe it is just too much, like trying to light a match in the wind.

3- Not enough oxygen (maybe I need to make a nozle that injects more air).

4- Too much air (maybe there is too much air introduced into the stove, and the syngass produced is too lean to burn).


Any other ideas.

If you need more details, I can get some pictures, and try to explain it a little better. You can see a few pictures here:
http://www.independenthomeenergy.com/pictures-test-burn/

Thanks

 
pollinator
Posts: 583
Location: Southwest U.S.
12
  • Mark post as helpful
  • send pies
    Number of slices to send:
    Optional 'thank-you' note:
  • Quote
  • Report post to moderator
There's little info to go on here. However, it's possible to narrow things down to a handful of culprits. It's clear that if the smoke will not ignite, then there are few or no combustible gases present. If this is the case, then all these gases are being burned in the primary combustion chamber. This might be cause by excessive thermal losses from the primary combustion chamber (which can include high moisture content in the fuel). Basically, the temperature in the primary combustion chamber is limited by heat losses due to poor insulation and/or due to the presence of excess moisture which adds a heat sink, this lowers temperatures, this in turn lowers the rate of pyrolysis, and this in turn allows all combustible gases generated in the primary combustion chamber to be consumed with primary combustion. The solution is to use dry wood, insulate the primary combustion chamber very well, and make sure to operate it long enough to reach peak temperatures.
 
david willis
Posts: 78
1
  • Mark post as helpful
  • send pies
    Number of slices to send:
    Optional 'thank-you' note:
  • Quote
  • Report post to moderator
Thanks for that information. It sounds like it may be that there is not enough heat in the primary burn chamber, but I am not sure how to fix this since the primary burn chamber is surrounded by a water jacket.....

I will get some dry wood, and run another test, and video it. Maybe that will give use more information to know for sure what is happening. I probably won't have the time to give it a try until firday or saturday.


Thank you very much for the help.


Posts: 238
Location: AR ~ozark mountain range~zone7a
9
  • Mark post as helpful
  • send pies
    Number of slices to send:
    Optional 'thank-you' note:
  • Quote
  • Report post to moderator
hey david, nice wood boiler!

The thing I'm seeing immediately on your fire box configuration is the exh. port location at the bottom of your V fire box it seems the smoke goes down thru that port, and directly to the twin smoke stack chimney manifold. Perhaps your losing all the smoke directly to the chimney, when I think you might intend the smoke to 'work' a little more in the brick lined lower chamber. Maybe moving the exh. port toward the front door, might cause the smoke at least a chance of becoming a 'burn tunnel' beneath the V bottom, I would even suggest fire brick sides to the 'burn tunnel' which would lead from the exh. port near the front door, rearward thru a fire brick 'burn tunnel' then waste the rest to your twin smoke stack manifold. Perhaps with a burn tunnel, your temps might increase as your stove with the water jackets & such are inherently cold natured. As you know a secondary combustion is not necessary, if your primary burn is lean & hot, I don't see your water jackets in this example missing any BTU's...so I would concentrate on creating the most efficient primary burn by running it thru a brick burn tunnel.

I guess you could experiment with your existing exh. port at the bottom of your V fire box, perhaps create a diverted exh. flow with bricks, cause the smoke to drop into the bottom chamber, and divert into a brick tunnel that winds around in the lower box, and eventually dumps at the twin stack manifold. I like 'tunnels' because if relatively 'smooth bore' they keep flow rates much faster than simply 'dumping the smoke into a large chamber'...you gotta make a road or tunnel for the smoke to follow, to allow as much flame travel as possible within this lower chamber. I don't think you can even have 'flame travel' or long 'flame length' if you only have a large chamber. Which means as your current configuration is, all of your flame travel or length that you do obtain...probably just goes up the twin stack. There again I'm very confident in your water jackets to catch as much BTU's as possible, but you gotta get your temps even hotter, hold them longer in your 2 stage fire box, then whatever is left over goes up the twin stack.

Would you agree your fire path should be improved in the 2 stage fire box?

James Beam
 
                    
Posts: 238
Location: AR ~ozark mountain range~zone7a
9
  • Mark post as helpful
  • send pies
    Number of slices to send:
    Optional 'thank-you' note:
  • Quote
  • Report post to moderator
I guess I've got RMH on the mind, trying to make a rocket out of your wood boiler. hahaha

James beam
davidwillis.jpg
[Thumbnail for davidwillis.jpg]
 
david willis
Posts: 78
1
  • Mark post as helpful
  • send pies
    Number of slices to send:
    Optional 'thank-you' note:
  • Quote
  • Report post to moderator
Thanks for the comments James. I agree with you, and actually have it planned to put in a tunnel of firebricks (I have the brackets welded in to hold the firebricks in place). The plan is to have the tunnel go from the back to the front, then have to exit and return to the stacks along to two sides. Basically just like your picture, except it is going from the back to the front, then there will be a firebrick at the very front to divert the flame to the sides after it exits the tunnel. I just have not added the bricks yet, because I want to figure out how to get the secondary burn to ignite first.

I like your idea of putting wood in the lower chamber to dry, however it may get too hot and actually start pyrolysis after the secondary burn... assuming I get a secondary burn going.

I will make a video when I test it this weekend, and try to show more details.

Thanks again for the comments.

David


Posts: 238
Location: AR ~ozark mountain range~zone7a
9
  • Mark post as helpful
  • send pies
    Number of slices to send:
    Optional 'thank-you' note:
  • Quote
  • Report post to moderator
hey david, yes sir I think that would work just right, as you describe it now~~at least we are on the same page~~ whew! ok well now I can see why you have your upper chamber port at the back of the box, I just couldn't figure that out yesterday. way2 go! Well then get that burn tunnel bricked in as you intend, and you will see better performance, with your design I don't think you can expect complete combustion until you get the brick tunnel installed. About a 'wood char chamber' in the lower level of your stove, I wouldn't worry about over charring the stuff, or even neglect of a batch in that chamber, a few vent holes from lower chamber to the upper chamber should allow the syngas of the the raw wood stored in the lower chamber to enter into the upper chamber combustion mixture.

I believe that a wood fire burns it's cleanest, leanest, and hottest when the firewood has become charcoal, a bed of burning charcoal only needs varied amounts of air involved with it to get really hot, really quick, with very little smoke. This is what an RMH, or a forced air forge takes advantage of, the air drawn over the embers, to cause a very lean burn, perhaps using a coarse steel mesh as a grate or 'coals hole' to capture that aspect of the fuel, your water pipe manifold does this already, good deal!

I guess you could charge the upper fire box with raw wood, and/or charcoal made in the lower chamber, I don't think you still have easy access to both chambers tho, to fill both chambers at same time, because of your front plate and doors now in place. I thought that maybe a different door that would open to both chambers at same time for filling would have been kind of fun...just an idea~~. In practice, something like that might operate such as: when the upper fire box needs refueled, first shovel the charcoal from the lower to the upper chamber, then refill both chambers with firewood, and call it good. Of the door, an air supply vent would need be made for the upper chamber only, and a good seal for the lower chamber should be created. That was just a funny thought~~, but as you have further explained your intended brickwork, stuffing the lower chamber with wood may not be very practical, as it would choke your airflow...unless you left an smoke passage thru the stack wood in the lower chamber. Wish you much success, looking forward to your updates.

james beam
 
david willis
Posts: 78
1
  • Mark post as helpful
  • send pies
    Number of slices to send:
    Optional 'thank-you' note:
  • Quote
  • Report post to moderator
Thanks for the suggestions. I like them a lot. I have just done some more testing, and I think I am not getting enough oxygen to the fire when I close my door. I made a video, but my thoughts now are that I need to open up my exhaust so it does not restrict it so much.

I would appreciate any ideas, or conformation that I am moving in the right direction. Here is the video


Thanks
 
                    
Posts: 238
Location: AR ~ozark mountain range~zone7a
9
  • Mark post as helpful
  • send pies
    Number of slices to send:
    Optional 'thank-you' note:
  • Quote
  • Report post to moderator
After looking at your video 1 &2, I don't think your going to see anything close to what you intend, until you revisit what Marcos Buenijo posted suggestions. I would get some brick in those boxes, and try leaving the upper chamber door slightly open to allow some air in there. I can see your caution of really stoking that upper chamber full, with only a 2 1/2" pipe type restriction in there, I liked the big square hole you had in the bottom previously, your new grate is nice. That tar on the ceiling of the upper chamber is due to the 'heat sink' of the water jacket, cooling the gases to condense the tar on the ceiling.

It is like you have built most of the stove, but insist on making a test burn without the brick, and so far proves it is too cold for working properly. You need air & your need brick. With your brick you don't have to use permanent cement, a forgiving/reusable clay slip can be used to seal brickwork, you could stack them in there without joint compound. The upper chamber must be brick lined (insulated if you want to call it that) to slow the heat transfer thru the brick to the water jackets, your water jackets are immediately consuming all the heat of combustion, as your video 2 shows.

I gotta say tho, I still don't understand all this 'secondary burn' stuff, I understand you can make a batch of fuel smoulder, and give off syngas, whether it burns just above the fuel itself, or whether you pipe the smoke down the line and burn it elsewhere...as I see it you only get 1 chance for the fuel to combust, whether remotely burn it, or in the wood box, a burn tunnel in the lower level is not a second burn, but simply a good place for the primary burn to realize the full potential of a long, lean flame, and absorb or direct the heat into your heat sink.

james beam
 
david willis
Posts: 78
1
  • Mark post as helpful
  • send pies
    Number of slices to send:
    Optional 'thank-you' note:
  • Quote
  • Report post to moderator
Thanks for your comments. I was not insisting on not using the firebricks, I just did not think I would need them to ignite the secondary burn (or long first burn). The reason I would like the secondary burn is so I can slowly burn the wood in the upper chamber, but be able to also have a clean efficient burn. I would like to be able to fill my boiler once or twice per day, and let it do it's job. I have had a fireplace in my house before, and the only way to get it to burn clean would be to have it very hot, which would overheat the house, and need to be filled every hour or two. My goal with this is to get a slow clean burn...

Anyway, as for an update, I modified my outlet to use the same big opening as before, and made a manifold that connects to three 2" pipes (I was only using one 2" pipe in that last video). I also put firebrick in the lower chamber, and let the fire get really going. I closed the door, and within a just a few seconds it ignited the secondary burn (or made a long primary burn). I burned it for about 20 minutes until the water in my tank was almost boiling (I have about 300 gallons in there). The water at the top of the tank was too steaming a lot, but the bottom was still cold. So then I decided to test it and see if I could shut it down, and let it reignite without opening the door. When I shut the fan off, the secondary burn did not go out right a way, but a slow flame kept rolling out for about 5 minutes. Then it went out. After waiting another 15 minutes I turned the fan on to see if it would ignite back up. Smoke started coming out, and I could hear it crackling, but after 5 minutes there was no secondary burn, so I opened the door. The fire was hot inside, and lit right up. I let it go for about 30 seconds and closed the door. The secondary burn started again, but it was not as good as before, and then went out. I tried several times, but it would not keep going very good at all. Looking inside, the bottom part of the box was all glowing with hot coals, and looked like it should be working, but it was not.

Anyway, I think you are correct about lining the top with firebricks as well to contain the heat in there better. That may fix all my problems (I hope). I also think my lower chamber needs a much bigger area with firebricks. That secondary burn goes much farther than my firebricks..... However even with the small channel I have, the fire was very clean (I could not see any smoke coming out of the chimney).

Here is a video of the secondary burn working.

http://youtu.be/zkIB4dsJ9wg


david willis
Posts: 78
1
  • Mark post as helpful
  • send pies
    Number of slices to send:
    Optional 'thank-you' note:
  • Quote
  • Report post to moderator
I just read my last post, and I hope it did not come across wrong. I am very appreciative of the advice on here. I am new to this, and just learning how it actually works, and need all the help I can get.

After reading over several of the posts on here, I am trying to get a better understanding of why the firebricks are necessary in the primary burn chamber.

Here is what I am trying to understand: quote from Marcos Buenijo

"It's clear that if the smoke will not ignite, then there are few or no combustible gases present. If this is the case, then all these gases are being burned in the primary combustion chamber. This might be cause by excessive thermal losses from the primary combustion chamber (which can include high moisture content in the fuel). Basically, the temperature in the primary combustion chamber is limited by heat losses due to poor insulation and/or due to the presence of excess moisture which adds a heat sink, this lowers temperatures, this in turn lowers the rate of pyrolysis, and this in turn allows all combustible gases generated in the primary combustion chamber to be consumed with primary combustion. The solution is to use dry wood, insulate the primary combustion chamber very well, and make sure to operate it long enough to reach peak temperatures."


I have read this several times trying to understand exactly what is happening here. And this is my interpretation:

1- the initial burn creates heat, but most of the combustible gases are burned because there is plenty of oxygen near the initial burn (when I say initial burn, I am talking about where the air is injected into the burn chamber)

2- If the heat from the initial burn is used up by producing steam, or heating the water in my tank, there is not much heat transferred to the rest of the wood in the primary combustion chamber. This means the wood will smoke, but not produce combustible gases?

3- So to produce syngas, and not just smoke, we need to heat the rest of the wood to a higher temperature. To do this we need to insulate the primary combustion chamber with firebricks and use dry wood to keep the heat high enough to produce syngas, and not just incombustible smoke.

Does this sound about right?


Posts: 238
Location: AR ~ozark mountain range~zone7a
9
  • Mark post as helpful
  • send pies
    Number of slices to send:
    Optional 'thank-you' note:
  • Quote
  • Report post to moderator
hey david, while your experimenting, what about introducing your blower air into your triple 2" tube manifold? This might further oxygenate the syngas thru its path in the triple tube manifold~~just a thought, see the diagramn~~. From video 3 you show your orange flame, which is hot, but needs to be leaned out with more air, (I'm guessing the only reason your not seeing smoke out the chimney is because you have your lower chamber door wide open allowing enough air to support a flame) you might try to get your flame to burn leaner. If you could somehow create a forced air nozzle from your pump, into the smoke/flame mixture (perhaps just before it enters the lower chamber at the bottom of the triple tube manifold) diluting the syngas mixture with air, the idea is to obtain a flame that is blue and possibly even white-ish blue, look for a color change and even a change in noise obtained from an air nozzle in the manifold...blue would indicate an efficient combustion that you seek.

james beam
davidwallisnozzle.jpg
[Thumbnail for davidwallisnozzle.jpg]
 
david willis
Posts: 78
1
  • Mark post as helpful
  • send pies
    Number of slices to send:
    Optional 'thank-you' note:
  • Quote
  • Report post to moderator
That is funny you say that. I was just thinking I would probably have to add more air in once I put that door on. However that is great to know that it should be blue. I Am attaching a picture I just drew, but it is not very good. Basically I build a manifold to go over the opening to the secondary burn area. I have two 1" pips that inject the air into the primary burn area, and I was thinking about piping one of them to the front of the manifold..... Or I was thinking I could just drill a hole in the front of the manifold to let more air in without forcing it up through the primary burn area... If that makes sense.

By the way, how do you draw those good pictures?
Scan_Pic0007.jpg
[Thumbnail for Scan_Pic0007.jpg]
 
                    
Posts: 238
Location: AR ~ozark mountain range~zone7a
9
  • Mark post as helpful
  • send pies
    Number of slices to send:
    Optional 'thank-you' note:
  • Quote
  • Report post to moderator
hey david, ya I use a computer program that comes with most computers the program is called 'Paint'. If you ever find it on your computer (usually listed under 'accessories' in your list of programs), just practice a few lines or circles or whatever, I even use 'spray paint tool' to make that splattered effect, once you get a little pix made, close the window and a little box will open, and it says: save your picture? say YES, and give it a name, noticewhere it will save the picture on your computer, then say OK. Then go find the picture...probably in 'my pictures folder'...look for the name you gave it.

Just to give you an practical example of how flame/fuel/& air work together, I sometimes think of a cutting torch. Typically a cutting torch is about the hottest/efficient flame around, so I think in practice, to truly get a flame similar to a cutting torch, you have acetylene delivered to the mixing valve, and oxygen also delivered to the mixing valve. As you know if you have ever operated a cutting torch, you first light your torch by opening the valve of the acetylene only, it burns orange, and has a sooty black smoke roll off of it. You would adjust your acetylene delivery pressure at the regulator. The oxygen side of the apparatus is practically identical, mixing valve, & regulated delivery pressure. Once the acetylene is lighted, then the oxygen mixing valve is cracked open and the flame immediately leans out, the flame shape, sound, and color all change causing dramatic increases in heat. This mixing of the bottled gases becomes quite easy once you have alittle experience, adjusting any of the mixing valves or the regulated pressures to obtain a heating torch. The fuel & oxygen goes thru the cutting torch handle, and is mixed, the fuel/oxygen delivered to the tip usually flows out of 6 small orifices. The only other part of a cutting torch is a single orifice in the center of the cutting tip, this orifice delivers oxygen only thru that passage, it has a 3rd mixing valve to control that circuit.

Now your probably wondering...what the heck does that have to do with my wood boiler? hahaha Well I noticed in your video 3 some nice orange flame wavering about, just as pure acetylene would do when you first light your torch. Now if you had a 'mixing valve' so that you could control to some extent, the syngas volume & pressure you could obtain a hotter flame. But just as a cutting torch uses oxygen, your stove needs air, at a rate that would allow all the fuel to be fully consumed. Since you had the air pump thing going there anyway, I was thinking somehow make that air get involved with your syngas, and hopefully do it in such a way that the process is controllable and repeatable with little or no adjustment. I think once you get your brick tunnels built in the lower chamber installed, the heat involved in the lower chamber will rise & radiate into the upper chamber, as well as the water jackets on the sides. The heat rising & radiating into the upper chamber is necessary, as this efficiently burned flame in the lower unit will have excess heat that you will use to keep your upper chamber very hot...that is hot enough to make the upper chamber wood fuel release more syngas. You must first have the upper chamber up to full temperatures to release a steady supply of syngas, then set about the business of heating water. This is why your video 3 shown a syngas flame, because you had the upper chamber fired up above a certain temperature...which released the syngas.

hope that helps.

james beam
 
david willis
Posts: 78
1
  • Mark post as helpful
  • send pies
    Number of slices to send:
    Optional 'thank-you' note:
  • Quote
  • Report post to moderator
That is a great example using the acetylene torch. I have used them plenty, so it makes a lot of sense. Thinking back, after I turned off the fan, it really looked like an acetylene torch flame. I will play around with that air mixture, and hopefully I can get it to burn like a cutting torch.... I am not sure when I will get some time to play around with it again, but I will update you with how it turns out.

Thanks again for all the information.
 
david willis
Posts: 78
1
  • Mark post as helpful
  • send pies
    Number of slices to send:
    Optional 'thank-you' note:
  • Quote
  • Report post to moderator
I have put firebricks in the burn chamber, and plumbed in some air into the exhaust. I run a test burn, but the wood was not that dry, so I don't know if it was the wood, but I couldn't get it burning very hot, and the secondary burn did not start. I know the gas was flammable (It would burn when I put a torch in, but it would go out shortly after I removed the torch). I am not sure if there was too much air, or too much steam, or just not hot enough.

Anyway, here is a video of the setup (I did not video trying to light the secondary burn).

http://youtu.be/q7ZmsOM53Qs

I am thinking I may remove the actual pipe going into the manifold, and just let the air blow past the coals and into the exhaust manifold. That way the air will be hot, and may ignite it better...?
 
david willis
Posts: 78
1
  • Mark post as helpful
  • send pies
    Number of slices to send:
    Optional 'thank-you' note:
  • Quote
  • Report post to moderator
I did some more testing today after removing the pipe forcing more air into the secondary burn. The fire started up, and the secondary burn ignited fast. However I still think it needs more air, because the flame didn't have much blue, and went out when I shut the bottom door. So I will work on getting more air in

Anyway, I am uploading a video where you can see everything.

 
Marcos Buenijo
pollinator
Posts: 583
Location: Southwest U.S.
12
  • Mark post as helpful
  • send pies
    Number of slices to send:
    Optional 'thank-you' note:
  • Quote
  • Report post to moderator
Try preheating the secondary air.
 
david willis
Posts: 78
1
  • Mark post as helpful
  • send pies
    Number of slices to send:
    Optional 'thank-you' note:
  • Quote
  • Report post to moderator
Thanks Marcos... I will work on getting the secondary air preheated, and give it another go.... I feel like it is soooo close, Hopefully I will be able to get that all setup on Saturday. I will make another video when I do.

 
david willis
Posts: 78
1
  • Mark post as helpful
  • send pies
    Number of slices to send:
    Optional 'thank-you' note:
  • Quote
  • Report post to moderator
The tests today did not go so well. I did record some of it, and will get the video together later (maybe tomorrow). But I tried running one 1" line into a box to preheat it, then inject the air into the secondary burn. It did not seem like enough air, so then I tried adding one of the other 1" pipes into the same box. That seemed even worse (I don't think the primary burn had enough air to heat up well enough.

 
david willis
Posts: 78
1
  • Mark post as helpful
  • send pies
    Number of slices to send:
    Optional 'thank-you' note:
  • Quote
  • Report post to moderator
Here is a video of the secondary air injection and pre heat box I made.

http://youtu.be/uPl2AgvjeiI

It still is not getting enough air to keep the secondary burn to burn without the door open. So then I tried running more air to the secondary burn (leaving only one line to the primary burn chamber instead of two). But when I did that, I could not get the secondary burn to light.

Does the wood producing the smoke (in the primary burn chamber) need to be up to a certain temperature to produce syngas (flammable gas)? I am wondering this, because I don't think it got as hot in the primary burn chamber when I had more air going to the secondary burn chamber. It was producing a lot of smoke, but it was not flammable. I also used larger logs the second time, so I am not sure if they got hot enough. I would like to be able to produce a slow burn in the primary chamber, but still produce a clean burn by burning the unburned smoke from the primary burn in the secondary burn. But I wonder if this is not possible, because a slow burn in the primary burn area will not get as hot.


Here is a video of the first test (I didn't video the second test, but basically it would not ignite even with a torch.

 
david willis
Posts: 78
1
  • Mark post as helpful
  • send pies
    Number of slices to send:
    Optional 'thank-you' note:
  • Quote
  • Report post to moderator
I think part of my problem is that I am not consistently using good wood. I need to use the same size wood, and dry in all tests to really know what works and what doesn't.

But I am still curious to know if you can produce smoke from wood that is not flammable if the temperature in the primary burn chamber is not hot enough?
 
                    
Posts: 238
Location: AR ~ozark mountain range~zone7a
9
  • Mark post as helpful
  • send pies
    Number of slices to send:
    Optional 'thank-you' note:
  • Quote
  • Report post to moderator
http://driveonwood.com/blogs/camilo-dittus/questions


hey david, ya might give that site a try with regard to results of gasified, lots of info over there, lots more info if ya buy a membership, they are about running tractors and pickup trucks from woodgas, which is kind of sort of what your trying to do, be sure to check out those pdf documents they offer.

I'm real happy with your results so far, this experiment is a good one, and sometimes the trial & error methods can be alittle frustrating but I'm confident you will figure out what is best for your setup. Ya the obvious conclusion to one of your question is: you shouldn't try to burn 'wet' wood in your experiment. I think a brick floor in the upper chamber is still required, I know you ran out of brick...but I would like to see a brick floor, upper chamber.

Something else you might think about is: sucking the woodgas from the upper chamber, and discharge it into your burn tunnel...via the air pump, you should get a torch at your delivery nozzle~~~just another funny idea to keep in the back of your mind!!

But I don't think low temperature is the same as slow burn, as far as producing syngas, I'm pretty sure you must have the wood over a certain temperature to produce syngas. As the website above mentions, the high temperature is required much like the high temperature of burning charcoal is required... to produce syngas.

I haven't had time to look at your 13 min. video yet.

James beam

 
david willis
Posts: 78
1
  • Mark post as helpful
  • send pies
    Number of slices to send:
    Optional 'thank-you' note:
  • Quote
  • Report post to moderator
Thanks for the link.... I will take a look at those pdf's

Something else you might think about is: sucking the woodgas from the upper chamber, and discharge it into your burn tunnel...via the air pump, you should get a torch at your delivery nozzle~~~just another funny idea to keep in the back of your mind!!


I am not sure I understand this entirely.... The woodgass in the upper chamber is already forced down into the burn tunnel since there is nowhere else for it to go. Maybe I just don't understand exactly what you are meaning to do, or how it would be different from what I am already doing?

I am going to try and keep more consistent test conditions with dry wood,etc. Then I will be able to tell what helps, and what does not, or makes it worse. Right now it seams like there it is critical to get the correct amount of air in both the primary (to get the wood hot enough), and also enough in the secondary to burn all the gas...

I just wish I had more time to work on it.

Thanks again for the comments and help!
 
                    
Posts: 238
Location: AR ~ozark mountain range~zone7a
9
  • Mark post as helpful
  • send pies
    Number of slices to send:
    Optional 'thank-you' note:
  • Quote
  • Report post to moderator
Hey david, heck I'm just throwing some of my funny ideas out there for this set up, so take most of what I'm saying with a huge ~dose of salt~, do what YOU think is best. I mentioned the sucking off the syngas, mainly for one reason: to 'sort of regulate the syngas' by the size of the pump & plumbing which when collected thru a suction pump a specific, continuous volume of syngas based on the size of the pump, if that became viable, the 'funny idea' was to perhaps deliver a consistent amount of syngas while allowing your upper chamber to burn as hot as necessary, but hopefully slower? That says to me: charcoalization is slower, and probably the best producer of the blue flame type syngas.

I was thinking if you had a bed of hot coals, stoked a pile of wood on top of it, the funny idea being your upper chamber is already sealed off from ambient air, use the air pump you have now to quickly get the whole batch of wood up to full temps, at that point turn the air pump off, and don't allow any air to the wood, the wood will continue to smolder and with time should charcoalize the whole batch--giving off lots of syngas in the process. While the batch is charcoalizing suck the syngas from the upper chamber, into the lower chamber & burn it there, the air required to complete the combustion in the lower chamber should be introduced there, in the lower chamber, I would think the air used to burn the syngas should be controllable with a valve of some type. I was thinking once you get the upper chamber up to temperature, a different control valve on your 'twin pipes manifold' could be nearly closed off also...we don't want too much pressure to build in the upper chamber tho, as explosion might occur if the suck pump failed, so don't lock your upper chamber door.

Again a huge ~dose of salt~ LOL but I think part of the problem you might try changing... is the air pump you have now is supplying air in the upper chamber and the wood is burning in the upper chamber, but I don't want the wood to burn in the upper chamber, I want to collect the syngas from the charcoalization process...so after your batch is well lighted, turn the air pump off, & turn the suck pump on. Crazy huh? Oh well that is what I've been thinking. I'm guessing without a suck pump, the air pump turned off, and the upper chamber door closed, there is no useable air flow to deliver the syngas into the lower chamber, and what syngas that does make it into your 'twin tube manifold' is probably caught on fire because the twin tubes are glowing hot & ignite the syngas before it gets into the lower chamber. Of which, something like those glowing tubes might further ignition...can you get them to glow hot & protrude partially down into the lower chamber? I've guess putting steel wires (that glow hot) connected to the twin tubes, extending into the burn tunnel lower chamber, it might act like a 'glow plug' used on a diesel engine. hahahaa OMG just another funny idea.

I would welcome anyone else's thoughts that could help get david's thing going better, I'm running out of funny ideas. :P

James beam

 
david willis
Posts: 78
1
  • Mark post as helpful
  • send pies
    Number of slices to send:
    Optional 'thank-you' note:
  • Quote
  • Report post to moderator
Thanks for those thoughts James. It really has me thinking.... I have a lot of ideas now... I will have to mull it over for a few days, and And then see what plan I can use.

 
david willis
Posts: 78
1
  • Mark post as helpful
  • send pies
    Number of slices to send:
    Optional 'thank-you' note:
  • Quote
  • Report post to moderator
I did some more testing today. I have not made any radical changes yet, but did increase the airflow to the secondary burn area. The burn was hot, and looked great, but it would not last long. I would have to open the main door and get the fire going stronger for it to fire back up again. I am wondering if the primary burn needs more air... but I also found that by shutting all the fan off for a minute, then turning it on will also start the flame back up.

- this one shows the burn kick on, and burn out, but it reignites after letting the fire burn some more.

- this one shows the flame starting back up after shutting the fan off and turning it back on.


I am not sure if the problem is just getting the correct air/fuel mixture, or if it is just not enough heat in the primary burn (although it feels very hot, and my metal grate at the bottom was glowing orange (which indicates it is around 2,000 deg down in the bottom of the primary burn chamber).

 
david willis
Posts: 78
1
  • Mark post as helpful
  • send pies
    Number of slices to send:
    Optional 'thank-you' note:
  • Quote
  • Report post to moderator
I made some more changes today, and am fairly certain my problems have been just simply not enough air. I am getting a second blower (one for the primary, and one for the secondary). I think this will fix it...

Here is the video I made.
 
                    
Posts: 238
Location: AR ~ozark mountain range~zone7a
9
  • Mark post as helpful
  • send pies
    Number of slices to send:
    Optional 'thank-you' note:
  • Quote
  • Report post to moderator
Hey david, I saw your latest video and I congratulate you on your new 2" pipe/valve/manifold set-up. Just curious, but did you try the 2" valve naturally aspirated, before connecting to the blower?

I am curious also, your setting of the 2" valve operation seemed to sustain a nice hot flame that roars, isn't this actually the best setting obtained for the hottest sustainable flame...I would consider this valve as a 'mixture adjustment', much like you would use while adjusting the mixture of a carbureator on an engine, or a cutting torch.

And I think what you are seeing in the 'flame out' portion of the video, is where you opened the 2" valve... too quickly? The flame roared hotter and larger from the sudden blast of more air (by setting 2" valve to wide open) until the syngas was 'leaned out' with the additional air, to the point of the flame blowing out. I believe you had found the optimum mixture of air & syngas when you had the 2" valve nearly closed, and sustained a good flame.

As you know from previous discussion, I think a secondary burn is a myth. I still think the flame you are seeing in the lower chamber is from pressurizing your upper chamber which elongates the initial flame until the flame tip arrives in the lower chamber, it seems you are simply forcing the primary flame down the internal tubes. I think also you are now properly capturing all available syngas in the upper firebox, concentrating it thru those internal tubes and burning it as efficiently as possible, by mixing (carburizing) the upper firebox intake air with the 2" valve.

There again I'm still thinking 'rocket stove' as your adjusting your flame, I think most people run their rocket stoves in a similar fashion by adjusting the inlet air mixture to the wood, (often by setting/adjusting a brick over the air inlet) causing the flame to enrich/elongate into their burn tunnel and therefore capturing efficient heat from the one and only flame, in the rocket stove set-up. There is no 'secondary burn' in the heat riser/burn barrel. They simply burned their wood efficiently in the first place. The heat riser/burn barrel does create a secondary chamber to further/quickly dissipate heat from the original flame in the rocket stove...which occured in the burn tunnel.

Perhaps you could possibly incorporate some type of catalytic converter in your set-up (I'm still thinking like automotive applications) even in that application I am not aware of how to actually create a secondary combustion to ignite spent exhausted fumes. As suggested before, perhaps a 'glow rod/wire' that protrudes into the lower chamber might help with sustaining ignition of catalytic gases, but without exposure to the catalytic material, I simply cannot fathom burning spend exhaust gases.(sorry my brain only goes so far)

As your stove is now, how has the consumption of wood progressed? Does the stove seem to produce an acceptable rate of heat for the amount of wood? As the stove is now operated, can it heat your boiler as you intended? Do you know anyone in the automotive repair sector that might have an 'emissions testing tool' ...that you could check your emissions with in the future? When your lower chamber door is closed, and you have your 2" air valve turned on/adjusted, can you still hear the roar of the flame in the lower chamber?

james beam
 
david willis
Posts: 78
1
  • Mark post as helpful
  • send pies
    Number of slices to send:
    Optional 'thank-you' note:
  • Quote
  • Report post to moderator
Thanks for the comments James!!

I did not try the 2" valve naturally aspirated, but that is a good idea. I have a fan on order, and when I get it, I will test it with the fan, and without to see if it will work naturally aspirated.

I am curious also, your setting of the 2" valve operation seemed to sustain a nice hot flame that roars, isn't this actually the best setting obtained for the hottest sustainable flame...I would consider this valve as a 'mixture adjustment', much like you would use while adjusting the mixture of a carbureator on an engine, or a cutting torch.


Yes, the secondary burn is great, the problem I run into is that the flame eventually dies out when I don't have enough air into the primary burn chamber.

And I think what you are seeing in the 'flame out' portion of the video, is where you opened the 2" valve... too quickly? The flame roared hotter and larger from the sudden blast of more air (by setting 2" valve to wide open) until the syngas was 'leaned out' with the additional air, to the point of the flame blowing out. I believe you had found the optimum mixture of air & syngas when you had the 2" valve nearly closed, and sustained a good flame.


Actually if you look close, the flame went bigger, but not hotter (the extra air introduced into the primary burn chamber forced more wood gas out of the primary burn chamber, and less air into the secondary burn chamber which made the mixture too rich, and finally went out. I have played with it much more than the video's show, and opening the primary burn all the way kills the fire, however I can ignite it with the door open if the air flow is good enough to produce enough air through the door do burn the gas (like my boiler was originally before I added the secondary air injection).

As you know from previous discussion, I think a secondary burn is a myth. I still think the flame you are seeing in the lower chamber is from pressurizing your upper chamber which elongates the initial flame until the flame tip arrives in the lower chamber, it seems you are simply forcing the primary flame down the internal tubes. I think also you are now properly capturing all available syngas in the upper firebox, concentrating it thru those internal tubes and burning it as efficiently as possible, by mixing (carburizing) the upper firebox intake air with the 2" valve.


I really don't think the secondary burn is a myth... but I don't really care as long as I get a good clean burn. I also know that I don't get a clean burn when the secondary burn is not going, even with all the air going into the primary burn chamber. However when the secondary burn fires up, it is clean (at least I don't see any smoke).

Perhaps you could possibly incorporate some type of catalytic converter in your set-up (I'm still thinking like automotive applications) even in that application I am not aware of how to actually create a secondary combustion to ignite spent exhausted fumes. As suggested before, perhaps a 'glow rod/wire' that protrudes into the lower chamber might help with sustaining ignition of catalytic gases, but without exposure to the catalytic material, I simply cannot fathom burning spend exhaust gases.(sorry my brain only goes so far)


That sounds interesting, but for now I think I will just work on getting the burn efficient. I am not sure if you have seen in my pictures, but I have a hole in the front of my exhaust manifold (what I call the exhaust manifold it the little area before the secondary burn chamber where the three pipes run into). Basically this lets a small flame, and sparks enter the secondary burn chamber (directly from the hot coals). This seems to work well to ignite the secondary burn as long as the mixture is flammable.

As your stove is now, how has the consumption of wood progressed? Does the stove seem to produce an acceptable rate of heat for the amount of wood? As the stove is now operated, can it heat your boiler as you intended? Do you know anyone in the automotive repair sector that might have an 'emissions testing tool' ...that you could check your emissions with in the future? When your lower chamber door is closed, and you have your 2" air valve turned on/adjusted, can you still hear the roar of the flame in the lower chamber?


I have not done any real testing on this, and it will be hard to know for sure until I get it all insulated. However I have run a burn for about 30 min to 1 hour (I didn't time it). And it had my 300 gallons of water very hot all the way down to the last 6 inches (the part under the secondary burn area did not heat up, but that is probably because there is no flow through the tank, and heat does not go down very well). I also want to put some baffles and dampers in the chimney to slow the flow of the hot gas going out, and force it to hit the sites of the pipes, and lower chamber. So basically at this point I really don't know how well efficient it will work, but I feel like it should work very well when I get everything working correctly.

I hope to do some more testing on Monday. I will update you with how it goes.


Posts: 238
Location: AR ~ozark mountain range~zone7a
9
  • Mark post as helpful
  • send pies
    Number of slices to send:
    Optional 'thank-you' note:
  • Quote
  • Report post to moderator
Hey david, perhaps it is time to we somewhat recap your system. Dividing your system into 3 major components.

1. The primary (upper) chamber firebox, brick lined on sides and roof, 1/4" steel floor with steel grate. Solid non-vented access door at the front of the stove. There is a 2" pipe with valve that connects forced air thru the primary manifold located at the front of the stove supplying air to the primary (upper) chamber firebox.

2. The (3) steel tubes (exhaust manifold) located at the back of the primary (upper) chamber firebox transfer hot gases from the primary (upper) chamber firebox to the (lower) chamber burn tunnel. This exhaust manifold is loosely connected to an intermediate "V" channel that has a steel grate that allows forced air to partially mix with syngas, hot coals, & ash from the primary chamber and runs horizontally between the upper and lower chambers, this intermediate channel is supplied forced air via (2) 1" pipes with valves and a blower at the front of the stove.

3. The secondary (lower) chamber burn tunnel, contains some brickwork to tunnel ignited gas flow from the exhaust manifold toward the front of the stove and support a secondary combustion then toward the rear of the stove to connect to the chimney manifold at the back of the stove. There is a non-vented access door at the front of the stove.

Is this pretty close to the set-up as you have it now?, have I left out something important? Hey David please edit as necessary (if you want to) perhaps you can simplify these names of components for me, so that we may be clear to anyone reading this thread as to your progress so far. We still need & welcome technical input from others like Marcos Buenijo or anyone else that wants to chime in!

james beam
 
david willis
Posts: 78
1
  • Mark post as helpful
  • send pies
    Number of slices to send:
    Optional 'thank-you' note:
  • Quote
  • Report post to moderator
That is a pretty good recap of the system. The only part I think we are off a little on is #2 Let me try to explain it, and see if we are thinking the same or not.


The three 2" pips go into a plate that is loosely connected to the bottom of the primary burn, and above the channel into the secondary burn. I drew a picture, but it is not very good. basically there is a hole in the front to let some hot air/sparks/flame enter in and ignite the syn-gas. However it seals out most of the air, forcing it up through the wood, and down the back pipes. I call this whole assembly the exhaust manifold. Just under the exhaust manifold is an opening that goes down into the secondary burn camber. Just in front of this opening, and in the secondary burn chamber there is a box with a 1/2"x4" slit right in front of the opening under the exhaust manifold (I call this box the secondary pre-heat box... if you can think of a better name let me know). Two 1" pipes are fed into this box to supply the secondary air injection.

The syn-gas and hot air/sparks/fire all mix in the exhaust manifold, and are forced through the opening in the bottom of the primary burn chamber. As soon as this hot flammable mixture passes through this opening, it is injected with the hot oxygen rich secondary air, which ignites (or produces a hot lean burn if the flame is already there). From there it enters the area that is surrounded by firebricks to get hot enough to fully burn everything (I still need to add more firebricks to make a nice tunnel, and keep the burn going longer and hotter).

Did that make sense? And sorry about the poor picture.
exhaust.png
[Thumbnail for exhaust.png]
 
                    
Posts: 238
Location: AR ~ozark mountain range~zone7a
9
  • Mark post as helpful
  • send pies
    Number of slices to send:
    Optional 'thank-you' note:
  • Quote
  • Report post to moderator
Hey david, ya it is making a little better sense to me now that I have seen your new pixs over at your website. I had missed a few things about your exhaust manifold that are still not completely clear, so therefore more funny ideas are developing.

The first question that comes to mind is, have you tried temporarily blocking off exhaust manifold pipes one & two, leaving pipe 3 always open for safety. Flapper valves (like the rain protection valves you have seen atop a tractor exhaust pipe) might be used, or possibly a small coffee can placed over pipes 1 & 2? By closing one or even two of the exhaust manifold pipe flapper valves after the primary firebox is loaded and well lighted, this might regulate/reduce the volume of the syngas to exit the primary firebox. By adjusting the flapper valves closed on exhaust manifold pipes 1 & 2, and (always open on exhaust manifold pipe 3 for safety) this may slow down the rapid consumption of syngas. This rapid consumption might be what is causing you to occasionally lose your flame in the burn tunnel. By closing one or even two of the exhaust manifold pipe flapper valves, this might cause a better match to the volume of ambient or forced air.

You might be able to build a single damper type valve, activated from a pushrod, that could restrict or partially close all 3 pipes within the exhaust manifold, I enclosed a pix of it. I think this is better than the flapper thing I was talking about, the sliding valve need not be secured really, as it would rest upon the angled sides of the exhaust manifold, and simply needs pushed or pulled to adjust. I show the safety relief area that would prevent complete closure of the 3rd pipe. In this picture, note the large square port (colored beige), is that approximately what your port to the burn tunnel looks like?

A different idea that comes to mind, is about changing your forced air into the exhaust manifold, particularly at the front 1" inlet hole, as you shown in your latest drawing. This may sound kind of wild, but here goes: connect the forced air pipe from the blower directly to the 1" inlet hole, BUT construct the connecting pipe with an inner venturi that is located at the port to the syngas from the primary chamber. The idea would be to deliver mixed air & syngas, from the siphon effect of the air passing thru the pipe that draws the syngas from the primary chamber thru the provide port, and delivered into the exhaust manifold. In this way the forced air is separated from flowing into primary chamber directly {instead of into the firebox as a whole} and used mainly for delivering the forced air thru the venturi which should siphon syngas into the exhaust manifold.

james beam
david-willis-sliding-valve.jpg
[Thumbnail for david-willis-sliding-valve.jpg]
davidwillis-venturi.jpg
[Thumbnail for davidwillis-venturi.jpg]
 
david willis
Posts: 78
1
  • Mark post as helpful
  • send pies
    Number of slices to send:
    Optional 'thank-you' note:
  • Quote
  • Report post to moderator
James, I love your ideas!!! I am tempted to give them a try, especially your ventury system to mix the syngas with air....

I got my new blower last night, but probably won't get time to run a test until next week (I work wed-sat 10 hour shifts + 2 hours of travel). I have enough dry wood left for one more good test, and plan on trying it with both blowers, and just see how it works out. I also want to try ant run the primary without the blower to see how that goes, but I have a feeling it will need the blower.


Posts: 238
Location: AR ~ozark mountain range~zone7a
9
  • Mark post as helpful
  • send pies
    Number of slices to send:
    Optional 'thank-you' note:
  • Quote
  • Report post to moderator
Hey david, perhaps we can agree that there are (3) things that could control the stove. These (3) things have similarity to a cutting torch.

#1 The inlet air to the primary firebox, should be independently controlled, this would allow you to control the inlet air into the primary firebox, adjusting the inlet air at varous rates as necessary to obtain best results depending on the progress of the primary fire such as kindling a new fire', adding more wood to already hot coal bed, or thick hot coal bed.

#2 The 3 pipes of the exhaust manifold, should be independently controlled, to control the hot or ignited gases that flows thru those pipes a slide valve which can change flow, volume, and even concentration of the hot gases delivered to the secondary chamber burntunnel.

#3 The forced inlet air delivered to the exhaust manifold should also be controlled with a valve or speed of the air pump, but the control should be variable so that you can obtain the best mixture of air to hot or ignited gases just as they enter the secondary chamber burntunnel.

You might check out my latest version of modification to your exhaust manifold, in the pix, the 3 blue pipes represent forced air for the secondary chamber these pipes would be controlled with a valve or the speed of the air pump. The sliding valve should control the hot gases as they flow thru the 3 exhaust manifold pipes, once again I show a notched sliding valve that would prevent complete closure, I also added in the pix (2) simple rail type valve guides on each side, just for fun yanno. As you can see from the pix the absence of the primary firebox and related inlet air to it, is not even shown, as it is a separate stage of the process and should be independent controlled with both wood fuel and inlet air.

I'm wishing you good luck with the new motor your installing & testing at this time. I just throw these ideas out there for fun, I hope I'm not distracting you in a bad way from your original plans. I do think the new partition (green colored) could help & might stop some any unwanted backflow of hot gases into the horizontal valley that is currently in use, I think any mixing of forced air & hot gases should be in a fairly small area just before entering the secondary chamber burntunnel. You might even use some 45degree elbows on the ends of the 3 forced air tubes, to directionalize the forced air.

james beam

davidwallismodifiedexhaust-manifold.jpg
[Thumbnail for davidwallismodifiedexhaust-manifold.jpg]
 
david willis
Posts: 78
1
  • Mark post as helpful
  • send pies
    Number of slices to send:
    Optional 'thank-you' note:
  • Quote
  • Report post to moderator
Thanks James. You are by no means distracting me. These are all great ideas.

The thing I am not understanding though is your #2 section. I don't see how I can control this by a slide valve, because if I reduce the flow out the exhaust, it will just increase the pressure in the primary burn chamber, and reduce the air injected in. So basically I don't see how #1 and #2 can be independently controlled, because changing one will change the other. Or am I missing something here?

However with my new fan, I will have independent control over both the primary air injected, and secondary air. I have it basically how you describe, other than my secondary air is injected from the bottom after going through a pre-heat box. However, it should do about the same thing as what you describe.

I think after reading through your thoughts, I am going to put a plate to redirect the syn gas coming down my three pips closer to where the secondary air injection is. I drew a simple side view of what I have.

secondary-burn.png
[Thumbnail for secondary-burn.png]
 
                    
Posts: 238
Location: AR ~ozark mountain range~zone7a
9
  • Mark post as helpful
  • send pies
    Number of slices to send:
    Optional 'thank-you' note:
  • Quote
  • Report post to moderator
Hey david, your artwork is much improved, I like your new side view pix!

Which ummmmmm oh my!, shows the port to the secondary chamber approx. in the middle of the exhaust manifold. I thought all this time the port was at the rear, below the 3 exhaust tubes, I guess I should of caught that, but as you see in my pixs, I have the port (miss located) at the rear of the exhaust manifold. Not to worry tho, as I look at your new pix, I think your set-up will work just fine, once you get the new blower working within the system. I can't wait to hear your results.

As for controlling the syngas with a slide valve or flapper valves or whatever, to be delivered to the secondary chamber, I would still would like to see some type of control of the syngas. You know your set-up better than me, and if you say there is a back pressure build-up, then I believe you, especially because your using forced air.

Anyway, I didn't think there would be much of a pressure build-up if: one of the pipes is never blocked (hence the notched sliding valve), and the blower air to the primary firebox was simply switched off. I think this would allow the well kindled firewood to settle down from lack of forced air, producing a thick syngas to be given off & delivered at a more consistent rate to the exhaust manifold pipes. Remember our formost task at hand is to slowwwwwwly burn the firewood in order to make a batch last overnight without frequent tending. And yet, still delivering a consistent volume of syngas to the secondary chamber for the real work of the stove, to be carried out in the secondary chamber. {obviously a small amount of inlet air must be made available to support a minimum temperature of the coals in the primary chamber}

This is why I thought of damping down the exhaust manifold pipes much like I would close the damper on a normal wood stove to slow the burn down for the night. {this is where a normal wood stove is very inefficient} Next morning open the damper to allow full flow again & restoke the firewood. But in your set-up why not use the available syngas given off from a choked down hot bed of charcoal? As your main fuel for the secondary chamber, (while the fire is dampened down during the night), the firewood is still producing syngas in a big way, mainly from the complete charcoalization of the firewood in an low oxygen environment. (getting the consistent volume of syngas delivered to the secondary chamber as well as the consistent volume of forced air will determine the efficiency of the flame in the secondary chamber) I believe these are generally controlled either by the matching of size of the ports, pipes, motor speed, or valves to mix your syngas & forced air in an efficient way.

With all this in mind, I would not be sure what size of the flame I would expect to see in the secondary chamber. I would be looking for an efficient flame color produced in the secondary chamber by properly mixing the syngas and forced air, that is your goal to burn as clean as possible. In the primary chamber, an overly rich mixture is much easier to obtain by choking, and might be necessary to produce a consistent amount of syngas which will be more efficiently burned in the secondary chamber, that is how I see this project.

james beam
 
david willis
Posts: 78
1
  • Mark post as helpful
  • send pies
    Number of slices to send:
    Optional 'thank-you' note:
  • Quote
  • Report post to moderator
Ok, that makes more sense. I was thinking you wanted independent control for the primary burn air with the blower going (increase air going in, but restrict the exhaust).

I like the idea, however from some comments I received on my videos, it sounds like you need to keep the primary burn above a certain temperature to keep enough flammable gas. By reducing the air flow, the temperature drops, and you end up producing more co2 instead of co (you need about 800 deg to convert co2 to o2). This dilutes the syn gas to a point where it becomes non-flammable. I was hoping to keep the temperature hot enough just by having the secondary burn under the primary chamber, and reducing the airflow, but it did not seem to work. I am hoping that by forcing all the syn gas into the same small area where the secondary air is injected will help. Maybe I need to add more firebricks all the way down to the bottom (but I don't see how I could be loosing heat through the v area since there is a fire under that...).

I would really like it to slowly burn all night like you say (and I originally wanted). However I can also get basically the same results by running it full tilt until the water heats up, then turning it way down (just enough air to keep the coals hot) until the water cools down, then turn everything back on. I am anxious to do some more testing with my new blower and see how it works, and how low I can turn it and still keep the secondary burn going.

Also my plate I add, should kind of work like your valve idea, except it is not adjustable. I think making it adjustable could be a benefit as I could fine tune it to work with the amount of syn gas I am producing. I am only hesitant in doing it because I would have to drill a hole through the primary fire box, and that would end up leaking syn gas out of the fireplace into the insulation I will have around the stove. I guess I could always put the candle in the lower chamber, and use players or something to adjust it. That way I could open the bottom chamber, make the adjustment, then close it back up.

 
david willis
Posts: 78
1
  • Mark post as helpful
  • send pies
    Number of slices to send:
    Optional 'thank-you' note:
  • Quote
  • Report post to moderator
I did a lot of testing today, and was not able to get it to work very well. The secondary burn will not light with the full flow into the primary burn chamber. I am not sure if it is that it is simply burning too much of the syngas generated (there is still some smoke comming out, but maybe not enough), or what it is.

The only way I could get it to light was by running the stove with the primary burn on full, then turning it down (almost to off). Once I do that, then smoke starts coming out, and I can light it (it did not even light on its own today). After that, I still run into the problem of it going out after a few minutes.

I tried it with the plate installed, and without it, and it did not make much difference. I did not make an adjustable one yet, but I am not sure that will help..... but I don't know what else to do at this point....

I made a video, Here it is:

 
david willis
Posts: 78
1
  • Mark post as helpful
  • send pies
    Number of slices to send:
    Optional 'thank-you' note:
  • Quote
  • Report post to moderator
I did another test today running it more like a rocket stove. I think it may work...But I need to do a little more work to it, including the rest of the firebricks.

 
I've read about this kind of thing at the checkout counter. That's where I met this tiny ad:
the permaculture bootcamp in winter (plus half-assed holidays)
https://permies.com/t/149839/permaculture-projects/permaculture-bootcamp-winter-assed-holidays
reply
    Bookmark Topic Watch Topic
  • New Topic