• Post Reply Bookmark Topic Watch Topic
  • New Topic
permaculture forums growies critters building homesteading energy monies kitchen purity ungarbage community wilderness fiber arts art permaculture artisans regional education skip experiences global resources cider press projects digital market permies.com pie forums private forums all forums
this forum made possible by our volunteer staff, including ...
master stewards:
  • Carla Burke
  • Nancy Reading
  • John F Dean
  • r ranson
  • Jay Angler
  • paul wheaton
stewards:
  • Pearl Sutton
  • Leigh Tate
  • Devaka Cooray
master gardeners:
  • Christopher Weeks
  • Timothy Norton
gardeners:
  • thomas rubino
  • Matt McSpadden
  • Jeremy VanGelder

First rocket mass heater...questions

 
Posts: 9
  • Mark post as helpful
  • send pies
    Number of slices to send:
    Optional 'thank-you' note:
  • Quote
  • Report post to moderator
Hi everyone,

Just started laying my first RMH. I was very confident going into this but I am starting to lose it haha. This is mostly due to the manifold/ash pit area.

The build.

Firebrick combustion chamber.
Firebrick heat riser insulated with an old water heater then stuffing with perlite and clay
about 10 feet of 8" hvac pipe....wish i could go longer.
55 gallon drum with removable lid.....this may be inverted so that the lid is stationary and the barrel is removable.

questions:

Does the horizontal pipe need to be higher than the bottom of the ash pit? If so, by how much?
How big should the ash pit be?
The flue on my old wood stove is 6" can i go from my 8" into the 6" vertical pipe?......im guessing no.

THANKS!!!

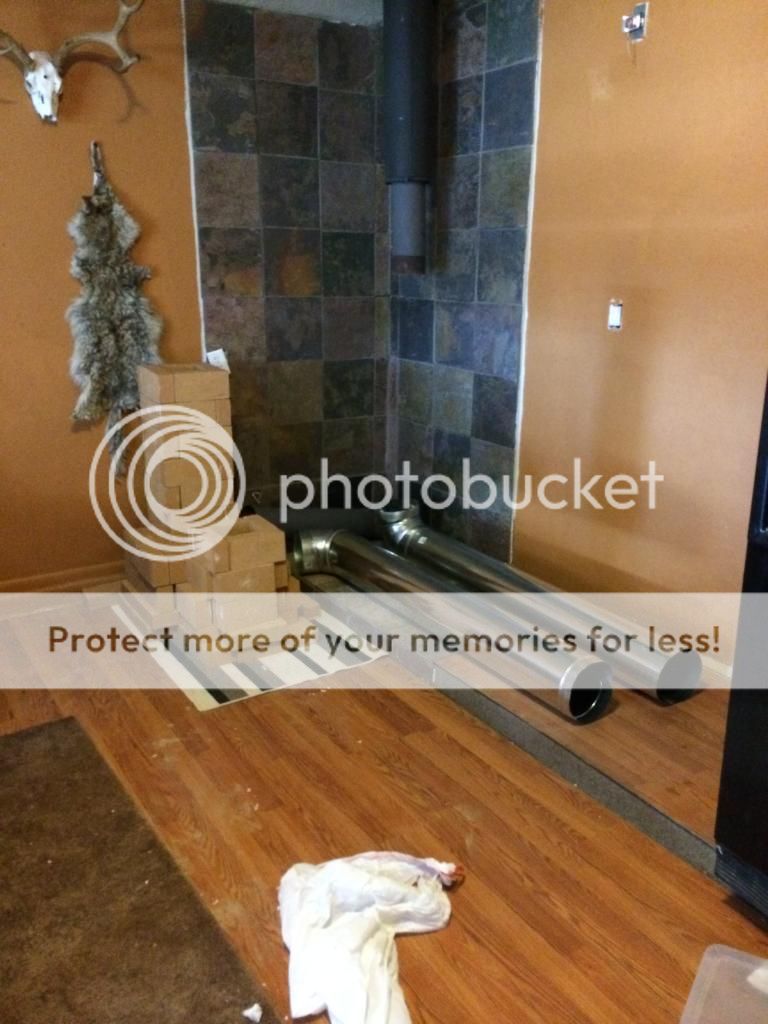
Her are some pics


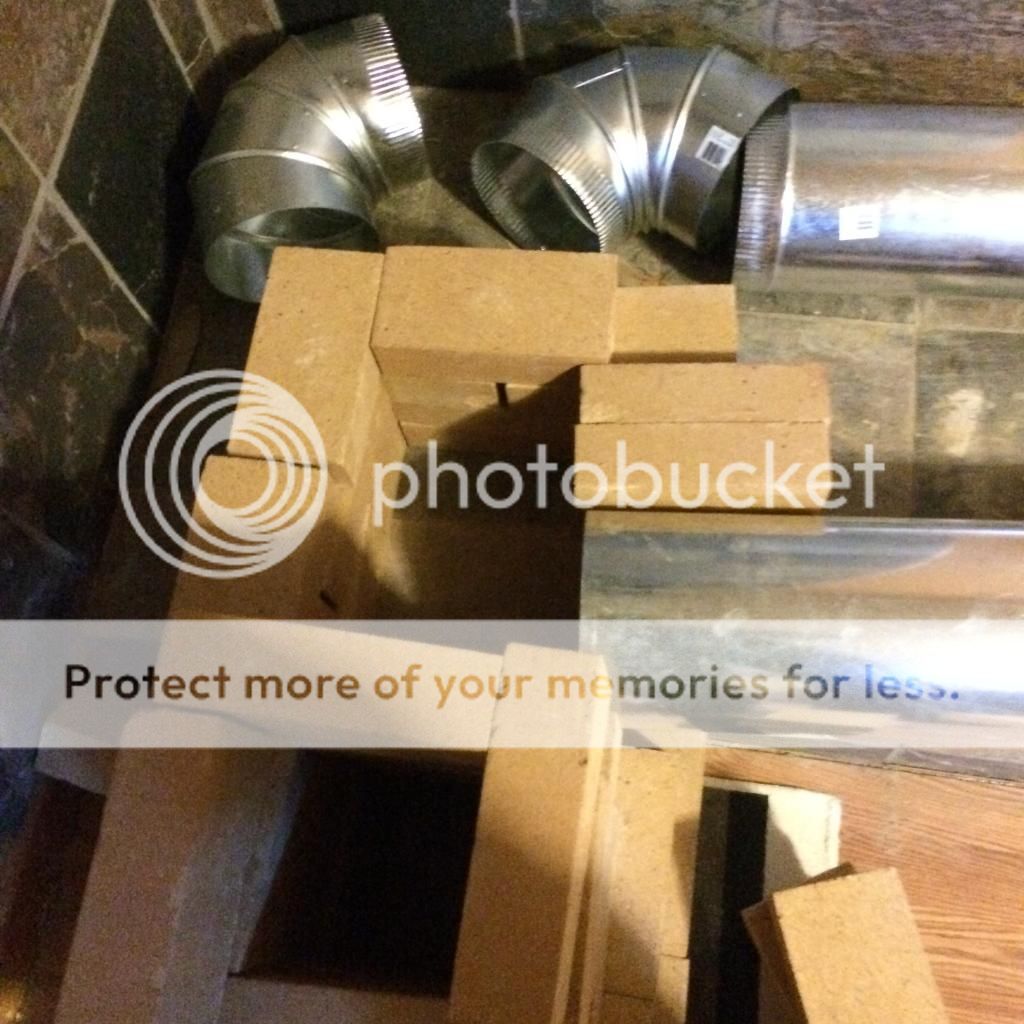
ash pit

 
pollinator
Posts: 4154
Location: Northern New York Zone4-5 the OUTER 'RONDACs percip 36''
67
hugelkultur fungi books wofati solar woodworking
  • Mark post as helpful
  • send pies
    Number of slices to send:
    Optional 'thank-you' note:
  • Quote
  • Report post to moderator
John Trujillo : You have a perfect example of why we recommend Building and Test firing your rocket outdoors 1st! A phone camera lets you try several iterations
until you find the one with the correct dimensions that works for you!

I am unhappy with the tile background that I think was put in place to provide some thermal protection of the 2x4 wall studs ! Also you will need to expand the area
covered by a good reflective barrier ! I deal would be to remove the tile and inspect the 2x4s, then replace with an upgrades reflective barrier on the two exposed
walls, vertical furring strips and cover them with an aluminized reflective barrier with at least a 4'' air gap behind it open at the top and bottom for convectional air
flow I could live with that !

With a very tall insulated chimney say 30 feet tall you might be able to create a 7'' system that would work at that location, but that would require a major upgrade
to your chimney, and budget !

I am concerned about the weight load and the heat load to the floor under your Rockets burner base !

I understand that you disassembled your Heat Riser and Burn Tunnel to show us the height difference, and that you understand that the transitional area sets under-
neath the barrel, not at the base of the Burn Tunnel /Heat Riser as it looked like was the idea in the second picture!

If you go for the whole barrel over the top and do not end up with the removable top use the lid to find the outside line of your burner base, and carefully mark
and use the entire space as part of your transitional area rather than trying to cut a hole in your now inverted barrel Lid! By the time you cut a large enough hole
in the barrels lid there will be nothing left of it !

During the final in house build your burner base should be finished and hard enough to support your inverted barrel before you finish your Heat Riser, you can
always adjust the last 4-5 inches of the top of your Heat Riser with a rounded cone shape of the top of your firebricks /Clay/Perlite !

Again everything after the bottom of the barrel is transition zone to be made as large as you can! Many people use Hardware cloth embedded in their cob to help
shape this area big enough !

The way your picture shows your build, you are short a clean out at your Rocket Burner Base, In order to get this clean out back- You could rotate the entire rocket
Burner Base 90 degrees clockwise, bringing the side of the Heat Riser more directly into the corner and facing your burner base's long axis along the far wall in
your picture , this would give you a place to put your clean out on the near side of the Burner Base using a stove pipe 'T' placed horizontally, and followed by an
elbow, not ideal but workable !

I would put a second clean out in at he base of the vertical pipe and plan on adding a clean-out when you can afford to extend your horizontal bench !

Because of your curtailed bench I would recommend making the bench as massive as practical, even if you need a kick stool the boost you up unto the bench,
this will allow you to extract more of the heat energy, and avoid hot spots in the bench.

I would not worry about the depth of the clean out as long as you make all bends in your pipe as sweeping as possible building parts of the curve out of Cob only
if necessary !

Here is where I put in a pitch for 'The Book'! Have you been to Rocketstoves.com to Download your PDF Copy of the Brand New 3rd edition of Rocket Mass
Heaters,? This is 'The Book' around which most of the 100,000 RMHs world wide have been built, and 95% of all the 1st builds (that Worked) were made
from this book !

'The Book' aids in clear communication of ideas by giving us a clear language of ideas, parts, and terms allowing your fellow members to talk to and assist people
around the world while Providing not just words but visual images to help describe Sizes, Shapes, and Orientation of parts to themselves and each other!

Get the book, read the book and come back often, your fellow members enjoy helping create Rocketeers and the innovators of tomorrow ! Big AL

 
john trujillo
Posts: 9
  • Mark post as helpful
  • send pies
    Number of slices to send:
    Optional 'thank-you' note:
  • Quote
  • Report post to moderator
Thanks Al,

I have actually done exactly what you said in regards to turning the chamber clockwise in order to add a cleanout....unfortunately my local hardware store didn't have 8" t's. still trying to find those. I will be adding a second cleanout at the end of the bench as well

The slate wall was built for a traditional wood stove and has the proper backing behind it already....with the barrel being re positioned i will only need to add backing and one row of tile.


So is and 8" system to big for the size of bench I'm using? if so i could easily return the 8" pipe for 6".

Building on a slab and cutting out the laminate floor from the build area....no need to worry there.....just not cutting until i am sure about where its going to sit.


allen lumley
pollinator
Posts: 4154
Location: Northern New York Zone4-5 the OUTER 'RONDACs percip 36''
67
hugelkultur fungi books wofati solar woodworking
  • Mark post as helpful
  • send pies
    Number of slices to send:
    Optional 'thank-you' note:
  • Quote
  • Report post to moderator
John T. : If your existing 6'' system is in good shape do a 6'' original. I Thought that the Rug under your RMH was your floor removed and the joists showing

You are aware we are talking a couple of tons of weight, and enough heat to cause the wood to slowly pyro-lyse its wood gases ?! Probably the single best way
to get a handle on floor and wall protection is a couple of paragraphs in the Book ! For the Good of the Craft ! Big AL!
 
john trujillo
Posts: 9
  • Mark post as helpful
  • send pies
    Number of slices to send:
    Optional 'thank-you' note:
  • Quote
  • Report post to moderator
Thanks again Al, no worried about the floor or wall at all. I will take care of that. My biggest concern is building the right size system. I do have the book already.

I have seen some posts suggesting that you could adapt a larger system to a smaller flue, but couldn't find anything definitive.

If i wanted to keep the 8" system would a longer bench help to get rid of the 30 ft tall chimney?
 
john trujillo
Posts: 9
  • Mark post as helpful
  • send pies
    Number of slices to send:
    Optional 'thank-you' note:
  • Quote
  • Report post to moderator
forgot to mention, I am trying to supplement heat in a 2200 sq ft house.
 
gardener
Posts: 3471
Location: Southern alps, on the French side of the french /italian border 5000ft elevation
194
  • Mark post as helpful
  • send pies
    Number of slices to send:
    Optional 'thank-you' note:
  • Quote
  • Report post to moderator

john trujillo wrote:forgot to mention, I am trying to supplement heat in a 2200 sq ft house.


Forget about pipes, switch to bell!
 
allen lumley
pollinator
Posts: 4154
Location: Northern New York Zone4-5 the OUTER 'RONDACs percip 36''
67
hugelkultur fungi books wofati solar woodworking
  • Mark post as helpful
  • send pies
    Number of slices to send:
    Optional 'thank-you' note:
  • Quote
  • Report post to moderator
John Trujillo No, the other way round! The longer the Final vertical chimney will allow a longer horizontal run and bigger Thermal Mass !

"Max'' has a good point, your 6'' system will only work as well as the old system did, or a little better, and with the reduced
thermal mass you will lose some heat up the chimney ! Unfortunately you are trying to adapt a 6'' Rocket to the layout of
an existing home! 2200 sq ft is a lot !

You can throw together the system you have now, and hope for the best, or ask 'Max' to help you re-sculpt your RMH to a
6' batch box an go for Multiple Bells ( your barrel is a bell) to squeeze out more heat, with less mass, in less space, there is
a steep learning curve and no way to judge how much time until bitter cold weather !For the good of the craft ! Big AL

Sending you a PM
 
Posts: 245
Location: near Houston, TX; zone 8b
3
  • Mark post as helpful
  • send pies
    Number of slices to send:
    Optional 'thank-you' note:
  • Quote
  • Report post to moderator

have seen some posts suggesting that you could adapt a larger system to a smaller flue, but couldn't find anything definitive.


Here is a definitive answer backed up by experimentation. If you have an 8" system, you can't use a 6" stove/chimney pipe. It won't burn properly; you will get smoke back and end up covering part of the feed tube to make it work.

The exhaust system must match the size of the combustion system or be larger...not smaller.

Technically, the steel drum is not tall enough relative to the heat riser to be an effective bell. If you want to read more about bells, there is a document on the blog in my signature which compares and contrasts bells vs. flues. A traditional rocket mass heater as described in the book is a flue system; the exhaust is routed through a constricted space and stratification by temperature does not take place to any significant extent. In a bell system, plenty of space is provided for the exhaust to stratify by temperature. The warmer gasses which were involved in the combustion stay in the bell until they have given up their heat to the surface of the bell. The cooler gases, such as Nitrogen (which is 79% of the air), fall out quicker and are swept out of the chimney.
 
john trujillo
Posts: 9
  • Mark post as helpful
  • send pies
    Number of slices to send:
    Optional 'thank-you' note:
  • Quote
  • Report post to moderator
update:

RMH is alive! Fired it up to test and everything is working, fire burns sideways!

I could feel cold air coming down the chimney before lit it so I used a propane torch in the cleanout to start the draft.....


here is a video of the fire...is this rockety enough? I am assuming that it will get better as the cob dries and everything is warmed. Unfortunately all the wood I had was damp since it rained yesterday.


Here is the manifold area.


burning:


unfinished bench....still need to set the blocks permanently:
 
allen lumley
pollinator
Posts: 4154
Location: Northern New York Zone4-5 the OUTER 'RONDACs percip 36''
67
hugelkultur fungi books wofati solar woodworking
  • Mark post as helpful
  • send pies
    Number of slices to send:
    Optional 'thank-you' note:
  • Quote
  • Report post to moderator
John Trujillo : 1st thing, take the barrel back off of the burner base and remove all of the original paint ! ( I burn mine off out doors ) you can use paint strippers
or grind it off but the original paint has to go !

I am concerned about your use of Cement Cinder blocks so close to the combustion core, 3'' of perlite alone should be enough, but if you needed extra support
6'' of clay slip perlite would be needed for an equal amount of protection, How much insulation do you have under the burner base ?

Your Fire was burning horizontally, but it was a little anemic, lets talk about the amount of ashes you are making with each burn, Right now you are still learning
to not let any embers or charcoal build up in the burn tunnel, but with practice you can control the fire and have a good burn without plugging the Burn Tunnel!

Again are you getting a good clean burn that consumes all of the charcoal. If you are left with 10% or greater charcoal you definitely are under insulated !

You have a couple of issues with the thermal mass that will need a fresh start. Please let us hear from you ! For the Good of he Craft ! Big AL
 
john trujillo
Posts: 9
  • Mark post as helpful
  • send pies
    Number of slices to send:
    Optional 'thank-you' note:
  • Quote
  • Report post to moderator
Allen Lumley: I already removed the paint. I burned the paint off then sanded it down. What you see in the picture is a dark blue hue from the intense heat it was subjected to.....outside of course.

what if i take the clay out of the blocks and fill with perlite?

Yes there was more charcoal than i would like. I am hoping it has to do with the fact that the wood was wet, the cob was wet and the mass was still very cold.

I did not insulate under the burner base. I read that it was not necessary if building on a slab.

what issues do you see with the thermal mass?
 
pollinator
Posts: 293
Location: US, East Tennessee
34
  • Mark post as helpful
  • send pies
    Number of slices to send:
    Optional 'thank-you' note:
  • Quote
  • Report post to moderator
Same concern here. I'm not seeing any insulation under the J-tube, nor under the bench piping. The problem with building on a concrete slab is that it is a huge heat sink, and will tend to suck almost all the useful BTU straight out of an already BTU limited 6" system, not to mention spalling the concrete under the J-tube. Lack of insulation is a problem even for larger 8" and up systems. Insulation is an RMH builders best friend for optimum performance. This is of course covered in detail in "The Book". A little reading will save a good deal of time, money, and labor, and yield a very usable RMH. Otherwise you are either waisting your time, or building a nice conversation piece.

Addendum: "the book" --> Rocket Mass Heaters, 3rd Ed. by Ianto Evans and Leslie Jackson is a must read for any first time RMH builder.
 
john trujillo
Posts: 9
  • Mark post as helpful
  • send pies
    Number of slices to send:
    Optional 'thank-you' note:
  • Quote
  • Report post to moderator
Thanks Byron,

The horizontal pipe is sitting on about 4" of cob. it is not directly on the concrete.

The bottom of the J-tube is firebrick but no insulation past that.
 
Byron Campbell
pollinator
Posts: 293
Location: US, East Tennessee
34
  • Mark post as helpful
  • send pies
    Number of slices to send:
    Optional 'thank-you' note:
  • Quote
  • Report post to moderator
Very good, what's the insulation in the cob? Clay stabilized Perlite is a good way to go.

Yeah, you're going to see a big improvement once your J-tube is insulated. It must come up to high temperature for a complete burn and you'll have less ash and less coaling then. I'd put at least 2.5" to 3.0" thick layer of clay stabilized perlite under that baby and on all sides.

Addendum: instead of cinder block I'd suggest using clay brick / common brick, set with clay / sand mortar.
 
john trujillo
Posts: 9
  • Mark post as helpful
  • send pies
    Number of slices to send:
    Optional 'thank-you' note:
  • Quote
  • Report post to moderator
Just cob, but I have another big bag of perlite i can use to re do it.

Regarding the J tube. Im ok with removing the blocks and insulating the sides but to remove the entire combustion unit to insulate underneath would be tough. It is all stuck together with refractory cement and extremely heavy.

 
allen lumley
pollinator
Posts: 4154
Location: Northern New York Zone4-5 the OUTER 'RONDACs percip 36''
67
hugelkultur fungi books wofati solar woodworking
  • Mark post as helpful
  • send pies
    Number of slices to send:
    Optional 'thank-you' note:
  • Quote
  • Report post to moderator
John Trujillo : There is a Universal thread in all Adult Education-al Experiences, Give a young child a chance to learn and they automatically absorb it like
a sponge! With all Adults there is an immediate 'why do I need to learn this' filter that can work to block understanding, even cause us to not remember
what we just read, for some people we say that- ''they are not book learners''

During WW11 we put millions to work at new jobs by doing two things Get people in a learning environment with few of the distractions of Real Life, and
then 1) Tell them what you are going to tell them (what its about ) 2) Tell Them and 3) Tell them what you told them ! The second part was hands on,
and some people can only be hands-on-learners ! Simply put the most successful Technique for small groups of people is See one, Do one, Teach one!

It is in no way showing any disrespect to those members of 'The Greatest Generation' who served in our Armed Forces to say that is how we won WW 11
For every American tank that was 'knocked out we supplied 10 more, we won by burying them in our junk !

Just a few days ago all of N.America was enjoying warm fall days, and everyone was relaxed and it seemed we had lots of time for your next round of
questions, and we seemed to be on the same page, While we have problems hundreds have been where you are standing now, we still have time, and
lots of potential help from your fellow members ! The miscommunications and missteps are something that you will in turn watch out for when helping
the next Crop of Rocketeers, where other luckier members would just say damn, I didn't have any problem with that !

You have two immediate problems with the burner base ! Lack of insulation To help contain the high temp fire to get an efficient clean burn!
And the presence of Any concrete so close to the combustion core, The lime used in making Portland based cement will under the heat load it is exposed
to disassociate back into an unbound state within the concrete! The concrete will fail. Simply removing the Clay (?) and replacing it with perlite will only
trap more heat against the inside wall of your Cinderblocks causing More Rapid failure !

All Concrete made from Portland Cement is hydrophilic, it will actually wick water up thru itself. An uninsulated Rocket Mass heater RMH, sitting on a slab
of concrete with no vapor barrier, or a poor one will generate enough heat into the concrete to flash to steam any pockets of water,trapped there it will
literally should like pistol shots ringing out of the Burn Tube /Heat Riser!

Congratulations on the great job you did burning off the barrel, I have seen Barrels warped from that kind of heat but we never argue with success !

You need to add more insulation to surround your combustion core, The Entire Transitional area can be floored with insulation and the side walls shaped
out of Cob with hardware cloth or chicken wire fire an embedded form The Initial sweeping curve of the Transitional area should be 3 Times the size of
the 1st clean out point.

You will also have to ether provide pictures, or explain carefully the amount of gap at the top of the barrel, the gap between your water tank and your
barrel and how you formed the transitional area at the bottom of your barrel ! These things need addressing before you move on to your Thermal Mass

In order to be sure that you are not creating air pockets within your Thermal Mass the 1st job is to Use a paint brush to paint all of the stove pipe with a
clay slip a little thicker than good pancake batter, and then place a shallow bed of cob to seat the pipes into any rocks needed during placement for
Bracing should be dipped in the clay slip also, all the entire bench should be made from the bottom up. When you have to stop working on your Cob, the
surface should be left roughened to make sure the next coat sticks well ! At the Start of your next coat you can spritz it with water from a spray bottle
or add a thin coat of Clay Slip! A fellow member describes the whole process as making a Rock and Cob Lasagna, the more heavy dense rocks you use
the less Cob you will have to make ! More rocks is a work, time, and money saver!

For the Good of the Craft ! Big AL


Byron Campbell
pollinator
Posts: 293
Location: US, East Tennessee
34
  • Mark post as helpful
  • send pies
    Number of slices to send:
    Optional 'thank-you' note:
  • Quote
  • Report post to moderator
The cob under your pipes can be broken up and reused, on top of an insulated pad of clay/perlite. That's the nice thing about clay based building materials. Wet it down and reuse it, or use it as fill with additional wet cob.

About the J-tube base insulation. It really NEEDS to be done. So the question is when do you want to do the job, now or later?

Option-1 (best)

Refractory cement takes a bit of time to fully cure. The job would be easier to do now rather than later. I'll bet the J-tube can be knocked apart fairly easily. To test it for disassembly, you might try using a block of wood as a drift set against one firebrick, tap the drift gently with a hammer, and I'll bet the firebrick comes loose easily. If the brick comes out in a few pieces, put it back together with refractory cement. It's really no big deal.

Option-2 (applicable in some cases)

If your J-tube has ISA to burn, it could be insulated by lining interior floor of the burn chamber with about 1" thick layer of insulating material. I.e. light insulating kiln brick, which cuts easily with a hand saw. However, this technique will reduce the system ISA, and so the vertical feed should be reduced (on just one side) by an equal thickness amount. The rub is that care must be taken when cleaning the stove and stuffing the feed with wood, since insulating kiln brick is soft and wears easily.

Excuse the rant. Just trying to save a fellow builder from making performance hindering construction errors.
 
john trujillo
Posts: 9
  • Mark post as helpful
  • send pies
    Number of slices to send:
    Optional 'thank-you' note:
  • Quote
  • Report post to moderator
Thanks for the thought out replies fellas.

I would have insulated it if i knew.....according to the book insulation on the bottom is optional.

I guess i will take it apart tonight when I get home.

Alot of my research was done watching youtube videos and looking at RMH images on google. Apparently there is alot of bad info out there. I should have started a thread here first with my plans and questions. before attempting to build it.

Barrel is 3" above the top of the heat riser.

I have a bunch of urbanite chunks left over from a flagstone style patio i built earlier this year. I plan to use as much of that as possible using cob only to fill in the gaps.


allen lumley
pollinator
Posts: 4154
Location: Northern New York Zone4-5 the OUTER 'RONDACs percip 36''
67
hugelkultur fungi books wofati solar woodworking
  • Mark post as helpful
  • send pies
    Number of slices to send:
    Optional 'thank-you' note:
  • Quote
  • Report post to moderator
I have added a New Thread asking for help to locate ether a video or pictures that shows setting the Lid to a 55 gallon barrel centered over the Lowest
possible opening of the Heat Riser to mark the outer edge of the RMHs Burner Base, this allows the exact area to be marked out !and should simplify
the rebuild if we get lucky !

Using urbanite, -as urbanite is the only 'stone' that sucks up water the more Cob you don't use,and the faster your mass dries out, and the water reaches
its New equilibrium Seeming to be dry a little sooner than it would with more cob, and both the urbanite and the cob will function to always moderate the
Humidity sucking it up when its high and releasing some when the humidity is low !

You will recognize the point your Cob is finally dry as the amount of wood burned decreases as the Cob Dries !

Again while this is not a good thing you will have learned more and truly learned it than ether the guy who built one without trouble and lived with it 5 yrs,
or the guy who built 10 RMHs without trouble and live with on for a year ! These things are supposed to be good for you, build Character ! Big AL
 
allen lumley
pollinator
Posts: 4154
Location: Northern New York Zone4-5 the OUTER 'RONDACs percip 36''
67
hugelkultur fungi books wofati solar woodworking
  • Mark post as helpful
  • send pies
    Number of slices to send:
    Optional 'thank-you' note:
  • Quote
  • Report post to moderator
John T. : I wanted to lookup a specific picture to show you the shape of the Footprint your RMHs Burner Base and Feed Tube, and what it should L@@K like.

At the bottom of this thread where it reads permies >> forums >> energy >> rocket stoves click on rocket stoves, this will take you to a new

rocket stove Threads page, near its top you will find :::--> rocket mass heater shippable core click on this and then scroll down to Emily Aaston's Thread

Extentions for Nov10th,2013, and for a picture labeled Finishing the manifold with an inside lip

The inside lip is where the open end of the 55 gallon barrel sits.For our purposes visualize just the large round tire/wheel/hub thing and the square of the Feed
Tube at its front. See the combined keyhole shape?

Installed at the corner of your room this model would still need to be packed in insulation and a 1st shell of Cob, And a 2nd shell of structural cob to surround
everything, fortunately this core is slightly oversize here and represents the approximate size and the right shape of Your RMH with its final shell ! Mostly !

For the Good of the Craft ! Big AL !
 
Posts: 455
Location: climate zone 6b
3
  • Mark post as helpful
  • send pies
    Number of slices to send:
    Optional 'thank-you' note:
  • Quote
  • Report post to moderator

allen lumley wrote:
Here is where I put in a pitch for 'The Book'! Have you been to Rocketstoves.com to Download your PDF Copy of the Brand New 3rd edition of Rocket Mass
Heaters,? This is 'The Book' around which most of the 100,000 RMHs world wide have been built, and 95% of all the 1st builds (that Worked) were made
from this book !


Al... I have the 1st edition RMH book. may i ask what the difference is between the 1st and 3rd edition?

John Trujillo... i have some interesting suggestions over here at my recent post. my first RMH to heat, cook, bake and heat water. i would also state that making the 55gal lid removable instead of the barrel seemed better for me because its easier to replace a lid than a barrel and cheaper. my system is on wheels so cleaning is not an issue with barrel in place.

i will state that my opinion is to have many clean outs (TEE at the bends instead of elbows for clean out spots) and a horizontal access port at the base of the feed tube/chamber. those things i mention have made my life so much easier when lighting, feeding, starting and cleaning my RMH system.
 
Rocket Scientist
Posts: 4530
Location: Upstate NY, zone 5
576
5
  • Mark post as helpful
  • send pies
    Number of slices to send:
    Optional 'thank-you' note:
  • Quote
  • Report post to moderator
I haven't seen the first edition, but I have the second and the third editions, and I would say that the quality of the technical information is improved, and some of the author's site-specific recommendations are toned down. I expect the difference is even more notable between the first and third editions. The RMH was originally developed in conjunction with all-cob houses in a mild coastal environment with extremely reliable prevailing winds. The cob/earthen floors in those houses would have needed little additional insulation for optimum efficiency. As well, the prevailing winds and low style of the houses would have made the floor-level exhausts practical. Neither of these work well in most of the world or in existing houses.
 
Won't you be my neighbor? - Fred Rogers. tiny ad:
A rocket mass heater heats your home with one tenth the wood of a conventional wood stove
http://woodheat.net
reply
    Bookmark Topic Watch Topic
  • New Topic