The problem with these wide eyed videos of young hip persons with their yurts is that these are young hip persons with BRAND NEW yurts. I look at that yurt and the first thing I think is how lightly framed the walls are. I've seen a few yurts, and most are framed much heavier than that. He needs an actual door. He has no way visible that keeps rain from blowing under the edge of the wall. It's daytime, and he has a bunch of candles lit around the shrine of his bed. Is this a home? Or is this just a bedroom? Where's the kitchen? He calls it "breathable". That's often another term for "drafty". Well, canvas tents don't hold up on east coast summers. They rot. Nylon doesn't hold up to UV. What's the skin made of? He's got Mongolian felt via Canada. That can't have been cheap.
In short, I want to see videos of people talking about lessons learned after living in one of these for three years.
Meanwhile, here's a picture from when I build the frame for my greenhouse eight years ago:
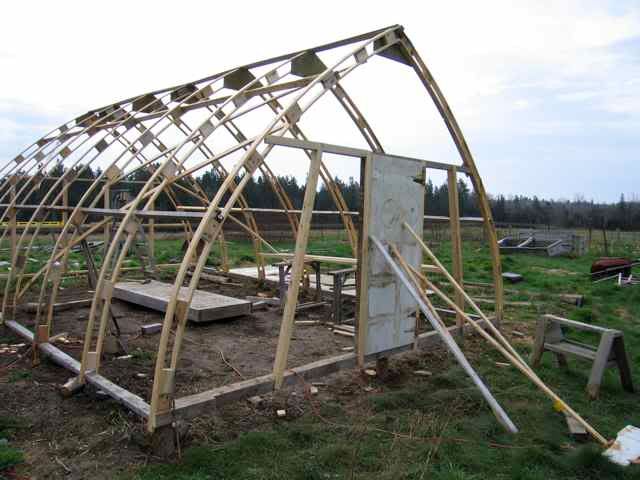
That frame cost me $100, for a 16'x24' frame. There was a lot of scavenged lumber in the bracing and the blocks in the trusses. That doesn't include whatever foundation, but I have another one on a layer of pallets just like Yurt Boy Charlie, except that has walls that cover the pallet edges. I use that one to dry my laundry and firewood. It sheds wind very well.
If I needed cheap fast shelter, I'd build a 16' x 20' gothic arch like this, with 2x6 blocking instead of the 2x4 I used for my greenhouse. You'll want that wall thickness for the insulation. I might tighten up the frame spacing to 3', rather than the 4' in the picture. I'd set it on pallets, as smooth as I could make them, then put 2" of foam down, air seal it, and then plywood. That would be my floor. I'd plastic up the interior face, then board it up on the inside. Pay attention to making the inside as air tight as you can. If you don't like plastic, maybe use big canvas painter's tarps. Put your doors and windows on the end walls.
Then board up the outer walls. Run the outer boarding at least 6" long to protect the tops of your end walls. When you're up to the top, and maybe somewhere along the way, blow cellulose into the wall/roof cavity. Push it down in there with a rake too. With the rental machine from Home Cheapo, you'll only get it so tight, and it will settle over time, but it's the cheapest stuff there is, made of old newspaper and laundry borax. Later, if you take this thing apart, get a giant shop vac and vacuum it out. You can then save it and blow it into whatever you build next if you're careful. Then put on that top roof board and roof the place up. Cellulose will wick moisture back and forth, but will stop air flow, mostly. If you do exactly like I've suggested here, that's about 720 square feet of wall and roof. Call it 360 cubic feet at 1.3 pounds per cubic foot, currently 26 bags, 18.1# each, at $12 each, about $310 plus tax, which is about the cost of the cord of firewood you'll save. The insulation is very worth it.
Call contractors and tell them you're looking for ugly but usable take-out doors and windows, and even used lumber.
Don't get a nasty barrel stove like Charlie has. You want a clean burn wood stove, or a clean burn rocket stove if that's part of your skill set. The rocket stove is going to be harder to build on the pallet foundation though. Remember, we're talking temporary. A dirty stove is a chimney fire in the making, and a waste of heat.
This will give you something between an old '70s A-frame and a Nordic Boat-House.


 2
2


![[Thumbnail for IMG_20151109_194001016.jpg]](/t/51173/a/33655/IMG_20151109_194001016.jpg "Filename: IMG_20151109_194001016.jpg
Description:")
![[Thumbnail for IMG_20151109_194001016-copy.png]](/t/51173/a/33656/IMG_20151109_194001016-copy.png "Filename: IMG_20151109_194001016-copy.png
Description:")