• Post Reply Bookmark Topic Watch Topic
  • New Topic
permaculture forums growies critters building homesteading energy monies kitchen purity ungarbage community wilderness fiber arts art permaculture artisans regional education skip experiences global resources cider press projects digital market permies.com pie forums private forums all forums
this forum made possible by our volunteer staff, including ...
master stewards:
  • Carla Burke
  • Nancy Reading
  • John F Dean
  • r ranson
  • Jay Angler
  • paul wheaton
stewards:
  • Pearl Sutton
  • Leigh Tate
  • Devaka Cooray
master gardeners:
  • Christopher Weeks
  • Timothy Norton
gardeners:
  • thomas rubino
  • Matt McSpadden
  • Jeremy VanGelder

Rocket stove in an RV?

 
Posts: 2
  • Likes 1
  • Mark post as helpful
  • send pies
    Number of slices to send:
    Optional 'thank-you' note:
  • Quote
  • Report post to moderator
I've been reading about RMH for years, but have only recently stumbled upon rocket stoves. My family and I live in a 30' RV and we can't really afford propane. I want to take my propane stove/oven out and build a RS to cook on. It would also be great if I could implement a water heating feature as hot water is also propane powered. I've also played with the idea of adding mass so it would heat my space more efficently.

Now for my biggest problem. I'm not very handy and even after years of study I barely grasp how to build either one of these. As I mentioned before, money is an issue, so I've not bought any books, nor can I afford professional help on this project.

I live in an area with clay (although I have no idea if it suitable for a RS), which is what I'm wanting to build with.

I'll be posting the dimensions of the current stove I have. Also, the reason I'm wanting to squeeze one into this space is there's already metal protecting the wood interior from heat.

Any help is greatly appreciated!


*Note* RMH is typically used for heating, RS for cooking.
 
pollinator
Posts: 4154
Location: Northern New York Zone4-5 the OUTER 'RONDACs percip 36''
67
hugelkultur fungi books wofati solar woodworking
  • Mark post as helpful
  • send pies
    Number of slices to send:
    Optional 'thank-you' note:
  • Quote
  • Report post to moderator
Natasha Green : Welcome to permies.com and our sister site richsoil.com, and a Big Welcome To our Rocket and Woodstove Forum Threads!

O.k. To start off you will need to keep the range hood/exhaust fan over Your 3-burner countertop and breadbox/oven !

The Rocket stove in its most common use is an unvented stove designed for use outdoors ! Any attempt to direct vent Your rocket stove will limit the size

of your cook top, and send most of the heat up the chimney- it will get screamingly hot if you are burning it hot enough to have it burn cleanly, and will burn

dirty if you try to moderate the temperature that your stove burns at.

So 1st recommendation link : https://www.youtube.com/watch?v=CfCLRufKhjc&list=PL4680BB06883874B3 - use Perlight or Vermiculite for insulation between

cans and then use it outdoors and see how hot it gets ! I don't see you using Your Rocket stove while sitting on the counter or underneath an overhead cupboard.

Hot water from a Rocket stove or RMH, hot water that flashes to steam expands 1600 Xs and does so instantly - You can google the phrase ''Boom -Squish'' -

THe steam explosion is the boom, the squish is you and yours!

Think Boston Marathon Bombing with more Casualties and more full Body, full thickness burns !

THis is where I ask you to go to Rocketstoves.com to price and download a PDF Copy of the brand new 3rd Edition of Rocket Mass Heater, this will

allow you to comeback here sure that you will be using the same words to describe to Ratios, Diameters,Dimensions, and calculating Constant Cross-sectional

areas, and the proper Orientation of the parts to themselves and each other !

You need to dig down to your clay and extract a gallon- or so and put it and enough water to cover in a 5 gallon bucket, then Google Soil Sediment Test, and

do that test ! latter you can test its fitness for other duties !

Warning ! Any metal that does not have a 1'' 2'' air space behind it or that directly touches ether the wooden studs in the wall or the paper backing on your

insulation Is a Hazard ! Merely having metal over wood is not a guarantee of fire safety !

Many of the Rocketeers that post to these pages where no farther advanced or better prepared to build Rockets than you are now, - If there is a rocket in your

future we will help YOU build it ! For the good of the Craft ! Big AL !


Rocket Scientist
Posts: 4530
Location: Upstate NY, zone 5
576
5
  • Mark post as helpful
  • send pies
    Number of slices to send:
    Optional 'thank-you' note:
  • Quote
  • Report post to moderator
One important factor in advising would be whether you are mobile in your RV. is it primarily a stationary home that may occasionally move, or are you frequently traveling?

Also, what is your climate like? That will affect what you can accomplish with a given design.
 
Natasha Green
Posts: 2
  • Mark post as helpful
  • send pies
    Number of slices to send:
    Optional 'thank-you' note:
  • Quote
  • Report post to moderator
Boom,squish only happens with pressurized systems yes? Because I already know about the dangers envolved with that if you don't know what you're doing, and I don't.

I was thinking of copper tubing coiled around the exhast. One end coming from the bottom of my current hot water tank, and the other going to the top.

My fan over the stove has never worked in my RV, so I was hoping to go with something like the Justa stoves used in Honduras. My biggest fear is that I don't have the space.
I might need to take out my stove to see if the metal is going to be enough. It looks to be about an inch of space, but I'd rather not burn my house down.


I live in PNW coastal/mountain area. My RV is mainly stationary. It only moves when I do.


Also thank you for the welcome! I've been reading posts on here, and been on richsoil a lot, especially recently. I love the sharing learning atmosphere here and thought I'd post a few questions that only people who've done it can answer.
 
Glenn Herbert
Rocket Scientist
Posts: 4530
Location: Upstate NY, zone 5
576
5
  • Mark post as helpful
  • send pies
    Number of slices to send:
    Optional 'thank-you' note:
  • Quote
  • Report post to moderator
Boom squish only happens with relatively closed systems. It doesn't need to be pressurized or even sealed, all it needs is for there to be insufficient escape room for steam flashing in a coil, which happens almost instantly when it happens. A coil could rupture and spray steam in your face even if its ends are in an open-topped tank.

At the recent Pyronaut event, Peter van den Berg built two small RMH systems suitable for use in a tiny house, both of which can be used for cooking on top of the barrel. Some adaptation of these might be useful, and you might be able to further modify one to not accumulate heat in the whole barrel when you don't want to heat your RV.
https://permies.com/forums/posts/list/40/44671
You might ask Peter about this in the thread.
 
allen lumley
pollinator
Posts: 4154
Location: Northern New York Zone4-5 the OUTER 'RONDACs percip 36''
67
hugelkultur fungi books wofati solar woodworking
  • Mark post as helpful
  • send pies
    Number of slices to send:
    Optional 'thank-you' note:
  • Quote
  • Report post to moderator
Natashia Green : If your RV is a semi permanent structure on the land you may be able to add on a lean-to structure to the outside of Your RV and create a

Multi-functional RMH at ground level - allowing the heat from the RMH rise up into your RV! Basically you are adding a new central hearth onto your living structure

Though at a lower level, radiant Heat off of your barrel becoming convectional air circulation/ heating for the higher RV structure !

With an unpressurized system ( you have done your research ) and placing your large diameter Coils 1'' to 2'' stainless around the Horizontal piping within the

Thermal Mass you only need to deal with pumping /circulating your water supply - again loss of power to a circulating pump during a power failure could potentially

isolate and super heat water trapped by the resulting non-circulation !

For the Crafts ! Big AL

 
Glenn Herbert
Rocket Scientist
Posts: 4530
Location: Upstate NY, zone 5
576
5
  • Mark post as helpful
  • send pies
    Number of slices to send:
    Optional 'thank-you' note:
  • Quote
  • Report post to moderator
As a point of reference, I recently built a 6" all-cob J-tube rocket stove with solid steel 18" square cooktop and chimney. It burns great, though reports are that the cooktop is too far from the fire to heat up fast, so one slightly shorter than 40" from bottom of burn tunnel to cooktop might be better.
 
  • Mark post as helpful
  • send pies
    Number of slices to send:
    Optional 'thank-you' note:
  • Quote
  • Report post to moderator
I have a few questions that are related to RMH in an RV...we own a 14x70 single wide mobile home in the country.....definitely stationary. We are in the process of replacing the walls with sheet rock. It currently has no heat source and we live at approx. 2500 feet in Oregon. We get snow here. Ok so my question is other than reinforcing the support beams in the floor in the living room where we want to build our RMH....how should we prep the wall where the heater is going to be? The walls are 2x3 construction with 2x6 support beams with sheet metal outdoors and sheet rock (drywall) indoors with insulation (R13). Should we use cement board over the sheet rock and if so how thick? How should we prepare the floor...what is the best base to use? Can we plumb the exhaust pipe out the side rather than up through the roof?? That is what people do for pellet stoves here. I have done lots of research on RMH and RMS and feel like that is the best and least inexpensive heat source for us. I have looked at the ANNEX plans...don't think we need something that extends that far across our living room. Should we keep the "bench" on an exterior wall? This will be our first time doing this and want to get it right...and safely as we have young children. Thoughts.....
 
Posts: 34
6
  • Likes 4
  • Mark post as helpful
  • send pies
    Number of slices to send:
    Optional 'thank-you' note:
  • Quote
  • Report post to moderator
Replying to a dinosaur post—but figured more folks might need same info…

A few years back, someone was selling steel, tiny, vented rocket stoves that could have a stainless steel cook top added.  
These were tiny enuf to use, fixed-mounted & shielded, inside an RV, using 4” pipe exhaust.
I think it was this company:  https://shtfandgo.com/product-category/bullet-proof-rocket-stoves/ , but just looked, & they were not showing the S/S add-on vent-insert cooktops—I’d ask them, tho.

But you have clay…I suggest experimenting.
Outside!
Dig up some clay—about enuf to fill a 5 gal. bucket.
It needs to be hydrated in a container of water, to make it workable.
It then needs worked, wet, to make it like thick mortar.
Clay shrinks as it dries; best method is, thoroughly mix-in course sand, to reduce shrinkage/cracking.

Can use recycled tin cans of various sizes as the forms/permanent coverage of clay.
Can use heavy-duty concrete blocks & clay bricks mortared together with clay.  
Can use some kinds of rocks mortared with clay.  
Clay should also coat the fire path, to protect the blocks or bricks.
If only using clay, it needs totally dried before firing, to minimize cracking, similar to working ceramics:  form unit, let dry; if it cracks, add more clay & air-dry again, til no cracks. Then test-fire it.  Firing it tempers clay into ceramic.
Clay layer on outside of the unit, adds mass that can hold some heat.

I’m in the PNW, too.  
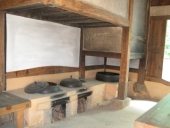
Used a few 8x8x16” concrete blocks & random bricks & rocks + clay from site, inside a tiny cabin.  
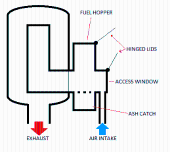
The firebox & smoke path were same size as exhaust pipe (about 4”), but, the fire chamber can be ..slightly.. larger.

The basic design is a “J”.
Making that shape, gets it to “rocket” (the sound, & the heat that makes it very efficient).
Must be coupled with exhaust pipe of enuf length to get a good “draw” of air.  Commonly, a 4” exhaust pipe…I used single-wall chimney pipe parts at the stove, then hooked that to the heavy duty drier vent to slinky over to the 6” chimneypipe already installed—but coulda routed it out the upper wall.
Tiny rocket stoves’ exhaust only needs to be about 8’ or more high; the regular size rocket stove in our house, needs a 15’ high 6” chimney liner.
Avoid putting exhaust pipe thru roof in RVs—avoid making holes in the roof, cuz RV roofs, especially, are prone to leaks—& esp. in the PNW.

Must have outside air brought in to the burn chamber, or right in front of it, via a heat-proof tubing, to help burn fuel right—even in our kinda leaky tract house, our rocket stove required outside air; so did the little one at the cabin (weathered-in, not “tight”).  I used aluminum duct parts & heavy duty drier venting to bring air to the fire.

1st, tried different ways to stack the blocks to form a fire path; it requires cutting a block or two, to get it right.
I used our site clay + silty dirt to grout between blocks, & to coat the fire path, & slathered the outside.
I mix in about 50/50 clay & silt, to reduce cracking.
I wanted a cooking area, so laid a (paver, recycled iron griddle or pan, etc.), to make a flat surface to place a cookpot.
Some make a pot-hole thru to the fire chamber, to exactly fit a dedicated pot over the fire chamber, & a lid to cover that when not cooking.

With clay coating firepath to the chimney connection, can custom fit a 4” pipe to that, & use same directions & cautions needed to install chimney vent.

RV walls are thin; you don’t know where the frame, wiring, etc are, inside wall—those need avoided.  
Vent needs to exit thru a wall, about 12” down from ceiling.  
Yes, must vent it, if used indoors.  
Even as efficient as a rocket stove can be, if used indoors, must vent it, but especially if using full-time!
Can get 4”d. slinky-tube heavy duty aluminum drier vent (but must use standard chimney fittings at the stove connection).

Metal wall shielding:
Use 1/2” spacers to stand-off the metal from any wall material.  
Heavy duty aluminum foil is great— I used it on 1x2” frames, to protect walls from a big woodstove, & it worked great.
Some have used wide flashing metal, recycled cookie sheets, etc.
Avoid galvanized—when heated to a few hundred degrees, galvanizing forms a toxic gas it emits.
If metal is painted, burn that off before using.  If you want it painted, ONLY use high-temp paint, then, expose that to heat outside, so it can off-gas, before using indoors.

Mass is HEAVY—make sure wherever you build yours, has enuf support to hold the thing without slowly caving-in the shelf  or floor.

There have been LOTS of DIY rocket stove videos on YouTube…some better than others.
Highly recommend binge watching a bunch of those, to help understand better what are the basic required rules that make rocket stoves work best.
Not too many address using them indoors—keep looking!

Also, might check if Aprovecho Institute, near Cottage Grove, OR, might help you https://aprovecho.org/
They have experimented on rocket stove tech, & using “straw box” to cook using only 15 minutes of fuel to bring food to rolling boil, then, it finishes cooking itself.
Straw-box cooking really works great…kinda like a slow-cooker.  But those things take-up real estate inside tiny homes—it might not be a fit, for RV living.

Did you mean, you intend to convert the existing cookstove, into a rocket stove?  
That’ll be a challenge, to configure it right.

Tiny rocket stoves do not retain much heat.
They can only burn small amounts at a time.
So, in cold weather, someone will have to keep feeding it fairly often, to keep indoor temps comfortable.
…unless you can figure out how to also make it burn pellets from a bin (like liberator rocket stoves can—but those are too big for an RV.

There are very tiny woodstoves, that burn charcoal or small pieces of wood—those are about 1 cubic foot stoves…so, can burn wood for maybe an hour or few—also needs vented.

If using an old stove, the goal is to create a fire chamber/smoke path kinda like a “J”.
Try to make that same diameter burn & smoke pathway throughout the path.
Check along the pathway, to be sure there’s enuf shielding to avoid igniting adjacent walls or other materials (see note on heavy duty aluminum foil, or shiny aluminum flashing metal).   Cuz the burn chamber gets blazing hot. The stove will reach several hundred degrees, no doubt, & so will the exhaust.


“……Any help is greatly appreciated!”
*Note* RMH is typically used for heating, RS for cooking.
 
steward
Posts: 16098
Location: USDA Zone 8a
4279
dog hunting food preservation cooking bee greening the desert
  • Likes 2
  • Mark post as helpful
  • send pies
    Number of slices to send:
    Optional 'thank-you' note:
  • Quote
  • Report post to moderator
For others interested in this subject here are a few more threads to give folks some ideas:

https://permies.com/t/44626/Rocket-Heater-Full-Time-RV

https://permies.com/t/33188/Rocket-Mass-Heater-Camper
 
I agree. Here's the link: http://stoves2.com
reply
    Bookmark Topic Watch Topic
  • New Topic