• Post Reply Bookmark Topic Watch Topic
  • New Topic
permaculture forums growies critters building homesteading energy monies kitchen purity ungarbage community wilderness fiber arts art permaculture artisans regional education skip experiences global resources cider press projects digital market permies.com pie forums private forums all forums
this forum made possible by our volunteer staff, including ...
master stewards:
  • Carla Burke
  • Nancy Reading
  • John F Dean
  • r ranson
  • Jay Angler
  • paul wheaton
stewards:
  • Pearl Sutton
  • Leigh Tate
  • Devaka Cooray
master gardeners:
  • Christopher Weeks
  • Timothy Norton
gardeners:
  • thomas rubino
  • Matt McSpadden
  • Jeremy VanGelder

High hydration and delayed fermentation loaves

 
Posts: 169
2
  • Likes 1
  • Mark post as helpful
  • send pies
    Number of slices to send:
    Optional 'thank-you' note:
  • Quote
  • Report post to moderator
Hi, all -

Wanted to share a couple of the techniques I've learned for making really nice, artisan loaves.

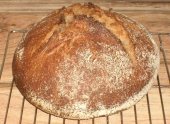
High hydration bread dough is key to getting the kind of crumb that one finds in an artisan loaf. The crumb ideally is open, with some good sized bubbles, and looking into those bubbles the interiors of the bubbles are glossy. A slice of the bread, held up to the light, is translucent, and the texture of the crumb is chewy, not starchy.

There are difficulties inherent to working with a high-hydration dough, the most significant being that they are loose and sticky enough to require special techniques when hand-kneading.

I use a combination of a couple of techniques. First, I knead in the bowl, shaping my hand into a scoop like a dough hook, grabbing a good portion of the dough and lifting/stretching it upward until it snaps in half or separates from the bottom of the bowl. Then drop it down and repeat.

Second, I use Peter Reinhart's trick of three brief kneadings separated by 15 -30 minutes rest. I get up in the morning, incorporate the additional flour into the dough, and knead for maybe five minutes. Make some coffee, answer e-mails, and then knead again. More coffee, or a bowl of oatmeal, knead a third time, put the dough in an oiled bowl and stick it in the fridge.

The gluten develops this way much easier than with continuous kneading.

The other trick in making an artisan-quality loaf is delayed fermentation. By sticking the dough in the fridge for a day after the bread is kneaded, the direct action of the yeast, basically eating sugar, peeing alcohol and belching CO2, is retarded, but the action of the enzymes secreted by the yeast, which break down the starch into sugar, are not. So the end product is lower in starch, with more sugars to feed the yeast. The higher natural sugar content also has an effect on the crust, which tends to caramelize more and develop more complex flavors.

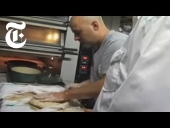
The combination of high hydration and delayed fermentation is a big part of what distinguishes the poilane loaf that Hollywood hoipaloi pay $50 a loaf for, flown in from Paris.

How do y'all do it?
 
pollinator
Posts: 1459
Location: Midlands, South Carolina Zone 7b/8a
43
  • Mark post as helpful
  • send pies
    Number of slices to send:
    Optional 'thank-you' note:
  • Quote
  • Report post to moderator
I have a one-knead recipe that my grandmother used and I have modified. 

I don't want to get all technical about the chemical process because my little brain can't handle it - that said....

When reading your post it sounds like the bread has a better texture when allowed to 'grow' longer before baking.  I have found that when I'm using my grandmothers one-rise recipe if I sit it in the fridge overnight, or freeze, before baking that the texture is softer and chewier rather than crumbly.  This must be due to the process that you are talking about (?).

What do you think about using a dough hook for kneading if I were to try your method?

  I am convinced that the best bread probably does require more kneading and attention before baking but I know I will not do it - that is why I love grandma's recipe.
 
steward
Posts: 3999
Location: Wellington, New Zealand. Temperate, coastal, sandy, windy,
115
  • Mark post as helpful
  • send pies
    Number of slices to send:
    Optional 'thank-you' note:
  • Quote
  • Report post to moderator
Lee, is this technique suitable for developing sourdough, or only standard yeast?
I've just acquired a starter; I've made lots of bread with 'normal' yeast (but not using your method) and now I'm on to sourdough...
I know nothing about artisan bread. Do you bake it on clay? How about water/steam in the oven?


pollinator
Posts: 1481
Location: Vancouver Island
60
  • Mark post as helpful
  • send pies
    Number of slices to send:
    Optional 'thank-you' note:
  • Quote
  • Report post to moderator

Leila Rich wrote:
Lee, is this technique suitable for developing sourdough, or only standard yeast?
I've just acquired a starter; I've made lots of bread with 'normal' yeast (but not using your method) and now I'm on to sourdough...
I know nothing about artisan bread. Do you bake it on clay? How about water/steam in the oven?


It should work with either. The wild yeast will take longer to ferment... but taste better. If you are making 1 or two loaves, baking inside a dutch oven works best as it keeps the moisture in. I normally make 4 at a time (thats all that really fit in my oven... or that we use in a week). I have an older oven with coil hobs on top. (well I have modified that, but thats another story) Anyway, the oven vent comes up under one of the hobs.... I plug that for making bread. I use firebrick "splits" to cook on... and have a pan of water inside right from turning the oven on (I think the steam soaks into the brick... but I don't know) certainly a brick oven gets lots of steam from the fire. I use a thin bamboo "cutting board" as a peel.

To switch a yeast recipe to wild yeast starter, you need to know whats in your starter. For example my starter is 50/50 flour/water. So for the amount of starter I want to use I subtract half that amount of liquid from the recipe and half that amount of flour (by weight). I use anywhere from about 12% to 40% starter to flour ratio. The low end is for no-knead styles. Bakers base everything on the amount of flour they intend to use.... The flour comes in pre measured bags after all...

Just for comparison ... in yeast bread the normal amount is about 2% and for no-knead about .4%
 
Lee Einer
Posts: 169
2
  • Mark post as helpful
  • send pies
    Number of slices to send:
    Optional 'thank-you' note:
  • Quote
  • Report post to moderator

Leila Rich wrote:
Lee, is this technique suitable for developing sourdough, or only standard yeast?
I've just acquired a starter; I've made lots of bread with 'normal' yeast (but not using your method) and now I'm on to sourdough...
I know nothing about artisan bread. Do you bake it on clay? How about water/steam in the oven?


I bake mine in the oven, shpritz it with water every five minutes for the first 15 minutes for steam.

Had a baking tile until it cracked from thermal shock, it was nice but not necessary.

And yes, this works well with sourdough,  sourdough is the only bread I bake.
 
Posts: 204
Location: Germany, 7b-ish
4
  • Mark post as helpful
  • send pies
    Number of slices to send:
    Optional 'thank-you' note:
  • Quote
  • Report post to moderator
The hoi oligoi bread that I've been baking for a few years now is my version of a high hydration no-knead bred.

I tend to use the exact same amount and combination of flours, but I don't measure the amount of water or yeast,
and also bake it all year round at different rising temperatures. That way there's plenty of variation .
 
Shiny ad:
Alan Booker's Spring Terrace Webinar Recording
https://permies.com/t/223970/Alan-Booker-Spring-Terrace-Webinar
reply
    Bookmark Topic Watch Topic
  • New Topic