• Post Reply Bookmark Topic Watch Topic
  • New Topic
permaculture forums growies critters building homesteading energy monies kitchen purity ungarbage community wilderness fiber arts art permaculture artisans regional education skip experiences global resources cider press projects digital market permies.com pie forums private forums all forums
this forum made possible by our volunteer staff, including ...
master stewards:
  • Anne Miller
  • r ranson
  • Pearl Sutton
  • Leigh Tate
stewards:
  • Beau Davidson
  • Nicole Alderman
  • paul wheaton
master gardeners:
  • Carla Burke
  • John F Dean
  • Nancy Reading
  • Jay Angler
gardeners:
  • Jules Silverlock
  • Mike Barkley
  • Jordan Holland

How to Make Pizza Crust

 
master steward
Posts: 11666
Location: USDA Zone 8a
3432
dog hunting food preservation cooking bee greening the desert
  • Likes 4
  • Mark post as helpful
  • send pies
    Number of slices to send:
    Optional 'thank-you' note:
  • Quote
  • Report post to moderator
How to Make Pizza Crust

Our best recipe for pizza dough is adapted from the one used at Roberta’s, the pizza utopia in Bushwick, Brooklyn. It provides a delicate, extraordinarily flavorful dough that will last — and improve — in the refrigerator for up to a week.

Before You Start:

Plan ahead. Make the dough at least a day before you intend to make pizza, to give it enough time to rise.

Buy a food scale on which to weigh the ingredients for dough and toppings. It’s a smart investment: In baking, weight is a more accurate measurement than volume.

You will need a cooking surface. This could be a pizza stone or steel, or four to six unglazed quarry tiles measuring 6 inches by 6 inches from a building supply store. Whichever you use, heat in a very hot oven for at least an hour before cooking.


Roberta’s Pizza Dough  -   Yield Two 12-inch pizzas

   153 grams 00 flour (1 cup plus 1 tablespoon)
   153 grams all-purpose flour (1 cup plus 1 tablespoon and 2 teaspoons)
   8 grams fine sea salt (1 teaspoon)
   2 grams active dry yeast (3/4 teaspoon)
   4 grams extra-virgin olive oil (1 teaspoon)


Preparation

In a large mixing bowl, combine flours and salt.

In a small mixing bowl, stir together 200 grams (a little less than 1 cup) lukewarm tap water, the yeast and the olive oil, then pour it into flour mixture. Knead with your hands until well combined, approximately 3 minutes, then let the mixture rest for 15 minutes.

Knead rested dough for 3 minutes. Cut into 2 equal pieces and shape each into a ball. Place on a heavily floured surface, cover with dampened cloth, and let rest and rise for 3 to 4 hours at room temperature or for 8 to 24 hours in the refrigerator. (If you refrigerate the dough, remove it 30 to 45 minutes before you begin to shape it for pizza.

To make pizza, place each dough ball on a heavily floured surface and use your fingers to stretch it, then your hands to shape it into rounds or squares. Top and bake.

The recipe didn't give oven temperature or baking time.  From another recipe:  Put a pizza stone in the oven and preheat to 550 degrees. (If you don’t have a stone, oil a rimmed baking sheet and set aside.) ... place the baking sheet into the oven. Cook the pizza for 6 to 10 minutes or until the crust is golden and the cheese is bubbling.

Pizza sauce does not need to be cooked ahead of time, and is so simply prepared that there is no reason to use the store-bought variety. Instead, use a food processor to combine a can of whole, drained tomatoes with a splash of olive oil and a sprinkle of salt.

Spread the sauce out on the dough using the back of a spoon, stopping approximately 1/2 inch from the dough’s edges. Do not use too much; two or three tablespoons is enough. Keep leftover sauce refrigerated.


Storing the Dough

Allow for a minimum of three to four hours for your dough to rise. But planning further ahead pays dividends: You can store that dough in the refrigerator until you are ready to cook, which means any weeknight can be pizza night.

We put our pizza dough in the refrigerator to rise, placing the balls of dough on a floured baking pan covered loosely with a clean, damp kitchen towel. The chill leads to a slow rise, so we generally allow it to go overnight, or for at least six to eight hours. For a faster rise, leave the dough out on a countertop, similarly covered. It should be ready — that is, roughly doubled in size — in three or four hours.

Time imparts a marvelous tanginess to pizza dough, but it extracts a price as well. What you want to avoid is a skin developing on the dough. When the dough has risen, if you are not going to use it right away, wrap it tightly in plastic wrap, or place it in a quart-size plastic bag. Pizza dough so wrapped will last in the refrigerator for three days or so.

https://cooking.nytimes.com/guides/1-how-to-make-pizza
 
steward
Posts: 4809
Location: West Tennessee
2379
cattle cat purity fungi trees books chicken food preservation cooking building homestead
  • Mark post as helpful
  • send pies
    Number of slices to send:
    Optional 'thank-you' note:
  • Quote
  • Report post to moderator
Pizza dough is something my wife and I have struggled with. Our main issue has been when stretching out the dough, it's so elastic that it won't stay anywhere near the size it needs to be and contracts, and we end up often tearing holes in it trying to pull the dough into something that resembles a circle.

Thanks for this recipe Anne. We'll give it a try in the not too distant future and I'll report back with our results.

Question for you: does this dough work well for deep dish style pies or is it best for thinner crusts?
 
Anne Miller
master steward
Posts: 11666
Location: USDA Zone 8a
3432
dog hunting food preservation cooking bee greening the desert
  • Mark post as helpful
  • send pies
    Number of slices to send:
    Optional 'thank-you' note:
  • Quote
  • Report post to moderator
I have not tried making it yet.  I plan to use it for the 12 day challenge.  I like it as it only uses a little over 1 cup all purpose flour.  Many recipes call for 2 to 3 cups.  I question that this will make two 12" crusts.  So maybe they are thin crusts which is what my DH likes.  I like that it advised that dough could be keep in the fridge.  The link also has a link to freezing pizza dough.
 
Anne Miller
master steward
Posts: 11666
Location: USDA Zone 8a
3432
dog hunting food preservation cooking bee greening the desert
  • Mark post as helpful
  • send pies
    Number of slices to send:
    Optional 'thank-you' note:
  • Quote
  • Report post to moderator

James Freyr wrote: Our main issue has been when stretching out the dough, it's so elastic that it won't stay anywhere near the size it needs to be and contracts, and we end up often tearing holes in it trying to pull the dough into something that resembles a circle.


James, I meant to comment on this ...  I have the same problem.  

I have been using the mixes like Jiffy and I don't think they use yeast.  At least if they do, they are not very yeast like.  They are easier to shape.

I like a yeast tasting crust and like the refrigerated dough better but not the crescent roll pizza crust.  When it pops open it tears so I have to mend the tear by pinching the dough together.  The shape is square so I start at the middle working the dough towards the rim of the pan.  It is not easy and takes many pats and pushes.  If it looks like it might tear I move to another area.

I thought of you when I found this one:  Chef John's Pourable Pizza; he uses a iron skillet over medium heat on the stove top.  After topping are added it goes into the oven's broiler to melt the cheese.

http://allrecipes.com/recipe/254280/chef-johns-pourable-pizza/.

 
pollinator
Posts: 459
Location: 18 acres & heart in zone 4 (central MN). Current abode: Knoxville (zone 6 /7)
52
dog books urban bike
  • Mark post as helpful
  • send pies
    Number of slices to send:
    Optional 'thank-you' note:
  • Quote
  • Report post to moderator
One thing I've found that helps with stretching is resting the dough -- at least a couple hours, even overnight. Letting it sit in the fridge also lends the dough a nice flavor, I find. I notice this recipe calls for 00 flour, which the internet suggests might also help. Will be giving this a try, but first I have to find 00...
 
gardener
Posts: 4409
Location: Cincinnati, Ohio,Price Hill 45205
745
forest garden trees urban
  • Likes 1
  • Mark post as helpful
  • send pies
    Number of slices to send:
    Optional 'thank-you' note:
  • Quote
  • Report post to moderator
Let me share my take:

5 cups high gluten (bread) flour.
2 cups water
1/4 cup or more grapeseed oil
1 tablespoon yeast
Mix, let rise 15 minutes minimum.
Roll out on flour with a pin or glass bottle.
Flop it over onto a pizza screen
Top it and bake it at the highest heat your oven will generate.
Remove from screen and feast
I like this method because it skips problems with transferring the pizza.
 
pollinator
Posts: 1517
Location: Southern Oregon
451
  • Mark post as helpful
  • send pies
    Number of slices to send:
    Optional 'thank-you' note:
  • Quote
  • Report post to moderator
As to the problem of the dough contracting, I find that a stretch and rest process is the easiest. The contraction is due to the high gluten content, and the more you work the dough, the more the gluten fights you. The gluten in the dough will relax if you walk away and let it rest. Also, I stretch and hold for a few seconds, it lessens the contraction. Forgive my unscientific language - it just seems the easiest way for me to explain.
 
Anne Miller
master steward
Posts: 11666
Location: USDA Zone 8a
3432
dog hunting food preservation cooking bee greening the desert
  • Mark post as helpful
  • send pies
    Number of slices to send:
    Optional 'thank-you' note:
  • Quote
  • Report post to moderator

chip sanft wrote:One thing I've found that helps with stretching is resting the dough -- at least a couple hours, even overnight. Letting it sit in the fridge also lends the dough a nice flavor, I find. I notice this recipe calls for 00 flour, which the internet suggests might also help. Will be giving this a try, but first I have to find 00...


I missed that 00 flour, so its 2 cups plus flour.  This info on 00 flour from Chef John's Pourable Pizza on the allrecipe link:

Cook's Note:
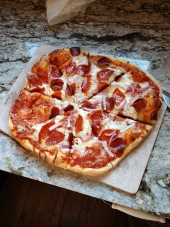
I used something called double-zero flour or "00" flour, which is an Italian flour used for pasta and pizza making. It is very finely milled, and lovely to work with. If you can't get or find it, just use all-purpose. I weigh my flour and used 14 ounces for this recipe, or approximately 3 cups.


So I will be using all purpose flour.
 
Posts: 145
Location: MA
purity forest garden trees
  • Mark post as helpful
  • send pies
    Number of slices to send:
    Optional 'thank-you' note:
  • Quote
  • Report post to moderator
I've always made bread and pizza dough in the usual ways with average results.  Then one day I wondered: how do they make that fancy bread that tastes so good?  So I googled it and youtubed it  
  Turns out there's no need to knead!  It seems that kneading is to bread, as tilling is to permaculture....unnecessary, and sometimes counterproductive!  Especially when it makes people avoid it entirely.  Simply mix ingredients until blended and shape as needed, anything more is an American past-time.  I haven't tried this yet with pizza dough, but one could imagine how unkneaded dough might simply slump into the shape of a pizza.  

Humidity grows crust, so cover, like in a cast-iron pan with lid or dutch-oven for 15 minutes for light crust, 30 minutes for crunchier crust.  (The heat that is held in a preheated stone/brick/iron pan and then *conducted* into the loaf/pie.  The conduction makes for fast-cooking.)

Independently of that, the longer you cook it at 500+ deg.F the browner the crust will be.  Cook it at 400+ deg.F for lighter-colored crust.

With bread, I found it worked to preheat the oven and cast-iron pan to 500 deg.F , cook covered at 450 deg.F for 20 minutes.  Then uncover and turn down to 400 deg.F for 25-30 minutes.  
 
Stacy Witscher
pollinator
Posts: 1517
Location: Southern Oregon
451
  • Likes 1
  • Mark post as helpful
  • send pies
    Number of slices to send:
    Optional 'thank-you' note:
  • Quote
  • Report post to moderator
P Mike - the pre-heated dutch oven method is the way I do my regular sourdough loaf, but it works best with a high hydration dough, so I suspect, it would work better for pan-type pizzas. Any pizza that needs to be transferred from a board onto the cooking surface, whether a baking stone or the floor of a brick oven, would need to be firmer than that.

And in my experience, no knead also works best with high hydration and long rise times. Sometimes I want a pizza sooner than tomorrow, making kneading a commercial yeast dough the quicker option. I've never understood the big deal about kneading. Some breads I knead, others I do not. It has more to do with the type of bread that I'm looking for, rather than I desire to avoid kneading.

If you get a chance to play around with this, let us know.
 
Mike Phillipps
Posts: 145
Location: MA
purity forest garden trees
  • Mark post as helpful
  • send pies
    Number of slices to send:
    Optional 'thank-you' note:
  • Quote
  • Report post to moderator
I'm learning as I go, but it seems like bread that rises longer / ferments longer just seems to taste better, whether it is kneaded or not.  No additional labor is needed, only clock time.  It seems like a high return on investment to me, and worthwhile.  Sure, if you didn't plan ahead then you make the quicker-rise bread.  Why is sourdough more complex/interesting/flavorful?  More fermentation / microbial activity, right?  If you make bread once or twice a week and especially if you have a refrigerator and/or don't mind if the dough goes a little long and sours a bit, then maybe there's negligible overhead of having a long-rise dough, because it's so automatic.  

Sure, kneading isn't necessarily a big deal, but maybe "permies" are busy and/or lazy.  Idk, maybe I'm not a "pemie", but before I knew about no-knead I resorted to using a bread machine to save labor.  With no knead, the bread machine doesn't offer any advantage I can see.  

I agree you probably do need a long rise time for a no knead yeast-bread.  No knead may work best with higher hydration, idk, but it doesn't seem to be required or necessary, because I made some successful bread with ordinary hydration levels.  

You're right, pizza either needs a flat cooking surface or a non preheated (deep dish) pan.  I was just joining in on the conversation.  Sorry if I got in on the wrong thread or got over-zealous, I was just excited with my early results in no knead.  It was a game-changer for me, and I figure it would be for other people as well, at least for bread.  Yes, I know pizza is similar but different.  
 
Stacy Witscher
pollinator
Posts: 1517
Location: Southern Oregon
451
  • Mark post as helpful
  • send pies
    Number of slices to send:
    Optional 'thank-you' note:
  • Quote
  • Report post to moderator
P Mike - I wasn't offended or anything like that, I was just adding my two cents, the more, the merrier.

I've been baking bread for a long time, and have always enjoyed the kneading process. I think that perhaps people think that it's harder or takes longer than it does. I have seen recipes calling for a long knead time, but I've never done that, 5 minutes max to knead. For a long time, I didn't try no-knead bread recipes because kneading doesn't bother me, but high hydration bread pretty much requires no-kneading, and it creates a lovely open crumb. I wish the recipes had been named open crumb bread, I would have tried it much earlier.

My at-home pizza, typically, has a focaccia crust, done in a half sheet pan. I'm baking in a conventional gas oven, no baking stone. But I've worked the wood oven in two restaurants, pizza transferred from a peel to the oven hearth. I like them both, but they are different.
 
pollinator
Posts: 2146
Location: RRV of da Nort
505
  • Mark post as helpful
  • send pies
    Number of slices to send:
    Optional 'thank-you' note:
  • Quote
  • Report post to moderator
Stacy and P. Mike,

Just  few questions, as my bread typically is rather "underwhelming"...  :-/

1)  Do you need to use a Dutch oven?.... Would there be a way to use a Pyrex/Corning dish over which a second dish of the same size is inverted?

2)  How crucial is the 500 degree temperature?  Just seems a bit of an energy drain to use that many more watts (electric oven) than the 'normal' 350....so just curious.

3)  Since I have a lot of gluten around to make seitan, I tend to throw some of this in with all purpose flour to give it a bit more "uumph".  Not needed with this recipe?

Thanks!
 
Stacy Witscher
pollinator
Posts: 1517
Location: Southern Oregon
451
  • Mark post as helpful
  • send pies
    Number of slices to send:
    Optional 'thank-you' note:
  • Quote
  • Report post to moderator
Hi John,

I have heard of people using pyrex dishes with success, or even pyrex bowls, with some kind of lid rigged.

A high temperature with moisture will cause oven spring in the bread, which is a fast rise at the beginning before the crust hardens to the point where the bread struggles against it. I usually do 450 preheat, add the dough, then drop the temperature to 400.

I often add about 1 Tbsp. of vital wheat gluten to my bread doughs. Adding a lot can make bread gummy. But what's too much is a matter of personal preference.

These techniques will make an open crumb bread (large, irregular holes) and a firm crust. Another trick is after the bake time, remove the bread from the pan, and allow it to cool on the rack in the oven, with the door cracked. This prevents the crust from softening as the bread cools.
 
John Weiland
pollinator
Posts: 2146
Location: RRV of da Nort
505
  • Mark post as helpful
  • send pies
    Number of slices to send:
    Optional 'thank-you' note:
  • Quote
  • Report post to moderator
Thanks, Stacy.....I just remembered that I have a Pyrex baking bowl with a lid, so this might be the best thing to try first.  And the "large, irregular holes" have been my elusive "white whale"  ..... so I'm very hopeful with this recipe and these suggestions.  (Any idea how it might work for baguettes to have a pre-heated metal sheet with preheated 13" baking dish inverted over the pan during baking?)  

I will try a 400+ preheating of the bowl with a 400 degree bake temp as a start and then try to adjust things in later tests.   Thanks and I hope to return to the thread to let you know how it worked!
 
Anne Miller
master steward
Posts: 11666
Location: USDA Zone 8a
3432
dog hunting food preservation cooking bee greening the desert
  • Likes 1
  • Mark post as helpful
  • send pies
    Number of slices to send:
    Optional 'thank-you' note:
  • Quote
  • Report post to moderator
Here is Mark Bittner's No Knead Bread recipe from the NY Times.  The key ingredient is the instant or Rapid Yeast.        Yield: One 1 1/2-pound loaf

Here is one of the most popular recipes The Times has ever published, courtesy of Jim Lahey, owner of Sullivan Street Bakery. It requires no kneading. It uses no special ingredients, equipment or techniques. And it takes very little effort — only time. You will need 24 hours to create the bread, but much of this is unattended waiting, a slow fermentation of the dough that results in a perfect loaf.


Ingredients

   3 cups all-purpose or bread flour, more for dusting
   ¼ teaspoon instant yeast
   1 ¼ teaspoons salt
   Cornmeal or wheat bran as needed

Preparation

   In a large bowl combine flour, yeast and salt. Add 1 5/8 cups water, and stir until blended; dough will be shaggy and sticky. Cover bowl with plastic wrap. Let dough rest at least 12 hours, preferably about 18, at warm room temperature, about 70 degrees.

   Dough is ready when its surface is dotted with bubbles. Lightly flour a work surface and place dough on it; sprinkle it with a little more flour and fold it over on itself once or twice. Cover loosely with plastic wrap and let rest about 15 minutes.

   Using just enough flour to keep dough from sticking to work surface or to your fingers, gently and quickly shape dough into a ball. Generously coat a cotton towel (not terry cloth) with flour, wheat bran or cornmeal; put dough seam side down on towel and dust with more flour, bran or cornmeal. Cover with another cotton towel and let rise for about 2 hours. When it is ready, dough will be more than double in size and will not readily spring back when poked with a finger.

   At least a half-hour before dough is ready, heat oven to 450 degrees. Put a 6- to 8-quart heavy covered pot (cast iron, enamel, Pyrex or ceramic) in oven as it heats. When dough is ready, carefully remove pot from oven. Slide your hand under towel and turn dough over into pot, seam side up; it may look like a mess, but that is O.K. Shake pan once or twice if dough is unevenly distributed; it will straighten out as it bakes. Cover with lid and bake 30 minutes, then remove lid and bake another 15 to 30 minutes, until loaf is beautifully browned. Cool on a rack.

Cooking Notes

In a follow-up article, Bittman's article added the recommended weights for the ingredients.
430 grams flour
1 gram yeast
8 grams salt
345 grams water

Bittman also noted he settled on just under a tablespoon of salt -- call it 16 or 17 grams.

https://cooking.nytimes.com/recipes/11376-no-knead-bread


Posts: 20
Location: Portland, OR
dog chicken bee
  • Mark post as helpful
  • send pies
    Number of slices to send:
    Optional 'thank-you' note:
  • Quote
  • Report post to moderator
i've been making naturally fermented sourdough breads for a while now.  curious if anyone here has used the cast-off sourdough starter to make pizza dough instead of packaged yeast?

cheers,
christine
 
Stacy Witscher
pollinator
Posts: 1517
Location: Southern Oregon
451
  • Mark post as helpful
  • send pies
    Number of slices to send:
    Optional 'thank-you' note:
  • Quote
  • Report post to moderator
Hi Christine, when I need to feed my starter, I divide it and fed both parts, half gets put back in my starter jar, and half gets used for whatever bread I'm making. Sometimes I use the half in an all sourdough bread or crust, sometimes I just add it to a recipe for added flavor, and to not waste. Often I will cut down on the commercial yeast when adding starter, like from 1 Tbsp. to 1 tsp. An all sourdough bread/crust tends to require longer rise times. And, your cast-off starter is likely to be even slower, depending on the current activity level.
 
christine shepherd
Posts: 20
Location: Portland, OR
dog chicken bee
  • Mark post as helpful
  • send pies
    Number of slices to send:
    Optional 'thank-you' note:
  • Quote
  • Report post to moderator
Thanks Stacy.  I just hate throwing half away every time I feed it, it seems like such a waste!
 
Posts: 315
54
2
  • Mark post as helpful
  • send pies
    Number of slices to send:
    Optional 'thank-you' note:
  • Quote
  • Report post to moderator
If I can source OO flour I will give this a try.

I do a variation on pizza without the tedium of 'stones' -- cast iron skillet. Choice of skillet? The bigger the better, but at a minimum 10", 12 or 14" if ya gott'em. Utilize the shape of the skillet, deep dish style is the pizza outcome.

Technique:

1) Prep your dough onto something you can you as a transfer sheet. I use the back of a large baking pan.
2) Have all your sauce and toppings at the ready as you need to move fast.
3) Preheat your skillet to at least 400.
4) Remove from heat slide in your dough, work it up the sides of the skillet quickly. It will literally be cooking at this point so you have to move fast.
5) Sauce and toppings are next just as quickly. Then put it back in the oven to finish.

You end up with a Chicago style pizza natch. Works great in a camping situation too. Place hot coals in the pan to heat, dump out and wipe out ash then fill. Cover with aluminum foil and place back on the fire. Just one more item I don't have to buy and store.
 
john mcginnis
Posts: 315
54
2
  • Mark post as helpful
  • send pies
    Number of slices to send:
    Optional 'thank-you' note:
  • Quote
  • Report post to moderator
The NYT recipe that Anne mention is what I use as the base for most of the breads I bake. But I usually double or triple that recipe. I use the given amount for bread loaves the balance I keep in a covered container in the cooler. That remainder we then use for dinner rolls, crusts and the like. Having fresh is a breeze if you already have the dough at the ready. Best used within a week to 10 days.
 
Posts: 19
Location: Central New Mexico
  • Mark post as helpful
  • send pies
    Number of slices to send:
    Optional 'thank-you' note:
  • Quote
  • Report post to moderator
Another easy to make Pizza dough is this one from the Pratt Family Cookbook. This is a one rise dough ,Kneaded for 5 minutes Cover and set. Rise depends on temp ( about 30 minutes), I place it under the covers and near the heat source on a water bed this time of year. Summer it goes in a  sunny window. For a cover I just use 2 plastic grocery bags.

3 cups  all-purpose flour
2 1/4 tsps instant yeast
1 T sugar
1 cup water( 120-130 F)
4 T of oil (or 3 T oil and 1 T more warm water) Oil I like olive or sunflower.

In a mixing bowl mix together 2 Cups of flour, yeast, sugar an salt. Add warmed water and oil to flour mixture. Mix well and add the other 1 cup of flour. Mix and Knead for 5 minutes.
Divide dough in 2 with knife.  Cover and let rest. (They say 10 minutes, but my cool house and a waterbed it takes 30 minutes)

I prep the cookie pans with a couple pinches of corn meal, which helps keep the dough from sticking to the pan.
Oven temp 400F

Roll out dough, I use 2 cookie pans that fit in a roaster pan one at a time.
Using margarine or oil wiped, smeared across the crust area and dough in the pan helps keep the crust from being soggy.

I use about 7 oz of tomato sauce, and various herbs and minced onion. Split that between the 2 pizzas after mixing.
Add your toppings like mozzarella (8 oz bag enough for both) and I use the shredded/dry Parmesan to fill in empty spaces.
Chopped green chili, local pork sausage, etc can be used as toppings

Cooking time 25 to 30 minutes.

 
Posts: 1
  • Mark post as helpful
  • send pies
    Number of slices to send:
    Optional 'thank-you' note:
  • Quote
  • Report post to moderator
Does anyone have a good recipe for gluten free pizza? I am new to this site and will start reviewing all of the topics.
 
pollinator
Posts: 378
194
hugelkultur forest garden food preservation medical herbs wood heat
  • Mark post as helpful
  • send pies
    Number of slices to send:
    Optional 'thank-you' note:
  • Quote
  • Report post to moderator
I have had poor luck in the past with making both bread and pizza crust. Until I found the book Flour, Water, Salt, Yeast by Ken Forkish. You can find it on Amazon if interested and I highly recommend it to anyone. It has been the most influential cookbook I've owned. I now make bread that is better than any artisan bread I've eaten. It looks like the bread on the cover of the book. And it's all done with regular flour, water, salt, yeast. That's it. This book is all about technique although I do follow his recipes/proportions fairly closely. There is no kneading but there is folding and gentle treatment of the dough, which is very different than the abusive kneading I've heaped on past doughs. I cook the bread in a cast iron dutch oven and it's been perfect every time. He has a section on pizza dough that works very well for me, although I've used the bread recipes to make pizza dough and they were very good too, without using the 00 flour.

I started a wild sourdough using his instructions and have kept it in the refrigerator this last year. I don't like wasting most of the starter, which is usually recommended when you feed it, so when I add new flour and water, I immediately put it in the fridge to slowly ferment until I need it again, usually a week later. It's worked great.

So in essence, I've found that ingredient ratios were less important than technique.
 
Anne Miller
master steward
Posts: 11666
Location: USDA Zone 8a
3432
dog hunting food preservation cooking bee greening the desert
  • Likes 1
  • Mark post as helpful
  • send pies
    Number of slices to send:
    Optional 'thank-you' note:
  • Quote
  • Report post to moderator
The other day, I made one of the best pizzas I have made in a long time.

At this point in my life, I want to keep everything as simple as possible. I have a balance problem so I don't want to spend a lot of time cooking or standing.

Back when we had our homestead I would make a pizza for the kids with ground beef, spaghetti sauce, and cheddar cheese.  That pizza that Dominoes advertizes called "Cheeseburger Pizza" reminded me of the pizza I made for my kids.

So I made it again the other day and it was so good.

But my pizza dough was a mess. Once I got it into the oven it turned out great and tasted great.

The reason for this post today is that I want a reminder that the next time I make a pizza I want to try Chef John's Pourable Pizza crust that I posted earlier in this thread.

The recipe calls for 3 C flour, 2 1/4 teaspoons of active dry yeast, 1 teaspoon salt, 1 1/2 teaspoons honey, 1 Tablespoon olive oil and 2 cups of warm water.

What his recipe doesn't do is I want to add the yeast in a medium bowl, dissolve yeast and honey in warm water. Let stand until creamy, about 10 minutes.

Then add this to the flour, salt, and olive oil, whisk together for about 5 minutes. The recipe says this will be a very thin batter-like dough. Cover and let rise 1 1/2 hours. The dough should be bubbly. Stir with a ladle to eliminate the bubbles.

I want to bake the pizza in my airfryer so I will use the baking pan that came with the airfryer.

The recipe says "Generously oil a cast-iron skillet with olive oil off heat." So I will oil the airfryer pan.

This is the part of the recipe that makes it pourable "Pour batter in a squeeze bottle or zip-top bag with a bottom corner snipped. Slowly pour the batter into the skillet starting from the center of the pan and working in circles toward the edge. Try to avoid mixing batter with the oil. If small bubbles of oil appear on the surface, use the tip of a paring knife to gently stir them into the dough."

He puts the cast iron skillet on top of the stove, instead of the oven and cooks it much like a pancake.  Since I am using the airfryer, I will have to just flip it over when I feel it is the right time. Maybe about 4 or 5 minutes.

I think this will be a fun experiment with happy results, maybe.

This is the sauce that I want to try from here:

https://permies.com/t/155709/kitchen/Spaghetti-Sauce-Marinara-Tomato-based#1234994


I agree. Here's the link: https://richsoil.com/wood-heat.jsp
reply
    Bookmark Topic Watch Topic
  • New Topic