• Post Reply Bookmark Topic Watch Topic
  • New Topic
permaculture forums growies critters building homesteading energy monies kitchen purity ungarbage community wilderness fiber arts art permaculture artisans regional education skip experiences global resources cider press projects digital market permies.com pie forums private forums all forums
this forum made possible by our volunteer staff, including ...
master stewards:
  • Nancy Reading
  • Carla Burke
  • r ranson
  • John F Dean
  • paul wheaton
  • Pearl Sutton
stewards:
  • Jay Angler
  • Liv Smith
  • Leigh Tate
master gardeners:
  • Christopher Weeks
  • Timothy Norton
gardeners:
  • thomas rubino
  • Jeremy VanGelder
  • Maieshe Ljin

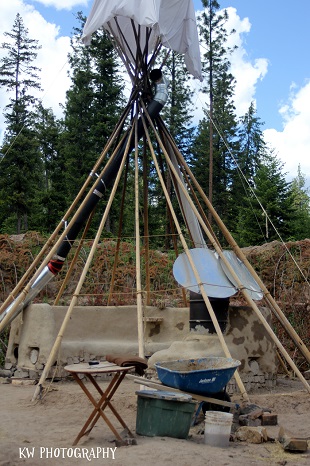
RMH in a Tipi

 
Posts: 107
Location: Merrickville, Ontario
12
  • Mark post as helpful
  • send pies
    Number of slices to send:
    Optional 'thank-you' note:
  • Quote
  • Report post to moderator

paul wheaton wrote: One thought is to put a guillotine where the exhaust comes out of the mass and shut that off when the fire goes out.

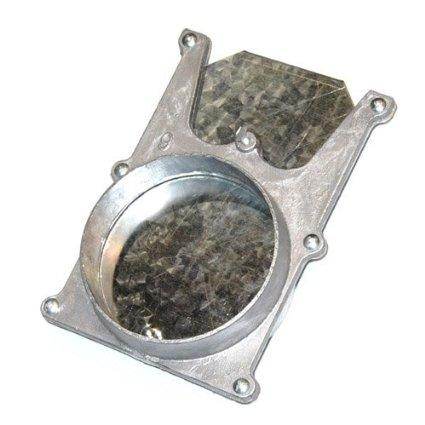
These guillotines have been referred to here and several times in the podcasts. Anybody have a shot of one they can post so we can all see what one looks like?

Edit:
As I often do, I posted this before I really tried to track down the answer.
Anyway, I found this post by Jim LaFrom, which has a link to a product that's very suggestive of a guillotine. I'm guessing, but it seems a good bet this is what Paul is referring to:

 
Posts: 1406
37
  • Likes 1
  • Mark post as helpful
  • send pies
    Number of slices to send:
    Optional 'thank-you' note:
  • Quote
  • Report post to moderator
This is the guiliteen that Tim built for paul..the difference between the one he built an the one you posted is ours is insulated. I also have a video of it I will put up when I get back to my computer today
IMG_20140108_113942120.jpg
[Thumbnail for IMG_20140108_113942120.jpg]
IMG_20140108_113933873.jpg
[Thumbnail for IMG_20140108_113933873.jpg]
IMG_20140108_113928562_HDR.jpg
[Thumbnail for IMG_20140108_113928562_HDR.jpg]
 
pollinator
Posts: 4715
Location: Zones 2-4 Wyoming and 4-5 Colorado
492
3
hugelkultur forest garden fungi books bee greening the desert
  • Mark post as helpful
  • send pies
    Number of slices to send:
    Optional 'thank-you' note:
  • Quote
  • Report post to moderator

paul wheaton wrote:

72) The tipi is wonky. The lower edge has an odd shape. We bought it used and now we are beginning to understand why the price was so good.


76) I think it would be good to have a collection of experiments involving the exhaust. My concern is that once the fire goes out, the chimney continues to draw cold air through the mass - taking the heat out through the chimney. One thought is to put a guillotine where the exhaust comes out of the mass and shut that off when the fire goes out.


All , if I may be so bold as to do some armchair TiPi quarterbacking.

If you lay the canvas out flat on the ground ,does the bottom actually look like it is cut in an odd shape or does it make a nice smooth arc?

Is the site level or slightly sloped? How much slope?

Have you tried doing a burn without the smoke stack going all the way up through the smoke hole? Say a smoke stack only 6 or 7 feet tall. What happened?

Do the smoke flaps close tightly around the crows nest? Have you practiced using the smoke flaps in different positions?

If you have the liner up is there a draft flowing upward between the cover and the liner?

Do you have an Ozan yet?
 
Kristie Wheaton
Posts: 1406
37
  • Mark post as helpful
  • send pies
    Number of slices to send:
    Optional 'thank-you' note:
  • Quote
  • Report post to moderator
here is the video of it works

 
pollinator
Posts: 1481
Location: Vancouver Island
60
  • Mark post as helpful
  • send pies
    Number of slices to send:
    Optional 'thank-you' note:
  • Quote
  • Report post to moderator

Kristie Wheaton wrote:here is the video of it works


Hmm Says "this video is private".
 
Kristie Wheaton
Posts: 1406
37
  • Mark post as helpful
  • send pies
    Number of slices to send:
    Optional 'thank-you' note:
  • Quote
  • Report post to moderator
Len it should be fixed now....sorry about that
 
Len Ovens
pollinator
Posts: 1481
Location: Vancouver Island
60
  • Mark post as helpful
  • send pies
    Number of slices to send:
    Optional 'thank-you' note:
  • Quote
  • Report post to moderator

Kristie Wheaton wrote:Len it should be fixed now....sorry about that


Yup, works now. That is the thickest one I have seen, most are single layer. It will be interesting to see how much the insulation affects the effectiveness of things.
 
steward
Posts: 3718
Location: Moved from south central WI to Portland, OR
985
12
hugelkultur urban chicken food preservation bike bee
  • Mark post as helpful
  • send pies
    Number of slices to send:
    Optional 'thank-you' note:
  • Quote
  • Report post to moderator
So, it's been really, really, REALLY cold over your way in the Montana Mountains.

How's life in the tipi?
 
Posts: 140
Location: montana
29
6
  • Mark post as helpful
  • send pies
    Number of slices to send:
    Optional 'thank-you' note:
  • Quote
  • Report post to moderator

Julia Winter wrote:So, it's been really, really, REALLY cold over your way in the Montana Mountains.

How's life in the tipi?


Hello! Life in the tipi: a quick update. This last week was VERY cold outside (a few nights it went to -25). I think this was a real true test of the ability of our Rocket Mass Heater to perform, AND a test of the ability for a canvas tipi to hold heat.

We found that our RMH needed a little bit of extra attention whenever we lit it, but if we made sure to really "prime the pump" but feeding plenty of flaming balls of paper into the burn tunnel, our heater performed well. It took some mistakes and observation before we realized this. But our RMH did very well. We spend a little extra time in this week, making sure to get a longer burn in, to make sure we were able to heat the mass thoroughly. We have found that it generally takes 3 hours to really heat up our mass, and the longer we burn it the hotter it gets.

The first really cold night (-24) we were able to stay very warm through the night on our heated bed. The temperature was cold in the tipi in the morning, although at least 40 degrees warmer than outside, so getting out of bed was not pleasant.

The next cold night (again at -25) we were very warm on our heated bed, and the temperature in the tipi was 50 degrees warmer than outside, although still chilly.

We spent the entire weekend in the tipi, making a few adjustments, and burning it throughout the day. One of the ajustments we made was replacing our sloppy blanket "ozan" with a more sealed, tighter canvas ozan. We ensured that our liner sealed with the ozan and this allowed the air in the tipi to retain quite a bit more warmth. This morning the temperature in the tipi was 46 degrees, a rather pleasant temperature to wake up to in the morning.

We plan to add a "vestibule" inside the tipi, that will connect with the edge of our ozan and create a bit of a seal from our door. The rocket mass heater core will not be sealed in, but we think this addition will significantly hold in more warmth until the morning.

Neither Tony nore I have ever been cold while sleeping in the tipi. It has been very warm, comfortable and cozy when we are in the tipi in the evenings or weekends, and very warm and toasty through the night. We are working now on trying to retain some of the heat through the night so that the morning air is more comfortable. I can say that we were comfortable this moring, and it should only get better as we make more adjustments.
 
Julia Winter
steward
Posts: 3718
Location: Moved from south central WI to Portland, OR
985
12
hugelkultur urban chicken food preservation bike bee
  • Mark post as helpful
  • send pies
    Number of slices to send:
    Optional 'thank-you' note:
  • Quote
  • Report post to moderator
Thanks so much for the update! It looks like one of Paul's long stated goals is coming to full fruition. Remember to gather video for the youtube "report" in the spring. . . .
 
Miles Flansburg
pollinator
Posts: 4715
Location: Zones 2-4 Wyoming and 4-5 Colorado
492
3
hugelkultur forest garden fungi books bee greening the desert
  • Mark post as helpful
  • send pies
    Number of slices to send:
    Optional 'thank-you' note:
  • Quote
  • Report post to moderator
Anything new at the TiPi ?
 
Emily Aiuppa
Posts: 140
Location: montana
29
6
  • Likes 2
  • Mark post as helpful
  • send pies
    Number of slices to send:
    Optional 'thank-you' note:
  • Quote
  • Report post to moderator
Hi Miles.

Tony and I returned less than a week ago from the Permaculture Voices conference and have been staying warm in the tipi. It snowed last night and today, so the temps are still low, but we are staying warm and cozy. You will be happy to know that we installed an ozan a couple of months ago, and added a vestibule in the tipi. The vestibule gives us enough room to take off muddy overalls and boots and gives another layer to prevent cold air from the door to enter. It seems to be working well. We actually stuffed some insulation to plug up most of the hole in the top as well and we are able to retain more warmth through the night. We are looking forward to the spring/summer when we can complete the cob bench, the sunscoop berm around the tipi and add a porch platform. It will only get cozier and nicer with time. We also made a rain cap before we left for the Voices conference and while we were away there was a lot of precipitation but the rain cap seemed to have kept the interior of the tipi nice and dry.
 
Miles Flansburg
pollinator
Posts: 4715
Location: Zones 2-4 Wyoming and 4-5 Colorado
492
3
hugelkultur forest garden fungi books bee greening the desert
  • Likes 1
  • Mark post as helpful
  • send pies
    Number of slices to send:
    Optional 'thank-you' note:
  • Quote
  • Report post to moderator
Thats awesome !!

I may be following your lead at my place in a year or two. When I find the time.
 
Emily Aiuppa
Posts: 140
Location: montana
29
6
  • Likes 1
  • Mark post as helpful
  • send pies
    Number of slices to send:
    Optional 'thank-you' note:
  • Quote
  • Report post to moderator
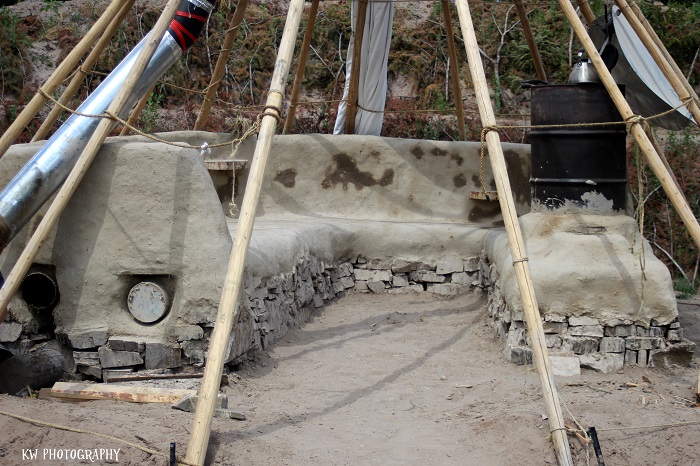
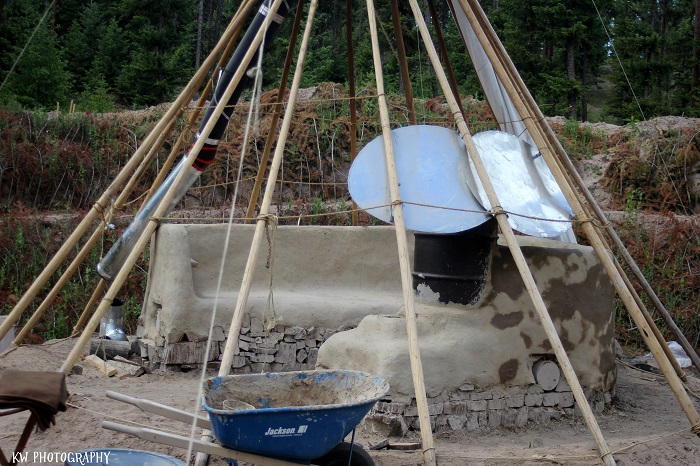
Tony and I have been very grateful to have the Natural Building Workshop participants here all this last week. For the last half of the workshop we were able to complete the cob bench in the tipi with the first plaster layer. We are thinking of adding one more final plaster layer, but it is looking pretty sharp!
IMG_0037.JPG
[Thumbnail for IMG_0037.JPG]
finally working on the cob bench in the summer!
IMG_0039.JPG
[Thumbnail for IMG_0039.JPG]
IMG_0042.JPG
[Thumbnail for IMG_0042.JPG]
 
Emily Aiuppa
Posts: 140
Location: montana
29
6
  • Likes 1
  • Mark post as helpful
  • send pies
    Number of slices to send:
    Optional 'thank-you' note:
  • Quote
  • Report post to moderator
more
IMG_0045.JPG
[Thumbnail for IMG_0045.JPG]
IMG_0064.JPG
[Thumbnail for IMG_0064.JPG]
IMG_0068.JPG
[Thumbnail for IMG_0068.JPG]
 
Emily Aiuppa
Posts: 140
Location: montana
29
6
  • Likes 1
  • Mark post as helpful
  • send pies
    Number of slices to send:
    Optional 'thank-you' note:
  • Quote
  • Report post to moderator
more photos
IMG_0069.JPG
[Thumbnail for IMG_0069.JPG]
IMG_0072.JPG
[Thumbnail for IMG_0072.JPG]
IMG_0085.JPG
[Thumbnail for IMG_0085.JPG]
 
Emily Aiuppa
Posts: 140
Location: montana
29
6
  • Likes 2
  • Mark post as helpful
  • send pies
    Number of slices to send:
    Optional 'thank-you' note:
  • Quote
  • Report post to moderator
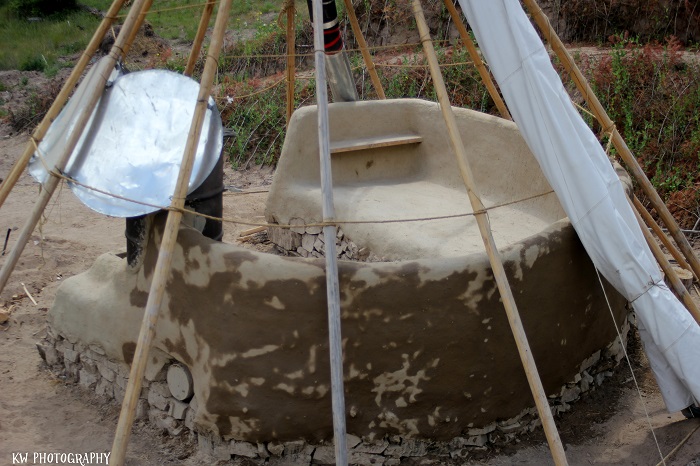
The end result, with possibly one more plaster coat to come.
IMG_0090.JPG
[Thumbnail for IMG_0090.JPG]
 
Julia Winter
steward
Posts: 3718
Location: Moved from south central WI to Portland, OR
985
12
hugelkultur urban chicken food preservation bike bee
  • Mark post as helpful
  • send pies
    Number of slices to send:
    Optional 'thank-you' note:
  • Quote
  • Report post to moderator
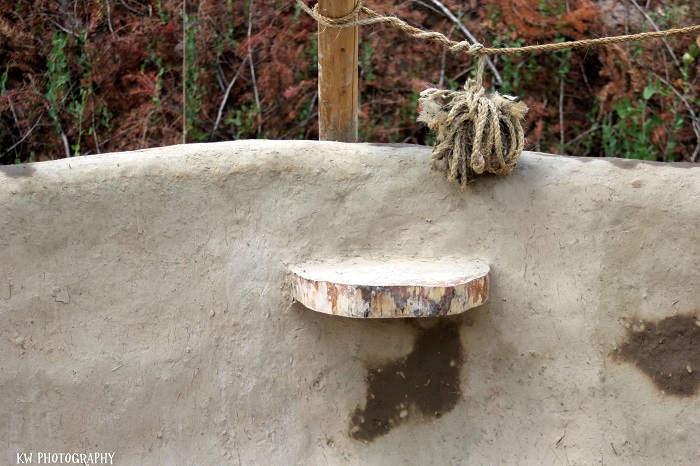
That looks great! I love the little table thingys sticking out from the bench back. So, is the bench on the left in that last picture where you sleep?
 
Emily Aiuppa
Posts: 140
Location: montana
29
6
  • Mark post as helpful
  • send pies
    Number of slices to send:
    Optional 'thank-you' note:
  • Quote
  • Report post to moderator
Yes, we sleep on the left. The bench is wider there -- probably the size of a double bed. We place our buckwheat mattress on top there, which we made to fit the pattern of the wavy bench.
 
Micky Ewing
Posts: 107
Location: Merrickville, Ontario
12
  • Likes 1
  • Mark post as helpful
  • send pies
    Number of slices to send:
    Optional 'thank-you' note:
  • Quote
  • Report post to moderator
Thanks for the update Emily. I'm keeping a close eye on your progress, since I'm planning to put a rocket mass heater in my 16' yurt (under construction). One thing I'm wondering as I look at these photos is how liveable the space is. I've no doubt you have a cozy bed but that bench takes up a lot of floor space. Where do you cook? Where do you put pots, dishes, clothes etc.? Where do you prepare food and wash dishes?

Do you think in-floor heating might be a better option, with the bed at floor level?
 
Posts: 3
Location: Salento, Quindio, Colombia [10b 2000m] Oakland, California, US [10a] Siskiyou, California, US [7b]
1
  • Mark post as helpful
  • send pies
    Number of slices to send:
    Optional 'thank-you' note:
  • Quote
  • Report post to moderator
THAT is a home. It is evident how much happiness and respect you put into this tipi, it shows in your face. How inspiring!
 
pollinator
Posts: 710
Location: SE Ohio
78
goat rabbit books fiber arts sheep homestead
  • Mark post as helpful
  • send pies
    Number of slices to send:
    Optional 'thank-you' note:
  • Quote
  • Report post to moderator
x2 i see the pots hanging in the one pic but i was curious how day to day activities went as well such as dishes washing. Love tipis but i dont think right now i could do it all year. Too many crafts i would need more floor space and storage space.
 
Emily Aiuppa
Posts: 140
Location: montana
29
6
  • Mark post as helpful
  • send pies
    Number of slices to send:
    Optional 'thank-you' note:
  • Quote
  • Report post to moderator

Micky Ewing wrote:One thing I'm wondering as I look at these photos is how liveable the space is. I've no doubt you have a cozy bed but that bench takes up a lot of floor space. Where do you cook? Where do you put pots, dishes, clothes etc.? Where do you prepare food and wash dishes?

Do you think in-floor heating might be a better option, with the bed at floor level?


Good questions. So, first off: we ate most of our meals down in the kitchen at base camp this winter. But we did spend a number of weekends in the tipi and would cook our meals. The barrell on the RMH works wonderfully for cooking. We were able to cook anything from eggs, pancakes, rice, beans, sweet potatoes etc. You can regulate the intensity of the fire to accommodate how much heat you need. We hung our cast iron pans and stainless steel pots above the barrel. We also had a small camp stove and 2-burner coleman stove that we never needed to use. I imagine in the summertime we will not be lighting the RMH very often, so using our camp stove would be the best option. In the winter, we kept two bins of food behind the bench but now tht is is summer we do not keep ANY food inside for bear safety. If we wanted to, we could set up a large bear box to store food outside.

There is not a lot of storage in this tipi, with the size and the bench. Before we added more height to the back wall of the bench we were able to store quite a lot of things, and access them reasonably well. But now that the back wall is built up about two feet high, our access behind the bench as been eliminated. With a larger tipi, I would think that building a circular platform on the inside back edge so that you could place bins on top and easily access them over the back of the bench, this would give you a sgnificant amount of storage. In addition, we can hang quite a lot of things from the poles inside the tipi. We also have made useo of our skiddable wood shed for wood, tools, and a few bins of clothes. There is more storage than you would think, but I also know that if you are choosing to live in a tipi, you are also choosing to greatly minimize your belongings unless you've got storage elsewhere.

We also have thought about building a mass that is at the level of the floor so that the floor is heated and we have a larger space. It would certainly be worth trying!
 
Len Ovens
pollinator
Posts: 1481
Location: Vancouver Island
60
  • Mark post as helpful
  • send pies
    Number of slices to send:
    Optional 'thank-you' note:
  • Quote
  • Report post to moderator

Emily Aaston wrote:
We also have thought about building a mass that is at the level of the floor so that the floor is heated and we have a larger space. It would certainly be worth trying!


Actually it has been done.... well not a Tipi, but with a yurt (fabric not one of those wood ones). There is a thread about it in permies somewhere.... try https://permies.com/forums/posts/list/40/5937... lots of pictures here: Pictures

They did not use cob for the floor, I think it is wood over gravel. But it has worked well from what reports I have seen.
 
Posts: 18
Location: Sprague River, Oregon
2
  • Mark post as helpful
  • send pies
    Number of slices to send:
    Optional 'thank-you' note:
  • Quote
  • Report post to moderator
Hi Emily,
Can't you use the area at the base of the tepee as storage and just access it from the outside by lifting up an edge? Might not be feasible when the snows start falling and you have a snowbank sitting against the lower wall I'd imagine.
 
Posts: 29
Location: Colorado Rockies, off grid
2
  • Mark post as helpful
  • send pies
    Number of slices to send:
    Optional 'thank-you' note:
  • Quote
  • Report post to moderator
I have just finished reading this thread and really am delighted to discover it. I built a rocket stove (minus the mass heat storage) last summer and it has been wonderful all this past winter.

Now I'm going to build a rocket mass heater in a tipi. I would like to describe what I have in mind, and get feedback on whether or not these are good or bad ideas.

I'll be starting with the bare ground. I intend to build up a level rock and dirt circle, about 16 inches in the front of the tipi and with ground sloping, about 22 inches in the back. I will build the RMH flat on the ground, or on top of rocks as needed, then fill with rock and dirt to the level for the floor of the tipi. So, here are some questions.

1. What if I were to make a frame along the pipe and then put about 3 - 4 inches of perlite under the pipe. Would that help to send more heat upward instead of into the ground? I mean by this, rather than surrounding the pipe with rocks, how about putting the pipe basically on the ground with perlite under it, and then rocks to the sides and top?

2. All the literature tells me I need between 30-40 feet of pipe. Would it be a problem to have more pipe? My tipi is 19 ft. around. I figured out the distance of 37 feet of pipe at a circle about 12 feet in diameter. So, I could make the circle about that big, or I could have more pipe and make it a larger diameter circle.

3. I know I need to use cob inside the stove itself. I used a commercial high heat cement on the one in my house and it tends to crumble. So, I want to use cob next time. But, I don't want to use cob all over the whole floor. I'm thinking that if I surround the pipe with rocks, and pour dirt over the whole thing, then cover it with sand (have a LOT of crushed granite sand that made sandbars all around my house in the flood last Sept.). So would it work to use dirt and sand instead of cob around the rocks? It would fill air spaces in the rocks I think. Is that a problem?

4. I don't want a floor that is made out of anything that would stop energy from the earth, so I'm thinking about drying out the dirt and sand completely with the stove, then putting wool rugs down on the sand. How many inches of rock, dirt, sand do I need between the pipe and the rugs to avoid having the rugs smolder or burn? How many inches is too many inches for the heat to effectively heat the air space?

5. Is there any problem with having the 55 gallon drum buried 18 inches in the floor? Is there any problem with having the entire height of the firebox surrounded by rock and dirt in the floor?

Anything else I'm missing?
Thank you,
Lua


Len Ovens
pollinator
Posts: 1481
Location: Vancouver Island
60
  • Mark post as helpful
  • send pies
    Number of slices to send:
    Optional 'thank-you' note:
  • Quote
  • Report post to moderator

Lua Sage wrote:
I'll be starting with the bare ground. I intend to build up a level rock and dirt circle, about 16 inches in the front of the tipi and with ground sloping, about 22 inches in the back. I will build the RMH flat on the ground, or on top of rocks as needed, then fill with rock and dirt to the level for the floor of the tipi. So, here are some questions.

1. What if I were to make a frame along the pipe and then put about 3 - 4 inches of perlite under the pipe. Would that help to send more heat upward instead of into the ground? I mean by this, rather than surrounding the pipe with rocks, how about putting the pipe basically on the ground with perlite under it, and then rocks to the sides and top?


I think the perlite under the pipe would be ok... I think you may also want to use perlite or an other insulator around the perimeter of your mass to floor level.


2. All the literature tells me I need between 30-40 feet of pipe. Would it be a problem to have more pipe? My tipi is 19 ft. around. I figured out the distance of 37 feet of pipe at a circle about 12 feet in diameter. So, I could make the circle about that big, or I could have more pipe and make it a larger diameter circle.


I do not think it is how much length you need so much as there is a limit to the length. The numbers I have heard are 30ft for a 6inch system and as much as 50 for an 8 inch system. Bends in the pipe decrease the maximum length. These numbers are approximate and are affected by length of feed/tunnel/riser as well. So if you follow a design from a book, the pipe layout should be exact because the lengths and turns have been calculated as a unit. If you will deviate, then you need to run it before you cover it and adjust the lengths untill it works and draws well. No one can give you a rule of thumb that will just work... it will only get you started, then adjust to work. Your setup has the advantage that you are starting with a flat open space that you will cover after so you can add or take away lengths easier than someone going for a certain shape. Height of final flue will have an effect too, so test with the whole thing.


3. I know I need to use cob inside the stove itself. I used a commercial high heat cement on the one in my house and it tends to crumble. So, I want to use cob next time. But, I don't want to use cob all over the whole floor. I'm thinking that if I surround the pipe with rocks, and pour dirt over the whole thing, then cover it with sand (have a LOT of crushed granite sand that made sandbars all around my house in the flood last Sept.). So would it work to use dirt and sand instead of cob around the rocks? It would fill air spaces in the rocks I think. Is that a problem?


I am not sure. read the thread about Paul's portable RMH. It seems to me they started with sand and changed to gravel because the sand ended up being too insulative. Putting gravel around the pipe would be ok. adding a thinner dirt floor on top as a sealer would be ok so long as it was not all sand... some clay bearing dirt mixed with the sand would be ok, I think. The pictures of Paul's had open gravel on top. I would suggest a deeper hole, but if you are digging by hand that may be too much to ask. The thing I would remember is that the one you made with no mass did work for you, so adding mass even a bit will help. Things will be different, it may take a number of burns before your mass gets up to temperature, so the barrel may be your heat for a few days.


4. I don't want a floor that is made out of anything that would stop energy from the earth, so I'm thinking about drying out the dirt and sand completely with the stove, then putting wool rugs down on the sand. How many inches of rock, dirt, sand do I need between the pipe and the rugs to avoid having the rugs smolder or burn? How many inches is too many inches for the heat to effectively heat the air space?


you will find this out if you use gravel, you can add or remove mass with a shovel. I would start a little low and add as I went. If the floor is too hot for your feet add more... if your feet can stand it, so can wool. This is not rocket sci.... well ok maybe it is but it is still a lot of common sense too.


5. Is there any problem with having the 55 gallon drum buried 18 inches in the floor? Is there any problem with having the entire height of the firebox surrounded by rock and dirt in the floor?

Anything else I'm missing?


Having the feed at floor level seems ok to me so long as what is buried is done right. That is the burning parts are somewhat insulated from the ground. The barrel being 18inchs down seems like the feed would be to high unless the feed is outside of the floor area.

Missing? Tell us how it works. Show us what it looks like.
 
Lua Sage
Posts: 29
Location: Colorado Rockies, off grid
2
  • Mark post as helpful
  • send pies
    Number of slices to send:
    Optional 'thank-you' note:
  • Quote
  • Report post to moderator
Thank you for responding, Len. I had also thought about putting some foam board insulation inside the outer row of rocks as perimeter insulation. Nice to have it confirmed.

Great idea about testing the length and height of pipe for draw before filling. I will plan for 50 ft of pipe, since that is the maximum. With a single large circular shape to the pipe, the bends are kept to a minimum - no sharp turns and a gentle curve around.

I do plan the exact same dimensions for the rocket stove as the one in my house with such a fabulous draw, except that I want to make the firebox a little bit bigger diameter, just for the pleasure of an open fire in the tipi. Will a larger firebox opening at the top change the draw?

About the flue going up outside the tipi - at the end of the pipe. Does that flue need to go up into the air significantly to achieve a draw? Or can it just be a hole going out at the level of the exit pipe? When designing ordinary chimneys for wood stoves in our cabins, we have followed the principle of a minimum of 2 ft higher pipe than the highest point in the room. Logically, that would seem to mean a 2 ft high flue at the end since there is no height of air space above the buried stove, but the firebox is open to the room, which goes about 20 ft into the air!

I was confused about your "deeper hole" comment. I'm not digging at all because the entire structure is above ground. I'm building up from the ground level. So, what needs to be deeper? It can all be as deep as it needs to be.

About the barrel being 18" down - if the stove itself (firebox, burn tunnel, heat riser, and surrounding 55 gallon drum) is built first on the open ground, then when I start adding rocks to floor level, the end result should be a firebox that has the top edge level with the floor (with a circle of rocks around it to make it pretty) and a barrel that only has the top half coming up into the room. I think I'm going to really like that height of the cooking surface, by the way. I am handicapped with knees that do not work well and it works better the be able to do my cooking sitting down.

I don't have to use sand at all. There is a lot of heavy clay soil on the mountain and I can make the whole surface with that. But, that would mean it would be quite difficult to remove if it were too thick, so the number of inches between pipe and surface is pretty critical. Also critical because my floor needs to be level with a porch that will be coming out from my cabin so that I can walk from the tipi into the cabin without having to change floor height.

Eta: Wowsers. I just noticed in one of the above pictures that the flue goes up inside the tipi all the way to the very top of the smoke hole! Is that because that much draw is needed or just as a way to get the smoke out of the tipi? Because the whole system is built lower than the tipi, I can exit the pipe out the side of the foundation and don't need to run it inside at all, but this goes back to my previous question about the height needed for draw.

Thanks again,
Lua
 
Micky Ewing
Posts: 107
Location: Merrickville, Ontario
12
  • Mark post as helpful
  • send pies
    Number of slices to send:
    Optional 'thank-you' note:
  • Quote
  • Report post to moderator
I'm just going to barge in here with a couple of thougths.

Lua Sage wrote:I will plan for 50 ft of pipe, since that is the maximum. With a single large circular shape to the pipe, the bends are kept to a minimum - no sharp turns and a gentle curve around.


You should plan for less pipe than the maximum. Any curve, regardless how smooth, will resist flow more than a straight run. The faster flow in the middle of the pipe pushes its way to the outside of the curve because of its greater momentum and is slowed down by friction.

Lua Sage wrote:About the flue going up outside the tipi - at the end of the pipe. Does that flue need to go up into the air significantly to achieve a draw? Or can it just be a hole going out at the level of the exit pipe?


You can get a fine draw with a RMH that vents at ground level, though it may mean a shorter run. The chief problem with this design is that, when there is a wind blowing and your vent is on the windward side, the natural draw of the system will be countered and you can get smoke (and fire) into the tipi.

Lua Sage wrote:I do plan the exact same dimensions for the rocket stove as the one in my house with such a fabulous draw, except that I want to make the firebox a little bit bigger diameter, just for the pleasure of an open fire in the tipi. Will a larger firebox opening at the top change the draw?


What you refer to as the firebox is normally called the feed tube, since the fire mostly happens in the burn chamber... at least, that's how it should work. If you widen the feed tube, though, that's liable to change, and not in a good way. The rapid flow of air down the feed tube is the only thing that keeps the fire from following the wood up the tube and into your tipi. Widening the feed tube will slow that air flow and allow the fire to follow its natural tendency to climb. You will have that open fire you sought, but I don't think you would derrive much pleasure from it amid all the smoke.

As with any RMH project, your test burns will tell you what you can get away with and what you can't (except when wind is the wild-card as with ground level venting). I'm just giving you a bit of a heads up on what you can expect.
 
Lua Sage
Posts: 29
Location: Colorado Rockies, off grid
2
  • Mark post as helpful
  • send pies
    Number of slices to send:
    Optional 'thank-you' note:
  • Quote
  • Report post to moderator
Thank you, Micky. So, if every curve is a problem, would it be better to design it with straight pipe runs all the way across instead of circular, with a 180 degree turn? That would mean only two rows of pipe, of about 40 ft.

I would definitely have some upward vent because of snow - just not 22 ft into the air. So, say a 4 ft vertical pipe at the end, with a 180 curved top to stop rain and slow down wind blowback.

Lua
 
Micky Ewing
Posts: 107
Location: Merrickville, Ontario
12
  • Mark post as helpful
  • send pies
    Number of slices to send:
    Optional 'thank-you' note:
  • Quote
  • Report post to moderator

Lua Sage wrote:So, if every curve is a problem, would it be better to design it with straight pipe runs all the way across instead of circular, with a 180 degree turn? That would mean only two rows of pipe, of about 40 ft.


I couldn't say which would allow the longest total run, but I know which would be easiest to build. I plan to heat my yurt with a RMH, so I'm solving a problem very similar to your. In my case I intend to lay out the floor ducting in a square pattern. It's just simpler, and it's not clear to me that a rounder shape would have any advantage. I think only experimentation would tell.

Lua Sage wrote:I would definitely have some upward vent because of snow - just not 22 ft into the air. So, say a 4 ft vertical pipe at the end, with a 180 curved top to stop rain and slow down wind blowback.


A stack higher than the tipi is a tall stack indeed. I'm not sure what I'd do in your case, but the smoke problem occurs because there is a zone of higher air pressure on the windward side of any structure, and a 180 curve in the pipe doesn't change that. I would think, though, that the pressure drops off quickly as the tipi narrows toward the top and also as you go further from the structure. Perhaps a chimney that goes out the side a little way and then goes straight up for a bit would do the trick. See my little sketch.

Lucky for me a yurt of a similar diameter is considerably shorter. I plan to vent my RMH above the roof peak.
tipi-chimney.png
[Thumbnail for tipi-chimney.png]
 
pollinator
Posts: 4154
Location: Northern New York Zone4-5 the OUTER 'RONDACs percip 36''
67
hugelkultur fungi books wofati solar woodworking
  • Mark post as helpful
  • send pies
    Number of slices to send:
    Optional 'thank-you' note:
  • Quote
  • Report post to moderator
Lua Sage : I would run any final plans past Ernie and Erica Wisner, also it has always been my understanding that there is a special gain in keeping the
Exhaust pipe inside the Tipi Structure -above and beyond the 'whole house stack effect' of running a warm pipe through a warm multi level structure !

I can see no additional benefit to running the exhaust gases to an outside chimney-


I just took 3 minutes to run my objections through my 'but we have always done it this way ! " Alarm, with no response, but I would like to get a second
and third opinion !

For the good of the Crafts!Big AL
 
Len Ovens
pollinator
Posts: 1481
Location: Vancouver Island
60
  • Mark post as helpful
  • send pies
    Number of slices to send:
    Optional 'thank-you' note:
  • Quote
  • Report post to moderator

Micky Ewing wrote:I'm just going to barge in here with a couple of thougts.


Thankyou. About what I thought.

The one thing I would add with regards to mass thickness (amount of covering over the pipe) is that the shallower the cover, the more concentrated the heat will be around the pipe and thicker will tend to spread the heat more.... however, it will also take longer to get warm. So there is not really a right thickness so much as the thickness that gives the best compromise for your liking. More responsive with concentrated heat and more frequent shorter firings, or less responsive with more spread out heat, less frequent firing, but longer firings.

With regard to the big circle or square: It may take some time before the centre of the floor gets warm (provided ones definition of warm is cool enough ) heat takes time to travel through earth. In the PAHS world they say 9 inches per month, but that is with lower temperatures than your flue pipes... still, don't expect a nice even warm floor to walk on. You will have favourite spots to sit and sleep depending on the inside air temperature... how close to pipe you want to be.

Also remember to factor in the position of your barrel as it will be radiating heat into the room, you may wish to have more pipe covering close to the barrel and less as the pipe gets farther away. Both because the flue gas will have less heat to give up and because you need more heat as you get farther away from the barrel.
 
Lua Sage
Posts: 29
Location: Colorado Rockies, off grid
2
  • Mark post as helpful
  • send pies
    Number of slices to send:
    Optional 'thank-you' note:
  • Quote
  • Report post to moderator
Thank you. Len. That's a lot to think about.

I just realized another design issue and haven't figured out a solution. With my current rocket stove I have 2 clean out valves. One is a removable brick at the end of the firebox (feed tube) and I can reach all the way into the base of the heat riser with a rake type tool. The other is a cap on the pipe coming out of the back of the barrel. Both those spots would be buried. Any ideas?
 
allen lumley
pollinator
Posts: 4154
Location: Northern New York Zone4-5 the OUTER 'RONDACs percip 36''
67
hugelkultur fungi books wofati solar woodworking
  • Mark post as helpful
  • send pies
    Number of slices to send:
    Optional 'thank-you' note:
  • Quote
  • Report post to moderator
Lua Sage : Best short cut I can give you ! Goto Our 'Sister site' www.richsoil.com/rocket-stove-mass-heater.jsp If you have not watched this entire series of
videos you should ! Specifically, you are looking for the video of Ernie and Erica 'At home " Opening shot shows Ernie in blue checked lounging pants, you are
watching to see the removable Top to the Barrel. It makes cleaning the area immediately after the heat riser ( where most of the fly ash accumulates ) simple !

With what you can clean from this location, plus a second clean out at the base of your vertical chimney, (yes, you need this one too ) you should go years before
you have to clean out the entire system ! Big AL
 
Len Ovens
pollinator
Posts: 1481
Location: Vancouver Island
60
  • Mark post as helpful
  • send pies
    Number of slices to send:
    Optional 'thank-you' note:
  • Quote
  • Report post to moderator

Lua Sage wrote:Thank you, Micky. So, if every curve is a problem, would it be better to design it with straight pipe runs all the way across instead of circular, with a 180 degree turn? That would mean only two rows of pipe, of about 40 ft.


Some more thoughts off the top of my head. Assuming you have looked at the pictures of the unit above... You should have seen that there are two metal plates behind the barrel to reflect heat into the room as well as protect the skin on the tipi. The barrel is to the side because of the bench design. Traditionally the fire has been in the centre or very slightly offset. There are obvious reasons why this was done with an open fire, but I can think of at least some reasons for centering the barrel as well. The safety aspect has not really gone away for sure. The evenness of heat use from the barrel is another reason. If it rains there is less likelihood of things touching the skin producing a hole in the air layer and letting water through (Len lives in a rainy part of the world... but then he would not use a tent for long term living on the wet coast). It would give access to the top of the barrel without having to lean over the feed. <tongue in cheek> It gives a clear indication of where the mens and womens side of the tipi is.</tongue in cheek> (traditionally this was true, but I think we have gotten beyond that now) Anyway, It is normally frowned on, but you could then use more than one flue coming out of a manifold and have them radiating out. The main thing to remember is that it is impossible (pretty much) to expect the flue gas to split exactly evenly between flues, so there may be more heat from one than other(s). This has been done with reasonable success, but again, I would try it out and see what part of the flue gets warmest and take that into consideration when deciding where to place ones sleeping area. Traditionally this has been close to the skin with the awake time area being close to the radiant heat more towards the centre.
 
author and steward
Posts: 52415
Location: missoula, montana (zone 4)
hugelkultur trees chicken wofati bee woodworking
  • Mark post as helpful
  • send pies
    Number of slices to send:
    Optional 'thank-you' note:
  • Quote
  • Report post to moderator
Some more finishing layers ....


Emily Aiuppa
Posts: 140
Location: montana
29
6
  • Likes 1
  • Mark post as helpful
  • send pies
    Number of slices to send:
    Optional 'thank-you' note:
  • Quote
  • Report post to moderator
Greetings from the Tipi! Tony and I have been enjoying the finished cob bench after moving back into the tipi this last week. There were a few cold days so we fired up the heater and stayed nice and cozy. Our sunscoop berm is full of life and the new colony of bees in our bee hut are enjoying the warm days.

Tony and I have decided not to live in the Tipi this next winter. We have other tasks and goals that will take us away from Wheaton Labs in September. We will certainly miss the Tipi. It brought us a great deal of peace, solace, and warmth through the cold winter months. We do not want the tipi to be empty this winter! We have put a great deal of work into making that space cozy and productive and would love to pass it on to another caretaker.

We have a small list of recommendations to improve the comfort even more this coming winter. And we would hope that a new couple would be up to the challenge! The hardest parts have already been done, but more improvements can always be made. We suggest a couple because although it is very comfortable, it is still a tipi in the winter in montana. It is nice to have 2 people sharing chores like chopping wood, starting/maintaining the rocket mass heater, sharing the cold journeys off of the lab on cold winter mornings.

So, if there are any couples out there (or a competent individual) make it known! And please ask any questions if you have them.
 
Posts: 20
Location: san bernardino, california
  • Mark post as helpful
  • send pies
    Number of slices to send:
    Optional 'thank-you' note:
  • Quote
  • Report post to moderator
If only me and the wife were on the same page, but I'm still trying to convince her to read the same book. What an opptunity you are offering. Best of luck on your new adventures hope someone will take over the responsibility of the tipi.
 
Posts: 4
  • Mark post as helpful
  • send pies
    Number of slices to send:
    Optional 'thank-you' note:
  • Quote
  • Report post to moderator
Hi Emily,

My partner and I are interested in being caretakers! A little about us...we just finished a 6 month bike (and bus) tour of South America. Okay it was just Ecuador and Peru! So, our next step is to work real hard for a year, save and buy a piece of land to start permaculturing. Our first project will be a tipi with a rocket mass heater! My boyfriend loves to always make things better and improve things. Does that sound like it might be a good fit? What kind of details might you want to know about us? Are your dates of departure? Feel free to email me at kellyloren008@gmail.com

Warmly,
Kelly
 
When evil is afoot and you don't have any arms you gotta be hip and do the legwork, but always kick some ... tiny ad:
permaculture and gardener gifts (stocking stuffers?)
https://permies.com/wiki/permaculture-gifts-stocking-stuffers
reply
    Bookmark Topic Watch Topic
  • New Topic