• Post Reply Bookmark Topic Watch Topic
  • New Topic
permaculture forums growies critters building homesteading energy monies kitchen purity ungarbage community wilderness fiber arts art permaculture artisans regional education skip experiences global resources cider press projects digital market permies.com pie forums private forums all forums
this forum made possible by our volunteer staff, including ...
master stewards:
  • Carla Burke
  • Nancy Reading
  • r ranson
  • Jay Angler
  • John F Dean
  • Pearl Sutton
stewards:
  • Nicole Alderman
  • paul wheaton
  • Anne Miller
master gardeners:
  • Christopher Weeks
  • Timothy Norton
gardeners:
  • thomas rubino
  • Jeremy VanGelder
  • Matt McSpadden

Steel Frame RMH in Container Home, first build, pics and questions galore

 
Posts: 29
Location: Western WA
1
  • Likes 3
  • Mark post as helpful
  • send pies
    Number of slices to send:
    Optional 'thank-you' note:
  • Quote
  • Report post to moderator
Hi gang!
LONGTIME lurker here, I had another account before this that I lost access to some time ago. I bought my first copy of Evans/Jackson's RMH in the early 00s, and updated to the third edition a couple years ago. I also have the annoyingly disorganized bloviation fest "Wood Burning Stoves 2.0 that I spent a million dollars on.

I am finishing up work on a container home that I built/designed solo and the last project on the list is the RMH.
I wanted something I could cover in tile, the Sketchup pics you'll see show the RMH covered in cement tile backer board (*Hardie Board), which in turn will be covered in tile I plan to make (Next project is a ceramic/tile studio).
I also wanted something safe that I could put a mattress on and not burst into flames. So I decided on a steel frame that provides a 2" air gap all around the top sides. Hardie Board is screwed into the frame and contains the stone/sand/clay mass.
The design for the stove includes both the Trip Wire and Peter Channel modifications which aren't visible in the Sketchup pics I've included a link to here. It's an 8" system with an approx 51 3/4" heat riser and is built with two barrels, the top one will be removable.
I'm about a week out from beginning, I have all the materials on hand and am ready to go. I created an album to share pics with you all here on Google Photos, but I've never used it before today and am not sure you will be able to access the pictures.
I've taken some screen shots from Sketchup and have hopefully put together a portfolio which you will be able to make sense of the design. I included some pics of the downstairs floorplan and of the entire house, which is built from three 9.5ft x 8ft x 40ft storage containers, so you can get an idea of context.
Real photos of the build will begin shortly and you'll get to see how the house itself turned out, which you might enjoy.
So you know what you're looking at, the red brick sits on aluminum foil on the floor and is covered with Hardie board, the pipes sit directly on that. Yellow bricks are fire bricks, included under the burn tunnel sits on a 5 3/4" perlite/cement base, the burn tunnel is insulated with perlite/clay contained in expanded lathing.
So, the price of all this good DIY porn is I could use some help and advice here and there along the way, mostly with advice on how to go about mixing the sand and clay, which we have in abundance here in Western WA and with the actual mortaring of the tunnel itself, which I've never done before, mixing the fire clay and the Perlite insulation.
Here's the link to the album on Google Docs
Sketchup Pics for Permies
There are 19 pics and I figured it's easier to share them this way rather than pic by pic here in the post...let me know if you're able to view them.
THANKS VERY MUCH FOR YOUR INTEREST AND ASSISTANCE!!
Jon


Jon Terry
Posts: 29
Location: Western WA
1
  • Likes 1
  • Mark post as helpful
  • send pies
    Number of slices to send:
    Optional 'thank-you' note:
  • Quote
  • Report post to moderator
I'm having trouble posting pics directly, I tried posting one under my name at the end there, but it doesn't look like it's displaying properly...
Here's the URL I used on its own_ https://photos.app.goo.gl/AJpnmWAZtb3wBCAU7
 
Rocket Scientist
Posts: 1810
Location: Kaslo, BC
525
building solar woodworking rocket stoves wood heat greening the desert
  • Likes 3
  • Mark post as helpful
  • send pies
    Number of slices to send:
    Optional 'thank-you' note:
  • Quote
  • Report post to moderator
Hi Jon,   I can see by your pictures you've got quite a build in mind!

- First off, seeing as how your spanning the bed/mass with steel, have you thought of getting rid of the pipe (which looks like with all those bends would cause a lot of drag on your exhaust) to make a bell out of it instead? The heat would be more dissipated throughout the bed as the heat stratifies rather than having a hot, medium and warm line on the surface as the exhaust gasses cool as it travels through the pipe. A little info on bells: Bell Theory

- I'm assuming you've looked at the weight of the stove and whether or not your floor joists will be able to handle everything?
- To keep the heat from traveling downwards at the bed area, you should provide some form of insulation above the hardie board as well. Possibly perlite/clay but not as thick as under the stove.
- I noticed with your red brick placement that you left openings for air to flow from one side to the other with your bed area but not with the stove. A concrete floor may not be a concern but a wooden floor it could be.

The mix is always custom to the area where you are getting your clay soil from. Best to make test bricks before you start, allow them to dry and see which ones hold together the best without cracking or crumbling.
 
Jon Terry
Posts: 29
Location: Western WA
1
  • Likes 1
  • Mark post as helpful
  • send pies
    Number of slices to send:
    Optional 'thank-you' note:
  • Quote
  • Report post to moderator
Hi, thanks for the thoughtful reply!
The floor is good to go, these storage containers have steel joists every foot, so no problem there.
I'm intimidated by the Bell suggestion, though intrigued. I've built the living room around this design, so no changes to the layout can be made. Is it possible to create a bell underneath that mattress without changing the general size and shape of the mass?? I'm not too worried about the temp zones above because of the platform the mattress sits on, it won't be as noticeable up there.
I like your suggestion to close the gaps under the red brick, I have loads of perlite, I can fill in those gaps with just dry perlite.
I also have some kiln cloth that's going underneath the area where the gasses leave the barrel and enter the mass heater. That entire bottom zone will be made from large perlite and clay.
Lastly, to clarify, I'm not making bricks with the local clay and sand, just mortar. All of my main worries at this point are with the laying of the brick, something I've never done before.
Thanks again for your input!
 
Gerry Parent
Rocket Scientist
Posts: 1810
Location: Kaslo, BC
525
building solar woodworking rocket stoves wood heat greening the desert
  • Likes 3
  • Mark post as helpful
  • send pies
    Number of slices to send:
    Optional 'thank-you' note:
  • Quote
  • Report post to moderator

Jon Terry wrote: Is it possible to create a bell underneath that mattress without changing the general size and shape of the mass??


That's what I was thinking. Keep the size the same, just enclose it all to keep all the exhaust gases in. If you decide to stick with your piped mass, I think the drag is still going to be an issue that you'll need to modify to make it work properly for you. Here is Paul's description of a bell:  Stratification chamber

I like your suggestion to close the gaps under the red brick, I have loads of perlite, I can fill in those gaps with just dry perlite.


Dry perlite will settle over time without a little clay slip mixed in the give it some structure and hold its shape, but actually I was suggesting to have an open air flow rather than a closed off air gap that would keep the hot air from potentially building up.

Lastly, to clarify, I'm not making bricks with the local clay and sand, just mortar. All of my main worries at this point are with the laying of the brick, something I've never done before.


A couple of youtube videos and a bit of trial and error and I think you'll do just fine. Stagger your joints, keep the mortar as thin as possible, keep it all level/plumb and don't mix more mortar than what you can use in a short period of time (unless its clay based). A refractory mortar would be best for longevity in the heat/cool cycles but even better would be to use a clay mortar as it can be modified much easier if needed, easier on the hands and is an all natural product. I used a local clay and made a slip from it that turned out quite well. Thomas Rubino our fearless forum leader has documented his shop heater build here with some useful tips  shop heater build
 
Jon Terry
Posts: 29
Location: Western WA
1
  • Mark post as helpful
  • send pies
    Number of slices to send:
    Optional 'thank-you' note:
  • Quote
  • Report post to moderator
Open airflow under the bed? I like that a lot!! I'll put some vents in the Hardie Board down low, mess with it on Sketchup a bit and get back to you.
Now, about that bell chamber, I like that, too, but, I'm concerned with the exhaust flue being moved, that's something I can't do. I have my vent hole cut in the steel wall already and insulated and sheathed, it's carved in stone now, so to speak.
You keep saying I'll have trouble with drag, I designed this keeping to the guidance of the book and extended my burn tunnel about a foot, I think, in order to power it through. According to the book, it should be fine...?
 
Jon Terry
Posts: 29
Location: Western WA
1
  • Mark post as helpful
  • send pies
    Number of slices to send:
    Optional 'thank-you' note:
  • Quote
  • Report post to moderator
So, I could build a steel frame *bell* inside that area, just a square framed open area under the bed...
I'm a little concerned with the loss of mass that would normally fill the area between the pipes. It seems I'd lose quite a bit of mass that way. Should I be?
I really appreciate you taking the time to talk with me about this. I have to admit it was not at all what I was hoping to read and my first impulse was just to look away, but the more I think about it, the better it gets.
I've been so busy building the house for the last few years that I stopped researching the RMH and fell behind the times. I like the open bell under there a lot, though. I'll get Sketchuping today and will be back with a design to run by you.
Thanks again, Gerry!
 
Posts: 576
Location: Richwood, West Virginia
12
  • Likes 1
  • Mark post as helpful
  • send pies
    Number of slices to send:
    Optional 'thank-you' note:
  • Quote
  • Report post to moderator

Jon Terry wrote:
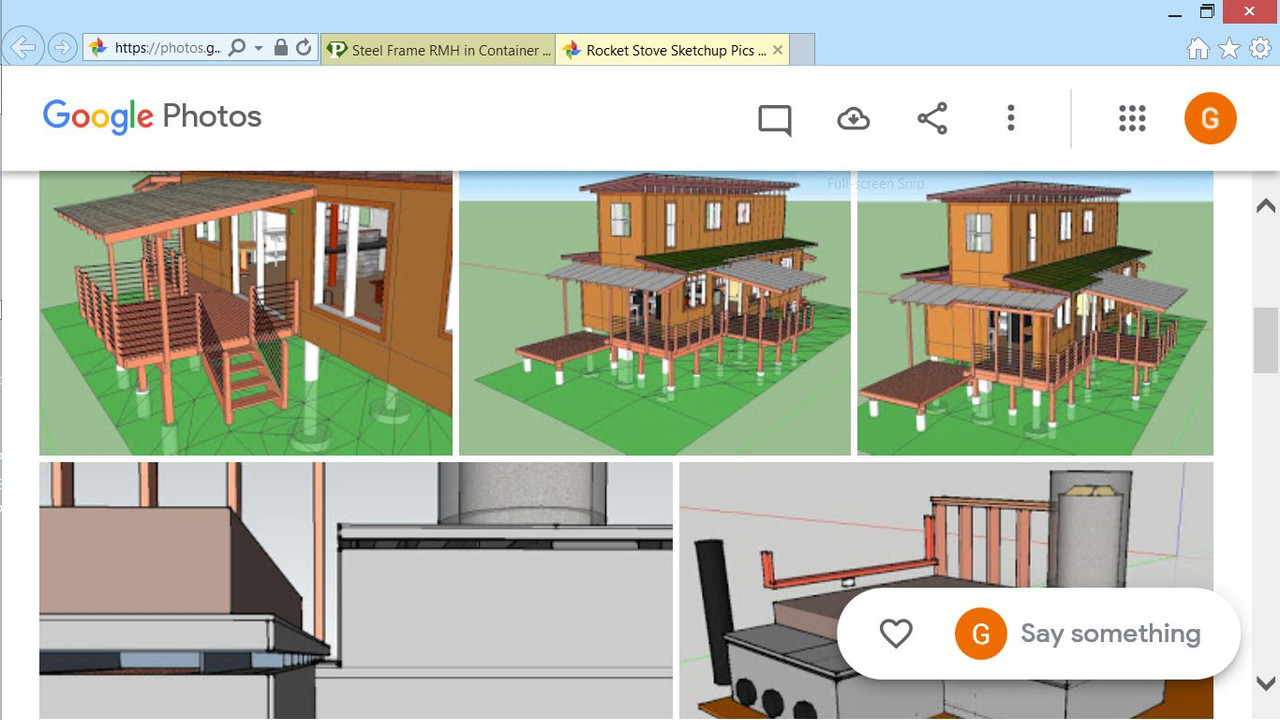
I also wanted something safe that I could put a mattress on and not burst into flames...Sketchup Pics for Permies


I know the draft will keep the sparks going into the stove but some people might be a little squeamish about placing a mattress so close to it


Jon Terry
Posts: 29
Location: Western WA
1
  • Mark post as helpful
  • send pies
    Number of slices to send:
    Optional 'thank-you' note:
  • Quote
  • Report post to moderator
That's a good point.
I originally designed it with the feed tube on the opposite side of the barrel, well away from the mattress, I changed it in order to leave more space in that area of the room, but I could put it back if you guys think this will be a real concern...
thanks for your input!!
 
Jon Terry
Posts: 29
Location: Western WA
1
  • Mark post as helpful
  • send pies
    Number of slices to send:
    Optional 'thank-you' note:
  • Quote
  • Report post to moderator
Again, THANK YOU, for your input and suggestions! I'm loving this. SO glad I took the time to post this here before starting.
Really looking forward to revising the design now to accomdate a bell chamber. I can use pieces of corrugated steel that I've removed from the containers to enclose at least the roof of the chamber, if not the sides, they'll add to thermal mass and conduct heat upwards and possibly sideways into the mass much more efficiently than the cement backer board, I'm guessing...?
 
Jon Terry
Posts: 29
Location: Western WA
1
  • Mark post as helpful
  • send pies
    Number of slices to send:
    Optional 'thank-you' note:
  • Quote
  • Report post to moderator
A couple quick questions: it's an 8" system, so the hole on the side of the bell leading out would stand 8" high, what if I put an L bend there pointing down, trimmed a few inches off the floor of the chamber so as to draw cooler air? would that work?
also-
what's the best way to post updated pics, directly in the thread or just added to the Google photos folder? If best to post directly, how? I tried using the link given from Google photos, but they didn't show up in my browser, at least?
 
Gerry Parent
Rocket Scientist
Posts: 1810
Location: Kaslo, BC
525
building solar woodworking rocket stoves wood heat greening the desert
  • Mark post as helpful
  • send pies
    Number of slices to send:
    Optional 'thank-you' note:
  • Quote
  • Report post to moderator

Jon Terry wrote: Now, about that bell chamber, I like that, too, but, I'm concerned with the exhaust flue being moved, that's something I can't do. I have my vent hole cut in the steel wall already and insulated and sheathed, it's carved in stone now, so to speak.


Having your exhaust on the opposite end from your intake seems quite ideal to me. Generally, the exhaust port goes closest to the bottom of the bell and the intake somewhere in the middle to allow the gases to properly stratify. There could also be multiple chambers or pillars involved too depending upon your ISA (Internal Surface Area). In case you havn't read the next part about bells sizing here is the link to Peters website Bell Sizing

You keep saying I'll have trouble with drag, I designed this keeping to the guidance of the book and extended my burn tunnel about a foot, I think, in order to power it through. According to the book, it should be fine...?


I count 7  90's. From my memory, it is said that each 90 turn takes away approximately 5 feet from the total run you can have. If the maximum total horizontal exhaust run for an 8" system is 50' then 7x5 = 35' - 50' = 15'.   So that means at a maximum, you could have 15' of horizontal run of piping with the current configuration you have. Not sure of the length of the piping in your drawings but I'd say its over this limit. Its also best not to push things to their limits as there will be days where the weather is not conducive to a great draft especially during the shoulder seasons. Please feel free to correct me if this sounds off to anyone.
 
Gerry Parent
Rocket Scientist
Posts: 1810
Location: Kaslo, BC
525
building solar woodworking rocket stoves wood heat greening the desert
  • Likes 1
  • Mark post as helpful
  • send pies
    Number of slices to send:
    Optional 'thank-you' note:
  • Quote
  • Report post to moderator

Jon Terry wrote: I'm a little concerned with the loss of mass that would normally fill the area between the pipes. It seems I'd lose quite a bit of mass that way. Should I be?


Gaining a more even distribution of heat across the entire bed I think would outweigh any potential of more mass being better but that is just a gut feeling.  
Thomas Rubino's shop heater had a brick bell with many of them sticking inwards to increase the surface area the heat could be collected from. Can't remember if he commented on how effective that was to extract more heat from the exhaust. As I quickly mentioned before, columns could also be added which would also increase the surface area and mass. Peter van den Berg is the pro in this department and has helped me with my bell build many years ago which I have been grateful. Once you get a little closer to designing what you like, perhaps he (or others) could give you a few pointers  

 
Gerry Parent
Rocket Scientist
Posts: 1810
Location: Kaslo, BC
525
building solar woodworking rocket stoves wood heat greening the desert
  • Likes 2
  • Mark post as helpful
  • send pies
    Number of slices to send:
    Optional 'thank-you' note:
  • Quote
  • Report post to moderator

Jon Terry wrote:A couple quick questions: it's an 8" system, so the hole on the side of the bell leading out would stand 8" high, what if I put an L bend there pointing down, trimmed a few inches off the floor of the chamber so as to draw cooler air? would that work?


Sorry, I'm not quite following what you mean... perhaps a picture?

what's the best way to post updated pics, directly in the thread or just added to the Google photos folder? If best to post directly, how? I tried using the link given from Google photos, but they didn't show up in my browser, at least?


When I post a picture from my computer, I click on the tab in the beige area right below the reply window (where I type) called "attachments", then the button "upload a file". Hope this helps.
 
Jon Terry
Posts: 29
Location: Western WA
1
  • Likes 1
  • Mark post as helpful
  • send pies
    Number of slices to send:
    Optional 'thank-you' note:
  • Quote
  • Report post to moderator
OK, I added a bell chamber, put it up on a one inch thick layer of perlite/clay, which sits on the hardie board setting on the red brick. I re-arranged the bricks to get some airflow under there and opened up holes in the Hardie board to vent the underside.
I also rotated the burn tunnel and feed tube so as to move it away from the mattress.
Better? I know I feel better making these changes and I owe you guys a beer someday!
Here is what I hope is a link to a new Google Photos folder with the changes... https://photos.app.goo.gl/95aSPh9dooerWMp56

I'll work on a pic of the right angle bend on the exhaust flue and try to get it uploaded tonight. Thanks again, Gerry!
 
rocket scientist
Posts: 6476
Location: latitude 47 N.W. montana zone 6A
3319
cat pig rocket stoves
  • Mark post as helpful
  • send pies
    Number of slices to send:
    Optional 'thank-you' note:
  • Quote
  • Report post to moderator
Looking good Jon!    Gerry is lining you out very well!
Holes thru the hardy board are not really needed, that heat will transfer just fine.
Please send photo's about your exhaust idea.
 
Jon Terry
Posts: 29
Location: Western WA
1
  • Mark post as helpful
  • send pies
    Number of slices to send:
    Optional 'thank-you' note:
  • Quote
  • Report post to moderator
Thank you, Thomas!
No need for the holes? I thought they were such a great idea! Having open air flow under there and really keep the heat from building up...? But, if they're not necessary, I'd love to omit them, they'd be a real bear to cover in tile. So, leave them out?
 
Gerry Parent
Rocket Scientist
Posts: 1810
Location: Kaslo, BC
525
building solar woodworking rocket stoves wood heat greening the desert
  • Likes 1
  • Mark post as helpful
  • send pies
    Number of slices to send:
    Optional 'thank-you' note:
  • Quote
  • Report post to moderator
Jon,  If Thomas says no holes, then I would trust his judgement as he has more experience with others who have done this same thing. If you still feel more comfortable with the 'premium ventilation option', you could reduce the number of holes maybe to one hole per side - acting like a manifold. If it were my stove, I know I'd be sticking a temperature probe in there to see what kind of temperatures it really does get to but that's my personal guy nature. We'll leave it up to you :)

The space that is between the top of the blue corregated metal and the bottom of the steel frame (and also along the sides) for the bed, is that going to be filled with your choice of mass?

Here are a few short clips from the build that Ernie and Erica did on a wooden floor that needed protection. About half way through the first clip you can see the ventilation holes under the stove and bench. It may give you some visuals that are helpful:   Rocket Mass Heaters Instructional DVD   and   RMH floor
 
Jon Terry
Posts: 29
Location: Western WA
1
  • Mark post as helpful
  • send pies
    Number of slices to send:
    Optional 'thank-you' note:
  • Quote
  • Report post to moderator
Here's a before and after of what I meant about altering the opening into the exit flue: put an elbow turning down on the end of it, and trim the opening as needed to make sure there's ample space...?
Also, you mentioned putting pillars in the bell and facing bricks inward to add to the mass in there, what about covering most of the floor with river rocks about 3-5" in diameter?? Maybe leave a channel in them to open a path to help guide the cooler gasses into the exit flue?
redux-5.JPG
[Thumbnail for redux-5.JPG]
redux-6.JPG
[Thumbnail for redux-6.JPG]
redux-7.JPG
[Thumbnail for redux-7.JPG]
redux-8.JPG
[Thumbnail for redux-8.JPG]
 
Jon Terry
Posts: 29
Location: Western WA
1
  • Likes 1
  • Mark post as helpful
  • send pies
    Number of slices to send:
    Optional 'thank-you' note:
  • Quote
  • Report post to moderator
Hi Gerry,
I just noticed the "like" option on posts here. Sorry I didn't hit that on everybody's prior posts...
I kinda like the idea of leaving a couple *premium* holes, lol. I have a infra red thermometer gun thingie I use all the time and was looking forward to being able to shoot it right under the center of the mass on the wood floor. Love that idea, actually.
And, to answer your question, yes I will fill in around and above the bell cave with rock/clay/sand. Waiting to hear what you think of the altered exit flue. I definitely owe you guys a beer (or a smoke) if you're ever in Western WA! The helpful suggestions you guys have all made here has really improved this design so much. Please let me know if there's anything I can do to improve it further!
When it's done I can maybe upload a copy of the Sketchup file here to share...
oh, what should I use to seal the gaps in the inner chamber where the walls and ceiling come together? Just clay and ash?
many thanks!
redux-9.JPG
[Thumbnail for redux-9.JPG]
 
Gerry Parent
Rocket Scientist
Posts: 1810
Location: Kaslo, BC
525
building solar woodworking rocket stoves wood heat greening the desert
  • Likes 2
  • Mark post as helpful
  • send pies
    Number of slices to send:
    Optional 'thank-you' note:
  • Quote
  • Report post to moderator

Jon Terry wrote:Here's a before and after of what I meant about altering the opening into the exit flue: put an elbow turning down on the end of it, and trim the opening as needed to make sure there's ample space...?
Also, you mentioned putting pillars in the bell and facing bricks inward to add to the mass in there, what about covering most of the floor with river rocks about 3-5" in diameter?? Maybe leave a channel in them to open a path to help guide the cooler gasses into the exit flue?


I see what you mean now. Thank you for the clarification. Having the elbow there will certainly allow the exhaust gasses to linger (and stratify) that much longer. Having the clean out right there, if you make the elbow flexible so it can be adjusted to allow more or less of the gasses to escape, it could be used to help find that sweet spot.
River rocks on the floor of the bell could be a good idea. I do foresee them getting in the way when you go to vacuum out the ash annually, but again, with the clean outs, you could reach in there with a long hook and pull them out if you don't find them useful or a pain in the butt. Only time and your own experiences will show you what is going to work as everyone's stove is designed a little different and with new innovations that may not ever had been tried quite the same before. Just be prepared to accept that innovation sometimes requires future modifications. But as they say, no guts no glory!
I don't think leaving a path to the exit flue would do much as stratification happens mostly horizontally and can only happen without too much turbulence.

The rock/clay/sand you mentioned using as your mass would certainly be a good sealant for the inner chamber also. No rock at the joints but a good coating of what is called "fire cob" (generally sand and clay with no fiber). Ash and clay slip has been used as a makeshift refractory which would work also.

Your interest and enthusiasm for giving life to a fire breathing dragon is not one many can put on their resume! To be a part of your journey towards a cleaner and more joyful world is reward enough for me.
 
Rocket Scientist
Posts: 4566
Location: Upstate NY, zone 5
590
5
  • Likes 1
  • Mark post as helpful
  • send pies
    Number of slices to send:
    Optional 'thank-you' note:
  • Quote
  • Report post to moderator
With all the advice so far, you have what looks to be a very good setup. I have just a couple of comments to add.

The aluminum foil on the floor that you mentioned in your first post is a good idea, but it would be much more effective on top of the bricks. The foil's entire function happens due to a shiny surface not radiating heat well, but if its exposed surface is facing up, it will get dust on it which will kill the shine and eliminate its effectiveness. With the shiny surface facing down, it will not gather dust to speak of and will stay shiny longer.

Your bell space appears to have plenty of circulation/flow capacity, and several brick columns in the middle of it would add to the mass and to the heat transfer surface area, both of which I feel are on the low side for your combustion core's capacity.
Also, since heat generally travels about an inch per hour through cob, the apparently quite thick top of the bell combined with the mattress would limit the warmth that will escape upward. I think you could make the top a bit thinner, increasing the internal height of the bell.
Peter van den Berg's batch rocket sizing calls for a 6" batch box to have about 57 square feet of internal bell surface (an 8" J-tube seems to have similar capacity as a 6" batch box). I would estimate that you have around 40 square feet of internal bell surface (the floor doesn't count). Pillars would help.
 
Jon Terry
Posts: 29
Location: Western WA
1
  • Mark post as helpful
  • send pies
    Number of slices to send:
    Optional 'thank-you' note:
  • Quote
  • Report post to moderator
Thank you, Glenn.
I really like the internal pillars idea, do the pillars need to make direct contact with the roof of the bell chamber? If so, I guess I need to adjust the heighth of that inner chamber so as to sit directly on the bricks.
How many bricks can I put in there?? Seems I could add quite a number of pillars, when does that begin to become an issue?
You mention decreasing the mass above the chamber, when I added the chamber I raised the top a couple inches because I wanted to increase the amount of mass. My thinking being that the extra mass would store more heat and thus keep the house warm longer. I'd be happy to lower that and decrease the mass size just to lower the mattress height. But, I'd rather have more heat storage.
I was hoping that the open air space above the mass, and the opened sides would allow heat to escape and not be held back by the mattress, but you seem concerned that it will.
Lastly, the foil. OK, on top it shall go. But, I had wanted to put a couple layers on top of one another on the floor anyhow, just to protect the wood floor, which is coated in polyurethane.
Once again, thank you for your insights!

 
Jon Terry
Posts: 29
Location: Western WA
1
  • Mark post as helpful
  • send pies
    Number of slices to send:
    Optional 'thank-you' note:
  • Quote
  • Report post to moderator
Maybe worth mentioning that the corrugations in the steel panel at the top of the chamber will add a bit of area to be considered as well...tricky to use those on the sides or I would. They're really heavy, 1/8" steel. I think I'm going to have to overlap two of them to bridge the gap here, effectively doubling them up, should add good mass as well as area, I think??
 
Jon Terry
Posts: 29
Location: Western WA
1
  • Mark post as helpful
  • send pies
    Number of slices to send:
    Optional 'thank-you' note:
  • Quote
  • Report post to moderator
guess you can't delete posts here, I went back and edited my first reply to Glen's comment after I had posted here on its own. Sorry...
the edit isn't showing up, however...
I figured out that the bricks were plenty dense and that their efficient shape made up for any lack of density, I can cram a lot of bricks in there  in any amount of ways...so the question remains how many should I put under there?
 
Glenn Herbert
Rocket Scientist
Posts: 4566
Location: Upstate NY, zone 5
590
5
  • Likes 1
  • Mark post as helpful
  • send pies
    Number of slices to send:
    Optional 'thank-you' note:
  • Quote
  • Report post to moderator
It sounds like your bell ceiling is hefty enough to not need support in the middle, so I think you could just make pillars as tall as convenient without interfering with the roof (the taller, the better, as the warmest air will be at the top.) The corrugated steel will add some surface area; you can calculate that from rib measurements, as well as actually calculating the internal surface area from your exact measurements which I don't have. The mass of the doubled steel will certainly be a benefit. I would add as many pillars as you have space for without cutting down air circulation. I would guess that keeping at least 2 square feet of open cross section throughout the length of the chamber would do it. You can figure the area of each pillar and use as many as needed to bring the total surface to 57 square feet. I don't think they need to be mortared, so you could even add or subtract pillars within reach of the cleanouts.

With an air circulation space between mass and mattress, my concern about overinsulation is mitigated. Keeping the mass about 8" thick is probably a good balance between storage and radiation. I would suggest not having a screen on the sides of the mass, but allow the mass to radiate directly, as that will give better heating effect to remote parts of the room. Warmed air will mostly go straight up and heat the ceiling, while radiation heats all surfaces in its line of sight.


Jon Terry
Posts: 29
Location: Western WA
1
  • Mark post as helpful
  • send pies
    Number of slices to send:
    Optional 'thank-you' note:
  • Quote
  • Report post to moderator
OK then, I didn't see your call to calculate the mass of the pillars until after I'd drawn it up on Sketchup, did I overdo it with the pillars?
I think I do want to mortar them, at least with clay and sand, because of earthquake risk, if they tumble inside there it would be very difficult to straighten them out.
I have plenty of those steel panels leftover from the house, I could throw a few more on top of those, they don't sit perfetly flush on top of one another, there would be a small air gap between them. I guess I need to burn the paint off them first...  
redux-pillar-3.JPG
[Thumbnail for redux-pillar-3.JPG]
redux-pillar-4.JPG
[Thumbnail for redux-pillar-4.JPG]
redux-pillar-1.JPG
[Thumbnail for redux-pillar-1.JPG]
redux-pillar-2.JPG
[Thumbnail for redux-pillar-2.JPG]
 
Jon Terry
Posts: 29
Location: Western WA
1
  • Mark post as helpful
  • send pies
    Number of slices to send:
    Optional 'thank-you' note:
  • Quote
  • Report post to moderator
oh, I didn't plan on having any sort of screen or barrier on the sides other than the hardie board that helps contain the cob mass, so it will radiate from the sides as you mentioned.
 
Jon Terry
Posts: 29
Location: Western WA
1
  • Likes 1
  • Mark post as helpful
  • send pies
    Number of slices to send:
    Optional 'thank-you' note:
  • Quote
  • Report post to moderator
Howdy!
I went over and over my Sketchup plans, made a few changes I won't bother updating here in lieu of sharing a link to some pics of the actual build so far. (Google rearranged their order, I can't correct it, sorry if they're confusing) https://photos.app.goo.gl/9BoLYo5aUJJAYG4X8
Haven't started on the burn tunnel assembly yet, will start that this week. Have a look and tell me what you think of it so far. I'm very pleased with how it came out. It may look perfectly square, but it spread a bit in the middle after filling it with the clay/rock/sand mix, in retrospect I should have welded a bar across the middle on the top to keep it from spreading. Because it spread like that, I had to match the welded top to it to match it so it still looks square. That took a lot of unnecessary effort that could have been saved with a stabilizing bar welded across the top...oh well! Let me know if you have any questions!  https://photos.app.goo.gl/9BoLYo5aUJJAYG4X8

 
Gerry Parent
Rocket Scientist
Posts: 1810
Location: Kaslo, BC
525
building solar woodworking rocket stoves wood heat greening the desert
  • Mark post as helpful
  • send pies
    Number of slices to send:
    Optional 'thank-you' note:
  • Quote
  • Report post to moderator
Jon,  The link you provided does not work...  :(
 
Jon Terry
Posts: 29
Location: Western WA
1
  • Likes 2
  • Mark post as helpful
  • send pies
    Number of slices to send:
    Optional 'thank-you' note:
  • Quote
  • Report post to moderator
Sorry about that! I've been struggling for hours to get the pics in order with no success and much frustration. Here's a working link, hope you can make sense of the build, each picture illustrates a specific point, but you might miss it when the order is jumbled...
grrrrrrr!!!
https://photos.app.goo.gl/9BoLYo5aUJJAYG4X8
 
Gerry Parent
Rocket Scientist
Posts: 1810
Location: Kaslo, BC
525
building solar woodworking rocket stoves wood heat greening the desert
  • Likes 1
  • Mark post as helpful
  • send pies
    Number of slices to send:
    Optional 'thank-you' note:
  • Quote
  • Report post to moderator
That's a very nice bench you've built Jon (with your happy helper!) Look forward to watching your progress with the burn chamber.
 
What are your superhero powers? Go ahead and try them on this tiny ad:
permaculture bootcamp - learn permaculture through a little hard work
https://permies.com/wiki/bootcamp
reply
    Bookmark Topic Watch Topic
  • New Topic