• Post Reply Bookmark Topic Watch Topic
  • New Topic
permaculture forums growies critters building homesteading energy monies kitchen purity ungarbage community wilderness fiber arts art permaculture artisans regional education skip experiences global resources cider press projects digital market permies.com pie forums private forums all forums
this forum made possible by our volunteer staff, including ...
master stewards:
  • r ranson
  • Nancy Reading
  • Carla Burke
  • John F Dean
  • Jay Angler
  • paul wheaton
stewards:
  • Nicole Alderman
  • Pearl Sutton
  • Anne Miller
master gardeners:
  • Christopher Weeks
  • Timothy Norton
gardeners:
  • Nina Surya
  • Matt McSpadden
  • thomas rubino

RMH error

 
Posts: 85
Location: Corinth, KY
2
forest garden fungi homestead
  • Likes 1
  • Mark post as helpful
  • send pies
    Number of slices to send:
    Optional 'thank-you' note:
  • Quote
  • Report post to moderator
So I built the heat riser and I kept measuring and making sure it was level. What happens if the heat riser is 7.5 x 8 when it’s supposed to be 7.5 x 7? Also what happens if the heat riser is not 47 inches tall? Do I take it down and do it all over again? The fire box is 7.5 x 7.
 
rocket scientist
Posts: 6531
Location: latitude 47 N.W. montana zone 6A
3401
cat pig rocket stoves
  • Likes 1
  • Mark post as helpful
  • send pies
    Number of slices to send:
    Optional 'thank-you' note:
  • Quote
  • Report post to moderator
Hi Diane;  I think you will be fine with a slightly larger riser.  How tall is it now?  Taller is better.
 
Diane Frenser
Posts: 85
Location: Corinth, KY
2
forest garden fungi homestead
  • Mark post as helpful
  • send pies
    Number of slices to send:
    Optional 'thank-you' note:
  • Quote
  • Report post to moderator
My heat riser measures 47 inches from inside from the base to the top of the heat riser would it be OK to add another course of fire brick?
 
thomas rubino
rocket scientist
Posts: 6531
Location: latitude 47 N.W. montana zone 6A
3401
cat pig rocket stoves
  • Mark post as helpful
  • send pies
    Number of slices to send:
    Optional 'thank-you' note:
  • Quote
  • Report post to moderator
Yes; Adding an extra run of firebrick to make your riser taller is a good idea!  
My riser's average  57"to 60" tall from the floor of the burn tunnel.
 
gardener
Posts: 3471
Location: Southern alps, on the French side of the french /italian border 5000ft elevation
194
  • Likes 1
  • Mark post as helpful
  • send pies
    Number of slices to send:
    Optional 'thank-you' note:
  • Quote
  • Report post to moderator
Careful with your top gap!
 
Rocket Scientist
Posts: 4587
Location: Upstate NY, zone 5
600
5
  • Mark post as helpful
  • send pies
    Number of slices to send:
    Optional 'thank-you' note:
  • Quote
  • Report post to moderator
Meaning, do not let the top gap get too small. 2" is generally minimum, more allows freer flow, while reducing the concentrated hot spot in the center. If cooking is important to you, you probably want it not much more than 2". Otherwise, no problem.
 
Satamax Antone
gardener
Posts: 3471
Location: Southern alps, on the French side of the french /italian border 5000ft elevation
194
  • Likes 1
  • Mark post as helpful
  • send pies
    Number of slices to send:
    Optional 'thank-you' note:
  • Quote
  • Report post to moderator
Myself, i would say more like 3 to 4 inches. As we have seen a fair share of top gap problems over here.  

http://donkey32.proboards.com/thread/1406/calculating-ring-circumference-projection-gap
 
Diane Frenser
Posts: 85
Location: Corinth, KY
2
forest garden fungi homestead
  • Mark post as helpful
  • send pies
    Number of slices to send:
    Optional 'thank-you' note:
  • Quote
  • Report post to moderator
I have a few more errors plus I would like any critical feedback on my build.

1. I forgot to add insulation on the heat riser before I started to build the manifold. I was able to add insulation to the top half. How important is it put insulation around the heater core on the bottom half?

2. I used clay slip for the manifold but it doesn't seem to be air tight. So mixed my clay slip with cob and its a little runny but I filled in all the holes as best as I could. Not sure if this is ok. I know I'll add cob on top of it but wanted to get feedback on the process.

3. I measured my pipes for the bench exactly by the book but I encountered a problem. The pipe closest to the wall will run into the manifold if I am to extend it to the other side of the heater core so I can access the clean out. The gap between the front pipe and the back pipe is 4 inches. Should I increase the gap towards the manifold or keep it at 4 inches and turn it 90 degrees to start the exit chimney before the manifold. If its the second choice then how do I access the clean outs?

4. I used Roxul- for insulation. I was told that is ok to use.

I think that is all for now. Thanks in advance!
IMG_6288.JPG
[Thumbnail for IMG_6288.JPG]
IMG_6289.JPG
[Thumbnail for IMG_6289.JPG]
IMG_6305.JPG
[Thumbnail for IMG_6305.JPG]
IMG_6308.JPG
[Thumbnail for IMG_6308.JPG]
IMG_6331.JPG
[Thumbnail for IMG_6331.JPG]
IMG_6332.JPG
[Thumbnail for IMG_6332.JPG]
IMG_6337.JPG
[Thumbnail for IMG_6337.JPG]
IMG_6340.JPG
[Thumbnail for IMG_6340.JPG]
IMG_6342.JPG
[Thumbnail for IMG_6342.JPG]
IMG_6350.JPG
[Thumbnail for IMG_6350.JPG]
IMG_6362.JPG
[Thumbnail for IMG_6362.JPG]
IMG_6370.JPG
[Thumbnail for IMG_6370.JPG]
IMG_6374.JPG
[Thumbnail for IMG_6374.JPG]
 
Posts: 30
8
  • Mark post as helpful
  • send pies
    Number of slices to send:
    Optional 'thank-you' note:
  • Quote
  • Report post to moderator
I'm not sure how much I would trust that insulation on the riser. I don't think regular batt insulation for walls will have a high enough heat tolerance inside the chamber. You want to use a ceramic wool. I bought some from Phillips energy that has a 2300 degree tolerance.
 
Rocket Scientist
Posts: 1810
Location: Kaslo, BC
525
building solar woodworking rocket stoves wood heat greening the desert
  • Likes 1
  • Mark post as helpful
  • send pies
    Number of slices to send:
    Optional 'thank-you' note:
  • Quote
  • Report post to moderator
Hi Diane,  The heat riser is one of the most important things in a RMH to insulate and be done correctly. I can see several potential problems with how you have it now. A) Yes, the heat riser definitely needs to be wrapped from top to bottom. The temperature differential inside vs outside the heat riser needs to be as high as possible to allow proper drafting to occur.
B) After you wrapped the insulation around the heat riser, it doesn't look as if there is going to be much space left for the exhaust gasses to flow freely. This is a bottleneck that will probably cause you poor drafting issues. I would suggest to make this gap a bit bigger, in particular the bottom portion of the manifold where it transitions to the horizontal pipe.

I know it says in the builders guide that you can use rockwool insulation around the heat riser, but just want you to be aware of what the company says about its product here:Rock wool insulation Mainly that the binder melts away at 250 C. The mesh you have around it should hold it together but don't know the long term integrity of it as its a product that is being used beyond its original intentions as a fire resistant house insulation. 1" Ceramic fiber blanket wrapped around the heat riser is an excellent alternative - much pricier though.... or 2" of perlite (stabilized with clay slip) and housed in a larger pipe...or a '5 minute riser' which is Ceramic fiber blanket inside a larger pipe which is the easiest and efficient of them all.

To answer your second question, on the inside of the manifold, your staggered bricks are going to cause turbulence and drag on the exhaust gasses. It would be best to finish the inside off with a clay/sand mix and make it nice and smooth. This will also help to ensure that its sealed well too.

The 180 turn with the two Tee's is going to also cause a bit more drag than if you were to use the more rounded kind like this:
...or even eliminate the 2 Tees and make a mini bell here -  a small boxed chamber with cleanouts.

Have you installed your exit chimney yet? If not, it is much easier to have the chimney all ready to go and work backwards from it as its easier to move/cut the horizontal pipes to accommodate the (plumb) vertical pipe than the other way around.

The cleanout at the base of the vertical pipe can be a Tee facing upwards if you want.
 
Satamax Antone
gardener
Posts: 3471
Location: Southern alps, on the French side of the french /italian border 5000ft elevation
194
  • Mark post as helpful
  • send pies
    Number of slices to send:
    Optional 'thank-you' note:
  • Quote
  • Report post to moderator


Jason Speaks wrote:I'm not sure how much I would trust that insulation on the riser. I don't think regular batt insulation for walls will have a high enough heat tolerance inside the chamber. You want to use a ceramic wool. I bought some from Phillips energy that has a 2300 degree tolerance.


Well, roxul, is rockwool in north america. Same stuff. IIRC, it's something like melted abd spun basalt.  It is not the usual spun glass usually found.

And if you know hat the bonding agent breaks around 400C°, it can be used.

The grid above is fine, except for one thing, not closing at the bottom, so the insulation will fall out.

Gerry Parent wrote:Hi Diane,  The heat riser is one of the most important things in a RMH to insulate and be done correctly. I can see several potential problems with how you have it now. A) Yes, the heat riser definitely needs to be wrapped from top to bottom. The temperature differential inside vs outside the heat riser needs to be as high as possible to allow proper drafting to occur.
B) After you wrapped the insulation around the heat riser, it doesn't look as if there is going to be much space left for the exhaust gasses to flow freely. This is a bottleneck that will probably cause you poor drafting issues. I would suggest to make this gap a bit bigger, in particular the bottom portion of the manifold where it transitions to the horizontal pipe.

I know it says in the builders guide that you can use rockwool insulation around the heat riser, but just want you to be aware of what the company says about its product here:Rock wool insulation Mainly that the binder melts away at 250 C. The mesh you have around it should hold it together but don't know the long term integrity of it as its a product that is being used beyond its original intentions as a fire resistant house insulation. 1" Ceramic fiber blanket wrapped around the heat riser is an excellent alternative - much pricier though.... or 2" of perlite (stabilized with clay slip) and housed in a larger pipe...or a '5 minute riser' which is Ceramic fiber blanket inside a larger pipe which is the easiest and efficient of them all.

To answer your second question, on the inside of the manifold, your staggered bricks are going to cause turbulence and drag on the exhaust gasses. It would be best to finish the inside off with a clay/sand mix and make it nice and smooth. This will also help to ensure that its sealed well too.

The 180 turn with the two Tee's is going to also cause a bit more drag than if you were to use the more rounded kind like this:
...or even eliminate the 2 Tees and make a mini bell here -  a small boxed chamber with cleanouts.

Have you installed your exit chimney yet? If not, it is much easier to have the chimney all ready to go and work backwards from it as its easier to move/cut the horizontal pipes to accommodate the (plumb) vertical pipe than the other way around.

The cleanout at the base of the vertical pipe can be a Tee facing upwards if you want.


Well as Gerry says.

Heat riser should normally be insulated down to the bottom.

Mind you, if the gap ius too small, i would try it that way. if you consider it too advanced into the build.

What is your gap? And the thickness of your insulation?

Can you still make changes?  

The pipe just poking like this, into the base, is often a problem source


Check this thread.

https://permies.com/t/61657/Flue-exhaust-transition-plenum-pictures#527311


Diane Frenser
Posts: 85
Location: Corinth, KY
2
forest garden fungi homestead
  • Likes 1
  • Mark post as helpful
  • send pies
    Number of slices to send:
    Optional 'thank-you' note:
  • Quote
  • Report post to moderator

Jason Speaks wrote:I'm not sure how much I would trust that insulation on the riser. I don't think regular batt insulation for walls will have a high enough heat tolerance inside the chamber. You want to use a ceramic wool. I bought some from Phillips energy that has a 2300 degree tolerance.


I was told that Rockwool which this is, is good to use on the heater riser. On their product page I found this...

Roxul Comfortbatt™ is a semi-rigid batt insulation
designed specifically for wood and steel stud
applications for residential and commercial
construction. The stone wool-based insulation is made
from natural stone and 75% recycled content, which
gives it properties that other insulation can’t match.
It also offers superior acoustical performance to wall
assemblies and floors and can be used in acoustic
applications required by building code.
Fire-Safe Insulation For Wall Assemblies – Won’t Burn or Develop Smoke
Roxul ComfortBatt stone wool insulation is noncombustible as determined by ASTM E136 and
CAN4-S114. It will not develop smoke or promote flame spread, even when directly exposed to fire, as
most other insulation materials will. Extremely high melting point of 1177 °C (2150 °F) Does not produce smoke or toxic gases in the event
of a fire. Excellent barrier against the spread of flames to help protect occupants and reduce property damage. Eliminates the risk of insulation accidentally catching fire during installation. Excellent Passive Fire Protection – ComfortBatt can add up to an additional 15 minutes of fire protection
to wall assemblies.
 
Diane Frenser
Posts: 85
Location: Corinth, KY
2
forest garden fungi homestead
  • Mark post as helpful
  • send pies
    Number of slices to send:
    Optional 'thank-you' note:
  • Quote
  • Report post to moderator

Satamax Antone wrote:

Jason Speaks wrote:I'm not sure how much I would trust that insulation on the riser. I don't think regular batt insulation for walls will have a high enough heat tolerance inside the chamber. You want to use a ceramic wool. I bought some from Phillips energy that has a 2300 degree tolerance.


Well, roxul, is rockwool in north america. Same stuff. IIRC, it's something like melted abd spun basalt.  It is not the usual spun glass usually found.

And if you know hat the bonding agent breaks around 400C°, it can be used.

The grid above is fine, except for one thing, not closing at the bottom, so the insulation will fall out.

Gerry Parent wrote:Hi Diane,  The heat riser is one of the most important things in a RMH to insulate and be done correctly. I can see several potential problems with how you have it now. A) Yes, the heat riser definitely needs to be wrapped from top to bottom. The temperature differential inside vs outside the heat riser needs to be as high as possible to allow proper drafting to occur.
B) After you wrapped the insulation around the heat riser, it doesn't look as if there is going to be much space left for the exhaust gasses to flow freely. This is a bottleneck that will probably cause you poor drafting issues. I would suggest to make this gap a bit bigger, in particular the bottom portion of the manifold where it transitions to the horizontal pipe.

I know it says in the builders guide that you can use rockwool insulation around the heat riser, but just want you to be aware of what the company says about its product here:Rock wool insulation Mainly that the binder melts away at 250 C. The mesh you have around it should hold it together but don't know the long term integrity of it as its a product that is being used beyond its original intentions as a fire resistant house insulation. 1" Ceramic fiber blanket wrapped around the heat riser is an excellent alternative - much pricier though.... or 2" of perlite (stabilized with clay slip) and housed in a larger pipe...or a '5 minute riser' which is Ceramic fiber blanket inside a larger pipe which is the easiest and efficient of them all.

To answer your second question, on the inside of the manifold, your staggered bricks are going to cause turbulence and drag on the exhaust gasses. It would be best to finish the inside off with a clay/sand mix and make it nice and smooth. This will also help to ensure that its sealed well too.

The 180 turn with the two Tee's is going to also cause a bit more drag than if you were to use the more rounded kind like this:
...or even eliminate the 2 Tees and make a mini bell here -  a small boxed chamber with cleanouts.

Have you installed your exit chimney yet? If not, it is much easier to have the chimney all ready to go and work backwards from it as its easier to move/cut the horizontal pipes to accommodate the (plumb) vertical pipe than the other way around.

The cleanout at the base of the vertical pipe can be a Tee facing upwards if you want.


Well as Gerry says.

Heat riser should normally be insulated down to the bottom.

Mind you, if the gap ius too small, i would try it that way. if you consider it too advanced into the build.

What is your gap? And the thickness of your insulation?

Can you still make changes?  

The pipe just poking like this, into the base, is often a problem source


Check this thread.

https://permies.com/t/61657/Flue-exhaust-transition-plenum-pictures#527311


Santamax,

Thanks for your link to the thread. Some of the pictures were blurred out because they were hosted on another site but I did see other examples that got me thinking that maybe I should build a rectangle manifold. I saw many pictures on a rounded manifold where the steel drum fits right on top of the rounded manifold. (the circumference of the manifold is same size of the steel drum). But from what I am reading the manifold should be larger than the circumference of the steel drum?  

I can still tear down the manifold if I need to to make it correct. I guess I was confused by the manifold design and the transition pipe based on what I have seen.

I guess my plan is to knock down the manifold and start over and make it a square to increase the size of the manifold and transition area. My question would be what would the barrel sit on because if its not going to be in the same shape as the manifold plus it having to be airtight? The picture below is what I was basing my design off of. It doesn't look there is much space for heat from the manifold to the ducting.

Or do you suggest building a manifold that is larger at the base and taper it towards the top so the barrel can sit on it?

Also someone mentioned the the bricks aren't to be staggered because they will cause a draft but I was taught never to have vertical seams when stacking bricks.

Thanks for your feedback and help. Much appreciated!!
rocket-mass-heater-manifold-beehive.jpg
[Thumbnail for rocket-mass-heater-manifold-beehive.jpg]
 
Satamax Antone
gardener
Posts: 3471
Location: Southern alps, on the French side of the french /italian border 5000ft elevation
194
  • Likes 2
  • Mark post as helpful
  • send pies
    Number of slices to send:
    Optional 'thank-you' note:
  • Quote
  • Report post to moderator
Diane, i won't sugest anything. I don't know your skills, nor the materials available to you.

It is simple tho.

Calculate.

Your system CSA  (cross sectional area) Should be exceeded by the gap!

Here the explanation.

http://donkey32.proboards.com/thread/1406/calculating-ring-circumference-projection-gap

To make it simple.

IIRC your system is 8 inches diameter.  So that's 50.25 square inches

So, your gap surface should be at least 1.5 this figure, but to err on the safe side, X3 is better.

For ease of calculation, lets say 150 sqin.  

With an 8 inch pipe, circumference is  25.1327 inches. So 150/25.1327 =  5.96 inch gap.

with a 12 inch pipe, which would funnel back to 8.  150/37.7 = 3.98 say 4 inch  gap. The gap is the distance between the heat riser, and the entrance of the flue.

If you have a 10*15 rectangle (well curving to follow your barrel support.

You have a perimeter of 50 inches, so you can get down to 3 inch gap.

Get it?

The X3 figure is experimental. But when gases change direction, they get turbulent, drag on the edges etc. So you need more CSA at this point, than elsewhere in the system.

Look at this!


Diane Frenser
Posts: 85
Location: Corinth, KY
2
forest garden fungi homestead
  • Mark post as helpful
  • send pies
    Number of slices to send:
    Optional 'thank-you' note:
  • Quote
  • Report post to moderator

Satamax Antone wrote:Diane, i won't sugest anything. I don't know your skills, nor the materials available to you.

It is simple tho.

Calculate.

Your system CSA  (cross sectional area) Should be exceeded by the gap!

Here the explanation.

http://donkey32.proboards.com/thread/1406/calculating-ring-circumference-projection-gap

To make it simple.

IIRC your system is 8 inches diameter.  So that's 50.25 square inches


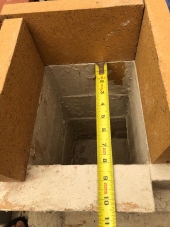
Ok I may be slowly getting it. For one I took out the T and put in a 90 degree turn. I also bought one inch fiber ceramic blanket to replace the rookwool. I wanted something more uniform and besides I can use the rockwool for insulating the stove pipe in the attic. I have posted two pictures below. The first is the replace of the T and the second is what I think I"m gleaning from your post.


So, your gap surface should be at least 1.5 this figure, but to err on the safe side, X3 is better.

For ease of calculation, lets say 150 sqin.  

With an 8 inch pipe, circumference is  25.1327 inches. So 150/25.1327 =  5.96 inch gap.

with a 12 inch pipe, which would funnel back to 8.  150/37.7 = 3.98 say 4 inch  gap. The gap is the distance between the heat riser, and the entrance of the flue.

If you have a 10*15 rectangle (well curving to follow your barrel support.

You have a perimeter of 50 inches, so you can get down to 3 inch gap.

Get it?

The X3 figure is experimental. But when gases change direction, they get turbulent, drag on the edges etc. So you need more CSA at this point, than elsewhere in the system.

Look at this!


Am I correct in stating the following?

My 8" heat exchange pipe has a 156 square inch area (which is 52 square inches x 3" (there is a 3" gap between the heat riser and the opening)) This has to be 1.5 times bigger than the CSA and the gap on top of the heat riser. That opening is 7.5X8 which is 62.4 square inches X a two inch gap between the heat riser and the top of the barrel. That comes out to 124 square inches. 156 square inches is not 1.5 times larger than 124. It has to be larger than 186 square inches. To increase the CSA I need a bigger gap or a bigger transition pipe.

So if I use a 12 inch to 8 inch transition pipe it would be...113 square inches X 3 inch gap (between the heat riser and the opening of the heat exchange) = 339 square inches.

Or if I use a 10 inch to 8 inch transition pipe it would be...78.5 square inches X 3 inch gap = 235.5

Or do I have this all wrong. lol

Thanks for your patience. Obviously this is my first time.
RMH-heat-exchange.jpg
[Thumbnail for RMH-heat-exchange.jpg]
RMH-CSA.jpg
[Thumbnail for RMH-CSA.jpg]
 
Satamax Antone
gardener
Posts: 3471
Location: Southern alps, on the French side of the french /italian border 5000ft elevation
194
  • Mark post as helpful
  • send pies
    Number of slices to send:
    Optional 'thank-you' note:
  • Quote
  • Report post to moderator
So, being a theoretical 8 incher.

It is 50.26 square inches CSA. Cross sectional area is what CSA stands for. And that's the CSA of the system size.

156/50.26. = 3.10. So that should be OK!

Let's talk about your heat riser. 7.5*2+8*2 that's 31 inch  perimeter. Multiplied by 2 inch gap.

62 square inches of projection. Not 124.    That starts to be a problem. Even more when you know that gases are stalling in the corners. It's more like a rounded corner square.  

That fucking two inch advertised everywhere is no good!  Sorry to get crossed. But this recommendation, coming may be from Ianto and Leslie's book; keeps coming back and giving trouble to people who aren't deeply into rockets.

Sorry to get crossed. But it bugs me!

The right way to calculate it is.

Theoretical CSA is 50.26 square inch. Multiplied by the 1.5 figure, to accomodate for the change of direction, and the subsequent turbulence

1.5*50.26 = 75.39 square inches of projection into the gap. Absolute minimum.

75.39/31 (the inside perimeter of the heat riser) =2.4322 inch of gap. As an absolute minimum. I would go to 3 inches , because the corners into a square heat riser are stalling, and not giving full speed flow. So the perimeter is reduced by this effect.

The only ill effect of a 3 inch gap is cooking. You don't reach as much heat, as some say. With a three inch gap. Otherwise, it is beneficial to the gas flow!
 
Diane Frenser
Posts: 85
Location: Corinth, KY
2
forest garden fungi homestead
  • Mark post as helpful
  • send pies
    Number of slices to send:
    Optional 'thank-you' note:
  • Quote
  • Report post to moderator

Satamax Antone wrote:So, being a theoretical 8 incher.

It is 50.26 square inches CSA. Cross sectional area is what CSA stands for. And that's the CSA of the system size.

156/50.26. = 3.10. So that should be OK!

Let's talk about your heat riser. 7.5*2+8*2 that's 31 inch  perimeter. Multiplied by 2 inch gap.

62 square inches of projection. Not 124.    That starts to be a problem. Even more when you know that gases are stalling in the corners. It's more like a rounded corner square.  

That fucking two inch advertised everywhere is no good!  Sorry to get crossed. But this recommendation, coming may be from Ianto and Leslie's book; keeps coming back and giving trouble to people who aren't deeply into rockets.

Sorry to get crossed. But it bugs me!

The right way to calculate it is.

Theoretical CSA is 50.26 square inch. Multiplied by the 1.5 figure, to accomodate for the change of direction, and the subsequent turbulence

1.5*50.26 = 75.39 square inches of projection into the gap. Absolute minimum.

75.39/31 (the inside perimeter of the heat riser) =2.4322 inch of gap. As an absolute minimum. I would go to 3 inches , because the corners into a square heat riser are stalling, and not giving full speed flow. So the perimeter is reduced by this effect.

The only ill effect of a 3 inch gap is cooking. You don't reach as much heat, as some say. With a three inch gap. Otherwise, it is beneficial to the gas flow!


lol ok I think I'm starting to understand...no two inch gap. :) I believe my gap is two inches though. I can always add another layer of brick onto my manifold to increase the gap to 3". That's one thing down.

So my 8" exhaust pipe if fine. I don't need to increase the size? Like from 12" to 8"? I believe the gap there is 3-4" between the opening and the heat riser. I'll take exact measurements when I'm down at my place tomorrow.


"156/50.26. = 3.10. So that should be OK! " Where do you get your 156 for your calculation? Is this the "3 times bigger than the CSA? Is the 3.10 what the gap should be between the bottom of the heat riser and the opening of heat exchange?
Sorry I'm confused on some of the literature because one part says it should be 3x larger and the other part says 1.5 x larger but are they talking about two different areas of the system? Like 3x bigger by the heat exchange and 1.5x bigger for the heat riser gap. ughhh I want to understand this so bad but I'm having a blockage problem like my RMH. Grrr.

Thanks for the feedback!
 
Satamax Antone
gardener
Posts: 3471
Location: Southern alps, on the French side of the french /italian border 5000ft elevation
194
  • Mark post as helpful
  • send pies
    Number of slices to send:
    Optional 'thank-you' note:
  • Quote
  • Report post to moderator
Diane, i took 156 from your previous post!

If it's down to me, i advise X3 all the way through! Like that there's no problem!
310 is the ratio that i get dividing your 156,by the csa!

Keyboard has let me down. i'm struggling.
 
Gerry Parent
Rocket Scientist
Posts: 1810
Location: Kaslo, BC
525
building solar woodworking rocket stoves wood heat greening the desert
  • Likes 1
  • Mark post as helpful
  • send pies
    Number of slices to send:
    Optional 'thank-you' note:
  • Quote
  • Report post to moderator
Diane,  I have never been good at the math either. Glad we have Satamax for that!
One thing I can mention though is you don't necessarily need a transition pipe from your manifold to your ducting, instead you can use "hardware cloth' which is like a metal mesh to form your shape and then just cob over it. Not sure if you want to go this route but just to let you know of another option that makes for a smooth flow of the exhaust gasses to travel through with minimal drag.
A good pictures of this is in the thread: Flue-exhaust-transition-plenum-pictures
One of the many pictures:
 
Diane Frenser
Posts: 85
Location: Corinth, KY
2
forest garden fungi homestead
  • Mark post as helpful
  • send pies
    Number of slices to send:
    Optional 'thank-you' note:
  • Quote
  • Report post to moderator

Gerry Parent wrote:Diane,  I have never been good at the math either. Glad we have Satamax for that!
One thing I can mention though is you don't necessarily need a transition pipe from your manifold to your ducting, instead you can use "hardware cloth' which is like a metal mesh to form your shape and then just cob over it. Not sure if you want to go this route but just to let you know of another option that makes for a smooth flow of the exhaust gasses to travel through with minimal drag.
A good pictures of this is in the thread: Flue-exhaust-transition-plenum-pictures
One of the many pictures:


Gerry,

Thanks for your feedback. Am I seeing it right where the heat from the barrel travels up to go through the heat exchange. I see a hole that goes down. What is that? Did you do any math to calculate the size of the area for the hardware cloth area. Also what is your barrel sitting on? (the side where the heat escapes to the heat exchange?

Thanks!
 
Diane Frenser
Posts: 85
Location: Corinth, KY
2
forest garden fungi homestead
  • Likes 1
  • Mark post as helpful
  • send pies
    Number of slices to send:
    Optional 'thank-you' note:
  • Quote
  • Report post to moderator
Ok I got some measurements!! And a light bulb came on in my head...at least for the gap between the barrel and the heat riser. I didn't realize there are different math equations for the two gaps. I work in metaphors and what I figured out is that its like a garden hose. If you place your thumb on the mouth of the hose, water splatters everywhere and you can't really direct your water downward. If you place your thumb too high over the mouth of the garden hose, you have water going in the wrong direction and there is no force pushing it downward. But if you place your thumb over the garden hose mouth just right you can divert the water down ward because of one the force at which the water comes out and two the distance between your thumb and the mouth of the hose. Make sense? Well at least I can understand it.

I measured my gap and it is 4.5 inches!! Too big of a gap. The heat will stay and the top and there is not enough force (the lid) to divert it downward to the escape route (heat exchange). I have to decrease this gap. So I will take off a layer of brick on the manifold and most likely rebuild my manifold with brick and cob instead of brick and clay slip. My clay slip cracked and I feel like there will be a lot of leakage.

If I understand correctly if I try to build a bell (big at the bottom and slope it toward the top so the barrel can sit on something, I'll have a big enough gap for the escape route...sorry transition to the heat exchange. Did I say metaphors are my thing?

I also took out the T and replaced with a 90 degree pipe, put some screws in and foil tape on along with a few explicit words because I was doing this alone and the pipes didn't want to cooperate. I have yet to put in screws by the transition pipe because I may have to adjust the pipe and I didn't finish the other end of the pipe where the chimney exits because I have to install the chimney first. I don't think there will be any problem with the chimney since I have already inspected the attic space and the chimney is pretty much in the middle of the house with no real obstacles, so I can exit the chimney close to the peak of the house. See...there are pros to building your own house. Although I could have done without the blood, sweat and tears...literally but as I'm nearing the end I am feeling such an immense sense of satisfaction and pride. I have thoroughly enjoyed this process and although I've hit a couple of knowledge walls, it was all worth it so I can share the information with others. Now I can get off my little soapbox.

I also replaced the rockwool with ceramic fiber blanket. I insulated it all the way to the bottom this time. Before the insulation there was a 4 inch gap between the heat riser and the heat exchange. After the insulation, there is a 3 inch gap if I push the hardware cloth in with the tape measure. Will this matter?

If you see anything else in my pictures that are just screaming for critique please let me know. I do not get offended with constructive criticism. I've come too far to be scared by off by others.
4.5-inch-gap.JPG
[Thumbnail for 4.5-inch-gap.JPG]
51-inches-heat-riser.JPG
[Thumbnail for 51-inches-heat-riser.JPG]
Back-side-of-Barrel-without-insulation.JPG
[Thumbnail for Back-side-of-Barrel-without-insulation.JPG]
Ceramic-Fiber-Blanket.JPG
[Thumbnail for Ceramic-Fiber-Blanket.JPG]
escape-side-of-barrel-without-insulation.JPG
[Thumbnail for escape-side-of-barrel-without-insulation.JPG]
heat-exchange-side-of-barrel-(2).JPG
[Thumbnail for heat-exchange-side-of-barrel-(2).JPG]
heat-exchange-side-of-barrel-3-inch-gap.JPG
[Thumbnail for heat-exchange-side-of-barrel-3-inch-gap.JPG]
heat-exchange-side-of-barrel.JPG
[Thumbnail for heat-exchange-side-of-barrel.JPG]
Heat-riser-with-insulation.JPG
[Thumbnail for Heat-riser-with-insulation.JPG]
Right-side-of-barrel-without-insulation.JPG
[Thumbnail for Right-side-of-barrel-without-insulation.JPG]
Top-of-heat-riser.JPG
[Thumbnail for Top-of-heat-riser.JPG]
without-the-2nd-T.JPG
[Thumbnail for without-the-2nd-T.JPG]
 
Satamax Antone
gardener
Posts: 3471
Location: Southern alps, on the French side of the french /italian border 5000ft elevation
194
  • Mark post as helpful
  • send pies
    Number of slices to send:
    Optional 'thank-you' note:
  • Quote
  • Report post to moderator
Diane, too big a gap doesn't exist (well sort off! if it's ten meters, ISA will be exceeded. )

Top or side gap at 4.5 is perfectly fine.

And the formula is exactly the same! Would it be for the top gap or side gap.

Only difference in your case, your riser is square.

I post it again!

https://permies.com/t/61657/Flue-exhaust-transition-plenum-pictures


and this one too!

http://donkey32.proboards.com/thread/1406/calculating-ring-circumference-projection-gap


Read, re read, and re re read until you get it!
 
Satamax Antone
gardener
Posts: 3471
Location: Southern alps, on the French side of the french /italian border 5000ft elevation
194
  • Mark post as helpful
  • send pies
    Number of slices to send:
    Optional 'thank-you' note:
  • Quote
  • Report post to moderator

Satamax Antone wrote:Diane, i won't sugest anything. I don't know your skills, nor the materials available to you.

It is simple tho.

Calculate.

Your system CSA  (cross sectional area) Should be exceeded by the gap!

Here the explanation.

http://donkey32.proboards.com/thread/1406/calculating-ring-circumference-projection-gap

To make it simple.

IIRC your system is 8 inches diameter.  So that's 50.25 square inches

So, your gap surface should be at least 1.5 this figure, but to err on the safe side, X3 is better.

For ease of calculation, lets say 150 sqin.  

With an 8 inch pipe, circumference is  25.1327 inches. So 150/25.1327 = 5.96 inch gap.

with a 12 inch pipe, which would funnel back to 8.  150/37.7 = 3.98 say 4 inch  gap. The gap is the distance between the heat riser, and the entrance of the flue.

If you have a 10*15 rectangle (well curving to follow your barrel support.

You have a perimeter of 50 inches, so you can get down to 3 inch gap.


Get it?

The X3 figure is experimental. But when gases change direction, they get turbulent, drag on the edges etc. So you need more CSA at this point, than elsewhere in the system.

Look at this!


3 inch gap with 8 inch pipe is nooooooooo goooooood!
 
Gerry Parent
Rocket Scientist
Posts: 1810
Location: Kaslo, BC
525
building solar woodworking rocket stoves wood heat greening the desert
  • Mark post as helpful
  • send pies
    Number of slices to send:
    Optional 'thank-you' note:
  • Quote
  • Report post to moderator

Diane Maldonado wrote:Thanks for your feedback. Am I seeing it right where the heat from the barrel travels up to go through the heat exchange. I see a hole that goes down. What is that? Did you do any math to calculate the size of the area for the hardware cloth area. Also what is your barrel sitting on? (the side where the heat escapes to the heat exchange?


The hole that goes down is an ash pit. The picture I posted was not my build but just a good example of the transition from the manifold to the pipes in the mass. No math involved for me however, the cross section area of this manifold should be at least 150% wider than the flue as a guideline.
The barrel sits on air above the manifold. As long as lets say 2/3's of your barrel is supported you should be fine.

EDIT: Your pictures are very helpful. When you do get your vertical chimney hooked up and everything is sealed up (even temporarily without all the trimmings), give it a test burn and see how it performs. This will show a lot for you and at a point where if there are any major problems, you don't have to sacrifice a lot of redos.
 
Diane Frenser
Posts: 85
Location: Corinth, KY
2
forest garden fungi homestead
  • Likes 2
  • Mark post as helpful
  • send pies
    Number of slices to send:
    Optional 'thank-you' note:
  • Quote
  • Report post to moderator
I believe the light has turned on and it is operating under full capacity. I understand now. I have read so much and looked at so many pictures and re-read everything. My plan is to rebuild the manifold so I can make the manifold (which I thought it was the whole brick wall which supports the barrel) bigger. I am going to build with cob and brick so can make the entrance of the manifold bigger. If I build with cob because its more monolithic, I'll have less chance of leaks and I can have smoother walls and less drag on the air flow. Plus I didn't realize the barrel can sit on a partial wall rather than a full circle to sustain it in place. I have plenty of hardware cloth which will help me build the bigger opening.

Thanks for all your help. I'll post pictures of my progress.

 
Satamax Antone
gardener
Posts: 3471
Location: Southern alps, on the French side of the french /italian border 5000ft elevation
194
  • Mark post as helpful
  • send pies
    Number of slices to send:
    Optional 'thank-you' note:
  • Quote
  • Report post to moderator
So Diane, any news?
 
ice is for people that are not already cool. Chill with this tiny ad:
Free Seed Starting ebook!
https://permies.com/t/274152/Orta-Guide-Seed-Starting-Free
reply
    Bookmark Topic Watch Topic
  • New Topic