• Post Reply Bookmark Topic Watch Topic
  • New Topic
permaculture forums growies critters building homesteading energy monies kitchen purity ungarbage community wilderness fiber arts art permaculture artisans regional education skip experiences global resources cider press projects digital market permies.com pie forums private forums all forums
this forum made possible by our volunteer staff, including ...
master stewards:
  • Carla Burke
  • Nancy Reading
  • John F Dean
  • r ranson
  • Jay Angler
  • paul wheaton
stewards:
  • Pearl Sutton
  • Leigh Tate
  • Devaka Cooray
master gardeners:
  • Christopher Weeks
  • Timothy Norton
gardeners:
  • thomas rubino
  • Matt McSpadden
  • Jeremy VanGelder

Butcher block wall - crazy?

 
pollinator
Posts: 3769
Location: 4b
1366
dog forest garden trees bee building
  • Likes 1
  • Mark post as helpful
  • send pies
    Number of slices to send:
    Optional 'thank-you' note:
  • Quote
  • Report post to moderator
I have a lot of lumber that is warped, bent, twisted, broken,...  Much of it isn't good for anything except firewood.  The wood is cherry, oak, walnut, maple.  I was thinking of ways to make it more useful than firewood.  I have more trees down than I will ever need to burn in my lifetime, so I hate the idea of wasting lumber on it, even really bad lumber.  If I connect a crooked board to a straight edge, I can run it through my table saw and "cut it back straight".  Problem is, some of it is crooked enough that it would only leave a board an inch or two wide.  The boards are different thickness, but are rough cut, so they are all at least a true 1".  While I was laughing internally thinking about being able to make the world's largest butcher block, I started to think that wasn't a bad idea...  Maybe not the world's largest, but what if I made a butcher block big enough to make the wall of my new chicken coop?  I could cut the boars to 2", so it would make a wall a true 2" thick, and being butcher block, would have no air gaps.  One of my winter projects is a Woods Open Air Coop.  These houses need to be very tight with no drafts in the back part where the chickens roost.  I've been trying to figure out what I wanted to use for siding for awhile now.  The coop is fairly short at the ends, 4 feet or so, and gets taller until, at the high point, it is above 7 feet.  For the shorter ends, I can use the boards that are broken or have really bad spots, and the longer ones of course towards the tall part of the roof.  The coop is 8x16', but the front is basically open, so I would have to build 3 butcher block walls.  Yes, that is a lot of cutting.  192 boards for the long sides, 81 for the short back side.  The same number for the front very short wall and a lot around the clerestory windows.  I would have to glue and clamp the boards to make the walls, but there is no hurry, I have all winter.  They would also need to be coated in poly or something to keep from rotting.  Anyone with more permie suggestions for the waterproofing, I would be more than happy to hear from them.

So, thoughts?  Has anyone ever down this?  Is it a crazy idea?  Will the walls warp into all sorts of crazy shapes?  Should I try to go thicker than 2"?  Any thoughts at all are very welcome.  
 
gardener
Posts: 3132
2095
  • Likes 1
  • Mark post as helpful
  • send pies
    Number of slices to send:
    Optional 'thank-you' note:
  • Quote
  • Report post to moderator
You might be able to make a jig and use steam or boiling water to straighten them. If you enjoy woodworking, you might make a bunch of butcher blocks to sell and come out ahead buying something to use on the coop.
 
master steward
Posts: 7001
Location: southern Illinois, USA
2556
goat cat dog chicken composting toilet food preservation pig bee solar wood heat homestead
  • Likes 6
  • Mark post as helpful
  • send pies
    Number of slices to send:
    Optional 'thank-you' note:
  • Quote
  • Report post to moderator
Make sure any significant others are on board.  I once used some very old , high quality, paneling that was rotting in the barn for our chicken coop. That was in 1983. I still hear about our chicken coop looking nicer than our house.
 
Trace Oswald
pollinator
Posts: 3769
Location: 4b
1366
dog forest garden trees bee building
  • Mark post as helpful
  • send pies
    Number of slices to send:
    Optional 'thank-you' note:
  • Quote
  • Report post to moderator

Jordan Holland wrote:You might be able to make a jig and use steam or boiling water to straighten them. If you enjoy woodworking, you might make a bunch of butcher blocks to sell and come out ahead buying something to use on the coop.


I like wood working, but I don't think I would enjoy doing it to sell. I'm also too much a perfectionist to make it worthwhile financially.
 
J. Graham
gardener
Posts: 3132
2095
  • Likes 1
  • Mark post as helpful
  • send pies
    Number of slices to send:
    Optional 'thank-you' note:
  • Quote
  • Report post to moderator

Trace Oswald wrote:

Jordan Holland wrote:You might be able to make a jig and use steam or boiling water to straighten them. If you enjoy woodworking, you might make a bunch of butcher blocks to sell and come out ahead buying something to use on the coop.


I like wood working, but I don't think I would enjoy doing it to sell. I'm also too much a perfectionist to make it worthwhile financially.


That's usually the rub, and why I mentioned the part about enjoying it. Even if you sold them for $40 bucks apiece, it would likely be a losing proposition for the time invested, unless you have some machinery that can crank them out at warp speed.
 
steward
Posts: 15517
Location: Northern WI (zone 4)
4852
7
hunting trees books food preservation solar woodworking
  • Likes 1
  • Mark post as helpful
  • send pies
    Number of slices to send:
    Optional 'thank-you' note:
  • Quote
  • Report post to moderator
I'm thinking it won't work well but maybe I'm imagining it incorrectly.  

You have boards of various thicknesses (generally over an inch) but they're twisted, bent or curved.  And the proposal is to chunk them up into 2" lengths, glue them together into a 2" thick by wall sized butcher block and use that as the wall?  If I have that correct, I think seasonal expansion and contraction would cause the wall to shrink/expand in height and width fairly significantly.  Plus I'm not sure how you'd get them to fit together into a solid block.  As the pieces have different thicknesses and widths it would be like a huge puzzle to get good mating surfaces everywhere.

Another crazy idea...  Start with a stud wall.  Take the curviest, crappiest boards and run them horizontally across the studs, kinda like flat purlins.  Or use pallets as the structure of the wall.  Then take two layers of the least curved boards and run them vertically attaching them to the horizontals below in a board and batten arrangement.  If a board is too curved but you want to use it anyway, cut it in half and use the two pieces in a straighter orientation.  

If the roost is far enough away from the wall, no waterproofing is needed on the inside.  If there's enough overhang on the outside, no waterproofing is needed on the outside.  My coop is just pallet boards run vertically on the outside.  It's weathering but won't look like my untreated antique barn for another 50 years.
 
pollinator
Posts: 4025
Location: Kansas Zone 6a
284
  • Likes 3
  • Mark post as helpful
  • send pies
    Number of slices to send:
    Optional 'thank-you' note:
  • Quote
  • Report post to moderator
It sounds like perfect wood for an accent wall.

 
Mike Haasl
steward
Posts: 15517
Location: Northern WI (zone 4)
4852
7
hunting trees books food preservation solar woodworking
  • Likes 3
  • Mark post as helpful
  • send pies
    Number of slices to send:
    Optional 'thank-you' note:
  • Quote
  • Report post to moderator
Wow, that's a lot of hot glue sticks!  

If you pretend that they were building it as a butcherblock and the grain was coming in and out of the wall, the key detail is that each horizontal run of the boards were the same height.  That way they could work across the room a row at a time.  If you butcher block it, I think you'd need to sort the pieces by thickness so each row is a given thickness.

Here's what my untreated coop looks like with boards that I ripped to a standard set of widths.  After only one year...
DSC03861s.jpg
[Thumbnail for DSC03861s.jpg]
 
Trace Oswald
pollinator
Posts: 3769
Location: 4b
1366
dog forest garden trees bee building
  • Mark post as helpful
  • send pies
    Number of slices to send:
    Optional 'thank-you' note:
  • Quote
  • Report post to moderator

Mike Haasl wrote:I'm thinking it won't work well but maybe I'm imagining it incorrectly.  

You have boards of various thicknesses (generally over an inch) but they're twisted, bent or curved.  And the proposal is to chunk them up into 2" lengths, glue them together into a 2" thick by wall sized butcher block and use that as the wall?  If I have that correct, I think seasonal expansion and contraction would cause the wall to shrink/expand in height and width fairly significantly.  Plus I'm not sure how you'd get them to fit together into a solid block.  As the pieces have different thicknesses and widths it would be like a huge puzzle to get good mating surfaces everywhere.

Another crazy idea...  Start with a stud wall.  Take the curviest, crappiest boards and run them horizontally across the studs, kinda like flat purlins.  Or use pallets as the structure of the wall.  Then take two layers of the least curved boards and run them vertically attaching them to the horizontals below in a board and batten arrangement.  If a board is too curved but you want to use it anyway, cut it in half and use the two pieces in a straighter orientation.  

If the roost is far enough away from the wall, no waterproofing is needed on the inside.  If there's enough overhang on the outside, no waterproofing is needed on the outside.  My coop is just pallet boards run vertically on the outside.  It's weathering but won't look like my untreated antique barn for another 50 years.


Mike, mine wouldn't be a true butcher block, meaning I would have end grain showing.  I guess I don't know what you call it when you use the side of the board facing out rather than the end.  My idea is to cut the boards down to 2", but the correct length for the wall.  I would cut the boards to 2", lay them on their sides on my shop floor and glue them together in that orientation.  Once dry, I'll cut the roofline.  I attached shitty pictures to show my plan.  The angle of the roofline isn't correct, just trying to show the idea.

wall.png
How the wall will be laid out
roofline.png
How I will cut the roofline
 
Trace Oswald
pollinator
Posts: 3769
Location: 4b
1366
dog forest garden trees bee building
  • Mark post as helpful
  • send pies
    Number of slices to send:
    Optional 'thank-you' note:
  • Quote
  • Report post to moderator
This is my plan to get a 2" straight board from a 4" crooked board.
boards.png
[Thumbnail for boards.png]
 
Mike Haasl
steward
Posts: 15517
Location: Northern WI (zone 4)
4852
7
hunting trees books food preservation solar woodworking
  • Likes 1
  • Mark post as helpful
  • send pies
    Number of slices to send:
    Optional 'thank-you' note:
  • Quote
  • Report post to moderator
Oh, I see now.  Ok, that should work decently and give a hell of an R value.  If you have a more crooked board, you could always try this:
Make-a-board-straight.png
Make a board straight
 
Trace Oswald
pollinator
Posts: 3769
Location: 4b
1366
dog forest garden trees bee building
  • Likes 1
  • Mark post as helpful
  • send pies
    Number of slices to send:
    Optional 'thank-you' note:
  • Quote
  • Report post to moderator

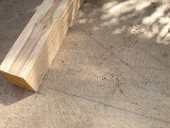
Mike Haasl wrote:Oh, I see now.  Ok, that should work decently and give a hell of an R value.  If you have a more crooked board, you could always try this:


That may be the way I end up going.  Believe me, more people than not have said to use board and batten to do this :)  My thinking with doing it the way I outlined was that it should be very visually appealing, while also using really marginal lumber, and, as you mentioned, should have pretty good R value for no cost to me other than my time.  If I alternate different types of wood, the contrast could end up being beautiful, or it could look like a mess.

The other thing that may or may not be a drawback is that the wall would be quite heavy.  I can only think of pluses right now, but there could be drawbacks I haven't considered.
 
Climb the rope! CLIMB THE ROPE! You too tiny ad:
A rocket mass heater is the most sustainable way to heat a conventional home
http://woodheat.net
reply
    Bookmark Topic Watch Topic
  • New Topic