• Post Reply Bookmark Topic Watch Topic
  • New Topic
permaculture forums growies critters building homesteading energy monies kitchen purity ungarbage community wilderness fiber arts art permaculture artisans regional education skip experiences global resources cider press projects digital market permies.com pie forums private forums all forums
this forum made possible by our volunteer staff, including ...
master stewards:
  • Carla Burke
  • Nancy Reading
  • r ranson
  • Jay Angler
  • John F Dean
  • Pearl Sutton
stewards:
  • Nicole Alderman
  • paul wheaton
  • Anne Miller
master gardeners:
  • Christopher Weeks
  • Timothy Norton
gardeners:
  • thomas rubino
  • Jeremy VanGelder
  • Matt McSpadden

Steel building shop/garage heating suggestions

 
Posts: 6
Location: Georgia, USA
  • Mark post as helpful
  • send pies
    Number of slices to send:
    Optional 'thank-you' note:
  • Quote
  • Report post to moderator
I am newly registered to the forums here because you all seem to be the most experienced and helpful people I have found on the net for wood stove/heater design an experimentation. I have the Rocket Mass Heaters book now, I have read a tremendous amount of information on this site, and I have looked all over the web to gather more information. I am a technical person, I have a good understanding of thermodynamics and fluid dynamics, and am good with my hands in metal and masonry construction. So, I am capable of understanding the physics of why rocket heaters work... and I love the idea.

I have a 30' x 40' steel building with two 10' tall roll up doors on one of the long sides, and a standard 3' door on one of the short sides. the ceiling height is 11' at the edges and 14' in the center. 3' from the middle of the back wall, opposite the roll up doors, I have a 6" ID triple insulated chimney pipe with code approved spark arrester already through the roof that hangs down 2' from the ceiling with nothing attached at the moment. There was a barrel stove in the shop at one point with the previous owner, he took it with him. I use this shop for a variety of things. I have long term household storage on industrial metal racks along one of the short walls, I have woodworking tools, lawn care equipment, storage for work materials (wiring, conduit, etc), and three motorcycles. I still have plenty of room to work on projects in here as well as doing vehicle maintenance. One of my projects will soon be to pull in my 22' car trailer to rebuild it.... there is plenty of room. I have even held poker games in the shop with my work van and three motorcycles still inside.

The problem I have is that in the winter, I just can't work in there. It is too cold for my aching and aging joints. We do not get long cold winters like many of you do elsewhere in the world... but it is too cold for me. I had a single barrel stove in a shop before that was almost this size, but with a lower ceiling and it did warm the room some and gave me a place to get closer to warm myself through radiation. I was all set to buy a kit and put one together and then started researching other options. I know I can get a double barrel kit to add another barrel on top for more heat transfer, and use a fan to try to draft more air off for better transfer. But my desire would be to burn cleaner and hotter, which in theory makes more heat available to transfer out to me and the room. I also have a strong desire to be able to have a system that can run with no power input other than feeding it wood. I have seen on this site many people trying to do some rather wacky stuff that the rocket heaters just won't like to run with, and I have seen you guys try hard to help people get back on track.... but I have also seen a high resistance to some things that have not been done before. I am not looking to heat a living space long term. I am not looking to make something to sleep on, or lounge on so contact or conductive heating is not what I am looking for unless it is to conduct through a heat sink to give more surface area. I want to pump heat as quickly as possible out into the air and objects in the room through radiation and convection.

With all that lead in out of the way, you know what i have and what I am trying to work with here.

Option one is a double stack barrel stove....

we all here know the simplicity of this and the draw backs to this design. I have seen one (see video link below) where there were pipes cut through the top barrel to add exposed surface area for more heat transfer, and I have also seen one where a triple stack was made. If no other options will work, this will be my fall back....
Double barrel with extra pipes http://youtu.be/wzQdj2TZfsI


Option two is a 55 gal pocket rocket design.

I would want to get more heat transfer off of the exhaust if possible though, so I would be looking at trying to pipe it into a secondary barrel as well to increase the exposed surface area for heat transfer. I could possibly incorporate the barrel with the extra piping like was seen in the video for the double stack stove to get even more surface area.


Option three is a "J" rocket stove design that does not use a mass, but radiating chambers. One of my Ideas to help with this actually seems to be something that could fit quite well in and rocket design. Below is a sketch up of the desgin basics of this modification. The other standard attributes of a rocket stove.... including height of riser vs. the length of tube, etc would be adhered to. If I need more height, I can add another set or partials of barrels for the riser and bell.... I just drew it with one barrel height to get the point across. The point of this is to have 55 gal barrel number two be a large manifold for the exhaust gasses to fall in, like the ones you guys are normally sculpting... to allow very easy access for clean out... and to be able to use it for more radiant and convection heating. As the drawing shows, I could take me pipe out to another barrel or to the chimney from there. I might also be able to pipe horizontally out of the manifold instead of vertical to go to another barrel, much like the way you guys pipe horizontally to go into your mass.


So... now I wait for your thoughts, ideas, and suggestions. I know it is not a Rocket Mass Heater, I dont want the mass. But this is the wood stoves section, and we should all be about burning as clean as possible no matter how we capture the heat from there. So, lay it on me.
 
pollinator
Posts: 4048
Location: Kansas Zone 6a
292
  • Mark post as helpful
  • send pies
    Number of slices to send:
    Optional 'thank-you' note:
  • Quote
  • Report post to moderator
I don't think there is much difference between the barrel stove and pocket rocket in performance. You can get them to burn clean, but they won't last long when you do. The J tube's insulation should help.

Best addition to the double barrel stove is to run a secondary air--put a piece of 2 inch pipe from the upper bung of the burn camber over to the pipe and elbow it up into the secondary barrel. You will get a reburn and a cleaner exhaust.

Which is best really comes down to what you have for firewood. We always ran barrel stoves in the shop because they could take any scrap lumber. But they would need CONSTANT feeding if all you have is small sticks. If you have fuel that feeds in a J tube, build a J tube.
 
Posts: 91
1
  • Mark post as helpful
  • send pies
    Number of slices to send:
    Optional 'thank-you' note:
  • Quote
  • Report post to moderator
Matt,
especially with your skills and understanding, nix option one and two.
Efficient and clean burn are the central advantages of the naturally aspirated rocket.
There are a lot of tricks you can play on the input and output side.
Best bang for the buck; build a down and dirty "Erica/Ernie" version.

Otherwise, keep reading to the end(!) of this forum and others: with a firm understanding of the basic principles
you can explore the possibilities.... a couple places to look - here on this forum look for the "greenhouse RMH"
thread which features a pellet feed, also search for "half barrel rocket" on you tube.

Sounds like you're qualified and able to build a real hummer...- if you're into purcha$ing
search also for Unforgettable Fire's Kimberly or the Wiseway Pellet stove.

Hope this helps...
 
Matt Brannan
Posts: 6
Location: Georgia, USA
  • Mark post as helpful
  • send pies
    Number of slices to send:
    Optional 'thank-you' note:
  • Quote
  • Report post to moderator

R Scott wrote:Best addition to the double barrel stove is to run a secondary air--put a piece of 2 inch pipe from the upper bung of the burn camber over to the pipe and elbow it up into the secondary barrel. You will get a reburn and a cleaner exhaust.


I get that you are saying to connect the two barrels together with a second 2" pipe.... but I dont understand where you are saying the pipe ends should be to induce reburn. Since I saw this comment last night I have been digging through the net trying to find any example of someone doing what you say and have not been able to get any results to show me what you mean.... so please, clarify.


R Scott wrote:Which is best really comes down to what you have for firewood. We always ran barrel stoves in the shop because they could take any scrap lumber. But they would need CONSTANT feeding if all you have is small sticks. If you have fuel that feeds in a J tube, build a J tube.


I have all kinds of wood here. I have 8 acres of woods around me that I can pick up small and medium sized wood with no issue. I brought 2 chord of large cut hardwood with me from the last house, and have good access to keep getting more. I just go on craigslist and sift through the free section for firewood that is close. Then go cut up whatever tree fell in someones yard to bring home and stack. I have done this for years whenever I needed more heating wood. Anyway.... I have plentiful access to any size wood really. I can split down the big wood to be smaller.... and I can load more small wood to build a bigger fire. Thank you for some input, and more would always be welcome. I'm here to learn from those that have seen and done more than I.


Andor Horvath wrote:
...Hope this helps...


Thank you for some input and for the compliments. I will do some searching today for the half barrel and greenhouse. As for purchasing, the only things I would purchase are pieces and components to assemble whatever type unit I decide on. There is no way I want to go pellet stove.... one for having to purchase fuel when fuel is so abundant around me, and two... all of them I have ever seen have to have AC power to operate at all and I am not interested in that.
 
R Scott
pollinator
Posts: 4048
Location: Kansas Zone 6a
292
  • Mark post as helpful
  • send pies
    Number of slices to send:
    Optional 'thank-you' note:
  • Quote
  • Report post to moderator
I will try to do this with words, I can't draw a picture right now from my phone.

If you look at the double barrel stove picture you posted, the upper 2 inch bung is still there above the door. If you run a pipe from there to the 6 inch flange you add from.the kit, the 90 it up several inches so it drafts and injects oxygen just as it enters the upper barrel.

Did that help.or make it muddier?
 
Matt Brannan
Posts: 6
Location: Georgia, USA
  • Mark post as helpful
  • send pies
    Number of slices to send:
    Optional 'thank-you' note:
  • Quote
  • Report post to moderator
From what I first read it sounded like you were suggesting A. After your second explanation I get option B. B makes much more sense to me. Is this what you are describing, and if so.... how high do you make that pipe go? Is is just into the vertical pipe, up into the barrel, etc? It does not seem we will have to rely on the Venturi effect since the top barrel will be trying to suck anyway as the heat rises out the flue.... but does the shape of the pipe end have any effect?
 
Posts: 11
  • Mark post as helpful
  • send pies
    Number of slices to send:
    Optional 'thank-you' note:
  • Quote
  • Report post to moderator
Hey Matt,

I'm from up here in MN. My father-in-law had an automotive repair business until he retired and always heated it with a small metal stove.
About 10-12 years before he retired, he decided to put a ceiling fan up with it blowing down, and he left it on 24/7 in the heating months.
The difference it made was amazing. It brought the heat down to the floor.
He said it stoped all of the aches and pains associated with the cold.

PeterJ
 
R Scott
pollinator
Posts: 4048
Location: Kansas Zone 6a
292
  • Mark post as helpful
  • send pies
    Number of slices to send:
    Optional 'thank-you' note:
  • Quote
  • Report post to moderator
B was exactly what I was describing (you are faster at drawing, too).

The up pipe needs to be long enough to prevent smokeback, but still in enough heat to light off the smoke. About where you have it pictured is about right, maybe even a little shorter. We could get the upper barrel glowing when it was running full bore. That pipe needs to be supported somehow, the barrel ends are not strong enough to hold that much.
 
Peter Jennen
Posts: 11
  • Mark post as helpful
  • send pies
    Number of slices to send:
    Optional 'thank-you' note:
  • Quote
  • Report post to moderator
Just an idea guys: Stretch large springs around the upper barrel (garage door extension springs come to mind) to increase the surface area for better heat transfer.

PeterJ
 
Matt Brannan
Posts: 6
Location: Georgia, USA
  • Mark post as helpful
  • send pies
    Number of slices to send:
    Optional 'thank-you' note:
  • Quote
  • Report post to moderator

R Scott wrote:B was exactly what I was describing (you are faster at drawing, too).

The up pipe needs to be long enough to prevent smokeback, but still in enough heat to light off the smoke. About where you have it pictured is about right, maybe even a little shorter. We could get the upper barrel glowing when it was running full bore. That pipe needs to be supported somehow, the barrel ends are not strong enough to hold that much.


Okay... now if I were to take this approach, does anyone know if it works better with the pipe in the center of the 6" riser, or on one edge? I am also assuming I will want to introduce some turbulence just after the pipe to help mix the gasses better.


I read in a link I found in a thread here about insulating the bottom burn barrel. This guy used a 35 gal inside a 55 gal, and filled the space between with packed sand. This made a little bit of a thermal mass, and apparently makes the main burn barrel live quite some time. I am wondering if doing this would help the second barrel be better at pyrolysis burn for more complete combustion since there would be more heat traveling up to the second barrel. Does anyone have any experience with having done this to comment one way or another? I know it would make it a bit slower on radiating the heat out of the main barrel, but if it help with a better burn, thus less creosote, and a higher radiating temp from the secondary barrel, I am willing to venture into it. I guess if I am looking at it this way, I may want to make the chimney from barrel one to barrel two go high in the barrel and slam into the top... like in the heat riser of a rocket stove.... if doing this I would need to insulate that chimney as well. Hmmmm I wonder if that would work. I dont know if I would have enough velocity in the riser there to make good flow in the barrels....It may stagnate flow. I may have to do some experimenting.


I am still open to ideas involving a pocket rocket, or J-tube rocket stove if they seem applicable to my needs.... I'm just trying to get complete ideas on anything that could work and the double barrel does show some promise. I do like the idea of trying to make a heat sink on the secondary barrel to try to get the heat off ASAP.
 
Matt Brannan
Posts: 6
Location: Georgia, USA
  • Mark post as helpful
  • send pies
    Number of slices to send:
    Optional 'thank-you' note:
  • Quote
  • Report post to moderator
I decided on a double barrel setup and have begun the process. Today I got two barrels, removable lids with a 2" bung and 3/4" bung in each. I have assembled the bottom stove, fired hot outside to burn off all original paint, emptied, cleaned with MEK, and put on a coat of High temp grill paint. I will be doing the upper barrel soon, but not tonight or tomorrow. While doing my burn I just had a 24" stove pipe on top and at times I got a 36" flame out the top of it..... this will be nice when I do the double barrel. Tomorrow I will begin making the radiant reflector to go behind the stove and work on getting my metal shelves in that will be holding my fire wood.

While doing the burn I was playing with a few ideas. I bent up a piece of rigid conduit and snaked it in to do the elbow for adding oxygen to the riser.... the flame out the top of the riser immediately jumped up and brightened. I will be fitting a pipe there permanently when I put in the second barrel. I will play with different treatments for the end to see what gives me the highest temps in the secondary barrel. I also snaked a piece of conduit in through the 3/4" bung at the bottom under my logs. I had drilled holes in it and capped the back end.... it worked wonderfully to add oxygen under the fuel and reduce the smoke out the chimney. I believe I will be lining the bottom of the barrel in fire brick, and making a permanent pipe for air right down the middle between bricks. To really burn up my barrel to take off all the original paint, I hit this lower pipe with some compressed air... the bellows gave me the desired result and all the paint on the barrel powdered and flew away in minutes. I love fire.

I am thinking I am going to build a reflector above the barrel setup to aim the radiant heat out as well rather than the roof there getting tons of convection heat as well as radiated heat. that reflector will also push the air that is rising out into the room more before it rises fully. Under normal operation I will likely be using fans to help circulate air.... I went ahead and brought home my 40" barrel fan and will probably use that to take heat off the barrels. In the event up having to use the shop as a warm refuge if the power goes out, well... we will just stay closer to the barrels until it has heated to room.
 
pollinator
Posts: 351
Location: S. Ontario Canada
29
  • Mark post as helpful
  • send pies
    Number of slices to send:
    Optional 'thank-you' note:
  • Quote
  • Report post to moderator
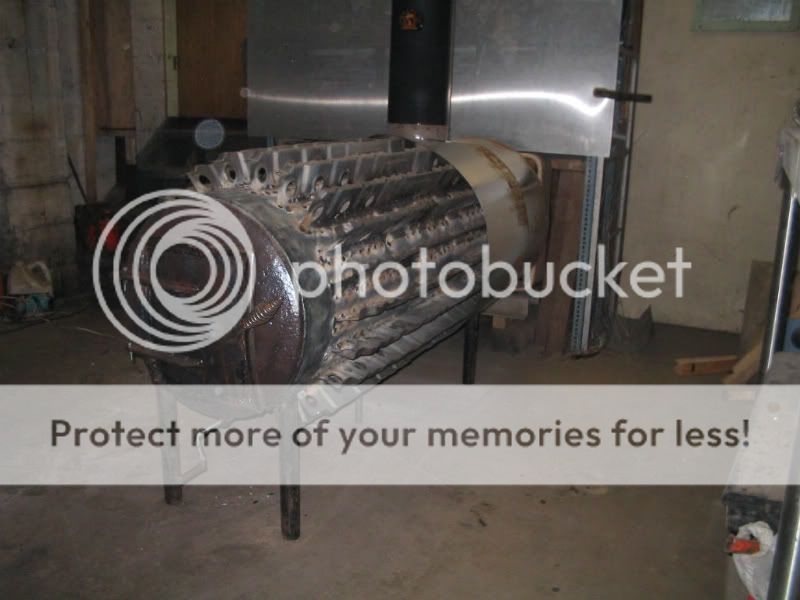
It's probably too late at this point but the most effective heater I made for shop use (to heat quickly from cold to comfy) was a stove made from an old water heater tank but with fins welded around the circumference. Then wrap some tin around to make a duct and blow air through.
This pic has the front half of the duct removed for clarity. You can just barely see the box fan at the rear.

 
Posts: 100
  • Mark post as helpful
  • send pies
    Number of slices to send:
    Optional 'thank-you' note:
  • Quote
  • Report post to moderator
I vote for a rocket heater type since they use less fuel than a barrel stove. In a space like yours, radiant heat is king. Multiple radiant barrels would do the trick, but again with the efficiency, a secondary brick or masonry bell would store the heat longer than a steel barrel.
 
Roy Hinkley
pollinator
Posts: 351
Location: S. Ontario Canada
29
  • Mark post as helpful
  • send pies
    Number of slices to send:
    Optional 'thank-you' note:
  • Quote
  • Report post to moderator

Rich Pasto wrote:I vote for a rocket heater type since they use less fuel than a barrel stove. In a space like yours, radiant heat is king. Multiple radiant barrels would do the trick, but again with the efficiency, a secondary brick or masonry bell would store the heat longer than a steel barrel.


Radiant heat would work fine if it was running all the time and had time to warm everything in the shop. In the OP's case it's no good for the same reason a RMH is not the best choice in a weekend cabin, it takes a long time to warm all the mass.
Really you only want to heat the AIR. So you want some kind of forced air heater.
A barrel stove already has a thin skin that warms very fast. Weld some 3" long bolts or some fins on the outside so you can wrap a duct around the exterior of the stove and set up a fan to blow air through that gap and you'll extract a lot of heat off the barrel skin to warm up the air in the space and you'll be comfortable quicker than any other method.
You also have a fairly high roof in your shop and all the heat is going to pool up there. Put in a ceiling fan to push it back down to where you are.


This isn't just armchair theory, I spent a lot of time huddled around the stove waiting for my shop to heat up enough to work. I planned and built the stove in my shop after much experimenting. I did make a double barrel stove type. Then I ran a duct through the upper barrel and forced air through that. It was better than anything else to date but high velocity air through a small (8") pipe doesn't pick up much heat, or rather as much as I would have liked. Once I built the other one to blow air much slower past the entire skin of the stove there was no comparison. I had my coat off in 45 min instead of 3 hours.
 
gardener
Posts: 791
Location: Tonasket washington
54
  • Mark post as helpful
  • send pies
    Number of slices to send:
    Optional 'thank-you' note:
  • Quote
  • Report post to moderator
do the same with a pocket rocket and get a cleaner burn. I like the ability to put 4 foot wood in my rocket and not have to tend it for several hours.
the boat shop i am building will have both types of rocket (i have to have a constant temp for the epoxy work) since at different times i will be doing different tasks. a fast heat up early in the morning and a way to burn scrap will be important (course since the shop is also my testbed i will have several stoves to choose from)
 
Roy Hinkley
pollinator
Posts: 351
Location: S. Ontario Canada
29
  • Mark post as helpful
  • send pies
    Number of slices to send:
    Optional 'thank-you' note:
  • Quote
  • Report post to moderator
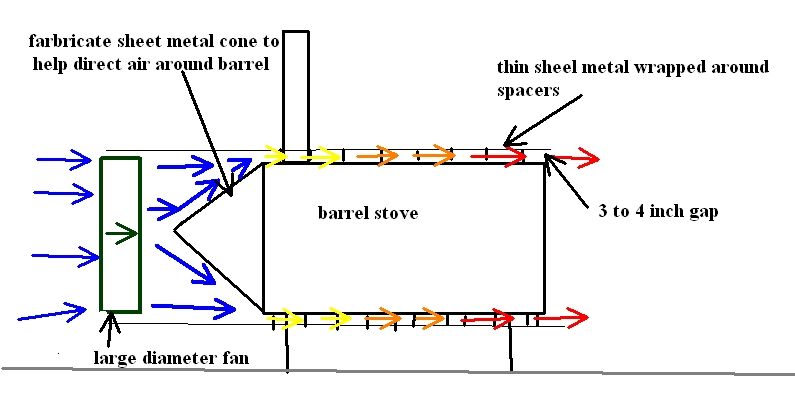
For sure a pocket rocket is going to get you the most heat available on the barrel skin but would complicate a duct around the shell. Maybe you could put the fan horizontal near the floor and blow the air up. That would mean some complicated framework to hold the fan, the cone to direct the air and you'll need some kind of diverter bell shape. Otherwise you'll blow the heat right up to the roof.

Hmmm. I wonder how well a pocket rocket would work made from a horizontal half (45gal) barrel? With that nice big curve you could maybe just lay firebrick in the bottom part of the barrel where the coals would sit.
Anyone ever seen one shaped like this? Heh, you have to cut one end of the barrel off anyway and it's easy enough to make a dish shaped end to substitute for the air diverter cone. Fill a barrel half full of water and put it out to freeze. It will make a fine dish in the bottom.


Posts: 130
Location: Hamilton, MT
4
forest garden chicken bee
  • Mark post as helpful
  • send pies
    Number of slices to send:
    Optional 'thank-you' note:
  • Quote
  • Report post to moderator

Matt Brannan wrote:

Option two is a 55 gal pocket rocket design.

I would want to get more heat transfer off of the exhaust if possible though, so I would be looking at trying to pipe it into a secondary barrel as well to increase the exposed surface area for heat transfer. I could possibly incorporate the barrel with the extra piping like was seen in the video for the double stack stove to get even more surface area.


So my PR is firing fine and heating up as advertised, but heat loss is immediate once fuel source is exhausted... obviously, there is no thermal mass to hold temp. Can I wrap my existing PR with a material to absorb the heat and release it into the space (shop) once fuel source is stopped? Perhaps an aggregate like Pea Gravel or other... ideas?
 
Roy Hinkley
pollinator
Posts: 351
Location: S. Ontario Canada
29
  • Mark post as helpful
  • send pies
    Number of slices to send:
    Optional 'thank-you' note:
  • Quote
  • Report post to moderator
If you were to build a duct type structure around the stove of dry stacked concrete blocks you could blow air through to extract heat and warm the space. The blocks would heat up and slowly give off the heat when the whole thing is shut down.
 
Tim Southwell
Posts: 130
Location: Hamilton, MT
4
forest garden chicken bee
  • Mark post as helpful
  • send pies
    Number of slices to send:
    Optional 'thank-you' note:
  • Quote
  • Report post to moderator
Thanks...

Here is my set-up pictured.

Do you suggest firebrick stacked up around the drum? What are the typical dims of concrete brick (like cinder blocks?)? I was thinking a outer shell of mesh wire screen that I could simply pour in an aggregate that would allow for thermal mass and air pockets, so the fan would be able to pass air through.

IMG_0845.jpg
[Thumbnail for IMG_0845.jpg]
 
Roy Hinkley
pollinator
Posts: 351
Location: S. Ontario Canada
29
  • Mark post as helpful
  • send pies
    Number of slices to send:
    Optional 'thank-you' note:
  • Quote
  • Report post to moderator
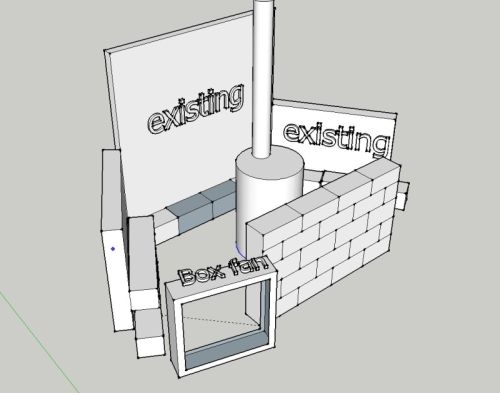
This should give you an idea what I meant.
Typical blocks are meant to have a mortar joint so they're just a bit smaller than 8" high by 16" long and usually 8" thick but come in 4, 8, 10, 12" as well, maybe more.

Make all the block piles at least as high as the stove, lay some plywood or concrete board over the top and blow some air through. The blocks will warm by radiant heat and you'll get airflow pulling heat off the barrel.
You have your stove up on something, raise the fan up that high too.
Use your imagination, blocks far away from the stove won't get much radiant heat. Closer the better to absorb heat. White blocks won't absorb heat as well as dark colours. Paint? Red brick?
I didn't really think that drawing through very well
1. The fan should be blowing towards you in the pic but up higher.
2. The far pile of blocks against the wall might not do much. Make em much closer to the stove.

If the fan is blowing air at the stove put it low so it gets the cold air off the floor. If the fan is sucking air past the stove put it higher and block things off so the air inlet is low. Experiment with it. Blowing air will make it turbulent, might get more heat. Sucking air past the stove will probably work better but try different things, observe and learn.
 
Tim Southwell
Posts: 130
Location: Hamilton, MT
4
forest garden chicken bee
  • Mark post as helpful
  • send pies
    Number of slices to send:
    Optional 'thank-you' note:
  • Quote
  • Report post to moderator
Nice Sketch-up work... I really do appreciate your time and input. I'll try your suggestion and get back with you.
gift
 
The Humble Soapnut - A Guide to the Laundry Detergent that Grows on Trees ebook by Kathryn Ossing
will be released to subscribers in: 08 : 54 : 45
reply
    Bookmark Topic Watch Topic
  • New Topic