• Post Reply Bookmark Topic Watch Topic
  • New Topic
permaculture forums growies critters building homesteading energy monies kitchen purity ungarbage community wilderness fiber arts art permaculture artisans regional education skip experiences global resources cider press projects digital market permies.com pie forums private forums all forums
this forum made possible by our volunteer staff, including ...
master stewards:
  • Carla Burke
  • John F Dean
  • Timothy Norton
  • Nancy Reading
  • r ranson
  • Jay Angler
  • Pearl Sutton
stewards:
  • paul wheaton
  • Tereza Okava
  • Andrés Bernal
master gardeners:
  • Christopher Weeks
gardeners:
  • Jeremy VanGelder
  • M Ljin
  • Matt McSpadden

Building a rocket oven? Have pictures?

 
pollinator
Posts: 643
Location: South East Kansas
221
8
forest garden trees books cooking bike bee
  • Likes 12
  • Mark post as helpful
  • send pies
    Number of slices to send:
    Optional 'thank-you' note:
  • Quote
  • Report post to moderator
If you answered yes to both or one question this is the place. Starting out or finished share your pictures here!  This is what I have done so far see description below each picture for more information.
DSC_0279.JPG
This is the outer barrel of the oven.
DSC_0280.JPG
Inner barrel that will be the oven.
DSC_0281.JPG
Frame for the oven to sit on.
 
T Blankinship
pollinator
Posts: 643
Location: South East Kansas
221
8
forest garden trees books cooking bike bee
  • Likes 6
  • Mark post as helpful
  • send pies
    Number of slices to send:
    Optional 'thank-you' note:
  • Quote
  • Report post to moderator
This morning I was measuring out how much Morgan Superwool I will need for the door of the oven. And after doing some math I was curious what I could fit into the oven area. That led to this picture. The bottom pan is a 13 by 18. On top of that a pizza pan. Then an air fryer/deep dish pizza pan. Last a bread pan.

Want to know more about Morgan Superwool check this link out https://dragontechrmh.com/morgan-superwool-plus-non-ceramic-fiber-blanket/
DSC_0282.JPG
13by18 pan, pizza pans and bread pan
 
gardener
Posts: 1883
Location: Trochu, near Calgary, Canada
272
2
homeschooling forest garden books
  • Likes 5
  • Mark post as helpful
  • send pies
    Number of slices to send:
    Optional 'thank-you' note:
  • Quote
  • Report post to moderator
I have video!  I should say, that it isn't mine, but an excerpt from the Rocket Wood Oven movie. This is shows how to assemble the stovepipe in a repurposed oil barrel. Pretty detailed explanation.
 
steward
Posts: 1899
Location: Coastal Salish Sea area, British Columbia
1063
2
books chicken food preservation pig bike solar wood heat rocket stoves homestead ungarbage
  • Likes 8
  • Mark post as helpful
  • send pies
    Number of slices to send:
    Optional 'thank-you' note:
  • Quote
  • Report post to moderator
Looks like we have had our Rocket oven for 2 years! We have been loving it ever since.

Here are a few pictures of my build. Lots of scrounging went into my build. Added time to to my project forsure.
IMG_0961.JPG
looking down the exhaust tube
IMG_0964.JPG
attaching the outer barrel
IMG_1048.JPG
Matt walkers j tube powers the rocket oven
IMG_1050.JPG
Reused insulation from the community hall. Prior to installing it.
 
T Blankinship
pollinator
Posts: 643
Location: South East Kansas
221
8
forest garden trees books cooking bike bee
  • Likes 5
  • Mark post as helpful
  • send pies
    Number of slices to send:
    Optional 'thank-you' note:
  • Quote
  • Report post to moderator
Did some work on the oven door last week and here are the picture's!
DSC_0007.JPG
Putting the door together
DSC_0011.JPG
Door in place and test fitting
 
Posts: 2
  • Likes 2
  • Mark post as helpful
  • send pies
    Number of slices to send:
    Optional 'thank-you' note:
  • Quote
  • Report post to moderator
Great pictures, thanks for sharing!

I'm hoping to get one built later this summer, and I'm very curious as to how many man-hours have gone into it so far, and how many you'll have put into it by the time you're done.  For those of you who have built them already, how many man-hours would you estimate went into it?

(I'm mainly wondering if I really will get it done this summer or not)
 
T Blankinship
pollinator
Posts: 643
Location: South East Kansas
221
8
forest garden trees books cooking bike bee
  • Likes 5
  • Mark post as helpful
  • send pies
    Number of slices to send:
    Optional 'thank-you' note:
  • Quote
  • Report post to moderator

Jennifer Herron wrote:Great pictures, thanks for sharing!

I'm hoping to get one built later this summer, and I'm very curious as to how many man-hours have gone into it so far, and how many you'll have put into it by the time you're done.  For those of you who have built them already, how many man-hours would you estimate went into it?

(I'm mainly wondering if I really will get it done this summer or not)


I would estimate 20 to 40 hours to date. I took sometime watching The Rocket oven movie to understand what is the next step. I also used Unofficial Companion Guide Rocket Oven in finding the step I was going to do that day. I would also recommend getting the Rocket Oven Plans. Having this helped me in building the stand and showing others how cool it is to build!
 
Posts: 45
9
  • Likes 10
  • Mark post as helpful
  • send pies
    Number of slices to send:
    Optional 'thank-you' note:
  • Quote
  • Report post to moderator
I built a rocket fired double barrel oven this year also.  I had previously built a rocket fired and traditional fired bread oven in my back yard, but found that there was too much thermal mass and took too much wood to get uo to cooking temperatures for a single use like baking bread or cooking a roast. When I discovered the double barrel oven I decided to tear down the top of the oven and use it as a base for the double barrel oven
20140928_151027.jpg
Original bread oven
Original bread oven
 
John Craig
Posts: 45
9
  • Likes 6
  • Mark post as helpful
  • send pies
    Number of slices to send:
    Optional 'thank-you' note:
  • Quote
  • Report post to moderator
I built a double barrel rocket oven this year. I had previously built a rocket fired and traditionally fired brick bread oven that would burn sticks or pellets in the j feed rocket.  The 4 inch rocket I built was too small for the large mass of the oven. So when I learned about the double barrel oven. I tore the top off the old oven and built the double barr3l oven using the existing rocket.
I will attempt to attach pictures of the build.

I had 12 pictures attached with explanations of the build but somehow deleted them before posting. When I have more time I will repost. Right now I have to go pick up a new vehicle.
20160107_151047.jpg
The bread oven was conventionally fired with a fire in the oven before baking. I added a four inch rocket which could be fired by stick wood in the conventional j tube rocket.
20160107_152118.jpg
I also modified the j tube to be fired by pellets with a hopper and steel carburetor that could be pushed in or out to control the burn temperature.
20160112_183636.jpg
This is the carburator
 
John Craig
Posts: 45
9
  • Likes 3
  • Mark post as helpful
  • send pies
    Number of slices to send:
    Optional 'thank-you' note:
  • Quote
  • Report post to moderator
I once again tried to post 12 pictures with explanations of my build but when I submitted it said  it was too long. Sooo! I'll post it in pieces.
DSC02840.JPG
The bread oven was conventionally fired with a fire in the oven before baking. I added a four inch rocket which could be fired by stick wood in the conventional j tube rocket.
 
John Craig
Posts: 45
9
  • Mark post as helpful
  • send pies
    Number of slices to send:
    Optional 'thank-you' note:
  • Quote
  • Report post to moderator
The top of the bread oven was removed to the concrete base. The picture is from the original build. The fire brick in the picture were removed.
 
John Craig
Posts: 45
9
  • Likes 3
  • Mark post as helpful
  • send pies
    Number of slices to send:
    Optional 'thank-you' note:
  • Quote
  • Report post to moderator
Build continued. A 35 gallon open top barrel, was used for the the outer barrel of the oven. Dents were hammered out, and a 4 inch hole was cut in the bottom to accept the 4 inch riser from the rocket. The outer paint and rust inside was removed with flap discs. The unit was painted with black hi temperature paint
20221024_130224.jpg
A steel barrel that was painted to house a rocket oven
 
John Craig
Posts: 45
9
  • Likes 2
  • Mark post as helpful
  • send pies
    Number of slices to send:
    Optional 'thank-you' note:
  • Quote
  • Report post to moderator
The bottom of the barrel was cut to accept a cast iron door from a barrel stove kit I had bought earlier.
20221024_130254.jpg
A squarish cut in the bottom of a steel barrel
 
John Craig
Posts: 45
9
  • Likes 3
  • Mark post as helpful
  • send pies
    Number of slices to send:
    Optional 'thank-you' note:
  • Quote
  • Report post to moderator
A round baffle was cut from sheet steel with a outlet at the top, of the same csa as the rocket, to fit into the outer barrel. It was tack welded to the barrel and painted with high temperature  paint.
20230208_153950.jpg
The outer barrel of a rocket oven with a baffle welded into it
 
John Craig
Posts: 45
9
  • Likes 1
  • Mark post as helpful
  • send pies
    Number of slices to send:
    Optional 'thank-you' note:
  • Quote
  • Report post to moderator
A sheet metal tab with a hole drilled through was welded to the floor of the outer barrel, to anchor the 4 inch smoke stack to.
20230208_154016.jpg
Sheet metal tab added to barrel to hold smoke stack
 
John Craig
Posts: 45
9
  • Likes 1
  • Mark post as helpful
  • send pies
    Number of slices to send:
    Optional 'thank-you' note:
  • Quote
  • Report post to moderator
Holes were drilled into the bottom of the outer barrel to attach the cast-iron door of the barrel stove. A 4 inch circular holewas cut into the top back of the outer barrel to accept the 4 inch stainless steel tube chimney.
20230208_154022.jpg
holes in the bottom of the barrel for door attachment
 
John Craig
Posts: 45
9
  • Likes 1
  • Mark post as helpful
  • send pies
    Number of slices to send:
    Optional 'thank-you' note:
  • Quote
  • Report post to moderator
The inner barrel was constructed from a 16 gallon barrel that was cut down and welded together to fit inside the outer barrel with baffle. Here is a picture on the 16 gal barrel as the outer barrel of a smaller two barrel oven I built as a proof of concept.
20221010_183629(1).jpg
Small two barrel rocket oven
 
John Craig
Posts: 45
9
  • Likes 1
  • Mark post as helpful
  • send pies
    Number of slices to send:
    Optional 'thank-you' note:
  • Quote
  • Report post to moderator
The inner barrel was welded into the outer barrel top that was cut to fit it. The top of the inner barrel was cut for the oven door, and ceramic fibre blanket was sandwiched within sheet metal that was tack welded to the inner side of the door. Hinges were attached with stainless sheet metal screws and the bottom of the door tack welded to the inner barrel. The I nerbarrelwas painted on the outside with high temp paint.
20230208_154117.jpg
Inner barrel with its door installed into outer barrel
 
John Craig
Posts: 45
9
  • Likes 1
  • Mark post as helpful
  • send pies
    Number of slices to send:
    Optional 'thank-you' note:
  • Quote
  • Report post to moderator
A latch mechanism and a thermometer were added to the inner barrel door.

20230817_150307.jpg
A black barrel with an oven door, thermometer and latch
 
John Craig
Posts: 45
9
  • Likes 1
  • Mark post as helpful
  • send pies
    Number of slices to send:
    Optional 'thank-you' note:
  • Quote
  • Report post to moderator
Long stainless steel bolts were inserted in the inner barrel to support the bottom  rack. ½ inch mild steel angle iron was bolted to the middle of the inner barrel to accept the middle shelving.
The legs of the barrel kit were attached to the concrete base with Cobra Tap concrete screws. A sheet of corrugated steel roofing was attached to the top of the legs with stainless steel bolts. A layer of rock wool was laid over the bottom sheet of roofing. The outer barrel was placed on the rock wool, with the rocket riser entering into the barrel.

Two additional pieces of corrugated roofing were laped over the bottom piece and secured with pop rivets. More rock wool was added over the outer barrel, and a top piece of roofing placed on top. The roofing was held together with two ratchet straps around the roofing and tightened until the corrugated roofing fit together. It was drilled and riveted to the side pieces.
The insulation was recessed 2 inches from either end of the outer barrel. Heavy duty a,uminum foil was cut to fit between the barrel and the corrugated roofing. It was sealed at the edges with high temp silicone. The gap between aluminum foil and barrel edge was filled with cob and waterproofed after it cured.

20230817_150447.jpg
A rocket oven with roofing material outside of insulation material. Racks are inside the oven
20230817_150455.jpg
Front view of a completed rocket oven with insulation and door closed
 
John Craig
Posts: 45
9
  • Mark post as helpful
  • send pies
    Number of slices to send:
    Optional 'thank-you' note:
  • Quote
  • Report post to moderator
The 4 inch stainless steel tube chimney was left over from another project. It was inserted through a 4 inch hole cut in the top corrugated roofing piece, the rock wool and outer barrel. It was attached with a stainless bolt to the plate welded to the floor of the outer barrel. The joint between the stainless chimney and the corrugated roofing was sealed with high temp silicone.
20230817_150507.jpg
The rear of a rocket oven with the chimney installed
 
John Craig
Posts: 45
9
  • Mark post as helpful
  • send pies
    Number of slices to send:
    Optional 'thank-you' note:
  • Quote
  • Report post to moderator
The barrel oven door was attached to the back of the outer barrel to allow clean out.

20230817_150521.jpg
A barrel stove door in the back of a rocket oven
 
John Craig
Posts: 45
9
  • Likes 4
  • Mark post as helpful
  • send pies
    Number of slices to send:
    Optional 'thank-you' note:
  • Quote
  • Report post to moderator
With using only pellets to heat the oven, it would reach 425 degrees Fahrenheit in 50 minutes and hold its temperature as long as the carburetor was fully open and pellets were feeding.

It has been a great success. Thanks Permies for the great idea of double barrel rocket oven.
20230817_150532.jpg
Many bright beautiful flowers, a double barrel rocket oven and more flowers
 
John Craig
Posts: 45
9
  • Likes 2
  • Mark post as helpful
  • send pies
    Number of slices to send:
    Optional 'thank-you' note:
  • Quote
  • Report post to moderator

Jennifer Herron wrote:Great pictures, thanks for sharing!

I'm hoping to get one built later this summer, and I'm very curious as to how many man-hours have gone into it so far, and how many you'll have put into it by the time you're done.  For those of you who have built them already, how many man-hours would you estimate went into it?

(I'm mainly wondering if I really will get it done this summer or not)


Hi Jennifer:

I just posted my build. As I am retired I don't keep track of the time I spend on a project.  This took about 8 months during which I  sourced materials, drew sketches of a build and actually fabricated the oven.  I bought the plans from permies and decided I didn't like the patch together outer barrel. So I used two different sized barrels and created my own design. It also had to fit with my existing rocket fired bread oven design. If I was to estimate the person hours I put in for all the sourcing, planning and fabrication I would estimate it at 100 hrs give or take 10 hrs.  But being retired I can work at my own pace and stop to ponder the next step before continuing on. I have also previously done a number of metal fabrications, such as a pellet gaseifier to run a generator, and a reflux still to make 95% ethanol, and built a traditionally fired and rocket fired high mass bread oven, so I find fabrication fun.
 
T Blankinship
pollinator
Posts: 643
Location: South East Kansas
221
8
forest garden trees books cooking bike bee
  • Likes 3
  • Mark post as helpful
  • send pies
    Number of slices to send:
    Optional 'thank-you' note:
  • Quote
  • Report post to moderator
Got more pictures! I worked on it a little at a time and still needs more work but the end is near. I also did video some of the build and I am thinking about sharing it. What are everyone's thoughts?
S1150002.JPG
Stove pipe in barrle
S1160006.JPG
Opening for rocket
Opening for rocket
S1160013.JPG
Adding the ceramic fiber blanket
 
John Craig
Posts: 45
9
  • Likes 4
  • Mark post as helpful
  • send pies
    Number of slices to send:
    Optional 'thank-you' note:
  • Quote
  • Report post to moderator
Yes please share your video when it is done. We are such a visual culture that seeing it, may inspire others to see in themselves the ability to make a rocket barrel oven for themselves.  Making good progress on yours. The big issue for those not retired is finding the time when we can to keep at it.
 
Steward of piddlers
Posts: 6134
Location: Upstate NY, Zone 5, 43 inch Avg. Rainfall
2970
monies home care dog fungi trees chicken food preservation cooking building composting homestead
  • Likes 1
  • Mark post as helpful
  • send pies
    Number of slices to send:
    Optional 'thank-you' note:
  • Quote
  • Report post to moderator
Rockets are incredible. One day I hope to gain the time/knowledge/ability to build my own and claim I am a Rocket Scientist.

I'd love to see a video if you are willing to share.
 
T Blankinship
pollinator
Posts: 643
Location: South East Kansas
221
8
forest garden trees books cooking bike bee
  • Likes 1
  • Mark post as helpful
  • send pies
    Number of slices to send:
    Optional 'thank-you' note:
  • Quote
  • Report post to moderator
I have about 15 minutes of unedited video and is in 1080p. I think with a little work I could get maybe 5 minutes but I can do more if the weather is good. One idea I have had is a series about using a rocket oven like: how many pounds of wood to cook (blank) amount of food, hardwoods vs. softwoods and if there is a good idea maybe try it!  Here is a few screen shot from some videos:
Screenshot-2024-02-13-182445.png
Oven opening
Oven opening
Screenshot-2024-02-13-183702.png
Me and my rocket Oven
 
T Blankinship
pollinator
Posts: 643
Location: South East Kansas
221
8
forest garden trees books cooking bike bee
  • Likes 3
  • Mark post as helpful
  • send pies
    Number of slices to send:
    Optional 'thank-you' note:
  • Quote
  • Report post to moderator
So this is my first video of my Rocket Oven. Showing just how big the oven is and what can go inside.  
 
John Craig
Posts: 45
9
  • Likes 4
  • Mark post as helpful
  • send pies
    Number of slices to send:
    Optional 'thank-you' note:
  • Quote
  • Report post to moderator
T. blankenship, thanks for the great video and pictures of your build.  Congratulations on being an oven rocketeer!  It looks as though your rocket oven is in a covered area.  If you decide to move it out into the elements, you will need to seal your cob realy well.
My outdoor oven's cob was sealed with waterproofing compound. This spring I noticed that there was some flaking of the cob. Apparently I hadn't sealed it well enough.
My solution was to spray flex seal on the cob, and it seems to have made it weather proof. Time will tell!
 
T Blankinship
pollinator
Posts: 643
Location: South East Kansas
221
8
forest garden trees books cooking bike bee
  • Mark post as helpful
  • send pies
    Number of slices to send:
    Optional 'thank-you' note:
  • Quote
  • Report post to moderator

John Craig wrote:T. blankenship, thanks for the great video and pictures of your build.  Congratulations on being an oven rocketeer!  It looks as though your rocket oven is in a covered area.  If you decide to move it out into the elements, you will need to seal your cob realy well.
My outdoor oven's cob was sealed with waterproofing compound. This spring I noticed that there was some flaking of the cob. Apparently I hadn't sealed it well enough.
My solution was to spray flex seal on the cob, and it seems to have made it weather proof. Time will tell!


Thanks

It is my understanding that cob needs to breath and if cob is sealed it will not be good. This was the first time I have used cob on a project so I am still learning. Using books and videos has helped me with making cob. In the end I just need to make more cob to get better at it. One thought I have had is to build another rocket oven but add some of my ideas to it. Like replacing the cob with a round metal ring with insulation on the back. But that is just a thought.
 
Rocket Scientist
Posts: 762
Location: Province of Granada, Andalucía, Spain
525
6
cooking rocket stoves woodworking wood heat
  • Likes 2
  • Mark post as helpful
  • send pies
    Number of slices to send:
    Optional 'thank-you' note:
  • Quote
  • Report post to moderator
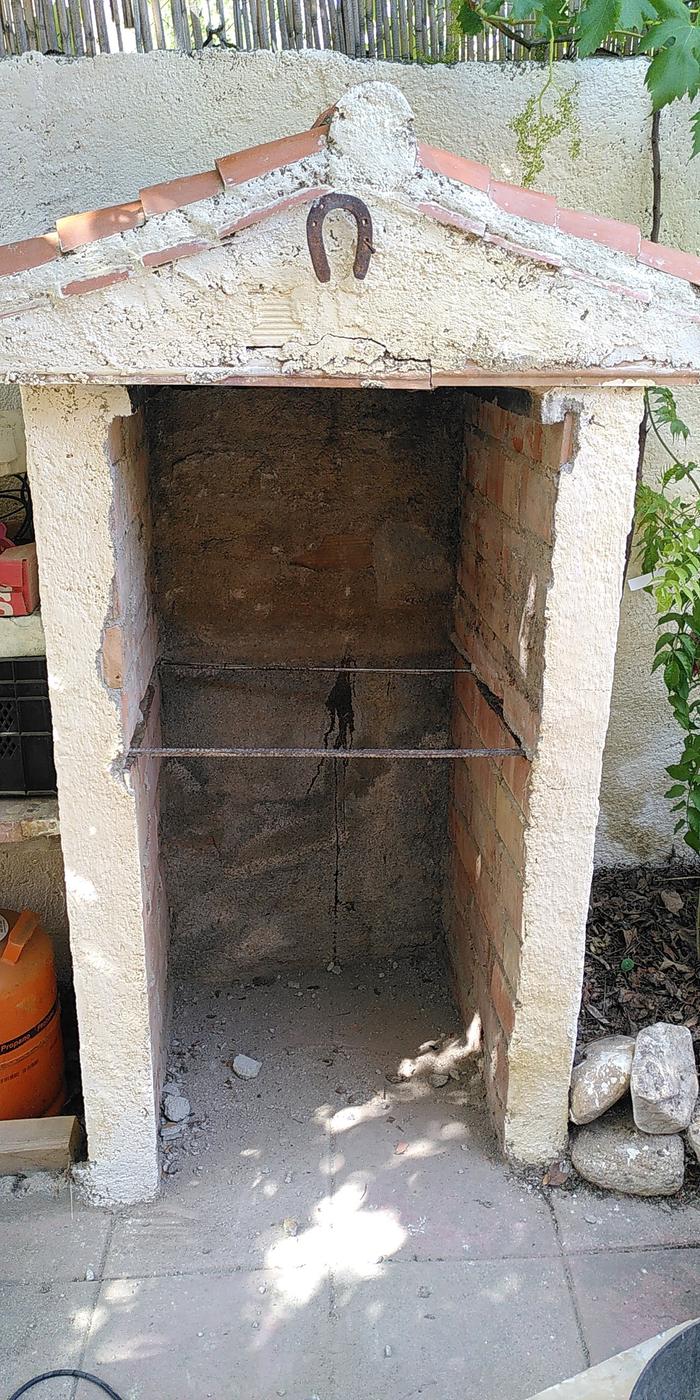
I started building a rocket oven as it gets too hot in the house in summer when I bake bread.
There is an unused outside grill/bbq structure, that I'm going to take advantage of.

Photo 1

As I want this to be training for building RMHs in the future I went for a full firebrick core and not a lighter weight, mobile version that are featured in a lot of rocket ovens.

The core will be in the bottom of the little bbq-house and a gutted (completely stripped of electronic components etc) household stove will be put in the top compartment, functioning as the "black" oven. This safes a lot of tinkering with doors etc and allows me to use the preexisting structure.

I started by following the instructions for the core in "The Rocket Mass Heater Builder's Guide". I decided to go for 15 cm cross section.

Photo 2

After building the mock up (in front of the future site) I decided to try to make it smaller.
So I reduced the height of the feed tube by 1 row of brick allowing me to make the riser significantly lower (1:3 ratio, 3 rows or 33 cm less). I was also able to reduce the lenght of the burn tunnel without having to make more cuts.

Photo 3

The first test fire (my first rocket fire in general) was quite successful.

Photo 4

I'm now waiting on an old oven/stove and will continue when I have it.

I'll keep you posted on the progress


1a.jpg
Starting the burn tunnel of a rocket oven
2-finished-tall-mock-up.jpg
dry stacked rocket stove core
3-finished-lower-mock-up.jpg
a completed dry stack rocket stove in front of it's future home
4-first-burn-lower-mou.jpg
fire in the mockup rocket stove
 
Benjamin Dinkel
Rocket Scientist
Posts: 762
Location: Province of Granada, Andalucía, Spain
525
6
cooking rocket stoves woodworking wood heat
  • Likes 2
  • Mark post as helpful
  • send pies
    Number of slices to send:
    Optional 'thank-you' note:
  • Quote
  • Report post to moderator

Benjamin Dinkel wrote:I started building a rocket oven as it gets too hot in the house in summer when I bake bread.
There is an unused outside grill/bbq structure, that I'm going to take advantage of.

Photo 1

As I want this to be training for building RMHs in the future I went for a full firebrick core and not a lighter weight, mobile version that are featured in a lot of rocket ovens.

The core will be in the bottom of the little bbq-house and a gutted (completely stripped of electronic components etc) household stove will be put in the top compartment, functioning as the "black" oven. This safes a lot of tinkering with doors etc and allows me to use the preexisting structure.

I started by following the instructions for the core in "The Rocket Mass Heater Builder's Guide". I decided to go for 15 cm cross section.

Photo 2

After building the mock up (in front of the future site) I decided to try to make it smaller.
So I reduced the height of the feed tube by 1 row of brick allowing me to make the riser significantly lower (1:3 ratio, 3 rows or 33 cm less). I was also able to reduce the lenght of the burn tunnel without having to make more cuts.

Photo 3

The first test fire (my first rocket fire in general) was quite successful.

Photo 4

I'm now waiting on an old oven/stove and will continue when I have it.

I'll keep you posted on the progress


smaller-core.jpg
Came up with a smaller design to fit into the hut a bit better and potentially use less wood to get up to temperature
cooking.jpg
Used the pretty sucessful test burn to cook some lentil soup
clean-bbq-hut.jpg
Broke off the old platform and was able to reuse some of the refractory brick for the riser
base-mix.jpg
Mix for the insulating base (lime, water, expanded clay)
insulating-base.jpg
Insulating base that also makes the interior more or less level.
 
Benjamin Dinkel
Rocket Scientist
Posts: 762
Location: Province of Granada, Andalucía, Spain
525
6
cooking rocket stoves woodworking wood heat
  • Likes 1
  • Mark post as helpful
  • send pies
    Number of slices to send:
    Optional 'thank-you' note:
  • Quote
  • Report post to moderator

Benjamin Dinkel wrote:

Benjamin Dinkel wrote:

I'll keep you posted on the progress


Here's the whole thing
permies.com/t/257726/rocket-ovens/Rocket-bread-oven-existing-BBQ#2433166
 
I agree. Here's the link: http://stoves2.com
reply
    Bookmark Topic Watch Topic
  • New Topic