• Post Reply Bookmark Topic Watch Topic
  • New Topic
permaculture forums growies critters building homesteading energy monies kitchen purity ungarbage community wilderness fiber arts art permaculture artisans regional education skip experiences global resources cider press projects digital market permies.com pie forums private forums all forums
this forum made possible by our volunteer staff, including ...
master stewards:
  • Carla Burke
  • John F Dean
  • Timothy Norton
  • Nancy Reading
  • r ranson
  • Jay Angler
  • Pearl Sutton
stewards:
  • paul wheaton
  • Tereza Okava
  • Andrés Bernal
master gardeners:
  • Christopher Weeks
gardeners:
  • Jeremy VanGelder
  • M Ljin
  • Matt McSpadden

Olla from plastic bottles and mortar

 
gardener
Posts: 5433
Location: Cincinnati, Ohio,Price Hill 45205
1120
forest garden trees urban
  • Likes 10
  • Mark post as helpful
  • send pies
    Number of slices to send:
    Optional 'thank-you' note:
  • Quote
  • Report post to moderator
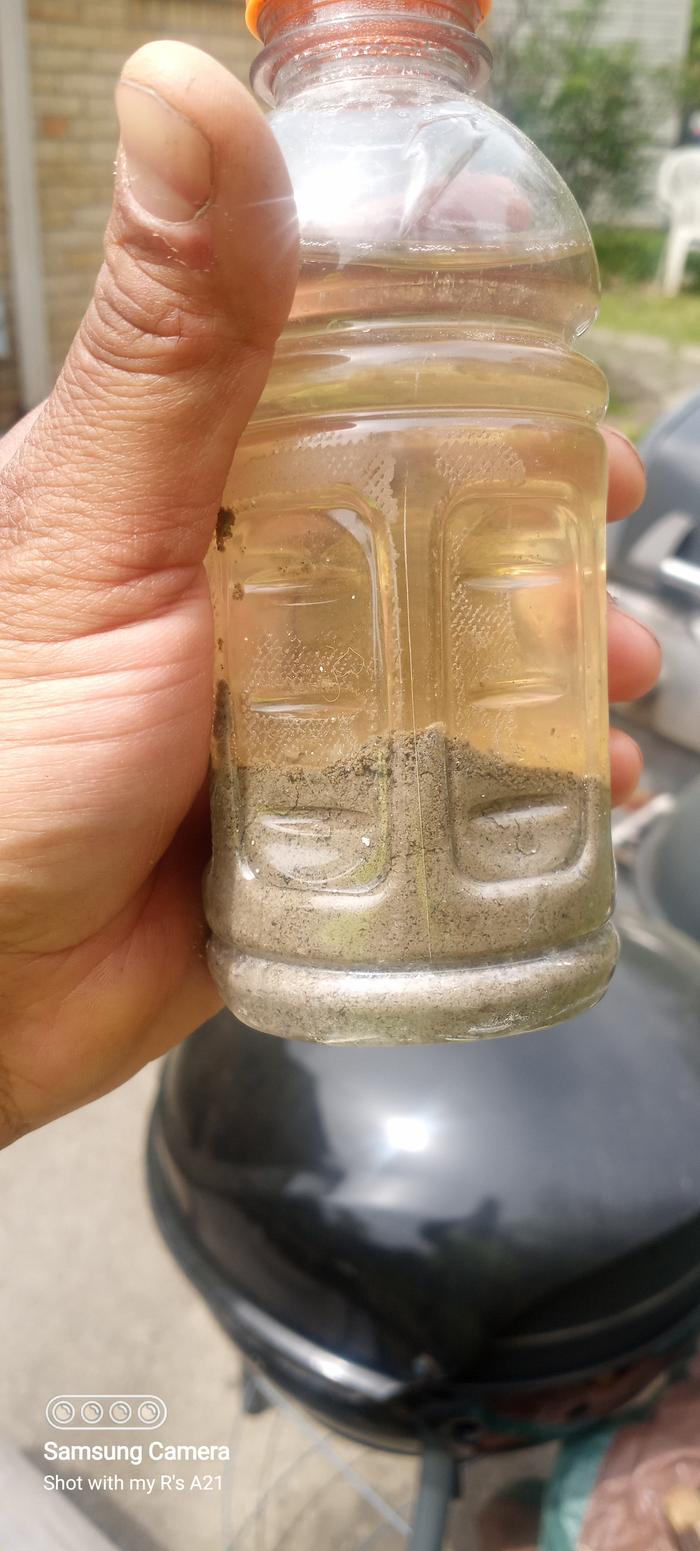
I have made some ollas by casting blocks of mortar inside of plastic bottles and cutting out the bottoms.
Aside from the cheapness, I am attracted by the ease of clean outs and monitoring water levels.
The plastic of the lids makes adding irrigation lines very easy.
Algae may become an issue,  for any bottle ollas I don't bury entirely.
I am probably going to try urine in a couple  of the bigger ones, both with and without charcoal.
20230420_134328.jpg
Gatorade bottles have thick plastic and lots of ridges, making them pretty ideal.
20230425_191316.jpg
This one gallon vinegar bottle is a less obvious choice, but it seems to be working.
 
pollinator
Posts: 396
163
2
hugelkultur forest garden foraging composting toilet food preservation medical herbs solar rocket stoves wood heat composting homestead
  • Likes 6
  • Mark post as helpful
  • send pies
    Number of slices to send:
    Optional 'thank-you' note:
  • Quote
  • Report post to moderator
William, I’m slow to understand how you use these. Please elaborate? Thank you for your time.
 
William Bronson
gardener
Posts: 5433
Location: Cincinnati, Ohio,Price Hill 45205
1120
forest garden trees urban
  • Likes 9
  • Mark post as helpful
  • send pies
    Number of slices to send:
    Optional 'thank-you' note:
  • Quote
  • Report post to moderator
Angela, I will try to elaborate.
An OLLA is a clay pot used for irrigation. It is buried in the ground or container neck deep and filled with water to supply water to surrounding plants. The roots will grow towards and around the pot. The process works by soil moisture tension: when the soil is dry, the water is pulled out, when the soil is moist, water stays in the OLLA. OLLA irrigation has been used for thousands of years.


By replacing the bottom of the plastic bottles with mortar I am giving them a porous surface that works the same way that terracotta does.
This is cheaper than a proper olla or even most other diy ollas.
Ollas can be used as individual reservoirs or attached to irrigation tubing.
Their greatest advantage is the way they respond to soil moisture.
They only deliver water that is needed.
This can drastically reduce water use and it works without any timers or electronics.
 
William Bronson
gardener
Posts: 5433
Location: Cincinnati, Ohio,Price Hill 45205
1120
forest garden trees urban
  • Likes 9
  • Mark post as helpful
  • send pies
    Number of slices to send:
    Optional 'thank-you' note:
  • Quote
  • Report post to moderator
 To cast a mortar  plug I first score a circle on the bottom of a bottle.
I cut a few slots along the score line, and pour about an inch of dry mortar down the neck.
When I place this prepared bottle into a tray of water,  the dry mortar wicks the moisture it needs to set up through the slots.
The next day I cut out the rest of the scored circle and the olla is ready to use.

So far I've been sitting them on top of the soil.
Without a lid, they seem to function just as a terracotta olla would.
With the lid on, there is almost no way for air to enter, and there seems to be little or no water released.
Since most of them will ultimately be  tied into a gravity fed rainwater irrigation system, there shouldn't be this same kind of "vacuum lock" issue.


Angela Wilcox
pollinator
Posts: 396
163
2
hugelkultur forest garden foraging composting toilet food preservation medical herbs solar rocket stoves wood heat composting homestead
  • Likes 3
  • Mark post as helpful
  • send pies
    Number of slices to send:
    Optional 'thank-you' note:
  • Quote
  • Report post to moderator
William, thank you for your helpful, detailed explanation. I wish you great success in your garden.
 
master steward
Posts: 13819
Location: Pacific Wet Coast
8150
duck books chicken cooking food preservation ungarbage
  • Likes 8
  • Mark post as helpful
  • send pies
    Number of slices to send:
    Optional 'thank-you' note:
  • Quote
  • Report post to moderator
I've tried various versions of this - I think the mortar for weeping is a great variation!

However, I do find that any part of the plastic bottle exposed to the sun will start degrading and if I didn't keep a close eye on the situation, I'd have a shattered plastic mess to clean up. The thinner the plastic, the faster the issue, so the heavier juice bottles such as in the picture will last much longer than something like a milk jug (which I *never* use now that I realize how poorly they cope with UV).

If you live in a region that doesn't get freezing weather, I wonder if you could cut the bottom out with a glass cutter and use glass jars? There are soooo... many glass jars going to the landfill as most places don't really have a reuse plan for them.

I've also collected "free to a good home" terra cotta pots and I plug the hole in the bottom and bury them and use a plate from the thrift store on top.

One of the biggest advantages of this system is that as the water's being released below ground. I'm not loosing it to evaporation before the plants get a crack at it. That said, I still only use them where I can't rely on things like punky wood or on simply watering deeply every 2 weeks so plants learn to reach further for their water.
 
steward
Posts: 17548
Location: USDA Zone 8a
4494
dog hunting food preservation cooking bee greening the desert
  • Likes 6
  • Mark post as helpful
  • send pies
    Number of slices to send:
    Optional 'thank-you' note:
  • Quote
  • Report post to moderator
In the past, I have used discarded 2-liter bottles with small holes in the bottom.

I like the idea of using the mortar in the bottoms.  The mortar would like the water to drain much slower and give the bottle some weight so that it doesn't fall over as easily.
 
William Bronson
gardener
Posts: 5433
Location: Cincinnati, Ohio,Price Hill 45205
1120
forest garden trees urban
  • Likes 5
  • Mark post as helpful
  • send pies
    Number of slices to send:
    Optional 'thank-you' note:
  • Quote
  • Report post to moderator
I am still refining this system and today I tested it with some swamp water.
Ok, it was the water from my weed tea barrel, filtered through sawdust and charcoal.
There resulting water is still stinky and its dark from the fine particles of charcoal suspended in it.
It seemed to  flowed out of a terracotta pot/bottle olla in a timely manner.
Tomorrow I hope to try out a mortar/bottle olla.
Being able to fertilize plants with "enhanced" rainwater will be very useful.

I'm tempted to try a gallon sized olla filled with strait pee, right next to a comfrey plant...

I'm also thinking about a bucket filter filled with layers of charcoal,sawdust and weed tea, that drains into an olla .
I have some cuttings planted into a sawdust water  filter ,so far they seem happy .
 
Jay Angler
master steward
Posts: 13819
Location: Pacific Wet Coast
8150
duck books chicken cooking food preservation ungarbage
  • Likes 4
  • Mark post as helpful
  • send pies
    Number of slices to send:
    Optional 'thank-you' note:
  • Quote
  • Report post to moderator
My understanding is that part of how an olla pot works is that there are tiny pores that water will seep through, but not quickly, so the plants get "slow release" water.

My experience is that since I use water from a deep well, the minerals in the well seem to gradually block those tiny pores so the water won't seep through after a while.

There resulting water is still stinky and its dark from the fine particles of charcoal suspended in it.


So you may find that after a while, those fine particles will choke the pores, even though it worked fine the first time.

This may not matter with the plastic bottles, as they will likely get brittle after a while anyway and have to be replaced.
This may only be an issue with our high-calcium water, as it's pretty notorious for sticking to stuff like toilet bowls! (It's good for hearts though!)
 
Posts: 64
18
  • Likes 5
  • Mark post as helpful
  • send pies
    Number of slices to send:
    Optional 'thank-you' note:
  • Quote
  • Report post to moderator
Several years ago I experimented using 2 L bottles (like Anne Miller) as improvised ollas.

I buried them about 2/3 deep, because I wanted to encourage deeper root growth.
Originally I put a pinhole near the bottom and one near the top. And after I filled them I would put the cap back on. The idea being that the water would slowly trickle out down near the roots encouraging the roots to grow deeper. I found out that the water drained out too quickly and would be gone after a few hours.
I tried two things next to get a slower water release:

Idea (1) A single pinhole near the bottom. When you first fill the bottle, there will be an initial small surge of water out into the soil. Once the cap is replaced, there will be a slight vacuum that forms inside the bottle. The varying degrees of barometric pressure and temperature changes of Night and Day would let the bottle release water and then 'burp' air back in through the pinhole.

Idea (2)  two pinholes near the bottom, one  higher than the other (.5-1inch?). Just like Idea #1, there would be a small flush of water when filling, and when the cap is on there would be a slight vacuum formed. The difference is that the higher pinhole should suck in air bubbles when the soil is 'dry'. But when saturated from the lower pinhole, the upper hole would suck in water and the lowered pressure would stop/slow water release. (There still might have been some burping from the day night temperature/pressure Cycles).  
The side-to-side distance of the pinholes from each other would determine how much water was released: right above each other should keep a small spot wet right next to the bottle. Further away horizontally would keep a larger area damp. Depending on how well the soil drains, it might never stop burping air.*

I know a lot of people are concerned about Plastics, but I found out that if you left the label on the 2 L bottle you could then tuck the plastic plant ID stake under the edge of the bottle label. Which was kind of nice.


The pinhole idea also works well if you need to leave some bottom watered plants while you are on vacation. Fill your 2 L and cap them, flip upside down and poke your holes low down on the bottom between the bumps. It may not be easy to do because the plastic is thicker. Place in a tray with water that the plants are also sitting in. Being sure that the holes are under the water. As the potted plants draw up water out of the tray, the bottles will burp replacement water into the tray.


* it did occur to me that an interesting variation of this might be to have the bottle sitting in some kind of a tray or Bowl with both holes below the rim of the bowl. The bowl could be filled with soil or sand. The bowl would fill with water and stop the water release, the dirt above the bowl would then pull out the water with capillary action. As the water seeped away, the pin holes would burp water as described earlier.


I did this with a couple of tomato and pepper plants. The plants were planted in a little bit of a depression with a circle of cardboard holding back the layer of wood chips that were piled on top to help retain moisture and discourage weeds.  Additional soil/compost was later added into the cardboard well. This was in a raised bed.

I have some pictures somewhere of the finished setup.


N
 
Nancy Graven
Posts: 64
18
  • Likes 3
  • Mark post as helpful
  • send pies
    Number of slices to send:
    Optional 'thank-you' note:
  • Quote
  • Report post to moderator

I find the mortar idea interesting. I guess I think of mortar as 'concrete' and I've always assumed that concrete was impervious to water..  How quickly does water soak through? Does the type of mortar or the thickness affect how quickly water seeps through?

I wonder if aircrete would do the same thing? You would probably want to fill it and let it soak through a few times to get the soap detergent from the foam out.

I wonder if you could do a hybrid?
Like, a clay pot with the drain hole plugged and then (silicon/glue/something) a  bottle on top for a bigger Reservoir? The threaded bottle caps would help with the automated watering that I think William mentioned. But you would still get the effect of the original clay olla.

If someone was doing the nipple waterers (or the little paddle waters for small livestock like chickens). I think you could set up a float stick to activate the mechanism when the water level in the Olla dropped.
As long as it was not a high pressure water system, it ought to work.

Forgive me, my brain runs away with ideas sometimes.

N.
 
Posts: 122
3
  • Likes 4
  • Mark post as helpful
  • send pies
    Number of slices to send:
    Optional 'thank-you' note:
  • Quote
  • Report post to moderator
I love this... It's ingenious actually.

However, what concerns me is the degradation of the plastic from the UV. It releases the nastiness from the plastic. In your soil, in your plants, etc.

This is why we should never drink the water from UV exposed plastic bottles.
Also the "bad" in plastic water bottle gardening, that no one ever considers or talks about when promoting it.
Also why I don't use the milk jug winter strat for edibles.
Also why during emergency relief efforts of natural disasters they have to be covered with tarps or they become contaminated and have to be disposed of properly.
Cover them.
Trust me or research or don't care
Your Choice

 
William Bronson
gardener
Posts: 5433
Location: Cincinnati, Ohio,Price Hill 45205
1120
forest garden trees urban
  • Likes 2
  • Mark post as helpful
  • send pies
    Number of slices to send:
    Optional 'thank-you' note:
  • Quote
  • Report post to moderator

Nancy Graven wrote:

Idea (2)  two pinholes near the bottom, one  higher than the other (.5-1inch?). Just like Idea #1, there would be a small flush of water when filling, and when the cap is on there would be a slight vacuum formed. The difference is that the higher pinhole should suck in air bubbles when the soil is 'dry'. But when saturated from the lower pinhole, the upper hole would suck in water and the lowered pressure would stop/slow water release. (There still might have been some burping from the day night temperature/pressure Cycles).  
The side-to-side distance of the pinholes from each other would determine how much water was released: right above each other should keep a small spot wet right next to the bottle. Further away horizontally would keep a larger area damp. Depending on how well the soil drains, it might never stop burping air.*


I'm excited to try this!

Nancy Graven wrote:
I know a lot of people are concerned about Plastics, but I found out that if you left the label on the 2 L bottle you could then tuck the plastic plant ID stake under the edge of the bottle label. Which was kind of nice.


This is a neat trick.

Nancy Graven wrote:
* it did occur to me that an interesting variation of this might be to have the bottle sitting in some kind of a tray or Bowl with both holes below the rim of the bowl. The bowl could be filled with soil or sand. The bowl would fill with water and stop the water release, the dirt above the bowl would then pull out the water with capillary action. As the water seeped away, the pin holes would burp water as described earlier.


This is very like what I do for winter sowing
My winter sowing modifications
I got the idea from here:

That guy is a clever maker.

Nancy Graven wrote:
I wonder if you could do a hybrid?
Like, a clay pot with the drain hole plugged and then (silicon/glue/something) a  bottle on top for a bigger Reservoir? The threaded bottle caps would help with the automated watering that I think William mentioned. But you would still get the effect of the original clay olla.


Wow, you are on a roll!
This video is what sent me down this road:


Will Wit wrote:I love this... It's ingenious actually.

However, what concerns me is the degradation of the plastic from the UV. It releases the nastiness from the plastic. In your soil, in your plants, etc.
.....


Trust me or research or don't care
Your Choice


Thank you for the complement!
I am abashedly obsessed with being clever with junk, so that really made my day!
I am familiar with the risks of plastic, and also a bit fatalistic.
Here is my take on it, from this thread:
Safe Containers

William Bronson wrote: You could  use a stainless steel sink or pan to grow in, toilet tanks or glass jars.

You might want to keep in mind that most every food you purchase to buy has been exposed to the very materials you are trying to avoid.
The water used in growing or processing has passed through these same materials.
This includes certified organic products.
No need to get into the contents of the soil itself, except to say that we as humans have spread our waste everywhere.


Will Wit
Posts: 122
3
  • Likes 7
  • Mark post as helpful
  • send pies
    Number of slices to send:
    Optional 'thank-you' note:
  • Quote
  • Report post to moderator
You deserved the recognition, I admire a thinker, an innovator.

I read a lot of that thread. I agree
I am guilty of not practicing what I preach(sometimes) and "thinking" of it is the key to limiting it.

I used to joke about exposure and the time it might take..."20 yrs"..."I'll be dead by then"...

When I first bought my place, beginning of 2020, Cvd had just broke. I did experience the grocery shelves issue on some items. I was rushed to get a garden started and my soil is compacted crap.
I found some old tires on the property, I used them. They worked great, didn't hardly even have to water because of the reservoir on the inside. The tomatoes loved them.This past Winter I have started to remove them and make raised beds. There were gobs and gobs of worms inside them.

I'm a hypocrite out of necessity and by choice... I'm not throwing them to the dump. We don't need to talk about the carpet I used to keep down the weeds and grass in the areas I couldn't mow or the cardboard I have used all over the place.
Delivering the knowledge is the purpose, for others to be aware and make their own choices. I will never hold yours against you. Yours = Everyone
The evolution of humans amazes me, there's things I absolutely can't live without. And disgusts me because of the knowledge I possess.
Please excuse me, Need to heat my coffee in the microwave and put it back in my plastic mug, sit back 6' away from my 50" tv and have a smoke as I browse the forums.

Sorry to get off your topic.
Grdn-Trs-210430_.jpg
[Thumbnail for Grdn-Trs-210430_.jpg]
Grdn-Trs-220517.jpg
[Thumbnail for Grdn-Trs-220517.jpg]
 
William Bronson
gardener
Posts: 5433
Location: Cincinnati, Ohio,Price Hill 45205
1120
forest garden trees urban
  • Likes 6
  • Mark post as helpful
  • send pies
    Number of slices to send:
    Optional 'thank-you' note:
  • Quote
  • Report post to moderator
Sir, you have me chuckling over here!
Knowledge gives us choices, but it can't weigh the options for us.
 
gardener
Posts: 3349
Location: Cascades of Oregon
856
  • Likes 6
  • Mark post as helpful
  • send pies
    Number of slices to send:
    Optional 'thank-you' note:
  • Quote
  • Report post to moderator
We ended up with about 250 carboys for our community garden. we took most of them and turned them into seed starter, were you cut the botom off and plant your seeds and then tape the two pieces together for winter planting. We then take the top and use that as a cloche in the early season. We also used some in an olla experiment. and in self watering beds.
carboy-olla.jpg
[Thumbnail for carboy-olla.jpg]
self-watering-grhs.JPG
[Thumbnail for self-watering-grhs.JPG]
 
William Bronson
gardener
Posts: 5433
Location: Cincinnati, Ohio,Price Hill 45205
1120
forest garden trees urban
  • Likes 2
  • Mark post as helpful
  • send pies
    Number of slices to send:
    Optional 'thank-you' note:
  • Quote
  • Report post to moderator
Today I planted more tomatoes at my sisters house.
I  buried bottle olla among them and connected the olla to a 1/2" garden hose using 1/4" irrigation tubing.

20230606_133952.jpg
Daisy chained without using a tee.
 
Nancy Graven
Posts: 64
18
  • Mark post as helpful
  • send pies
    Number of slices to send:
    Optional 'thank-you' note:
  • Quote
  • Report post to moderator
Pokepoke,

Update on the olla experimenting?
 
Something must be done about this. Let's start by reading this tiny ad:
montana community seeking 20 people who are gardeners or want to be gardeners
https://permies.com/t/359868/montana-community-seeking-people-gardeners
reply
    Bookmark Topic Watch Topic
  • New Topic