I recently finally had the guts to post an ad on Kijiji - Canada's version of craigslist - saying that I can weld. Steel, stainless steel and aluminum. Not too long afterwards, I got a call asking me to fix a wood splitter.
I asked him to send me some photos of the break to see what could be done. It turned out to just be some braces on the bottom to stabilize the frame that had broken off. Once I saw that it was fixable, I had the guy drop it off at my house. Here is what it looked like.

Clearly someone with a welder had slapped the braces on real quick. They were cut at awkward lengths and the welds had burned through the thin square tubing in some places. Unsurprisingly, they broke off.
So I sliced them off and ground down the old weld as best I could:

I could then see that this was a holey piece of equipment. See this hole? Not great.

And this hole in the center tube? Also not great :D

The white marks are me colouring with soapstone so I knew where to grind the paint off. Yes, you CAN weld through paint/rust/mill scale, but cleaning the steel makes things so much easier and you always end up with a superior weld. So clean your steel!!
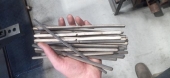
I could have just re-welded the braces to the existing tubing, but I worried about them just snapping off again. You can see just how rusted the tubing is after all. So I decided to weld some 1/8" plate to the three spots I'd be welding, and then weld the braces to the fresh steel. Here they are cut.

The long one was for the center tube, and the two shorter ones when on the two corners. Here's the test fit before welding stuff.

I figured by making the patches oversized, I could spread the stresses on the welds out more evenly and over a greater space, reducing the likelihood of a break. When welding the plates on, I only did full welds on the two ends. Along the long edges, I just made several tacks instead. The risk of burn through outweighed the potential increased strength of longer welds.
Here's my setup to get stuff welded.

Notice clamps on both ends of the plate. That's because when I tack one end, the metal will cool and contract, lifting up the other end. The clamp stops that from happening. Also notice how the ground clamp is gripping clean, shiny steel. A bad ground will give you alllll sorts of unnecessary headaches.
And here it is welded up.

You may notice the extra pieces of thicker metal in the corners. That's because I messed up. I forgot to take into account that the braces are higher at one end than the other. When I initially put them on to tack, I saw sizable gaps between the braces and the plates. I swore a little bit, then cut a couple little pieces of 1/4" plate to close up the gap. After that it was much closer. I clamped the braces down, tacked them, then welded them up. The welds are by no means beautiful. I was welded everything in place, as the machine still had hydraulic fluid in it that would leak everywhere if I laid it on its side. I got in some awkward positions that day, but I got it done!

You can see the welds are far from perfect. See the porosity on the top weld? That's where my arc length got too long, and atmospheric gases contaminated the weld. If this was a more expensive piece of equipment I would have ground and fixed it up, but I deemed the weld strong enough for the purposes and let it go. I do charge $25 an hour for my work, and on cheap equipment like this I need to be very efficient so my fixes don't end up costing more than the machine itself.
And here is my photo with my respirator on as a reminder.

These little things can save your lungs a lot of damage, especially when welding on painted surfaces!! Ventilate as best you can, and keep your respirator on. Your lungs will thank you.
When all is said and done I charged $45 for the repair. I also put some paint on as a little bonus. The guy was very happy about the result, and said he'd be telling his friends about me because they'd asked him before about welders in town. :D


 9
9


Skill verified by jordan barton")


Skill verified by gir bot")