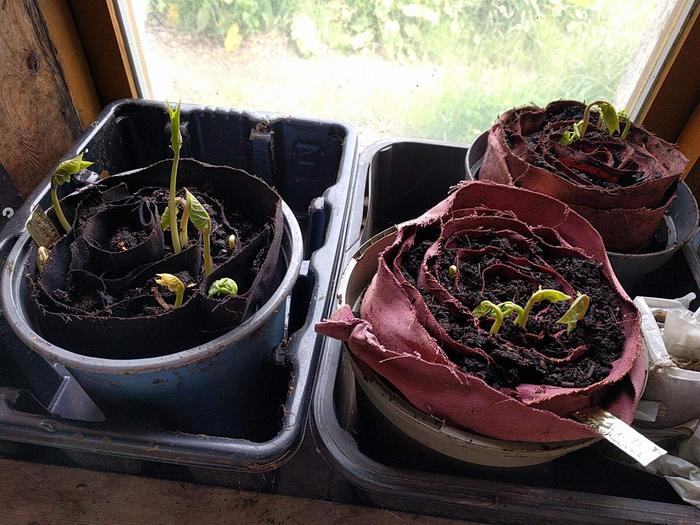
This is one of those things I'm constantly changing my mind about. Probably because I haven't found a great option.
I think I have the first part down. For seeds I start inside I like to use 3/4" soil blocks.
As soon as the seed sprouts I up pot the seedlings into a 2" pot usually 3 to 5 seedlings. This part is working well, but I do wish I could eliminate it. Potting up once the seedlings get 2 sets of true leaves is a pain. But I do it because I can start a lot of seedlings in a small space.
Next is the part I'm really struggling with. I bought a kit from epic gardening. It's 8 deep 4 packs, and a shallow bottom tray. I think this is going to be great for the plants I intend to keep. It seems sturdy, and seems like enough soil, without taking up to much space. But even on sale it was not something I could afford to buy several of. And I enjoy growing and giving away extra tomatoes and peppers, and a few other things. It definitely won't work for that. I bought sturdy 3" pots, but they are kind of short, and again the cost was not to bad, but more than I can just give away. So it's the 12 for 1.25 pots that are terribly thin and no way they will last more than a year. The party cups. I have tried large and medium size. If you don't leave these in the sun you can get more than one year out of them, and they are pretty cheap, but I hate the bottom is smaller than the top because they fall over very easy. If you fill them they take a good amount of soil.
I've tried a larger soil block, but I'm just not a fan no matter how much I want to be. Peat pots don't break down in our climate so they aren't a good option. Cow pots work pretty good, but again on the expensive side. I'm thinking about paper pots. My son is addicted to Amazon, so we get lots of plain brown paper. The hard part with this one is how time consuming it will be. I would love to get away from plastic. This year is a mix of using the dollar tree pots I already had, and using the dreaded cups I'm sure to be frustrated with soon.
If you have any tip, tricks, or out of the box ideas, or even if you don't, I look forward to hearing what you use.
“We can complain because rose bushes have thorns, or rejoice because thorn bushes have roses.” — Abraham Lincoln
I came up with one I hadn’t seen before - literally potting up.
This works with indeterminate tomatoes (and probably other vining plants of that nature).
Build a narrow wooden planter box with the “ends” really tall and the “sides” a lot shorter.
Plant seeds and wait.
As the plants grow, about once every few weeks, add “side” boards and gently backfill with soil up to the top few leaves of the plant.
Repeat until you reach the height of the end boards.
Last year I successfully planted out and grew tomatoes which I accidentally sprouted in November.
IMG_7246.jpeg
Planter box is 3 feet tall and the plant growth is ~4 feet more than that
When I lived in 9a, I would just direct sow into my container garden and I would sow all throughout the year as needed. Harvested radishes? OK plant some more. Squirrels ate the peas? OK, plant some more. The growing season was so long it really didn't matter.
Now I'm in 6a and I started plants indoors for the first time. I bought a 10-pack of small pot trays. Each tray has 40 pots about 1.25" square by 1.5" deep.
They came with these nifty humidity domes and LED grow lights with a timer.
As the plants grew, I up potted them into larger pot trays (3' square by 2.5" deep) that fit into standard 1020 trays.
As this is my first try at seed starting indoors, I have been trying different transplanting times. Some get transplanted when they sprout, others after they have grown quite a bit. It's a learning process and the tomatoes don't seem to like being up potted at all. Ever.
If you want to get away from the plastic pots, I suggest saving all your toilet paper and paper towel rolls to use as seed starting pots. I may try this one for next year.
Just Google "toilet paper rolls as seed starters" and you will get a dozen short videos on how to use them for seed starting pots. The real beauty of that method is you do not disturb the roots when you up pot. You just take the whole thing and plant it in the new pot, bed, or wherever.
“So I'm lightin' out for the territory, ahead of the scared and the weak and the mean spirited, because Aunt Sally is fixin’ to adopt me and civilize me, and I can't stand it. I've been there before.”
Clay that's great 😃 I've seen something similar for potatoes, but never thought of it for anything else.I imagine if you wanted to do it outside it could be wrapped in a heavy plastic ( just can't seem to eliminate plastic). Very cool thanks for sharing
“We can complain because rose bushes have thorns, or rejoice because thorn bushes have roses.” — Abraham Lincoln
I'm in zone 8b and I like to plant outdoors from the start, in the pots that I intend for things to grow in on my balcony. I like to limit transplanting as much as phesible.
Celtic/fantasy/folk/shanty singing at Renaissance faires, fantasy festivals, and other events in OR and WA, USA.
RionaTheSinger on youtube.
Pop-up garden/vintage+ yard stand owner.
I second the toilet paper tubes. You can cut a paper towel tube in thirds as well.
I put them in half-gallon milk cartons that have one side cut out, so they hold water. I don't buy plastic milk cartons, just the carboard ones. A little water in the bottom soaks up into the cardboard and the soil. Plant the whole thing, no roots disturbed.
I feel too guilty to use peat moss, so I buy cactus mix in bags. I put 1/3 at the bottom of my clay soil, because I want the roots to recognize it when they are transplanted. The middle third is compost, and the top third the cactus mix.
I don't fold the bottom of the tube up at all. The milk carton keeps the soil in, and when the roots fill the tube the soil doesn't fall out.
It doesn't hurt to slice up the sides of the cardboard a little before planting, but chances are, if it has stayed damp, it will be starting to fall apart anyway.
I learned during the lockdown when there was a shortage of toilet paper, and the only stuff left on the shelf was the expensive stuff, that those tubes don't break down at all!! Don't know why they are different, but they just didn't work for this application.
Mediterranean climate, hugel trenches, fabulous clay soil high in nutrients, self-watering containers with hugel layers, keyhole composting with low hugel raised beds, thick Back to Eden Wood chips mulch (distinguished from Bark chips), using as many native plants as possible....all drought tolerant.
My best seedlings have come from winter sowing in buss tubs, the kind they use in restaurants.
I pack it with potting soil, 50/50 peat and compost cow manure, then I space the seeds all at once using a dibbler I made .
One corner is scooped out and I add a 1 gallon plastic pickle jar, inverted, with a hole in the lid for watering.
This reservoir bottom waters the seedlings and extends the time between watering.
After seeding, I top the whole thing with a second, translucent white bus tub.
When they start to crowd the inside of the tub, I use an old spatula to cut out servings of seedlings and plant them out.
I haven't done a single tub this year 😔, but I hope to get back to it.
I'd like to get away from peat, I'm thinking of using sand or pine bark fines and my own compost instead.
My compost is food scraps, chicken feed, chicken poop and lots of leaves.
It holds water well, and the tubs have been too wet in the past , so amending for drainage might be the move.
I've used gutter mesh to make ~4" air pruning pots , but to work, they need more space than a tub with the same number of seedlings.
They use plastic or aluminum, and are kinda wonky, so buying actual hydroponic cups might be a better choice anyway.
If you don't care about air pruning but you do want to keep seedlings separated, a steel or aluminium can, with both ends cut off, might work.
Sections of downspout, plastic or aluminum, sheet flashing , PVC pipe or corrugated black pipe can all be used for planting pots.
I bet soil cement, especially if reinforced with natural fibers, would make an excellent plant pot.
Break it and discard it anywhere, with no fear of adding plastic pollution to the soil.
The same sort of thing could be made of pallet wood and deck screws(reusable after the wood fails), or staples(cheap and rust away into nothing).
Compost or combust the rotting wood.
I think cylinders made of wine cap mycelium would be my ideal plant pot.
I think some one mentioned solo cups being top heavy.
I've had good results planting in inverted yogurt containers in , by poking holes in the lids and holesawing out the bottoms.
You could do this with solo cups, cut off the bottom and invert it.
I don't think you will really need a bottom, but some aluminum foil might work if you do.
McDonald's cups could be used the same way.
The advantage they have over cylinders is they can stack inside each other for storage and you don't need to make them.
Solo also makes cups in aluminum now.
They cost more but should last forever.
Another way to avoid the tippy cups is to crowd them into a container like in the attached photo.
thumb-IMG_20220409_202032.jpg
Planting In A Buss Tub Without Individual Containers
Jen Fulkerson wrote:This is one of those things I'm constantly changing my mind about. Probably because I haven't found a great option.
I think I have the first part down. For seeds I start inside I like to use 3/4" soil blocks.
As soon as the seed sprouts I up pot the seedlings into a 2" pot usually 3 to 5 seedlings. This part is working well, but I do wish I could eliminate it. Potting up once the seedlings get 2 sets of true leaves is a pain. But I do it because I can start a lot of seedlings in a small space.
Next is the part I'm really struggling with. I bought a kit from epic gardening. It's 8 deep 4 packs, and a shallow bottom tray. I think this is going to be great for the plants I intend to keep. It seems sturdy, and seems like enough soil, without taking up to much space. But even on sale it was not something I could afford to buy several of. And I enjoy growing and giving away extra tomatoes and peppers, and a few other things. It definitely won't work for that. I bought sturdy 3" pots, but they are kind of short, and again the cost was not to bad, but more than I can just give away. So it's the 12 for 1.25 pots that are terribly thin and no way they will last more than a year. The party cups. I have tried large and medium size. If you don't leave these in the sun you can get more than one year out of them, and they are pretty cheap, but I hate the bottom is smaller than the top because they fall over very easy. If you fill them they take a good amount of soil.
I've tried a larger soil block, but I'm just not a fan no matter how much I want to be. Peat pots don't break down in our climate so they aren't a good option. Cow pots work pretty good, but again on the expensive side. I'm thinking about paper pots. My son is addicted to Amazon, so we get lots of plain brown paper. The hard part with this one is how time consuming it will be. I would love to get away from plastic. This year is a mix of using the dollar tree pots I already had, and using the dreaded cups I'm sure to be frustrated with soon.
If you have any tip, tricks, or out of the box ideas, or even if you don't, I look forward to hearing what you use.
Paper pots could be a great eco-friendly choice, especially with all that Amazon packaging. Have you considered repurposing yogurt cups or other sturdy containers? They’re free and last longer than thin plastic pots!
It's a seed tray made from old fence wood (which I think he ripped on the table saw to make it tidier) with dividers made of cardboard. You can customize it every time to make plugs that are the size you want. Then, when you give away seedlings, you can just wrap them in paper for their journey, as long as they don't have to travel too far. Or, if you have a lot of fence wood, you can just give away the whole box because they're so cheap and easy to make. One torn down fence could provide you with seed trays for years!
(In the background is one of the the self-watering seed pots that I make to get your seedlings through the tricky first few weeks. Admittedly they're not the least expensive option out there, but they usually pay for themselves over time because your seedlings are more likely to stay alive! They're on sale right now with code POTS2026 for 20% off through March 1, 2026. Here is the link to our already discounted factory seconds: https://ortakitchengarden.com/collections/factory-seconds-1. Use the code to get an extra 20% off the already discounted price.)
Recently, I discovered compostable coffee filters. We've gotten them from Walmart and Winco. And of course, I use them to make my mandatory coffee in the morning before reusing them for gardening. Gotta have my caffeine!
I've begun experimenting with them, and this year I plan to try to use them in a seed starting role. I have tons of plastic 4" pots that these filters fit into nicely. My plan is to put the filters into the pots, fill with compost or another appropriate seed starting medium. Once the seeds take root, it's easy to remove the filter and soil to replant into either a larger container (especially for plants that are perennials if protected from freezing) or directly to the garden.
I'm also tried using cardboard egg cartons, but I'm not sure they're safely compostable yet. My first trials show that this could be a workable solution, but not recommended for fast growing plants needing a lot of root space quickly. I've tried small peat pots, but they're relatively expensive and small, with many of the same drawbacks of the egg cartons.
Jen Fulkerson wrote: I'm thinking about paper pots. My son is addicted to Amazon, so we get lots of plain brown paper. The hard part with this one is how time consuming it will be..
There is a thread on permies about paper pots called "do you use paper pots" and there are various versions. There's even a very well documented comparison test. My favorite is posted over there with a how to video. Yes, they can take time, but once you have the fold sequence memorised you can do them while doing anything that doesn't involve your hands. And they store flat til you need them so you can pop them in a bag/amazon box as you go. These are made from newspaper but I've used plain brown paper before. You might need to play around with the sizing to get an ideal size for you.
But last growing season I tried snails/spirals- whatever you want to call them! I used old plastic dog food bags cut into strips but I reckon double folded brown paper would work just as well. I made mine 6-8 inches deep so I had unobstructed root developement right past pricking out stage. They went straight into the garden-actually much later than anticipated but they seemed to self regulate their growth until planted out-and then they took off! Mine are made slightly different from videos I have seen, I lay the piece out, spread with an inch of compost covering the entire sheet, and then carefully fold just the bottom inch of plastic over the soil while rolling up and I squish them tight up against each other in a big waterproof tray to keep them rolled tight.. I suppose I could use string or plant velcro too. I see most people cover half the width of plastic/paper with soil, fold over the other half and then roll the whole thing creating a double wall effect. I find mine drain better while staying hydrated. But I used plastic, you wouldn't have drainage issues if you use paper. I imagine unrolling the paper snails would be a delicate operation so might benefit from the full fold. I intend to try paper as I'm not a fan of plastic.
I have photos, but struggling-as usual-to attach. I will try later.
Changing one thing, no matter how tiny, is still change
It's good timing this post has been revived. (seed starting time for lots of us)
Anne I love the boxes you made. I might have to make myself some. I like the cardboard dividers too. It makes it customizable.
I tried the paper pots. They were ok, but not for me.
I still have lots of those cheap thin dollar store pots. I never would have guessed they would last so long.
I watched a guy on YouTube who made me want to try 2" soil blocks again. The recipe and technique he uses has made a world of difference.
The only downside is his recipe uses peat. I try to not use peat. I think I will try to perfect my blocking abilities, then work on tweaking the recipe.
https://youtu.be/mFonCh7D-_o?si=RhnMO___Au-j9cPM
PXL_20260208_055059373.jpg
“We can complain because rose bushes have thorns, or rejoice because thorn bushes have roses.” — Abraham Lincoln
Sarah Joubert
pollinator
Posts: 212
Location: More D'Ebre, Tarragona, Spain Mediterranean zone
Jen Fulkerson wrote:The only downside is his recipe uses peat. I try to not use peat. I think I will try to perfect my blocking abilities, then work on tweaking the recipe.
https://youtu.be/mFonCh7D-_o?si=RhnMO___Au-j9cPM
I read in the comments of that video that somepeople use coir in place of the peat, might be worth trying the substitute. Monty Don, a well known british gardener on BBC has video with a recipe: https://www.bbc.co.uk/programmes/p068y4ps but if you are not in the UK you probably won't be able to access it.
It's 4 parts coir and 1 part each of garden compost, garden loam, sieved leaf mold and vermiculite or perlite mixed with enough water to create a slightly wet, moldable mixture..
Changing one thing, no matter how tiny, is still change
I try and sow direct if I can at all, but there are a few crops which just need a bit more warmth to get them going - tomatoes and runner beans come to mind.
Sarah Joubert wrote:But last growing season I tried snails/spirals- whatever you want to call them! I used old plastic dog food bags cut into strips but I reckon double folded brown paper would work just as well.
That's what I'm planning to do this year too - my runner beans last year were pretty successful. I think I will just pre-germinate the tomato seed on a bit of cotton wool (I have quite a bit of very old seed that I don't know will grow) and then transfer to seed snails. here is the thread on seed snail trials.
I'm seriously thinking about the snail method, too. But, (zone 6), my real preference is simply direct sowing.
"The only thing...more expensive than education is ignorance."~Ben Franklin. "We can easily forgive a child who is afraid of the dark; the real tragedy of life is when men are afraid of the light." ~ Plato
Sarah Joubert
pollinator
Posts: 212
Location: More D'Ebre, Tarragona, Spain Mediterranean zone
Carla Burke wrote:I'm seriously thinking about the small method, too. But, (zone 6), my real preference is simply direct sowing.
I agree, direct is best and I have had the most success with volunteer squash and tomatoes than any I have planted! The butternut just rambles out of the compost and the tomatoes apper in arreas that I have applied compost to. It's great!
I like to use snails for very small seeds that require delicate watering- like cape gooseberries which grow like weeds once they take ,but have a very slow germination rate and take a while to get to transplanting size. If I put them straight out, in my zone 8 clay soil, I would have very poor germination and lose the rest because the weeds would outstrip the seedlings before I could identify them. Asparagus and artichokes are also slow starters. I think snails have their place for rare, expensive or delicate plants. I find it easier than soil blocking, it takes up less space- I can get 12-20plants in a snail and fit probably 3-5 snails in the same space as 12-20 soil blocks. And I can make them as tall as I like to allow for root development. I suppose if you wanted more lateral root growth they wouldn't work as well. If I had to germinate corn I would't use snails, I'd use soil blockers-less transplant shock as each is self contained. But I wouldn't want to have to transplant corn given the choice! Not in the quantity we like to eat it.
Changing one thing, no matter how tiny, is still change
Sarah Joubert
pollinator
Posts: 212
Location: More D'Ebre, Tarragona, Spain Mediterranean zone


 10
10


Skill verified by gir bot")

Skill verified by Mike Haasl")

Skill verified by Mike Haasl")

Skill verified by Jeremy VanGelder")

Skill verified by Paul Fookes")

Skill verified by Alexandra Malecki")

Skill verified by Timothy Norton")

Skill verified by Timothy Norton")

.JPG)
.JPG)


![[Thumbnail for PXL_20260208_055059373.jpg]](/t/275819/a/283409/PXL_20260208_055059373.jpg "Filename: PXL_20260208_055059373.jpg
Description:")