Hello again,
Silence was not inaction. The RMH is up and running, commissioned on the last day of fall, so I "got it done before winter" by about 4hrs. It has been a busy fall, both with this and all the other projects (not to mention work), so I am sorry for the lack of in-process posts, but this way all my mistakes can be solely blamed on myself.
We've been burning it over the past few days, and gathering data from the thermocouples, and I am pleased to report that it seems to be working, and even more pleased that my wife agrees that it seems to be working. For lack of a properly formatted SD card (or maybe a small-enough one, my reader is old), I do not have the temperature graphs ready yet, but those will be forthcoming after I fiddle it into cooperation. We burned a batch around 9pm, and this morning at 6am the outer skin was ~25degC and the inner temperatures were still in the 60-70degC range. I was quite pleased.
I must again thank Peter, Thomas, and Glenn in particular for your excellent advice and guidance, whether or not you knew you were giving it. Glenn's build (linked in Thomas' post above) was the nearest template to what I wanted, and where I have differed, I will take blame for failure; where I have followed, I will give him credit for success.
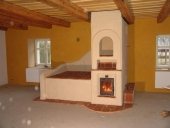
The final outer bell size is about 3.5ft wide, 6ft high, and 4ft deep, made of clay common brick. Most of the outer bell is mortared with regular Type S masonry mortar, there are a few places near the firebox door where I used Rutland refractory cement. Yes, the masonry is not pretty, that's my doing, we may clean it with an acid and scrub to get it red again (my wife's preference) or plaster it (my preference), but right now it is what it is.
The two K-type thermocouples monitoring it are positioned roughly above the inner bell riser and roughly on top of the insulated firebox (just inside the outer bell skin there, it will become clearer with photos), and we are now getting burn temperatures about 580degC at the top of the riser, and up to about 150degC on the top of the firebox. The outer mass seems to have fully dried after about 3 days of use, and is a pleasant 25-35degC. Here is a short video of it burning: [youtube]https://youtube.com/shorts/xKOSKjSKZBs[/youtube]
The photos are numbered in sequence of the build, and I am supplying a short caption for each.
1) The layout on the floor, loose. I started with a plinth support for the core, but abandoned that in favor of a metal rack for better dimensional control over the core floor height and for cleanout access.
2) Old stovepipe from the wood stove, with a rectangular aperture cut in it to allow the air nearest the floor to come in. Rectangular apertures can be treated equivalent to circular by making the hydraulic diameter (Dh) match, where Dh = 4* A / P where A is the hole area and P the perimeter.
3) The cleanout is a stainless blast gate from Zoro, it didn't have to be that fancy (it's cool down there, relatively speaking), but I like it. This was a major reason to ditch the plinth support and have legs. I can get a shop vac tool all around the bottom now.
4) The basket for the core, which has six legs and also rests on the inner bell walls. Note that I only have a single layer of brick at the front at this point, which is a departure from Glenn's plan. Time will tell whether that was a reasonable call or not, but you will see a double front further up.
5) The door frame, which has its own legs on the floor, and also ties into the core basket with bolts for stability, somewhat hard to see, but they drop into the wide crossbar at the back of the core support, and make an angle brace for the front door support legs, which are nice and stiff.
6) The core takes shape, following Peter's 6in dimensions. Very thin fireclay in the joints, which was a surprisingly fun material to work with, way nicer than the refractory mortar.
7) Assembled core, and I did choose a notched brick arch for the top, it kept the same perimeter of the core, and avoided casting a slab. This did not change the door aperture size, which remains rectangular following Thomas' plans.
8) 1.5in Superwool all around the core, tied on with stainless wire.
9) Here is where I accommodate the arch with a pretty aggressive corbel. I do have a steel plate supporting the top, and this is all done with refractory mortar, since it gets warm, though not, so far, above 160degC, which is not a significant stress on the concrete. This is a very good article about Portland at elevated temperatures (but NOT firebox temperatures!):
courtesy of Periodica Polytechnica Civil Engineering.
10) Here, above the body of the core, I add a front face to the inner bell, and transition to firebrick for it. This rides on angle iron, which is supported on the inner bell common brick as well as with a support leg resting on the door support angle iron, so there should be good support all across the span, which is only 25in. The second thermocouple tip is located just below this support beam, more or less on the superwool on top of the core, just inside the single-layer common brick front wall. I wanted to know how hard I was stressing this beam, and so far, so good, it's peaked at about 160degC as noted above.
11) Here you can see the superwool trimmed to the riser top, and the firebrick inner bell growing.
12) Here is where I checked all my interior surface area calculations for the last time, which required one more layer of firebrick to hit the 57sq.ft goal. The final ISA came out as 57.6sqft, though I did not calculate error bars on the value.
13) Many thanks to Thomas Rubino for his excellent and very usable door plan and parts kit. The snotty welding is my own failing, but the design is great.
14) The top is built a little differently, so it may be worth a few words and pictures. Glenn's design has his riser exhausting against the angle iron which supports his uppermost firebrick layer. This did not sit well with me (though I won't knock his design in the least!! accept this as my engineering neurosis). So, instead of layering it steel-brick-wool, I chose to layer it wool-steel-brick at the top, and I formed a basket of ultrahigh temperature stainless rods (303 series, I think, but $7/rod from McMaster, I used 9, not too bad). In this basket I laid my large piece of superwool. Exhaust gases from the riser will hit this refractory assembly first, and the steel angles which support the roof will not get so hot. Thus, the upper superwool is not used for sealing (as I believe Glenn's is), but is used for insulation. More on sealing later.
15) You can see my upper thermocouple wired to this stainless basket, located about over the exit to the riser - it's not exactly at the stagnation point of the flow, so it won't see quite the highest temperatures, but it will be quite close.
16) Another view of the basket and thermocouple.
17) Laying the superwool in the basket
18) I said I'd say more about sealing. The roof of the inner bell is not perfectly sealed, as the firebricks on their beams are set dry on a 1/8in gasket of superwool. The edges are stuffed with the same thin stuff, doubled, and this is not airtight.
19) The topmost common brick layer sits on a shelf I made on the outer bell by turning the topmost bricks on edge, and then sits on the firebrick inner bell top. I used more of the thin superwool to give it relief from shifting, and covered the angle iron joints with it. The top bricks laid in beautifully in integer rows, almost like math actually worked for me. Still not airtight.
20) Perhaps the most gratifying one. The first real wood fire in it, with the stovepipes hooked up and everything. The flames went back and it roared gently. It has gotten a deeper voice as it has grown up, er, dried out, and runs hotter now with a stronger draft. However, a modest but unpleasant amount of smoke oozed out the top.
21) Here was burn #1, which I did rather cautiously. I had actually put tea light candles in the core for a few days, just to start the dryout as I was completing the outer bell, and that may have helped season the surface a bit, but the burns have only heated up from this one.
22) So I fireclayed the top to stop the leakage, and that has been very effective. No more smoke.
23) And here it is with a much more respectable burn temperature. The stovepipe stays hand-touchable.
The following are FLIR camera shots, they are tiny, but fun.
24) Here's the stovepipe. The FLIR puts an averaged temperature number corresponding to the target circle region (+/-).
25) You can see the wet brick at the top, those were the last courses laid, and they are still cool in this frame.
26) The door gets warm. It's finally cured the high-temp paint, which was a bad smell for a while. I just used Krylon BBQ paint from Amazon.
27) Here is the large sidewall, quite comfortable and pretty well dried.
Time will be the test, of course, but so far, I am very thankful that this (long, long) project seems to be at a functional place. I have to tidy up the front with a better faceplate to hide some superwool around the door assembly, and I am sure there will be more to learn, but we're all enjoying the house being warmer now that the days are staying cold.
Happy heating,
Mark


 11
11


Skill verified by gir bot")

Skill verified by Nikki Roche")

Skill verified by Alexandra Malecki")


![[Thumbnail for 20250112_152914.jpg]](/t/279820/a/264699/20250112_152914.jpg "Filename: 20250112_152914.jpg
Description:")


![[Thumbnail for 1_dry_layout.jpg]](/t/279820/a/280667/1_dry_layout.jpg "Filename: 1_dry_layout.jpg
Description:")
![[Thumbnail for 2_exhaust_duct2.jpg]](/t/279820/a/280668/2_exhaust_duct2.jpg "Filename: 2_exhaust_duct2.jpg
Description:")
![[Thumbnail for 3_exhaust_duct_andCleanout.jpg]](/t/279820/a/280669/3_exhaust_duct_andCleanout.jpg "Filename: 3_exhaust_duct_andCleanout.jpg
Description:")
![[Thumbnail for 4_CoreBase.jpg]](/t/279820/a/280670/4_CoreBase.jpg "Filename: 4_CoreBase.jpg
Description:")
![[Thumbnail for 5_BaseAndDoorFrame.jpg]](/t/279820/a/280671/5_BaseAndDoorFrame.jpg "Filename: 5_BaseAndDoorFrame.jpg
Description:")
![[Thumbnail for 6_FloorChannelAndThroat.jpg]](/t/279820/a/280672/6_FloorChannelAndThroat.jpg "Filename: 6_FloorChannelAndThroat.jpg
Description:")
![[Thumbnail for 7_Core.jpg]](/t/279820/a/280673/7_Core.jpg "Filename: 7_Core.jpg
Description:")
![[Thumbnail for 8_insulatedCore.jpg]](/t/279820/a/280674/8_insulatedCore.jpg "Filename: 8_insulatedCore.jpg
Description:")
![[Thumbnail for 9_outerBellBridge.jpg]](/t/279820/a/280675/9_outerBellBridge.jpg "Filename: 9_outerBellBridge.jpg
Description:")
![[Thumbnail for 10_AddingInnerFirebrickFront.jpg]](/t/279820/a/280676/10_AddingInnerFirebrickFront.jpg "Filename: 10_AddingInnerFirebrickFront.jpg
Description:")
![[Thumbnail for 11_InnerFirebrickAndFinishedRiser.jpg]](/t/279820/a/280677/11_InnerFirebrickAndFinishedRiser.jpg "Filename: 11_InnerFirebrickAndFinishedRiser.jpg
Description:")
![[Thumbnail for 12_InnerBellCheck.jpg]](/t/279820/a/280678/12_InnerBellCheck.jpg "Filename: 12_InnerBellCheck.jpg
Description:")
![[Thumbnail for 13_DoorFitting.jpg]](/t/279820/a/280679/13_DoorFitting.jpg "Filename: 13_DoorFitting.jpg
Description:")
![[Thumbnail for 14_refractory_Basket.jpg]](/t/279820/a/280680/14_refractory_Basket.jpg "Filename: 14_refractory_Basket.jpg
Description:")
![[Thumbnail for 15_UpperThermocouple.jpg]](/t/279820/a/280681/15_UpperThermocouple.jpg "Filename: 15_UpperThermocouple.jpg
Description:")
![[Thumbnail for 16_UpperTC2.jpg]](/t/279820/a/280682/16_UpperTC2.jpg "Filename: 16_UpperTC2.jpg
Description:")
![[Thumbnail for 17_UpperSuperwool.jpg]](/t/279820/a/280683/17_UpperSuperwool.jpg "Filename: 17_UpperSuperwool.jpg
Description:")
![[Thumbnail for 18_InnerBellRoof.jpg]](/t/279820/a/280684/18_InnerBellRoof.jpg "Filename: 18_InnerBellRoof.jpg
Description:")
![[Thumbnail for 19_Top.jpg]](/t/279820/a/280685/19_Top.jpg "Filename: 19_Top.jpg
Description:")
![[Thumbnail for 20_TheFlamesGoBack.jpg]](/t/279820/a/280686/20_TheFlamesGoBack.jpg "Filename: 20_TheFlamesGoBack.jpg
Description:")
![[Thumbnail for 21_FirstBurnCool.jpg]](/t/279820/a/280687/21_FirstBurnCool.jpg "Filename: 21_FirstBurnCool.jpg
Description:")
![[Thumbnail for 22_MudOnTop.jpg]](/t/279820/a/280688/22_MudOnTop.jpg "Filename: 22_MudOnTop.jpg
Description:")
![[Thumbnail for 23_NowWereCooking.jpg]](/t/279820/a/280689/23_NowWereCooking.jpg "Filename: 23_NowWereCooking.jpg
Description:")
![[Thumbnail for 24_StovepipeFLIR1000127.jpeg]](/t/279820/a/280690/24_StovepipeFLIR1000127.jpeg "Filename: 24_StovepipeFLIR1000127.jpeg
Description:")
![[Thumbnail for 25_TopStillWetFLIR1000131.jpeg]](/t/279820/a/280691/25_TopStillWetFLIR1000131.jpeg "Filename: 25_TopStillWetFLIR1000131.jpeg
Description:")
![[Thumbnail for 26_DoorToastyFLIR1000136.jpeg]](/t/279820/a/280692/26_DoorToastyFLIR1000136.jpeg "Filename: 26_DoorToastyFLIR1000136.jpeg
Description:")
![[Thumbnail for 27_WallComfyFLIR1000139.jpeg]](/t/279820/a/280693/27_WallComfyFLIR1000139.jpeg "Filename: 27_WallComfyFLIR1000139.jpeg
Description:")