|

|
|
|
|

|

|

|

|

|
 2
2


For all your Montana Masonry Heater parts (also known as) Rocket Mass heater parts.
Visit me at
dragontechrmh.com Once you go brick you will never go back!

God of procrastination https://www.youtube.com/watch?v=q1EoT9sedqY
 Isolation best made with air gap or sand or any other mean of isolation?
For all your Montana Masonry Heater parts (also known as) Rocket Mass heater parts.
Visit me at
dragontechrmh.com Once you go brick you will never go back!
God of procrastination https://www.youtube.com/watch?v=q1EoT9sedqY
thomas rubino wrote:The slab will warm up some BUT the earth will never warm up and it will continue to steal heat from your core. Your firebox can be build on a perlite/clay base. Your mass can be simply built over several inches/MM thick of cob, with plenty of straw mixed in to make it insulating. Your horizontal pipes lay on top of this.
God of procrastination https://www.youtube.com/watch?v=q1EoT9sedqY

God of procrastination https://www.youtube.com/watch?v=q1EoT9sedqY
God of procrastination https://www.youtube.com/watch?v=q1EoT9sedqY
God of procrastination https://www.youtube.com/watch?v=q1EoT9sedqY
God of procrastination https://www.youtube.com/watch?v=q1EoT9sedqY
God of procrastination https://www.youtube.com/watch?v=q1EoT9sedqY
God of procrastination https://www.youtube.com/watch?v=q1EoT9sedqY
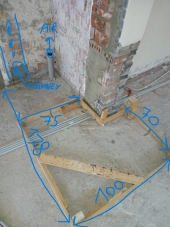
![[Thumbnail for 20180107_154422.jpg]](/t/72864/a/57446/20180107_154422.jpg "Filename: 20180107_154422.jpg
Description:")
![[Thumbnail for 20180107_154526.jpg]](/t/72864/a/57447/20180107_154526.jpg "Filename: 20180107_154526.jpg
Description:")
![[Thumbnail for 20180107_154854.jpg]](/t/72864/a/57448/20180107_154854.jpg "Filename: 20180107_154854.jpg
Description:")
God of procrastination https://www.youtube.com/watch?v=q1EoT9sedqY
Thomas Holm wrote:ISA is to spec, approx 7,7sqm.
Mass is approx 2000 kg in bricks alone. Add to that cob/clay/stone filling.
God of procrastination https://www.youtube.com/watch?v=q1EoT9sedqY
![[Thumbnail for door1.jpg]](/t/72864/a/62687/door1.jpg "Filename: door1.jpg
Description:")
God of procrastination https://www.youtube.com/watch?v=q1EoT9sedqY
Thomas Holm wrote:Also, it should be ok with normal bricks in the manifold area? No need for firebrick there?
God of procrastination https://www.youtube.com/watch?v=q1EoT9sedqY
![[Thumbnail for pipe-dimensions.jpg]](/t/72864/a/62723/pipe-dimensions.jpg "Filename: pipe-dimensions.jpg
Description:")

God of procrastination https://www.youtube.com/watch?v=q1EoT9sedqY
God of procrastination https://www.youtube.com/watch?v=q1EoT9sedqY
2
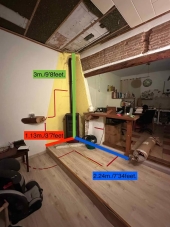
![[Thumbnail for 20190124_124013.jpg]](/t/72864/a/70856/20190124_124013.jpg "Filename: 20190124_124013.jpg
Description:")
![[Thumbnail for 20190123_115347.jpg]](/t/72864/a/70857/20190123_115347.jpg "Filename: 20190123_115347.jpg
Description:")
![[Thumbnail for 20190120_130644.jpg]](/t/72864/a/70858/20190120_130644.jpg "Filename: 20190120_130644.jpg
Description:") 3
3
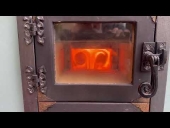
![[Thumbnail for 20190509_214334.jpg]](/t/72864/a/77117/20190509_214334.jpg "Filename: 20190509_214334.jpg
Description: Barrel lifting")

| I agree. Here's the link: http://stoves2.com |