• Post Reply Bookmark Topic Watch Topic
  • New Topic
permaculture forums growies critters building homesteading energy monies kitchen purity ungarbage community wilderness fiber arts art permaculture artisans regional education skip experiences global resources cider press projects digital market permies.com pie forums private forums all forums
this forum made possible by our volunteer staff, including ...
master stewards:
  • Carla Burke
  • Nancy Reading
  • John F Dean
  • r ranson
  • Jay Angler
  • paul wheaton
stewards:
  • Pearl Sutton
  • Leigh Tate
  • Devaka Cooray
master gardeners:
  • Christopher Weeks
  • Timothy Norton
gardeners:
  • thomas rubino
  • Matt McSpadden
  • Jeremy VanGelder

Help: rocket mass heater not 'rockety'

 
Posts: 26
Location: Nagano. Japan
1
2
  • Mark post as helpful
  • send pies
    Number of slices to send:
    Optional 'thank-you' note:
  • Quote
  • Report post to moderator
Hello folks,

I finally, after 2 years, took the plundge and try to make a rocket mass heater. I first had to ask my Japanese landlord (I live in Japan) the permission to put a wood stove in the house. I didn't tell him what kind I was planning....

So, I understand that picture would be better but I will post them later today as I am now at work.

Here is my situation:

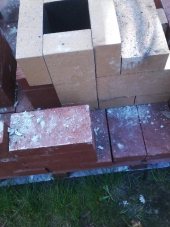
My J tube is made of bricks. My exhaust pipe is 150 mm (6") as it is already hard enough to come by to in Japan and space is a factor.

So, the CSA of 150mm is 17,662 mm2 (about 27 square inches)
My feed tube is 120 mm X 150mm (18000 mm2) but it's hard to cut 1/16 of a brick just for the right dimensions.
my heat riser is the same.
My small h is about 22 cm deep and my big H is 81 cm.
My barrel is 84 cm high, which leaves me with a 3 cm gap at the top of the heat riser. (1 1/2")
The heat riser is made of refractory bricks. I first put some rock wool on the outside but removed it to test if the inside of the barrel was clogged. It didn't change much.
So, the whole J tube is made of a mix of fire brick (rated 2000 Celsius) and some refractory bricks.
I forgot the length of the burn chamber but it is only 3 bricks long, on the side. It respects the 1 / 1.5/ 3 proportions mentioned by Erika in the videos.


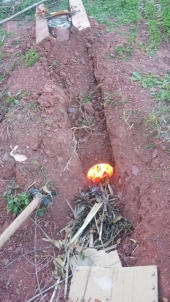
My problem: it's not very rockety. I build my core outside, to test it. Without the barrel, when the fire gets intense enough, the flames will come into the heat riser but there doesn't seem to be a second burn in there.
With the barrel, it's barely rockety, and if the wind changes side, the flame come back up the feed tube or even goes out completely, smoking the whole thing up badly.
I can't afford to put that in moy house if it doesn't suck properly.
Now, I'm wondering if the problem is the wind outside (I couldn't test it on a windless day yet as it is fall weather after all)

If pictures and or videos are needed, I will post them later.
Sorry it's all in metric but that is what is used here in Japan. Being from Canada, I was raised with both systems.
 
pollinator
Posts: 4154
Location: Northern New York Zone4-5 the OUTER 'RONDACs percip 36''
67
hugelkultur fungi books wofati solar woodworking
  • Mark post as helpful
  • send pies
    Number of slices to send:
    Optional 'thank-you' note:
  • Quote
  • Report post to moderator
Hugo D. & ''th' Permies Cloud'' : I am sorry, but somehow the WAY that the numbers translated seem funky, could you repeat them for us war-mongering imperialists
who never learned the right way ?

Having learned the the hard way, if your whole outdoors lay-out does not work for you, immediately come off of the transitional area with a vertical chimney at least 6'
above any obstruction/high point outdoors and try it again ! If it works, fine the 'problem is in the Thermal Mass, it may only need more drying, or it may have too many
elbows as built.

If it does not flow well with a Vertical chimney immediately off of the Transitional Area, then you do not have your cross sectional area figured right,
or you have a problem in flow within your Transitional area, a very common area for trouble, this is an area for 3Xs the Cross Sectional Area and sweeping curves with
very smooth side walls, think sheetrock !

If this works, but is slow starting, optimize the amount of light weight fire brick facing in toward your combustion chamber, Heavy Weight refractory bricks at & pounds each
actually fall 3rd behind light weight Fire brick (#1) and 100 year old common red, red orange soft brick (#2) !

Pictures always help, and are much looked for, If there is a Dragon in your future we will find it together Big AL !
 
Posts: 67
1
  • Mark post as helpful
  • send pies
    Number of slices to send:
    Optional 'thank-you' note:
  • Quote
  • Report post to moderator
did i hear you right.. 1.5 inches between top of riser and barrel? might be you problem.. open it up to 2.5 -3 in.. how does it run with barrel removed?
 
brian hall
Posts: 67
1
  • Mark post as helpful
  • send pies
    Number of slices to send:
    Optional 'thank-you' note:
  • Quote
  • Report post to moderator
look like you have a 5in burn chamber feeding 6in exhaust aswell.

4.7in X 5.9in retangular burn chamber
 
Hugo Deslippe
Posts: 26
Location: Nagano. Japan
1
2
  • Mark post as helpful
  • send pies
    Number of slices to send:
    Optional 'thank-you' note:
  • Quote
  • Report post to moderator
Thank you to those who took the time to reply.

I took some pictures this morning, I hope they will make things a little more clear.
First, the album is here:Picture Album of Rocket mass heater

Next, let's look at some of the measurement.
My feed tube is 14.5 X 12cm (5" 9/16 X 4" 3/4) 174cm2
My burn tunnel is 10.8 X 12cm (4" 1/4 X 4" 3/4) 129.6 cm2
My heat riser is 16.5 X 13cm ( 6" 1/2 X 5" 3/16) 214.5cm2

I now realize that they are not the same CSA, they vary some 20% between the heat riser and the feed tube.
As for the burn tunnel, I have read everywhere that it should be smaller.

What is my margin of error?

It sucked ok, without the barrel, as long as there is no wind. The wind screws up the dynamic inside I guess. With a barrel, it will suck fine if the fire is really going hot. As soon as it starts getting small, it starts to smoke.

Question, should I put insulation around my riser or are those bricks enough? I read in the book, or heard on the DVD that refractory brick doesn't need insulation.
 
Hugo Deslippe
Posts: 26
Location: Nagano. Japan
1
2
  • Mark post as helpful
  • send pies
    Number of slices to send:
    Optional 'thank-you' note:
  • Quote
  • Report post to moderator
Ok, so I fired it up again tonight. I raised the heat riser 2 rows of bricks and the feed tube 1 row.
It sucks perfectly without the barrel.

I put the barrel on top (not sure of the clearance yet because I did it approximately, jacked on bricks. With the barrel, it sucks ok but as soon as the wind turns a little, it starts to smoke. Is that normal for a rocket built outside?

Also, my question about the margin of error still stands.
 
Posts: 245
Location: near Houston, TX; zone 8b
3
  • Mark post as helpful
  • send pies
    Number of slices to send:
    Optional 'thank-you' note:
  • Quote
  • Report post to moderator
Do you have a chimney? Even outside, you need a stove pipe.

There are many types of refractory, some of them conduct heat, some of the insulate. Fireclay bricks usually conduct and store heat, not insulate.
 
allen lumley
pollinator
Posts: 4154
Location: Northern New York Zone4-5 the OUTER 'RONDACs percip 36''
67
hugelkultur fungi books wofati solar woodworking
  • Mark post as helpful
  • send pies
    Number of slices to send:
    Optional 'thank-you' note:
  • Quote
  • Report post to moderator
Hugo Deslippe : you can run a calculator to do the conversions better than I can- for a 6'' system your cross sectional area should be pi Xs radius squared 3.14 Xs (3 Xs 3)=28''

This is the smallest that your cross sectional area should ever be, and that should be located within the Burn Tunnel !

I can easily visualize you are learning to burn wood in your new stove as the wood starts to really burn nicely, you are certainly trying to encourage the fire with frequent feedings
of fairly dry and small to your eyes chunks of wood ! If and this only takes one time, you knock into and dislodge a chuck of wood out of the 'Feed Tube' area and sideways into the
area where the Burn Tunnel is supposed to receive the flame front and turbulent Exhaust gases, It would be like you trying to swallow a small cooked potato whole! ( Remember -
you are already starting with a sub-prime air and pyrolyzed gases Flow through area !

You describe being able to start the fire without problems, and then running into problems, without re-creating the same blockage again, you should always have between 3 and 5
pieces in your Feed tube area , extra air space can be blocked of with a brick to channel incoming air more directly over the small very dry wood chunks, with your much smaller
Feed Tube, I doubt that this has been a problem for you !

I Sat on this for a while, looking for other More Likely causes and this is the best I could come up with ! Eventually you must up grade your brick ! Big AL !
 
Hugo Deslippe
Posts: 26
Location: Nagano. Japan
1
2
  • Mark post as helpful
  • send pies
    Number of slices to send:
    Optional 'thank-you' note:
  • Quote
  • Report post to moderator

allen lumley wrote:Hugo Deslippe : you can run a calculator to do the conversions better than I can- for a 6'' system your cross sectional area should be pi Xs radius squared 3.14 Xs (3 Xs 3)=28''

This is the smallest that your cross sectional area should ever be, and that should be located within the Burn Tunnel !


I Sat on this for a while, looking for other More Likely causes and this is the best I could come up with ! Eventually you must up grade your brick ! Big AL !


Hello Allen,

so, if I understand you well, I should increase the CSA of my burn tunnel to 28 square inches (it's currently at 20 square inches, my feed tube is at 26 and my heat riser is at 33)
So, I guess I would need to increase the feed tube, which is easily done as I already chocked it a bit to make sure to be close to 28"2.

From what I understood, all the CSAs had to be the same as the exhaust, except the burn tunnel, which had to be a bit smaller.

I'll try to increase the size of the feed chamber and the burn tunnel to see what it does.
 
allen lumley
pollinator
Posts: 4154
Location: Northern New York Zone4-5 the OUTER 'RONDACs percip 36''
67
hugelkultur fungi books wofati solar woodworking
  • Mark post as helpful
  • send pies
    Number of slices to send:
    Optional 'thank-you' note:
  • Quote
  • Report post to moderator
Hugo Deslippe : The smallest Part of your build should be the burn tunnel. you can actually go just a little bigger as you will have some wood ash partially filling your Burn Tunnel
say 10 % bigger,ALL your other dimensions should be bigger than that ! As you remarked you do lose some Flow with Squares and Rectangles !

When you finally get you Rockets dimensions true ! Consider getting some just made Binchotan charcoal for your next fire, just made will be as dry a wood as you will ever get a
chance to burn, give yourself at lest 6 ft of vertical chimney above all near-by obstructions and see what it does for you then ! Big Al !
 
Hugo Deslippe
Posts: 26
Location: Nagano. Japan
1
2
  • Mark post as helpful
  • send pies
    Number of slices to send:
    Optional 'thank-you' note:
  • Quote
  • Report post to moderator
Thanks all,

the main part is now done. I have the whole structure up and the barrel is on it. I need to finish the manifold, connect the duct and then build the mass but I think that hardest part is done now and it seems to work well.
I increased, according to Allen and Brian's advice, the burn tunnel to exactly 6" and it works like a charm.
The feed tube is a little bit bigger and the heat riser still a fraction bigger but it works so I'm happy for now.
 
allen lumley
pollinator
Posts: 4154
Location: Northern New York Zone4-5 the OUTER 'RONDACs percip 36''
67
hugelkultur fungi books wofati solar woodworking
  • Mark post as helpful
  • send pies
    Number of slices to send:
    Optional 'thank-you' note:
  • Quote
  • Report post to moderator
Hugo : Just a couple of small things, for the rest of the year, we are once again asking people to include their general location with their name, it often changes our best guess
of how to help you! Look at yours, then L@@K at mine. At the right hand side between the Permies Ad banner, and the Permies Video of the Day, is the Permies Toolbox, Click
on> 'my profile' which will send you to where you can add your location and your growing zone #, if you know it !

The other is just a general information thingy, and a rule of thumb, Like the dancing bear, you are not watching because the bear dances gracefully, you are watching because
it can dance at all. Our rocket can push the hot exhaust gases as far as 40', but usually with the help of a vertical Chimney SO- the rule is, 'when the Barrel goes on, -
- the vertical chimney goes up' ! for the craft ! Big AL!
 
Hugo Deslippe
Posts: 26
Location: Nagano. Japan
1
2
  • Mark post as helpful
  • send pies
    Number of slices to send:
    Optional 'thank-you' note:
  • Quote
  • Report post to moderator
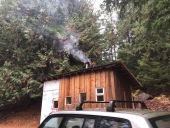
After lots of work, calculations, worries, and doubts I finally made it.
Here is my baby.

My rocket mass heater.
 
Pay attention! Tiny ad!
GAMCOD 2025: 200 square feet; Zero degrees F or colder; calories cheap and easy
https://permies.com/wiki/270034/GAMCOD-square-feet-degrees-colder
reply
    Bookmark Topic Watch Topic
  • New Topic