|

|
|
|
|

|

|

|

|

|
 13
13


 12
12
Moderator, Treatment Free Beekeepers group on Facebook.
https://www.facebook.com/groups/treatmentfreebeekeepers/

Skill verified by gir bot") 11
11
"When the whole world is running towards a cliff, he who is running in the opposite direction appears to have lost his mind." C.S. Lewis
Visit https://themaineingredient.com for organic, premium dried culinary herbs that are grown, processed, and packaged in the USA.


 9
9
Matt McSpadden wrote:One issue was that it was on a slight slope. So by the time the chickens got done scratching around, it would all end up at the bottom end of the greenhouse... and the top end was bare dirt.
How Permies works: https://permies.com/wiki/34193/permies-works-links-threads
My projects on Skye: The tree field, Growing and landracing, perennial polycultures, "Don't dream it - be it! "
8

In modern times the only right way forward is to come back to nature.
9
Nancy Reading wrote:
Matt McSpadden wrote:One issue was that it was on a slight slope. So by the time the chickens got done scratching around, it would all end up at the bottom end of the greenhouse... and the top end was bare dirt.
Great as a continuous system for compost creation (maybe with retaining walls...?), not so good for deep litter. I can imagine the frustration!
"When the whole world is running towards a cliff, he who is running in the opposite direction appears to have lost his mind." C.S. Lewis
Visit https://themaineingredient.com for organic, premium dried culinary herbs that are grown, processed, and packaged in the USA.
12
A build too cool to miss:Mike's GreenhouseA great example:Joseph's Garden
All the soil info you'll ever need:
Redhawk's excellent soil-building series
9
10
Matt McSpadden wrote: One issue was that it was on a slight slope. So by the time the chickens got done scratching around, it would all end up at the bottom end of the greenhouse... and the top end was bare dirt. I would rake it to the top... or add the new mulch only on the top end. Between those chickens and gravity... it would keep ending up downhill. It also seemed to be breaking down fairly quickly. By the end of the winter, I only had maybe 4 inches of "mulch" on the bottom end, as it was breaking down more quickly than I expected.
In the end, the chickens had a nice warm place for the winter, and the next spring I had some crazy tomatoes growing in there, but I doubt I will try it on a slope again :)
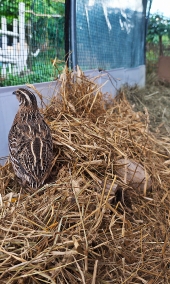
While quail aren't quite the scratchers that chickens are... I would still advise people to try to find flat ground when doing this method... or you will be doing extra work spreading it out again
![[Thumbnail for 20250908_130226.jpg]](/t/358162/a/273341/20250908_130226.jpg "Filename: 20250908_130226.jpg
Description:")
![[Thumbnail for 20250908_130236.jpg]](/t/358162/a/273342/20250908_130236.jpg "Filename: 20250908_130236.jpg
Description:")
"The genius of American farm experts is very well demonstrated here: they can take a solution and divide it neatly into two problems." -Wendell Berry
10
Matt McSpadden wrote:...One issue was that it was on a slight slope....
Josh Hoffman wrote:...But, adding the 2x6's and using the deeper part that collects there has been very manageable and I think most anyone could make it work. If you have a steep area, I could foresee some issues with the material moving along too rapidly. Adding things to slow it down, in closer intervals may be the solution...
A build too cool to miss:Mike's GreenhouseA great example:Joseph's Garden
All the soil info you'll ever need:
Redhawk's excellent soil-building series


 11
11
- Tim's Homestead Journal - Purchase a copy of Building a Better World in Your Backyard - Purchase 6 Decks of Permaculture Cards -
- Purchase 12x Decks of Permaculture Cards - Purchase a copy of the SKIP Book - Purchase 12x copies of Building a Better World in your Backyard

Skill verified by gir bot")

Skill verified by Opalyn Rose") 10
10
Trace Oswald wrote:A properly designed coop will be bone dry all the time, so no real composting happens.
Timothy Norton wrote:I primarily utilize Pine Shavings in their coop for their softness and exposed surface area. In their run, I dump in arborist wood chips if I have it on hand.
![[Thumbnail for 20250908_164430.jpg]](/t/358162/a/273346/20250908_164430.jpg "Filename: 20250908_164430.jpg
Description:")
![[Thumbnail for 20250908_164533.jpg]](/t/358162/a/273347/20250908_164533.jpg "Filename: 20250908_164533.jpg
Description:")
![[Thumbnail for 20250908_164549.jpg]](/t/358162/a/273348/20250908_164549.jpg "Filename: 20250908_164549.jpg
Description:")
"The genius of American farm experts is very well demonstrated here: they can take a solution and divide it neatly into two problems." -Wendell Berry
6
Josh Hoffman wrote:...
Since it stays very hot here (chill hours are around 450 a year or so) the coop/run is open at the top and on the south side. Since it is on a slight slope, we get some ground water intrusion on the north and east walled side (during torrents) and coming in when the wind blows sideways while raining.
The chickens roost in the rafters and some other lower spots. This allows us to use the same deep litter of wood chips/grass clippings/leaves, etc. for the entire coop/run. We could not do this if we experienced colder temps.
A build too cool to miss:Mike's GreenhouseA great example:Joseph's Garden
All the soil info you'll ever need:
Redhawk's excellent soil-building series
3
Trace Oswald wrote:We get -20 every year, -30 sometimes, and I've seen -40 two days in a row a few years ago. My roost area has to be very tight with no drafts at all while still having a lot of ventilation. Any moisture or drafts on the birds while roosting will cause bad frost bite here.
"The genius of American farm experts is very well demonstrated here: they can take a solution and divide it neatly into two problems." -Wendell Berry
5

|
Look! It's Leonardo da Vinci! And he brought a tiny ad!
grow your own garden and build your own home in the gardening gardeners program
https://wheaton-labs.com/bootcamp
|