• Post Reply Bookmark Topic Watch Topic
  • New Topic
permaculture forums growies critters building homesteading energy monies kitchen purity ungarbage community wilderness fiber arts art permaculture artisans regional education skip experiences global resources cider press projects digital market permies.com pie forums private forums all forums
this forum made possible by our volunteer staff, including ...
master stewards:
  • Carla Burke
  • Nancy Reading
  • John F Dean
  • r ranson
  • Jay Angler
  • paul wheaton
stewards:
  • Pearl Sutton
  • Leigh Tate
  • Devaka Cooray
master gardeners:
  • Christopher Weeks
  • Timothy Norton
gardeners:
  • thomas rubino
  • Matt McSpadden
  • Jeremy VanGelder

New mass heater

 
  • Likes 1
  • Mark post as helpful
  • send pies
    Number of slices to send:
    Optional 'thank-you' note:
  • Quote
  • Report post to moderator
After a lot of reading, I finally took the plunge and built an 8" RMH, which before I began adding cob to the bench, was drawing brilliantly. Having got the bench about 2/3 covered, I thought I'd light the fire last night to start the drying process, and had problems with smoke at the feed tube. Any thoughts?
The burner and ducting are on a rubble and perlite base, with paving slabs and perlite directly under the burner. The cob is wet(ish) but is already drying around the feed tube.


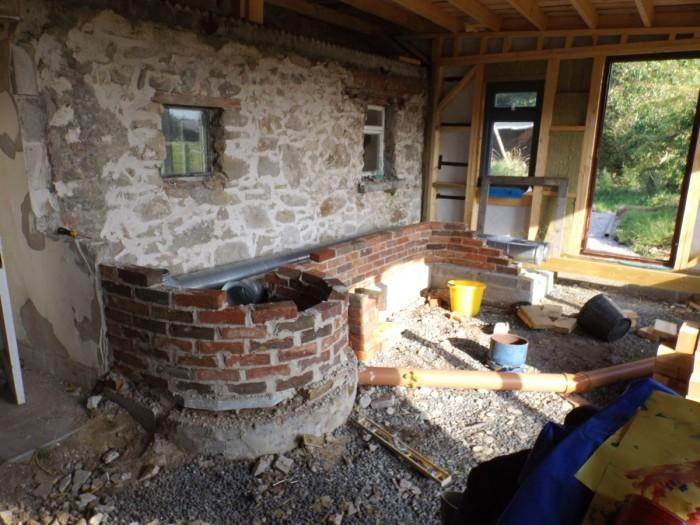
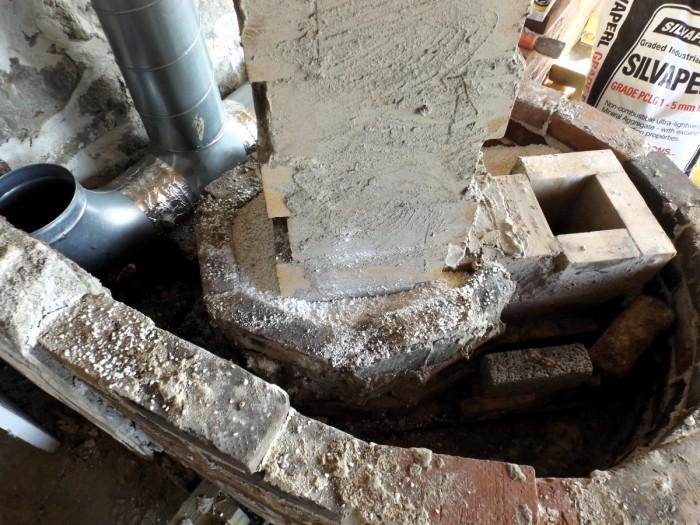
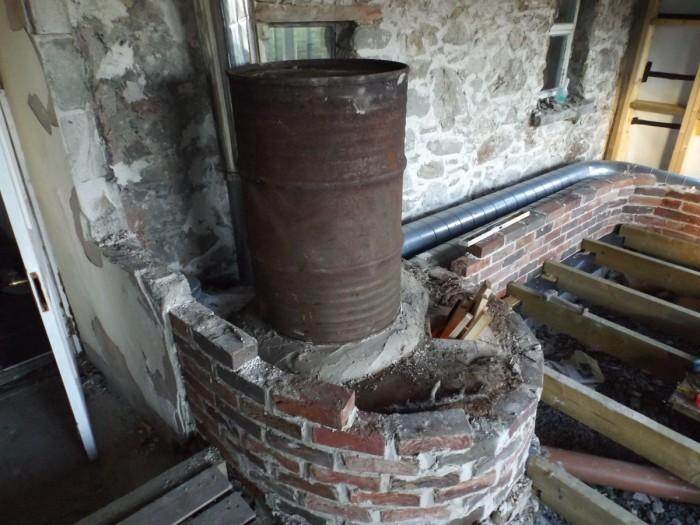
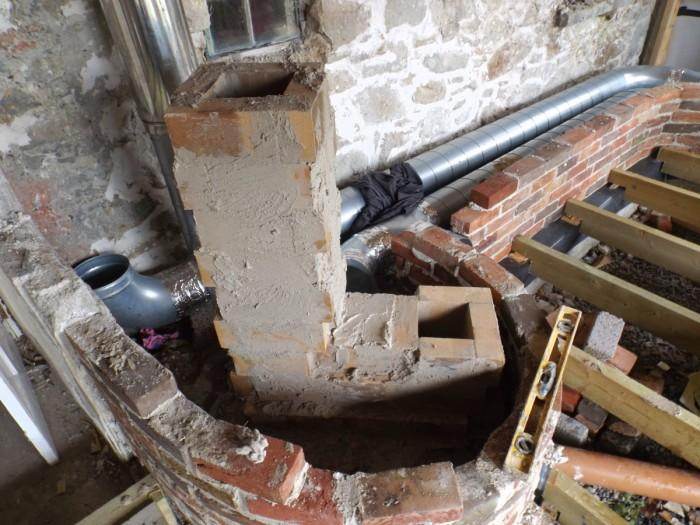
here's a couple of build pics -


and a short vid of the first lighting -

 
pollinator
Posts: 4154
Location: Northern New York Zone4-5 the OUTER 'RONDACs percip 36''
67
hugelkultur fungi books wofati solar woodworking
  • Mark post as helpful
  • send pies
    Number of slices to send:
    Optional 'thank-you' note:
  • Quote
  • Report post to moderator
Steve G.-B. : I certainly see nothing to worry about here, if there Is, a 3rd, or 4th pair of eyes will catch it here ! It takes a lot of Heat energy to dry out Cob,
so the Exhaust gases going up your chimney are much colder than you will see after everything dries out ! Then it will 'Draw' much better !

Where the vertically falling exhaust gases from your heat riser meet the horizontal transitional area you could have made a bigger bell shape to redirect and
smooth the gases flow, but this is a more modern adaptation and 10s of thousands were made just like yours !

It is possible while trying to speed the process along to over-feed the Rocket Mass Heater RMH, and end up with a restrictive pile of red hot burning embers
and charcoal built up within the Burn Tunnel, this area is for the wood gases to mix in and burn, and this can constipate the system, you want the pieces of
wood to be burning only directly on their lower tips. The downward drafting air actually cooling the upper 2/3rds of the sticks! This is mostly self correcting
in that you will stop feeding the fire about when you want it to go out -then your hot embers and charcoal will burn up and disappear as though by magic
leaving little behind to feel or see !

You will very quickly learn to tend to Your RMH, by ear, adding wood or partially blocking the airflow with a flat brick or stone to send all the air past your
wood for good combustion, rather than possibly chilling the fire, and you will do it instinctively, with no more thought than adjusting a pair of reading classes!

I hope that your house layout plans were a little flexible, more and more you should notice that within an arms reach of your Rocket will gradually turn into
the heart* of your home as you gravitate there for the warmth and because it becomes the place to do many of the more portable household chores, just to
be there to feed the House Dragon that lives in the heart of all well tended RMHs Enjoy and good luck, and send more pictures ! Big AL

* hearth and heart come from the same root word and have many interchangeable meanings ! A. L.
 
Steve Golemboski-Byrne
Posts: 17
3
  • Mark post as helpful
  • send pies
    Number of slices to send:
    Optional 'thank-you' note:
  • Quote
  • Report post to moderator
Great, thanks for that, I'm relieved to know that this is normal. Something I have definitely done is to end up with burning wood in the burn tunnel, so I'll give that a good clean before I go again. The only part of the 'J' that I'm not 100% happy with is the height of the burn tunnel, which is a fraction over height when I read that it should be the tightest part of the system. I figured that I can experiment by adding tiles to the bottom of the burn tunnel to reduce the cross section a little. Its maybe 52" in area compared with 50" in the rest of the system. The bit between the exit from the barrel and the ducting ended up being quite big, but its not so obvious here. Its maybe 10" tall, 12" wide and tapers into the duct with an ashpit just before the duct. It's top edge is level with the lower edge of the barrel, is that correct? I can just reach it from the nearest clearout.
The room that this is in is intended to be well used, and as it is against the granite wall of the cottage I am hoping that it will gradually give some warmth to that mass too.
Here's the room that it is in -

thanks for your advice and encouragement
 
rocket scientist
Posts: 6355
Location: latitude 47 N.W. montana zone 6A
3209
cat pig rocket stoves
  • Mark post as helpful
  • send pies
    Number of slices to send:
    Optional 'thank-you' note:
  • Quote
  • Report post to moderator
Steve; nice looking build ! The inner cob takes a LONG time to totally dry out , much longer than the outer surface. Yup a slightly larger burn tunnel will cause some smoke back, just use a brick or two to restrict the top of the feed tube after it's burning .
 
thomas rubino
rocket scientist
Posts: 6355
Location: latitude 47 N.W. montana zone 6A
3209
cat pig rocket stoves
  • Mark post as helpful
  • send pies
    Number of slices to send:
    Optional 'thank-you' note:
  • Quote
  • Report post to moderator
Steve: I just noticed your stone cottage wall that you built against, is that an interior wall or exterior ? If that is an exterior wall you are going to have the problem of trying to heat the great outdoors. I built next to a stone wall in our greenhouse and i used perlite to insulate the mass away from the rock wall to avoid any heat getting sucked outside.
 
Steve Golemboski-Byrne
Posts: 17
3
  • Mark post as helpful
  • send pies
    Number of slices to send:
    Optional 'thank-you' note:
  • Quote
  • Report post to moderator
Hey Thomas - it was an external wall, but is now an internal wall. Its 30 inches thick, and on the other side is a bathroom and bedroom, so hopefully it'll take the chill off them as last winter (when that was an external wall) it was *freezing* in the bedroom..
 
allen lumley
pollinator
Posts: 4154
Location: Northern New York Zone4-5 the OUTER 'RONDACs percip 36''
67
hugelkultur fungi books wofati solar woodworking
  • Mark post as helpful
  • send pies
    Number of slices to send:
    Optional 'thank-you' note:
  • Quote
  • Report post to moderator
Steve : Is that a living roof or just a sod roof on top of your addition ?! If so you will have to give us a serious breakdown on the whole job ,
like what did you use for a membrane ?

With over 27,000 fellow members here at Permies.com as many or more will want to know all about your build, maybe as many who
want to see more of your Rocket build !

Near the top of this thread, directly under the Spinning Permies Sun find the :::--> permies >> forums >> Energy >> rocket stoves, click on

the [forums] Button, at the next page scroll down to the Buildings section and click on the left hand wafati and earth berm forums

I believe that the ground is being broken now for a third or forth Wafati structure, at Wheaton labs, Permies research station !

All of the threads in each forum are listed in the order they have last been responded too! The top most ones (of pages and pages) are most
recent, I loaded a thread :::--> , welcome back Mike Oehler, author of two books on eco buildingto the top which should be close to
where you will find it ! Respond when you can, For the good of the Crafts !

Think like Fire! Flow like a Gas! don't be the Marshmallow! Your questions and comments are welcome and Solicited Pyro-magically Big AL
 
gardener
Posts: 3471
Location: Southern alps, on the French side of the french /italian border 5000ft elevation
194
  • Mark post as helpful
  • send pies
    Number of slices to send:
    Optional 'thank-you' note:
  • Quote
  • Report post to moderator
Steve, few questions. How is the insulation around your burn tunel and heat riser? How much top and side gap do you have?

What you say about your transition area sound realy good. It's like, the bigger, the better! For that part.

One thing i would do for the moment, is to insulate the vertical part you have inside the room for the moment. With something like glass wool or rock wool. 10cm of the stuff all around, to gain a smidge of draft. And if that doesn't work, get a fan of some kind, that you put in your chimney cap's place, as i have done here

http://donkey32.proboards.com/post/11668/thread

I got a fridge fan. You can see the plume of smoke getting out at startup Run that all the time when you're drying the mass, and you'll have no probs.

I use it every time i light the green machine up, since i have pipe lengh and reductions problems. When it's hot, it self drafting.
 
Steve Golemboski-Byrne
Posts: 17
3
  • Mark post as helpful
  • send pies
    Number of slices to send:
    Optional 'thank-you' note:
  • Quote
  • Report post to moderator
The riser has 2 inches max of perlite around it - less at the corners of the brick; and there's 2 inches of room around the inner riser cylinder and the outer oil drum. 2 inches above the riser ( I had to jack the barrel up a little once the riser was built to give enough clearance. I've just experimented with setting some tiles so that the feed tube is a bit taller, and now that I've added some larger wood and the fire is going, I am getting less smokeback, and the smoke is getting drawn back down into the feed. Just as well, as it smoked like a bugger when I first lit it.
 
Steve Golemboski-Byrne
Posts: 17
3
  • Mark post as helpful
  • send pies
    Number of slices to send:
    Optional 'thank-you' note:
  • Quote
  • Report post to moderator
Allen, I posted details of the build and green roof in the timber frame section of the build forum - here
 
Steve Golemboski-Byrne
Posts: 17
3
  • Mark post as helpful
  • send pies
    Number of slices to send:
    Optional 'thank-you' note:
  • Quote
  • Report post to moderator
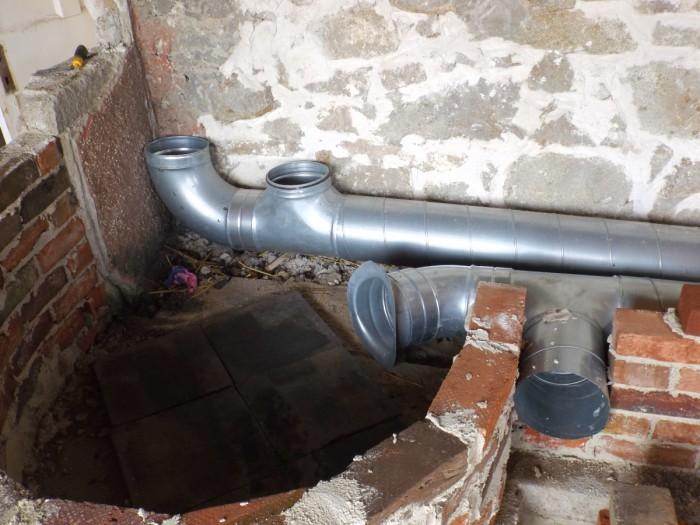
Here's some more pics. First the ducting, which is 8" spiral duct - this was relatively inexpensive, but sturdy, and the joints are good. We screwed and taped them with foil tape. In the pic, the outlets are - from left to right - cleanout; vertical exhaust; opening to bottom of barrel, and cleanout.


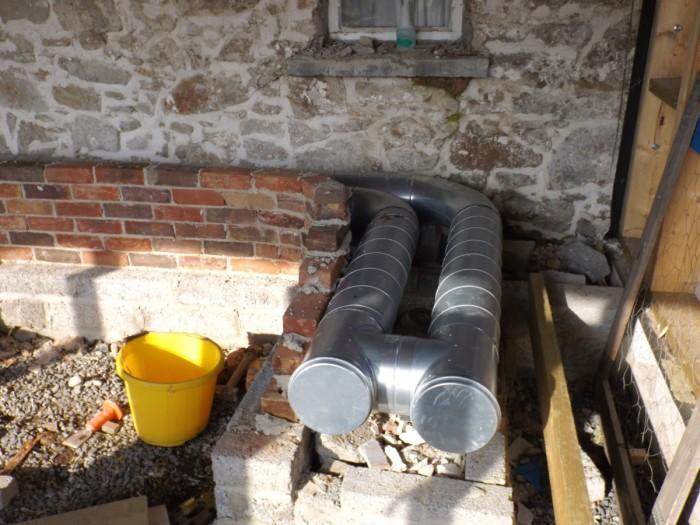
Cleanouts at the far end of the bench


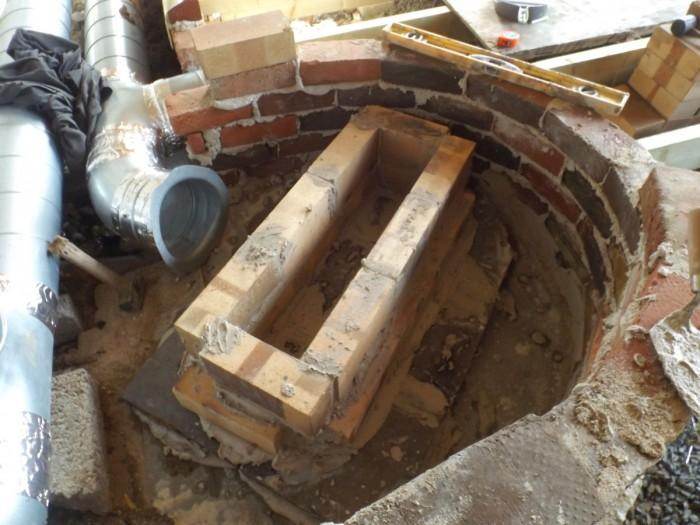
Building the burner from firebrick, sitting on a base of clay hearth tiles.


Brick built up to support the riser surround, and the barrel. Filled with perlite.


annoyingly I omitted to take pictures of the riser with its water tank surround on, so the next image is of the barrel on, and test firing.


and the rest of the pictures are in the original post. Hope these are useful. I tried to follow the instructions and dimensions in 'Rocket Mass Heaters' by Ianto Evans.


Posts: 140
1
  • Mark post as helpful
  • send pies
    Number of slices to send:
    Optional 'thank-you' note:
  • Quote
  • Report post to moderator
thats a very nice stove. thanks for sharing with us. kinda what i want out by my fire pit, to warm the elders tails. lol
 
Steve Golemboski-Byrne
Posts: 17
3
  • Mark post as helpful
  • send pies
    Number of slices to send:
    Optional 'thank-you' note:
  • Quote
  • Report post to moderator
Latest update - I was tending to see wood at the back of the feed tube (ie furthest away from the tunnel) burn up and smoke; adding a tile here to make the feed tube a little smaller (1") cured the problem and I get a more even burn. Whether this will change as the bench continues to dry I don't know, but small alterations in the sizes do seem to make a big difference generally.
 
I think he's gonna try to grab my monkey. Do we have a monkey outfit for this tiny ad?
GAMCOD 2025: 200 square feet; Zero degrees F or colder; calories cheap and easy
https://permies.com/wiki/270034/GAMCOD-square-feet-degrees-colder
reply
    Bookmark Topic Watch Topic
  • New Topic