gift
PIP Magazine - Issue 19: Ideas and Inspiration for a Positive Future
will be released to subscribers in: soon!
  • Post Reply Bookmark Topic Watch Topic
  • New Topic
permaculture forums growies critters building homesteading energy monies kitchen purity ungarbage community wilderness fiber arts art permaculture artisans regional education skip experiences global resources cider press projects digital market permies.com pie forums private forums all forums
this forum made possible by our volunteer staff, including ...
master stewards:
  • Carla Burke
  • Nancy Reading
  • John F Dean
  • Jay Angler
  • paul wheaton
  • r ranson
stewards:
  • Pearl Sutton
  • Leigh Tate
  • Liv Smith
master gardeners:
  • Christopher Weeks
  • Timothy Norton
gardeners:
  • Jeremy VanGelder
  • Matt McSpadden
  • thomas rubino

Paramo Permacultura Colombia - project for homesteading and education in the tropical highlands

 
Posts: 53
Location: Colombia
16
2
trees solar woodworking
  • Likes 4
  • Mark post as helpful
  • send pies
    Number of slices to send:
    Optional 'thank-you' note:
  • Quote
  • Report post to moderator
Hi Permies,

my girlfriend and I are going to build our cob house in the Andes of Colombia, near a place called Paipa, which has a temperate oceanic climate (Cfb, like London or Seattle an average temperature of 14°C (day around 25, night around 5, year-round) and 911 mm of rain, without dry months.

We are just starting to think about the design, and would love to get advices or tips. One interesting challenge is that even though we are in the tropics, we are in the high tropics (2600 m), and nights are cool/cold. It would be nice to go solar passive, but... the sun just passes above us most of the year, there is no way we can use the midday sun to warm the house (unless we put a transparent roof). So we want to build a nice RMH in the center of the house (and another reason to support the kickstarter Oh, and against to wall would be a rumford fireplace, we would connect the pipe of the RMH to the one of the fireplace to have only one pipe outlet.

We also would like to build a green roof, and are wondering whether to insulate the roof. you can see in the images below that the roof would have a small angle, and rainwater would be collected in a water tank behind the house.

The outer walls would support the roof, while the inner walls would be thinner, just separating rooms.

We want to use a dry toilet system, probably one with bucket/barrel that we leave decompose outside. Not sure yet about it. We want something that can be replicated in big cities like Bogota.

We'd like to have a small greenhouse where the shover is.

Water from kitchen and bathroom would go into 2 greywater systems.

The door in the kitchen would lead to a small hill, inside which we plan to build a small storage cellar for food. Anyone has done it?

Ok, we will keep posting here the construction process, which should start in August.

All the best

greg and angela

Plano-casa-distribucion.jpg
2d view with rooms
2d view with rooms
Plano-casa-3d.jpg
[Thumbnail for Plano-casa-3d.jpg]
3d view
Plano-casa-lateral.jpg
lateral view
lateral view
 
gardener
Posts: 500
Location: Victor, Montana; Zone 5b
228
hugelkultur forest garden composting toilet building rocket stoves
  • Mark post as helpful
  • send pies
    Number of slices to send:
    Optional 'thank-you' note:
  • Quote
  • Report post to moderator
What is the approximate sq. footage? Seems somewhat large for a starter project for two people, cob requires thinking small. I would also think about designing all water supply in one section of the house. Try to keep the kitchen, bath and wash somewhat close so you don't have to run as much plumbing.

Definitely insulate the roof. Cardboard, bottles, carpet, straw/clay works really well as insulators if your looking for low cost or free. What type of water barrier were you planning to use?

Sounds like an awesome project, gotta love cob.
 
Greg Amos
Posts: 53
Location: Colombia
16
2
trees solar woodworking
  • Mark post as helpful
  • send pies
    Number of slices to send:
    Optional 'thank-you' note:
  • Quote
  • Report post to moderator
Hi Daniel,

width is 15 m and 9.5 m deep (front to back wall). Area is more or less 100 sq meters, that is ca. 1076 sq feet.

Thanks for your advise, yes, the house is sort of big, we will probably start with a smaller project to gain some experience, like a cob dry toilet.

Plumbing... we thought a lot about putting all water supply together... we are sort of between to small hills and may build a water tank on each of them, so each section would have a separate water supply.

For the roof, the water barrier will probably be some plastic membrane (the only unnatural part with the plumbing, but how to avoid it? the flatter the roof, the more tricky it gets)... thanks for the advice about insulation, straw and clay sounds good

greg
 
Rocket Scientist
Posts: 4468
Location: Upstate NY, zone 5
561
5
  • Likes 1
  • Mark post as helpful
  • send pies
    Number of slices to send:
    Optional 'thank-you' note:
  • Quote
  • Report post to moderator
What kind of roof support structure are you planning for interior areas? Cob walls the thickness you show would not be strong or stable enough to safely support a green roof over that area. Spans up to 9 meters would require significant beams even for a lightweight roof, and truly massive beams for a green roof.

Given your latitude, average temperature and annual constancy, I think a green roof would not want significant insulation, as you will get a lot of solar input into its surface. Enough mass to carry the heat overnight should moderate it nicely.

I would advise designing the structure to build part first, leaving say the master bedroom, half bath and office for later. You can live in the other rooms and not be disrupted as you add the second set. This would be compatible with a structural inner wall to cut roof spans considerably as well. As a general rule, I would not advise more than about 5 meter spans between supports, and any main beams that carry other beams need individual support posts, not just cob. Is there any history of earthquakes in your region? If so, you cannot safely depend on pure cob walls for roof support but will need to have wood or other reinforced posts inside the cob that can carry the roof. What kind of rainfall does your area get in the worst storms? A low-slope green roof will have to account for all that water weight added to the earth.
 
Glenn Herbert
Rocket Scientist
Posts: 4468
Location: Upstate NY, zone 5
561
5
  • Likes 1
  • Mark post as helpful
  • send pies
    Number of slices to send:
    Optional 'thank-you' note:
  • Quote
  • Report post to moderator
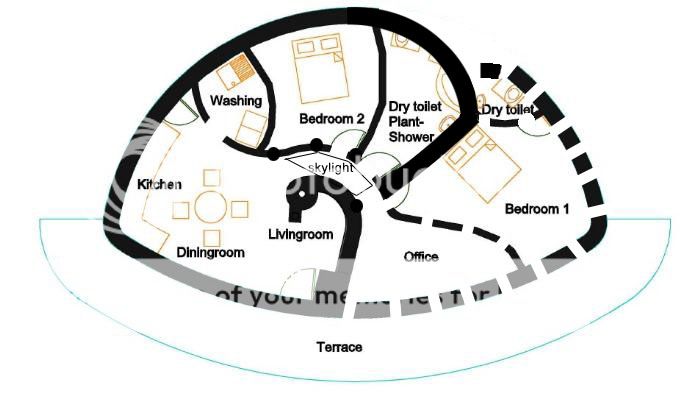
As an architectural designer, I really like your overall organic shape and layout. However, the bathroom wastes a bunch of space to no particular effect, and you don't need to worry about minimizing exterior envelope as you would in a cold climate. Pulling the exterior wall in to move the bathroom functional space closer to the door would reduce the amount you need to build at first, and the master bedroom/office part can perfectly well have its own organic shape as an addition.

You have the sun directly overhead at midday and wide overhangs to protect the cob, so your windows are going to admit relatively little daylight without being bigger than cob wants to allow. I would consider having the high point of the roof at the center with a skylight, and the roof sloping away on all sides to ease sealing. This would also mean that all the exterior cob walls would not have to be too tall. An extra couple of feet/half meter of height require the wall to be correspondingly thicker. Support posts around this center would reduce the roof beam spans to manageable levels for a self-built structure.
 
Glenn Herbert
Rocket Scientist
Posts: 4468
Location: Upstate NY, zone 5
561
5
  • Likes 3
  • Mark post as helpful
  • send pies
    Number of slices to send:
    Optional 'thank-you' note:
  • Quote
  • Report post to moderator
I have done a crude photoshop modification to your plan to indicate the type of thing you could do. In reality, you would reshape the entire upper curve a bit to optimize those spaces, and give the second set of rooms its own curves.

 
Greg Amos
Posts: 53
Location: Colombia
16
2
trees solar woodworking
  • Mark post as helpful
  • send pies
    Number of slices to send:
    Optional 'thank-you' note:
  • Quote
  • Report post to moderator
Hi Glenn,

great suggestions! thanks a lot for taking the time to photoshop the blueprint! May I do some comments/questions:

1) we love the idea of building in 2 phases, finishing the master bedroom, office and extra toilet later. I guess we would probably finish the roof for the whole house, then add those 3 rooms. Any recommendation about this?

2) we love also the skylight. Actually we did consider putting one, then discarded the idea because we thouht we would loose quite a lot of heat, but it's easy to build a sort of curtain to close it overnight.

3) we love the idea of a circular roof around the skylight. In our context, would you consider another option for the roof, like wood or anything else?

4) there are no earthquakes record in the area, however there is a strong earthquake region 400 km away, and some shaking can be felt sometimes. We don't know how much rain falls during the worst events.

5) there are times of the year without much sun, which means no heat in the roof mass, does it mean insulation is a must?

6) what about walls insulation?

Thanks a lot Glenn, looking forward to hearing from you

greg and angela
 
Glenn Herbert
Rocket Scientist
Posts: 4468
Location: Upstate NY, zone 5
561
5
  • Likes 1
  • Mark post as helpful
  • send pies
    Number of slices to send:
    Optional 'thank-you' note:
  • Quote
  • Report post to moderator
1) Finishing the whole roof first kind of negates the staged building idea - you would have to fully support and brace the whole thing and leave part exposed to some weather until the second phase. As the walls that would separate the stages would be fairly close to the slope line of the roof, you would not have water pouring off the exposed edge, and some minor temporary finishing would give a safe edge that can be extended later.

2 & 3) Any roof surface that was not "green" or a solid rubber/plastic material would need to be higher slope than you show in your side view and thus make the center taller - nice for spaciousness and cooling, not so much for heating and constructing.

4) That strengthens my general inclination that it is better to have independent support for the roof. It will help construction anyway, to put up the posts at the inner face of your proposed cob wall, with diagonal bracing, and the roof structure and membrane so you can work on cob under cover.

5) Are the sunless times also the coldest times? If so, then you definitely want some insulation in the roof. If not, you will have to weigh the balance between spending real money on insulation that can work in your roof, and running the RMH for more of the year to keep the chill off.

6) Your walls will be massive enough that you may not need wall insulation. Using cob high in straw will make it more insulative.
 
Greg Amos
Posts: 53
Location: Colombia
16
2
trees solar woodworking
  • Mark post as helpful
  • send pies
    Number of slices to send:
    Optional 'thank-you' note:
  • Quote
  • Report post to moderator
Hi Glenn, you just gave us a lot a great advices! thanks a lot for this.

our next step will be to read a good cob-building book, and then... well... start!

all the best

greg
 
Glenn Herbert
Rocket Scientist
Posts: 4468
Location: Upstate NY, zone 5
561
5
  • Mark post as helpful
  • send pies
    Number of slices to send:
    Optional 'thank-you' note:
  • Quote
  • Report post to moderator
Good luck! Let us know what you finally decide to do and post pictures as you go. We will be very interested to see the progress. And ask if you have more questions.
 
Greg Amos
Posts: 53
Location: Colombia
16
2
trees solar woodworking
  • Likes 5
  • Mark post as helpful
  • send pies
    Number of slices to send:
    Optional 'thank-you' note:
  • Quote
  • Report post to moderator
Hi there, finally we did start with the construction. Not directly the house though, but a little toolshed that allowed us to test our material and become more familiar with cob building. It was great fun to do it, and fairly quick also: about 20 days, 4-5 hours per day, 2 people. We did learn a lot of stuff, like to brace well the door frame, unless we want a funny entrance... We are now waiting for the building permits, and will start our house soon

DSC_0032.jpg
[Thumbnail for DSC_0032.jpg]
DSC_0046.jpg
[Thumbnail for DSC_0046.jpg]
DSC_0050.jpg
[Thumbnail for DSC_0050.jpg]
 
Daniel Ray
gardener
Posts: 500
Location: Victor, Montana; Zone 5b
228
hugelkultur forest garden composting toilet building rocket stoves
  • Likes 2
  • Mark post as helpful
  • send pies
    Number of slices to send:
    Optional 'thank-you' note:
  • Quote
  • Report post to moderator
Hey, awesome to get some cob going and some great practice before starting your home.
You probably know this, but make sure you overkill rather than under do the thickness of your walls. Even for a practice shed, they seem a bit thin. Also, make sure you get the cob up on a nice high footer, you don't want the cob anywhere close to the ground.

You will learn a lot as you build with cob. I learned that everything takes twice as long as I calculated, I also had to do some major work to fix the door frames after finishing the walls.
 
Glenn Herbert
Rocket Scientist
Posts: 4468
Location: Upstate NY, zone 5
561
5
  • Mark post as helpful
  • send pies
    Number of slices to send:
    Optional 'thank-you' note:
  • Quote
  • Report post to moderator
Glad to see your progress! Cob is fun, though it is also a lot of work... er, exercise

I concur that your toolshed walls should be thicker, and most especially your house walls. If you do have the center as the high point, you can make the exterior walls only as tall as needed for doors and windows, and still have mostly high ceilings. This will allow sturdy cob walls with minimal thickness - say a foot to 16" at the base. Cob building books will have more authoritative dimensional recommendations.
 
Greg Amos
Posts: 53
Location: Colombia
16
2
trees solar woodworking
  • Likes 2
  • Mark post as helpful
  • send pies
    Number of slices to send:
    Optional 'thank-you' note:
  • Quote
  • Report post to moderator
Hi Daniel and Glenn and all,

thanks for the advices, indeed the wall thickness of the toolshed is too small, and of course for the house walls will be thicker. Actually we read in "the hand-sculpted house" that a circular shape is more stable and allows a reduced wall thickness, so we decided to try it with the toolshed, and so far it still stands A proper roof is still missing, we want to try to make our own clay tiles...

Also we will build a higher stone foundation for the house, really this toolshed was an experiment, and we did not take all the care requiered for a proper cob building.

As for now we are in the final steps of levelling the terrace for the construction. It takes time, because we do it with human power only, but actually it's ok because we are still in the process of getting a building permit.

A friend of ours is architect, and he helping us with the official part of blueprints and civil engineering paperwork. Incredibly, earth is not officially recognized as load-bearing material in Colombia, but fortunately wood is, and as we plan to start building the shell with posts and the roof structure, and then fill it up with cob, that'ok. You can see a model in the photos below. We don't know yet if the posts will be partially embedded in cob, or outside the structure, but probably it will be the second option, so we can put a hammock

We are very excited to try natural ways to fix and treat our eucalyptus roundwood posts. Jay White Cloud is an awesome source of inspiration in this regard. To fix them, either cobblestone foundation, or in the soil. For wood treatment, Yakisugi sounds very good.

Happy new year!

IMG_20151215_160937789.jpg
House area December 2015, with cob stove in the back
IMG_20151029_143857610_HDR.jpg
Toolshed with plaster and a tree :)
IMG_20151017_141430127.jpg
Model
Model
 
Daniel Ray
gardener
Posts: 500
Location: Victor, Montana; Zone 5b
228
hugelkultur forest garden composting toilet building rocket stoves
  • Mark post as helpful
  • send pies
    Number of slices to send:
    Optional 'thank-you' note:
  • Quote
  • Report post to moderator
Hey, great and good luck with building and leveling. I know the pains of hand digging. If you're going post and beam then wall thickness isn't a huge issue as the stress will be on your posts rather than the walls themselves. I still suggest the thickest walls you can manage though, they have benefits other than structural integrity--aesthetics, sound proofing, thermal benefits-- I think your idea of having the posts outside of the walls is smart. Cob Cottage company's cobweb books have an article that discusses embedded beams causing weaknesses in the wall and cracking from the different thermal expansions of those two materials. If you can get your hands on a copy of those books I highly suggest it. Good luck getting your permit and building your house!
 
Greg Amos
Posts: 53
Location: Colombia
16
2
trees solar woodworking
  • Likes 2
  • Mark post as helpful
  • send pies
    Number of slices to send:
    Optional 'thank-you' note:
  • Quote
  • Report post to moderator
Hi there,

finally we applied for the building permit!!  we found a good architect and civil engineer who helped us with the blueprints.

Now we are trying to figure out how to join the different posts and beams together. As you can see in the images, some unions could be tricky. We will use eucalpyptus roundwood.

The posts diameter is about 20 cm, while the beams diameter is about 15 cm.

We plan to build on the floor the 4 main sections (VC-01 to VC-04), and then rise them up, and on the top put the 3 remaining parts (VC-05). The exterior beams (VC-06 to VC-11) would be placed at the end.

For VC02, VC03 and VC04, we are wondering whether to use 4 beams per section, only 2 beams, connected on the central post?

Do you recommend to put the beam on the top of the post, or on the side of it? what kind of joint would you use?

Any other recommendation?

thanks a lot

all the best

greg
roof.png
Top: beams, bottom: beams and purlins
profile.png
Sideview with the 4 main posts, and roof.
01.jpg
the new shape of the house
 
Glenn Herbert
Rocket Scientist
Posts: 4468
Location: Upstate NY, zone 5
561
5
  • Mark post as helpful
  • send pies
    Number of slices to send:
    Optional 'thank-you' note:
  • Quote
  • Report post to moderator
The longer you can make the continuous beam sections, the more rigid and strong the assembly will be. If you can make up VC-02, 03 and 04 from only two beam timbers, do it.

Post-to-beam connections are always stronger if the beam is on top rather than at the side of the post. The beams should be at least spiked to the posts, if not actually joined by mortise and tenon.

You will need some diagonal braces to keep the frame from collapsing while it is being built (before the cob is in place to steady it), and braces will be helpful even after completion.
 
Greg Amos
Posts: 53
Location: Colombia
16
2
trees solar woodworking
  • Likes 2
  • Mark post as helpful
  • send pies
    Number of slices to send:
    Optional 'thank-you' note:
  • Quote
  • Report post to moderator
Hi there, time to put some news of our project. Actually, I'd like to move this post from the "cob" to "project" forum, as we decided to change the building material a little bit, and build with strawbale. Also, I'd like to add the other stuff we are doing in the farm, that has nothing to do with cob. If someone knows how to do it, I'd be very thankful

We finally got our building permit, and now we are building the round timber frame for the green roof. It takes a bit of time, as we are only between 2 and 4 people, without electricity, but with much ingenuity!

We started with lifting the beams with pulleys and with a kind of pulley used in car workshops to lift motors (I don't know the name in English).


Then we put the beams (previously charred using the Yakisugi method) on stones under the beam, and attached them to the beam.


Once we had all beams and posts in place, we continued with the rafters


And now we are in the process of putting the rest of the rafters


We attached the beams to the huge posts we used for the pulleys, in order to secure them. The base of those posts is 60 cm deep into the soil, so they are not going to move.

There are not many joints as for now. The beams "fit" on the posts thanks to a simple V-shaped cut. The rafters have a simple joint to fit in the lower beam.


There are some "diagonal" beams, which will require some more elaborate joints, we are doing them right now.

So, as for now, the frame is made only of natural material, we used no concrete, not even a nail


IMG_20170402_115727846_HDR.jpg
Lifting the beams with pulleys
IMG_20170402_161047844.jpg
Attaching the posts to the beams
IMG_20170411_133617786_HDR.jpg
The first rafter
The first rafter
IMG_20170504_133214150.jpg
The situation in May 2017
 
out to pasture
Posts: 12387
Location: Portugal
3231
goat dog duck forest garden books wofati bee solar rocket stoves greening the desert
  • Likes 1
  • Mark post as helpful
  • send pies
    Number of slices to send:
    Optional 'thank-you' note:
  • Quote
  • Report post to moderator

Greg Amos wrote:Hi there, time to put some news of our project. Actually, I'd like to move this post from the "cob" to "project" forum, as we decided to change the building material a little bit, and build with strawbale. Also, I'd like to add the other stuff we are doing in the farm, that has nothing to do with cob. If someone knows how to do it, I'd be very thankful


I've made it show up in several forums, with 'projects' as the main one.  

Would you like the title to be changed a bit too?  Just tell me what you think would be best.  

Also, the photos in your last post aren't showing up. Might be that they're no longer there, or maybe the permissions are set wrong.  
 
Greg Amos
Posts: 53
Location: Colombia
16
2
trees solar woodworking
  • Mark post as helpful
  • send pies
    Number of slices to send:
    Optional 'thank-you' note:
  • Quote
  • Report post to moderator
Hi Burra, thanks a lot for your help!

I will attach the photos, it works better.

Yes, I'd be grateful if you could change the title a bit. Maybe something like: "Paramo Permacultura Colombia project for homesteading and education in the tropical highlands".

All the best


Greg Amos
Posts: 53
Location: Colombia
16
2
trees solar woodworking
  • Likes 3
  • Mark post as helpful
  • send pies
    Number of slices to send:
    Optional 'thank-you' note:
  • Quote
  • Report post to moderator
We've been busy the last 6 months, and now is time for a little update.

In August, we finished to build the roof of our cob straw house. We were quite happy, putting all the boards, and then covering them with a 40 mil HDPE membrane, and some gravel for the green roof.

As you may notice in the second picture, something very VERY important is missing... And a Permies contributor, Glenn Herbert, did mention it... Unfortunately, I did not pay enough attention to.... CROSS BRACING!!

Well, what had to happen... just happened. On August 16, the roof felt down... Fortunately, without damage for us (I was on the roof, my wife under it, she noticed someting was wrong and could escape just in time...).

After this unfortunately event, we decided to 1) bury the posts (not let them standing on stones like before) and 2) start building a thick cob wall.

We started the next phase of our cob straw cob house in September, and we are nearly done. We started mixing the cob by foot, but with only the 2 of us, it takes a lot of time, so we asked an excavator to come and help us, and it really helped (it mixed in 3 hours what we had mixed in 3 weeks...).

We are rebuilding the roof right now, and honestly, it feels much more secure than before.

We hope to finish the roof before Christmas, so we can move in for New Year (good thing we are in the Tropics: no dead season).

IMG_20170713_110953428.jpg
Situation in Mid July
Do-you-notice-No-cross-bracing....jpg
Do you notice? No cross bracing...
IMG_20170812_144631835.jpg
Putting the HDPE membrane
IMG_20170814_161544450_HDR.jpg
Starting to cover the roof with gravel
IMG_20170816_104951580_HDR.jpg
O_o.
O_o.
IMG_20170831_130755197.jpg
Posts buried deep down
IMG_20170919_132613211.jpg
Starting the cob wall
IMG_20171014_140321353_HDR.jpg
Mid October
Mid October
IMG_20171106_100238244.jpg
Early November
Early November
 
Greg Amos
Posts: 53
Location: Colombia
16
2
trees solar woodworking
  • Likes 2
  • Mark post as helpful
  • send pies
    Number of slices to send:
    Optional 'thank-you' note:
  • Quote
  • Report post to moderator
And two more pics
IMG_20171204_093224985.jpg
Front view early December
IMG_20171204_152539455.jpg
The rafters are coming back!!
 
Greg Amos
Posts: 53
Location: Colombia
16
2
trees solar woodworking
  • Likes 2
  • Mark post as helpful
  • send pies
    Number of slices to send:
    Optional 'thank-you' note:
  • Quote
  • Report post to moderator
By the way, here is the new blueprint.
blueprint.JPG
Blueprint
Blueprint
 
pollinator
Posts: 304
Location: La Mesa, Cundinamarca, Colombia
93
dog forest garden trees earthworks food preservation pig
  • Likes 2
  • Mark post as helpful
  • send pies
    Number of slices to send:
    Optional 'thank-you' note:
  • Quote
  • Report post to moderator
Hi Greg,

We're in Colombia too, about 2 hours from Bogota. Warmer climate than you have.

I looked at the pictures you posted, both the collapsed structure as well as the new one. If I understand it correctly you want to build an earthen roof, so that implies a layer of soil on top of this structure, of how much? 10 cm, 20 cm of soil?

To be brutally honest, these pictures send chills down my spine. Just layer of only 10 cm of soil weighs down heavily on that construction. Now imagine being hit by one of our tropical storms that can pour down as much as 100mm per hour when extreme and the load rises quickly.

Wood is a strong material when it comes down to forces trying to pull it, but way less to forces compressing it. I do not think your vertical support beams can handle an earthen roof. Nor can your horizontal beams. The only thing I think they can handle is a metal roof, which is quite light weight.

I would strongly suggest you have an engineer calculating the forces the roof will have to handle and come up with minimum thickness of the beams supporting the roof.

I hope this will make you pause for a minute and rethink your construction.
 
pollinator
Posts: 564
Location: Nomadic
50
  • Likes 2
  • Mark post as helpful
  • send pies
    Number of slices to send:
    Optional 'thank-you' note:
  • Quote
  • Report post to moderator
That looks great as long as no snow load up there in the clouds. Probably none in the tropics unless you are very high. You should be proud. Nothing like an earthen home. I stayed in one Costa Rica. I'm curious how many man hours go into a cob house? I've built a few ovens and decided they are great for big work parties to make it fun and speed it up. How much did the house cost may I ask? That pond liner is amazing stuff.  With my joints acting up I'd like to build one with payed local help. Thanks
 
Greg Amos
Posts: 53
Location: Colombia
16
2
trees solar woodworking
  • Mark post as helpful
  • send pies
    Number of slices to send:
    Optional 'thank-you' note:
  • Quote
  • Report post to moderator
Rene: Thanks for your honesty better safe than sorry. The structural engineer calculated a load of 130 kg/m2 for the roof, with the rafters size we are using, so you're absolutely right, we need to keep the soil layer as thin as possible. Metal roof could be an option, but I do not like them that much. I would prefer going with some 3-5 cm of soil, mixed with gravel. I calculated that a layer of 5 cm of wet soil weighs about 80 kg/m2, so I do hope we are safe with it.

Jeremy: in workdays, let's say about 60 to build the cob wall, 6 hours/day, 2 people. (and an excavator). What we spent so far. Stones and gravel for foundation: 200$, wood boards for frames and roof 400$, excavator for cob mixing and leveling 500 $, HDPE 400$ so in total around 1500 US$ so far.
 
Greg Amos
Posts: 53
Location: Colombia
16
2
trees solar woodworking
  • Likes 6
  • Mark post as helpful
  • send pies
    Number of slices to send:
    Optional 'thank-you' note:
  • Quote
  • Report post to moderator
We are now ready to move in our new cob house!

We put the HDPE membrane on the roof just before Christmas, and after some heavy rainfalls, there are no signs of leakage.

Even though we designed 4 skylights, in case it was going to be too dark inside, now that the membrane is installed, a lot of light enters through the windows, to we will leave the skylights close. It will be easy to cut the opening in the future, sould we require it.

The next steps are: building inner walls, putting grey water pipes, floors, plasters, building a ferrocement rainwater tank,...

A lot of interesting work for 2018!

IMG_20171223_101559465.jpg
Roof finished! with the 4 skylights
IMG_20171225_134952731.jpg
HDPE on
HDPE on
IMG_20180105_133603627_HDR.jpg
View from inside
View from inside
IMG_20180105_133632039.jpg
View from the front
View from the front
 
steward
Posts: 21459
Location: Pacific Northwest
11930
11
hugelkultur kids cat duck forest garden foraging fiber arts sheep wood heat homestead
  • Mark post as helpful
  • send pies
    Number of slices to send:
    Optional 'thank-you' note:
  • Quote
  • Report post to moderator
Wow! Your home looks amazing. Thank you so much for sharing pictures of it, and it's progress!
 
Greg Amos
Posts: 53
Location: Colombia
16
2
trees solar woodworking
  • Likes 6
  • Mark post as helpful
  • send pies
    Number of slices to send:
    Optional 'thank-you' note:
  • Quote
  • Report post to moderator
Hi Nicole, glad you like it.

Some more pictures, as we are now working inside.
IMG_20180201_164624463.jpg
Evening light
Evening light
IMG_20180211_110025207_HDR.jpg
starting with inner cob walls
IMG_20180308_124408184.jpg
entrance door, we improved the look with pine boards
IMG_20180412_091104598_HDR.jpg
Applying the plaster, a mix of cow manure, clay and flour
IMG_20180416_083423449_HDR.jpg
Inner walls slowly growing
IMG_20180422_085430752.jpg
First floor layer, sifted soil with cow manure
 
gardener
Posts: 6814
Location: Arkansas - Zone 7B/8A stoney, sandy loam soil pH 6.5
1640
hugelkultur dog forest garden duck fish fungi hunting books chicken writing homestead
  • Mark post as helpful
  • send pies
    Number of slices to send:
    Optional 'thank-you' note:
  • Quote
  • Report post to moderator
Wow, simply wonderful thread Greg, the photos show the progression and the pit fall is a great heads up for all thinking or planning to build with cob.
I am in awe of the amount of work you two have done and are doing.

Redhawk
 
Greg Amos
Posts: 53
Location: Colombia
16
2
trees solar woodworking
  • Mark post as helpful
  • send pies
    Number of slices to send:
    Optional 'thank-you' note:
  • Quote
  • Report post to moderator
Hi RedHawk,

thanks for your appreciation  To be honest, from time to time we are in awe too. Now that we are building the inner walls, which are thinner and lower than the exterior walls, we keep thinking: "how were we able to build those huge exterior walls, only the two of us???" It must be the magic of cob. And the luxury to have the time to do it.

 
Greg Amos
Posts: 53
Location: Colombia
16
2
trees solar woodworking
  • Likes 2
  • Mark post as helpful
  • send pies
    Number of slices to send:
    Optional 'thank-you' note:
  • Quote
  • Report post to moderator
More than a year has passed since the last post, time to put some updates! We have been quite busy, with travels, design consultancies and permaculture workshops, but the work on the house is going well.

In July 2018 we more or less finished the interior walls. Then of course because the shrank, we had to refill the top part between roof and wall 2-3 times, quite an exhausting job, given that you have to work around rafters and beam. If we had to do it again, we would definitly build all the walls (interior and exterior) at the same time, to ensure better cohesion, and faster drying.

In March 2019 we covered the roof. In order to keep it as light as possible, we put sod (actually more grass than soil) directly on the HDPE membrane in some places, and gravel in others, so we could create a kind of drainage. It has rained a lot since, with hail and everything, and nothing happened: no collapse, no rain inside, so I assume it's safe to say the roof is sound

We also finished the floor. First we put the basic layers: gravel, vapor barrier and cob. It was not so great to put cob, as it shrank and cracked and was quite uneven... the best we could do was filling the largest cracks, and then we put the final (for now) layer: a lime mortar made with 1 part hydrated lime and 3 parts sand. We bought the lime in a local producer, and the quality was quite different between bags. Some produced a very nice and smoot layer that did not crack, while another batch would crack a lot and even had some kind of bubbles popping up. Now the floor is quite ok, strengthening by the day, but we will probably cover it with a water-based epoxy paint or resin for durability and easy cleaning.

We installed the electric system, which consists of a 100W solar panel, a charge controller, a 65 Ah 12 V battery and a 600W inverter. It works like a charm, we have no problems working all day on the computer, plus watching 3 hours of shows in the evening. LED lights, computer and phone charging are our only requirements for the moment, but we may have a small fridge or coolbox in the future, as well as a water pump and maybe a small washing machine.

We finished covering the outer part of the exterior walls with what we call "sticky plaster": 1 part sieved soil and 1 part cow manure. It provides a protective layer, which is also somewhat waterproof.

The interior walls were also covered with the sticky plaster, and then, because it is very work intensive to apply a clay plaster, as we previously did with the interior part of the exterior walls, we decided to paint them with limewash. We bought a better quality lime, called "type N" and put 2 coats on all walls. It looks great. The transition between the cream colored clay and the white limewash is also nice.

Finally we brought some furniture: gas stove, kitchen, table and chairs, as well as a bed.

We also advanced with the garden.

Next steps: finish the shower, which currently has a lime plaster. We will either put an epoxy on it, or a sealant they use for concrete water tanks. Then finish the water tank, and install the water system. Hopefully by the end of January we will have everyting done (even if the tank might not be full, as the dry season will start soon).

IMG_20180706_121645627.jpg
Finishing the interior walls
IMG_20190306_142108237.jpg
Roof 1
Roof 1
IMG_20190306_152541152.jpg
Roof 2
Roof 2
IMG_20190309_141940715.jpg
Roof 3
Roof 3
IMG_20190327_120123047.jpg
Floor 1
Floor 1
IMG_20190731_115137877.jpg
Floor 2
Floor 2
IMG_20190801_110018138.jpg
Floor 3
Floor 3
IMG_20190804_144839728.jpg
Floor 4
Floor 4
IMG_20190810_161803357.jpg
Floor 5
Floor 5
IMG_20190422_151623619.jpg
Fiat lux
Fiat lux
IMG_20190713_100116479.jpg
Sticky plaster outer 1
IMG_20190713_104125687.jpg
Sticky plaster outer 2
IMG_20190829_165122272.jpg
interior walls 1
interior walls 1
IMG_20190904_123346806.jpg
interior walls 2
interior walls 2
IMG_20190928_113122655.jpg
interior walls 3
interior walls 3
IMG_20190511_121108618.jpg
Permaculture workshop
IMG_20190917_160156353.jpg
University students visiting
IMG_20191014_141117634.jpg
Garden
Garden
IMG_20191019_152346300.jpg
Bed.
Bed.
 
Posts: 336
Location: North Coast Dominican Republic
19
forest garden trees tiny house
  • Likes 2
  • Mark post as helpful
  • send pies
    Number of slices to send:
    Optional 'thank-you' note:
  • Quote
  • Report post to moderator
Your blueprint has inspired me! Building a more oval shape instead of right angles does seem more in keeping with a life in nature, doesn't it? I may adapt this idea...
 
Normally trees don't drive trucks. Does this tiny ad have a license?
rocket mass heater risers: materials and design eBook
https://permies.com/w/risers-ebook
reply
    Bookmark Topic Watch Topic
  • New Topic