• Post Reply Bookmark Topic Watch Topic
  • New Topic
permaculture forums growies critters building homesteading energy monies kitchen purity ungarbage community wilderness fiber arts art permaculture artisans regional education skip experiences global resources cider press projects digital market permies.com pie forums private forums all forums
this forum made possible by our volunteer staff, including ...
master stewards:
  • Nancy Reading
  • Carla Burke
  • r ranson
  • John F Dean
  • paul wheaton
  • Pearl Sutton
stewards:
  • Jay Angler
  • Liv Smith
  • Leigh Tate
master gardeners:
  • Christopher Weeks
  • Timothy Norton
gardeners:
  • thomas rubino
  • Jeremy VanGelder
  • Maieshe Ljin

Final Questions before I start my build!

 
Posts: 47
Location: County Kerry, Ireland
12
2
  • Mark post as helpful
  • send pies
    Number of slices to send:
    Optional 'thank-you' note:
  • Quote
  • Report post to moderator
Hello all. I've read watched and listened to all I can find and planned the build, prepared the site and sourced all my materials. I am however left with a few questions where I've not been able to find answers clear enough for me to understand!

Heat riser construction.
**************************
I have a lot of fire brick, the kind that absorbs and holds a lot of heat, meaning it would take quite a while to reach a heat to get a complete burn. For the two skins of the heat riser (with a thick loose vermiculite centre), I had planned one skin to be made of fire brick set in cob, and the other a cob flue, made using a wire mesh within it to solely hold its shape whilst drying. My question is which material should go in the very hot inner skin, with the other on the outer closer to the edge of the barrel?


Using the lid of the barrel
***************************
My barrel has a lid with metal clasp, but the rubber seal that made it air tight burned with the original paint using Ernie's clever clay paper mache solution.

Can I use this lid as the top of my barrel to provide a handy way to clean it out, possibly using fire rope to create a good seal? Part of me worries about air managing to leak out of it and wondered what other people's exeriences have been?


Cob bench on damp wall
***************************
My cottage in Ireland has 4ft thick stone walls, possibly an extra heat storage. However the walls are somewhat damp and whilst optimistically I might hope the heat and breathable earthen plasters would actually help alleviate that, I do realise that cob and water tends towards mud!

Knowing that wood construction is far more common in America, I still hoped others may have some experience of this and whether I may need to add a damp proof membrane and then some insulation to protect the membrane?

Best cowl?
************
I've read of people using three equal t's joined together to make a H chimney, which I've heard is a very good all round cowl to protect against down drafts. Does that seem like a good plan or have other people found better solutions?

My apologies for the length, I just want to make sure I end up making a rmh with the smallest number of errors possible and the very least avoid any tier one mistakes!
 
Posts: 455
Location: climate zone 6b
3
  • Mark post as helpful
  • send pies
    Number of slices to send:
    Optional 'thank-you' note:
  • Quote
  • Report post to moderator
how many bricks do you have? do you have full size bricks? if you do have you thought about splitting the bricks to make more room for insulation. if you split the bricks then you will have more bricks to do other systems, repair any broken ones in the future and so on.

im not sure if you have seen my heat riser but i a bit of a unique way of building it. i would describe it here but its to long. just check out my thread if you are interested.

i have a barrel with a lid also. i do not use the rubber or the collar and i burn it with no leaks. im not saying yours wont leak but mine does not. my lid just snapped down snug and shown in a video on my thread.

the damp wall thing. i would not place your mass in contact with the damp wall. it will suck your heat dry and leave non for you while possibly causing condensation in your exhaust pipes. i would insulate it with just standard insulation, maybe some hay if you dont have store bought insulation and or a couple inches of air space.

i have noticed that the H chimney slows down draft slightly and to keep the down draft just have a higher chimney than the top of your roof. i have learned through experience that insulating the chimney is very important. i insulated my chimney by wrapping my naked chimney with a thin layer of insulation and then slipping the next size duct over to of it and it works extremely well and cheap.

 
Posts: 617
Location: ontario, canada
15
transportation fungi tiny house
  • Mark post as helpful
  • send pies
    Number of slices to send:
    Optional 'thank-you' note:
  • Quote
  • Report post to moderator
If I were you, I would use the brick to make the riser, then cob seal the outside of that, which is closest to the barrel. I'm sure the barrel lid will accomodate a stove gasket for ya.
 
pollinator
Posts: 4154
Location: Northern New York Zone4-5 the OUTER 'RONDACs percip 36''
67
hugelkultur fungi books wofati solar woodworking
  • Mark post as helpful
  • send pies
    Number of slices to send:
    Optional 'thank-you' note:
  • Quote
  • Report post to moderator
John Derry : Congratulations on your decision to build a Rocket Mass Heater RMH, enjoy the adventure! Not only will a well made RMH pump moisture out of your house,

while retaining your heat in its thermal mass all of moisture is retained in the cob when the moisture is high and gives it back to the houses air when the moisture is low .

For that reason I would not let the Thermal mass or any part of your rocket touch an inside wall.


In fact carefully built air channels can help create air currents to further reduce the ambient air. I am sharing a link to a series of short videos of a recent (?5 years old?)

Upscale build by Ernie and Erica Wisner . In this specific case due to the RMH being made on top of existing wood floors additional air channels were created for additional

air movement, review the videos and I am sure you can see how they can help your circumstance . /////// See link below :


https://www.youtube.com/watch?v=30rPCRB5e-s&list=PL0bZy202ImXP7NpLUJMtKJOjpjPPv59b-

Fire brick comes in extremely hard and soft bricks the soft bricks come in 1/2 thickness ones called splits, you can shape them yourself ! The hard ones need special tools.

Cob by itself is not very insulating, if the Temperature on both the inside of the heat riser and its outside equalize you can create a stall. Your best two choices are to 1) use

a bat of rock wool insulation wrapped around the out side of the heat riser and held with a wire mesh, or 2) create a second layer of insulation around your bricks with a

mix of ether Vermiculite or Perlite and Clay Slip. Generally an outside piece of stove pipe is used to hold the combined materials together until dry and the outer stove pipe

is left there forever. so best bricks very smooth walls to the inside, and additional insulation on the outside .


There is a common rope gasket that has several strands inside when these strands are pulled out you are left with a wide flat gasket material reminiscent of a Flat shoe-

-string only bigger and wider- often no gasket is needed .

Bess my, I haven't herd the word cowl used for anything in years, Engine Cowl is old fashioned and went out with Jeeves and Wooster, only a monks hood gets called a Cowl

on this side of the Atlantic !

Go for height, best is (usually ) on the lee or downwind side of the house and at least 1 meter above the peak of your roof.

I hope this was timely and useful, for the good of the crafts ! Big AL


gardener
Posts: 3471
Location: Southern alps, on the French side of the french /italian border 5000ft elevation
194
  • Mark post as helpful
  • send pies
    Number of slices to send:
    Optional 'thank-you' note:
  • Quote
  • Report post to moderator
Hi John Derry .

Well if you already have the bricks, it would be a shame not to use theses. Depending on which type of rocket, J tube or batch. You do your heat riser differently.

For a J tube, you can do a square heat riser. Lay your bricks on edge, instead of flat. For a lesser mass. When you're building it, it's a good time to implement kicktail and backsweep if you wish.

For a batch, you will need an octogonal heat riser. Which is more complicated, since it involves cutting firebricks. Again, you lay the bricks on their ends, for less mass. And hold theses with mud(or fireclay) and a bit of wire.

Surround all that by a piece of sheet metal, with enough of a gap to accomodate your insulation.


For your lid, either a braided gasket, there's flat ones, of about 3/32" 2.5mm which could do the job. You can also use mud and rockwool fiber.


If you build your bench against an external wall, insulate by all means. Bottom and side against the wall. Clay balls or perlite do all right. Covered by salvaged pavers for example. Sheetrock/plasterboard is good too, to avoid the spot sagging. If against an internal wall, may be just insulate bellow, so you can use the stone wall as mass. Which will also dry it. IIn this case, you lay the pipe closer to the wall and as high as practical, to increase the distance it has to travel to the foundations. Mind you, you will lose heat downwards. But it can be a space saver. Having less bench to build. A doorway can also be used as a bell.


Best type of cowl, usualy a weathercock type.

 
John Derry
Posts: 47
Location: County Kerry, Ireland
12
2
  • Mark post as helpful
  • send pies
    Number of slices to send:
    Optional 'thank-you' note:
  • Quote
  • Report post to moderator
Thank you all for such quick and helpful replies.

F Styles:
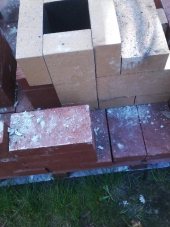
I have 150 bricks, of unusual dimensions – about 7 inch square and 2 inches thick, and had thought the thinner dimensions would leave more space for insulation.

The consensus on here agrees with my leaning to insulate the rmh from my external wall, so I will. Thank you.

I am surprised (but have no experience to back that up) that the H shape cowl would slow down the draft. If anything I could imagine the opposite. Have you used a simpler witches hat?


John McDoodle:
Thank you. I am glad to be able to use the lid as a cleanout for the barrel quite safely.


Allen Lumley:
Thank you for the youtube link. I can't believe I haven't found that myself. After sifting through hours of videos showing scary flaming barrels of death that people have labelled a rocket stove – all with hundreds of thousands of views, I am surprised such an incredibly good sequence isn't more visible!

I know you have voiced concerns of using 'fake firebrick' as they absorb so much heat at the start of a burn. I am fairly certain mine are this sort, hence wondering if I should place them as the outer layer and the clay flue in the centre with a thick insulation middle layer as the cob would absorb less of the heat?

The word cowl is common here for chimneys tops The chimney will go a good metre taller than the apex of my roof, but would you advocate the traditional witches hat, a h cowl (what should I call it here!?), or one of those spinning domes?


More last questions (sorry, I don't know if I'm over-thinking this, I just don't want to mess it up!)

I have a lot of rockwool gifted to me by a neighbour. Stiff thick boards, which I'm sure I can reform into a circle. I just want to place part of it in a fire to make sure that I'm not mistaken and find it is actually glass wool with the associated much lower melting point – unless somebody knows a less crude way to find out!

On a 6 inch system, may I ask what the maximum horizontal run is, and the impact of this with each 90 degree bend? - Due to the shape of the existing chimney I have to chose between making accessible cleanouts and letting the exit flue get reheated by passing the barrel on the way out, or save adding two 90 degree bends on the run.

Thank you all ever so much
 
Rocket Scientist
Posts: 4526
Location: Upstate NY, zone 5
574
5
  • Mark post as helpful
  • send pies
    Number of slices to send:
    Optional 'thank-you' note:
  • Quote
  • Report post to moderator
The common advice from experts is that a 6" RMH can handle about 35' of duct, minus 5' for every 90 degree elbow. A really good chimney can maybe increase this a bit.

Hard firebrick will absorb more heat at the start of a burn, but they are reported to work well, and are the most durable liner available.

 
John Derry
Posts: 47
Location: County Kerry, Ireland
12
2
  • Mark post as helpful
  • send pies
    Number of slices to send:
    Optional 'thank-you' note:
  • Quote
  • Report post to moderator

Glenn Herbert wrote:The common advice from experts is that a 6" RMH can handle about 35' of duct, minus 5' for every 90 degree elbow. A really good chimney can maybe increase this a bit.


Ah. I'd been working my plans on a lot of the information in the annex 6 inch plans by Ernie and Erica - which had 25ft horizontal ducting and 7 x 90 degree turns (though looking at the diagram wonder if that is counting the two 90 degrees in the j tube?

I may have to go for a short straight bench rather than the l shape that would much better suit the space?

Many thanks
 
gardener
Posts: 3489
Location: Fraser River Headwaters, Zone3, Lat: 53N, Altitude 2750', Boreal/Temperate Rainforest-transition
689
hugelkultur forest garden fungi trees books food preservation bike solar woodworking
  • Mark post as helpful
  • send pies
    Number of slices to send:
    Optional 'thank-you' note:
  • Quote
  • Report post to moderator
Hi Glenn Herbert:

I quote you:

The common advice from experts is that a 6" RMH can handle about 35' of duct, minus 5' for every 90 degree elbow. A really good chimney can maybe increase this a bit.


I just wanted to clarify: Is the 'ducting' in question in this advice indeed just for the horizontal ducting-post heat riser/barrel zone, and pre vertical chimney?
 
F Styles
Posts: 455
Location: climate zone 6b
3
  • Mark post as helpful
  • send pies
    Number of slices to send:
    Optional 'thank-you' note:
  • Quote
  • Report post to moderator
i have about 20' + of horizonal duct 3' or so internal RMH inner core and now 15' of insulated vertical running above my roof on the south side of my house and i have a standard cowl. im either old or outdated because i call them cowls. i think any time the exhaust has to make a bend like in an H or spiral it seems to slow it down... just from my experience over the years with standard firestove i burnt wood since i was a little boy splitting wood and running a chainsaw since i was 7. i prefer the hex riser over the square and feel there is more vortex without the corners... just from my research only. there is "fake fire brick" and wish you had a pick of what you got to tell. the non insulative real firebrick is better in my mind because it is more rugged and im hard on things and hate tiptoeing around stuff. i like to jam wood in and smash stuff down so i go with that. now my heat riser has 16'' of duct work around it with LOSE perlite to make up for the lack of insluative properties of my hard firebrick and it works amazing. i chose to put a TEE at every bend so i can clean my system real good if i need to... i dont like the idea of having areas of exhaust i cant see and just never be able to get to it stuck under my bench.
 
Glenn Herbert
Rocket Scientist
Posts: 4526
Location: Upstate NY, zone 5
574
5
  • Mark post as helpful
  • send pies
    Number of slices to send:
    Optional 'thank-you' note:
  • Quote
  • Report post to moderator
Correct. I believe the Annex plan would have four elbows by that reckoning. You start counting after the manifold where the duct leaves the barrel area, and stop before the last elbow that turns up to the chimney.
 
Glenn Herbert
Rocket Scientist
Posts: 4526
Location: Upstate NY, zone 5
574
5
  • Mark post as helpful
  • send pies
    Number of slices to send:
    Optional 'thank-you' note:
  • Quote
  • Report post to moderator
John - If you are following the Annex plans, I wouldn't worry about it - as long as you have a good chimney at the end, you should get similar results to that design which has functioned well for a number of years now.
 
F Styles
Posts: 455
Location: climate zone 6b
3
  • Mark post as helpful
  • send pies
    Number of slices to send:
    Optional 'thank-you' note:
  • Quote
  • Report post to moderator
if i had the money i would have done ventilation duct work under all my bench mass for greater return on my heat investment from each burn instead of giving it back to my basement. oh well you can only do what you can do with what you have.
 
allen lumley
pollinator
Posts: 4154
Location: Northern New York Zone4-5 the OUTER 'RONDACs percip 36''
67
hugelkultur fungi books wofati solar woodworking
  • Mark post as helpful
  • send pies
    Number of slices to send:
    Optional 'thank-you' note:
  • Quote
  • Report post to moderator
The best 'Firebrick' is generally highly refractory, meaning that instead of absorbing Heat it radiates that heat back into the Combustion Core, The Hard Dense Firebrick

will absorb more of the initial heat when compared to the soft light brick . The time difference to when the Walls of Your Combustion Core glow Red showing a high

Refractory state is just a few minutes.

The hard brick is much harder to cut/shape than the Soft brick! ALSO When you use "Hard Fire Brick'' to make your Feed Tube, and Burn Tunnel, these places will last

months or years longer before needing repairs when compared to soft Firebrick or especially an insulated cob anywhere in the Combustion Core !


I have for my personal use several 6'' by 12'' by 2'' Firebrick that I will use as the floor of my entire Burn Tunnel, and perhaps the lower part of the Heat Riser in my

next Build / Re-build. This is mostly for durability. The rest of the Combustion core will probably be soft firebrick. Others may plan differently.


If we are talking about regular red Terra-cotta Flue Tile -Its use near the combustion core has resulted many rapid failures due to thermal shock, for this reason I have

never used any Terra-cotta Flue Tile. There have been some builds that successfully used them if they were sawed into 2 pieces lengthwise leaving two C shaped

pieces to be held back together usually with gasket material, I have never used Split Terra-catta Flue Tile


If you have enough Rockwool ether as bats or as boards to insulate the outside of your Fire BrickHeat riser and then use a wire mesh to hold them in place, I would

definitely go that route, great insulation and simple insulation !


If there is room for many opinions on general points of build, there is room for many more on what kind of cap to use on the top of your final vertical chimney, the

Witches Hat is capable of being D.I.Y.ed with rivets, and Ernie has been known to use an upside down lightweight galvanized bucket, The taller the Chimney the Better

it will work. Generally, the only elbows (and 'T's used for clean outs )you have to count are the horizontal ones. Can we see a sketch ? Good luck Big AL
 
And now for something completely different ... OUCH! STOP THAT! HOLD THIS TINY AD!
GAMCOD 2025: 200 square feet; Zero degrees F or colder; calories cheap and easy
https://permies.com/wiki/270034/GAMCOD-square-feet-degrees-colder
reply
    Bookmark Topic Watch Topic
  • New Topic