

|

|
|
|
|

|

|

|

|

|
 3
3


You should never forget that every creature has its purpose in the cycle of nature and can also be very important to humans. Sepp Holzer's Permaculture
2


Skill verified by gir bot")

Skill verified by Dave Burton")

Skill verified by Mike Haasl")

Skill verified by Leigh Tate")

Skill verified by Mike Barkley")
marcin dop wrote:Hi. I am unable to open the video after I payed it. I think I made some mistake. what should I do now?


10 humans raise one child https://www.kickstarter.com/projects/positiverealfutures/an-actually-fun-tv-show-about-a-future-with-real-hope

Skill verified by jordan barton")

Skill verified by Mike Barkley") 1
1
Joshua Myrvaagnes wrote:Any update on how it performed in the summertime/fall (maintaining cool) about 180 days after the interior low temperature of March 14?
10 humans raise one child https://www.kickstarter.com/projects/positiverealfutures/an-actually-fun-tv-show-about-a-future-with-real-hope
Joshua Myrvaagnes wrote:Thanks Paul.
Is it being used currently with anyone's greywater, or would it be the bootcamp's greywater that would supply it?
This might be a good inspiration for people to join the bootcamp.
There's also the question of what could be grown in this greenhouse now that it's here...even if that isn't its purpose, it can win over taste buds and stomachs to permaculture.
Rambutan, lychee, longin, soursop, mango, banana, orange, pineapple, avocado, coconut? tilapia, eels? do these need a really hot climate to thrive, or simply to be free of frost long enough to get big? Apparently the big fruit-growing region of Vietnam ranges from about 50-85 degrees if my memory serves, not in the high nineties and hundreds as I'd assumed.
5
1
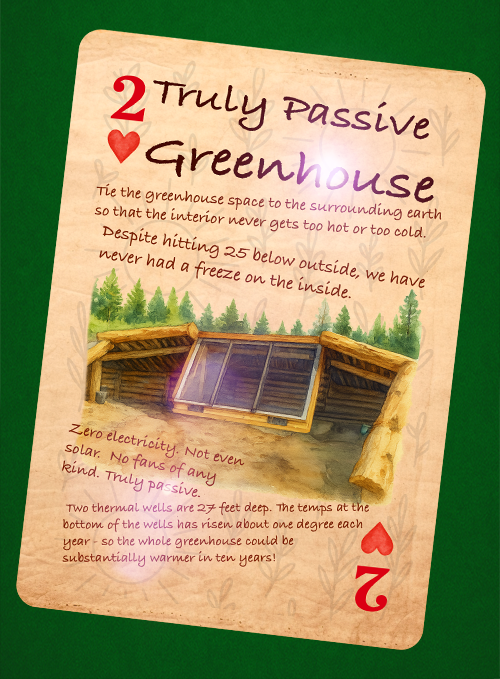
paul wheaton wrote:To me, this is pretty huge.
3
"Ah, but a man's reach should exceed his grasp,
Or what's a heaven for?"
Andrea del Sarto by Robert Browning
Arliss W.
Zone 3b, Palmer Alaska
2
2
Tim Blackk wrote:
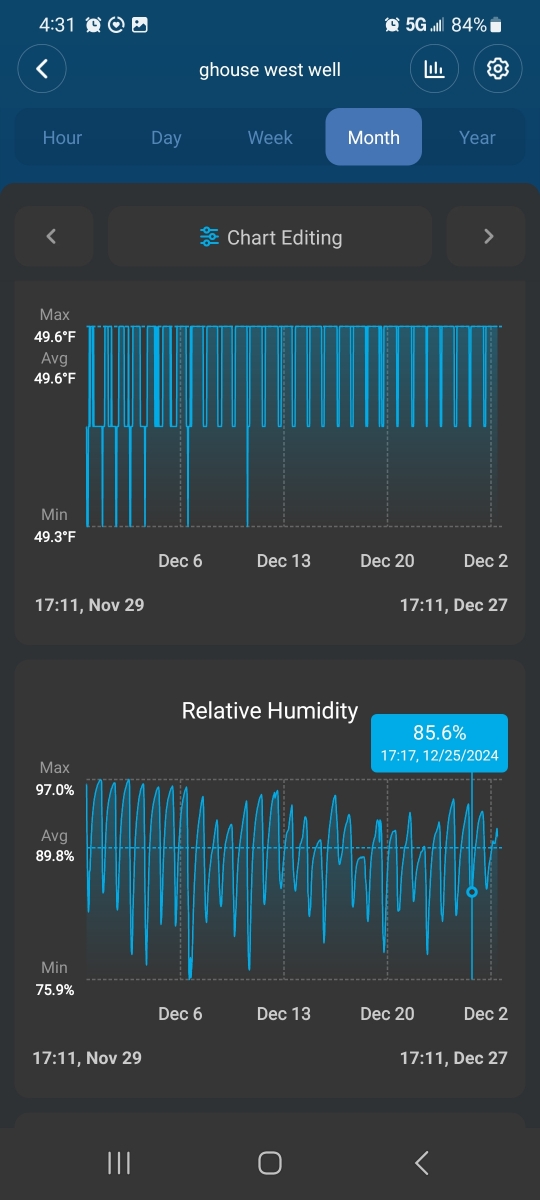
Not to ask too much, but I'd be interested in a graph tracking the daily well temperature, and average outdoor air temperature, over a 2 year period. That could answer many questions and objections...
The best gardening course: https://gardenmastercourse.com
Permies.com FAQ
"Ah, but a man's reach should exceed his grasp,
Or what's a heaven for?"
Andrea del Sarto by Robert Browning
Barney Berry wrote:what is the difference between the tiny download version and the HD download version of the truly passive greenhouse movie?
2
Vickey McDonald wrote:I know this is an old thread, but can anyone tell me if this would work in a zone 3b Alaska location? Our Winter lows get down to -25 to -30F. Summers can range from 50 to 90F. Though 70-75F is more common for high temps.
Vickey McDonald wrote:
paul wheaton wrote:
You coldest colds are about 5 degrees colder than our coldest colds. So I would say "yes"
When I read this to my husband he said that the problem is that we can reach those lows for weeks at a time, so it is unlikely to work here. Any suggestions?
2
 3
1
3
1


| I agree. Here's the link: http://stoves2.com |


