• Post Reply Bookmark Topic Watch Topic
  • New Topic
permaculture forums growies critters building homesteading energy monies kitchen purity ungarbage community wilderness fiber arts art permaculture artisans regional education skip experiences global resources cider press projects digital market permies.com pie forums private forums all forums
this forum made possible by our volunteer staff, including ...
master stewards:
  • Nancy Reading
  • Carla Burke
  • r ranson
  • John F Dean
  • paul wheaton
  • Pearl Sutton
stewards:
  • Jay Angler
  • Liv Smith
  • Leigh Tate
master gardeners:
  • Christopher Weeks
  • Timothy Norton
gardeners:
  • thomas rubino
  • Jeremy VanGelder
  • Maieshe Ljin

Using whole logs as trusses for green roof over 50’ oval earthbag home.

 
Posts: 13
5
  • Likes 2
  • Mark post as helpful
  • send pies
    Number of slices to send:
    Optional 'thank-you' note:
  • Quote
  • Report post to moderator
Hello all! We are building an earthbag house. We have a few questions as we have never built with earthbag before.

An outline:
 We live in SW Missouri USA. Our natural extreme weather is heavy Rain, Snow, high humidity, tornado winds. We want to build a 50’ oval earthbag house with an attached 16’ round master bedroom. We are planning on building onto the ouside of the earthbag house with milled lumber the kitchen, laundry and bathroom so that no water is coming into the earthbag portion of the house. We are going to build a cinderblock/cement root cellar entrance from inside the kitchen. We are also going to build 2 bedrooms inside the back of the house with milled lumber. We want to put large flat creek rock into the floor throughout the earthbag and bathroom portion of the house. We want to use the white pin oaks (debarked and left as whole as possible for its rustic look) that we are knocking down for the house site as trusses for an earth/green roof. We want the roof (on an oval) to be gradually higher walls towards the middle than at the ends. So kind of like stairs. My thinking is that this would help drainage from the green roof and shape it more like a mushroom cap which is secretly my plan for the rooftop.

We have a few questions about some confusing and conflicting information we keep searching.

1: Can we use whole (oak) logs for the roof trusses or is it going to gradually crush down the walls? They are not going to be flush but rather every few feet.
1.5: Also will we need rebar if we are using heavy logs or is that overkill?

2: Inside our bags... can we use plain rock 1/2” or gravel without anything else added? If so would that work under the pressure of the log and earth roof? If not, what should we use for bag fill under that much weight?

3: I hear of so many ways to cover a wall. Cement, cob, plaster, mud. But in a high humidity summer and a freezing cold winter, what walling is not going to mold or drip condensation as well as keep in heat and keep it cool when needed?

4: What are the layers, in order, for an earthfloor with large flat stone?  

5: What are the layers, in order, for a green roof?


A983067B-A8D9-4F9E-BBF1-6052FFFA60BF.jpeg
Outline of the house
 
pollinator
Posts: 1781
Location: Victoria BC
315
  • Likes 1
  • Mark post as helpful
  • send pies
    Number of slices to send:
    Optional 'thank-you' note:
  • Quote
  • Report post to moderator
Do you mean trusses, built up from multiple whole logs? Or rafters, using individual logs?
 
Posts: 19
Location: Sleetmute, Alaska
4
  • Likes 1
  • Mark post as helpful
  • send pies
    Number of slices to send:
    Optional 'thank-you' note:
  • Quote
  • Report post to moderator
I would think you could use oak logs for trusses just fine, but I would be concerned about your unsupported span.  I see the oval is 50’ but what is the distance at the middle of the short side of the oval.  Also, a true truss design is going to be a lot stronger than just throwing a log up on the roof and calling it a truss because of the way a truss works and how it transfers the load to the outside wall.  If you just throw a log up on the roof without support somewhere along the way, it will eventually sag in the middle, especially under the weight of a living roof.  If you put them up green, expect the sag to be more pronounced in the end.  Do you have one really big log that you could use for a center post?  Perhaps that still has a bit of the root bell and branches on it?  It would be pretty slick to plant that in the middle of the building and have it support the log trusses of the roof, with some of the branches reaching out and supporting the trusses.  

Are you planning insulation for your earthbag?  I hear people use vermiculite or perlite mixed in their earthbag, but I don’t know how much insulation that provides or how much compression it can withstand.  I’d maybe do gravel for a couple rounds near the bottom, then switch to more dirt and other stuff up above.  The gravel will be good for drainage, not so much for insulation.

For the earth floor, maybe foam insulation, vapor barrier, dirt or sand, rock tamped securely into place. Unless using open cell foam, then maybe vapor barrier, foam, vapor barrier? Dirt or sand, rock.  I wouldn’t normally put insulation tween 2 vapor barriers though.  I’m just thinking out loud here.

I think the order for a green roof is: plastic, plastic, plastic. Maybe more plastic.  Then gravel, with the gravel layer a little thicker at the eaves, then dirt, then grass, shrubbery, berry bushes, some roses a little spot for raised bed garden, etc...  any exposed plastic will deteriorate, so put on some sort of flashing along your eaves to cover it.

Or where I’m at, plastic, then the moss that was excavated from the building site. Done.  My kids want a hobbit hole playhouse so I’m planning a 12’ diameter timberframe/ log/ earthbag combo that will have a living roof. I’ve been wanting to use a pond liner for a green roof but I haven’t done my research on that yet.  I think it’d be better than a layer of 6 mil poly any day of the week.  For expensive you could cover the roof with Bituthene, it’s usually got like a 60 mil sheet of HDPE adhered to a tar like medium.  It’s self sealing, so you can theoretically drive a nail in it and it’s not going to leak.

Sorry, no help on how to cover earthbag.  Mines getting an earth berm outside and 4x6 milled log inside.  But the floor will be exactly as described above with the exception of I’m using end grain birch blocks for flooring.
 
Maria Arboleda
Posts: 13
5
  • Mark post as helpful
  • send pies
    Number of slices to send:
    Optional 'thank-you' note:
  • Quote
  • Report post to moderator

D Nikolls wrote:Do you mean trusses, built up from multiple whole logs? Or rafters, using individual logs?


Sorry! Yes I meant rafters not trusses.
 
steward
Posts: 15511
Location: Northern WI (zone 4)
4847
7
hunting trees books food preservation solar woodworking
  • Mark post as helpful
  • send pies
    Number of slices to send:
    Optional 'thank-you' note:
  • Quote
  • Report post to moderator
So you're planning on the rafters spanning across the whole oval?  If so are they're going across the narrow way or the long way?

Could you make the bedroom hall wall into a load bearing wall to help hold them up in the middle?  I'd be tempted to put a huge 50' log (or two 25' ones) running the long way of the oval resting on the hallway wall in the center.  Let's call it a beam.  Then, run the rafters the other way (the short direction) from the sides of the oval onto that main central support beam.
 
Maria Arboleda
Posts: 13
5
  • Mark post as helpful
  • send pies
    Number of slices to send:
    Optional 'thank-you' note:
  • Quote
  • Report post to moderator
I still want to use the logs for the rafters but how do I support them so they don’t cave in?

So far the plan for the house size is 50’ x25’  and the master bed (16’ round) is going to be done the same way.

It’s very important that we are able “ground” when in our house. So I would like to use natural materials for the floor. I watched a video on building earth floors (that I now can’t find again) and a lady used rock, sand, straw, sand, clay then oil and beeswax. Is that feasible for a humid and rainy environment?
 
Maria Arboleda
Posts: 13
5
  • Mark post as helpful
  • send pies
    Number of slices to send:
    Optional 'thank-you' note:
  • Quote
  • Report post to moderator

Mike Haasl wrote:So you're planning on the rafters spanning across the whole oval?  If so are they're going across the narrow way or the long way?

Could you make the bedroom hall wall into a load bearing wall to help hold them up in the middle?  I'd be tempted to put a huge 50' log (or two 25' ones) running the long way of the oval resting on the hallway wall in the center.  Let's call it a beam.  Then, run the rafters the other way (the short direction) from the sides of the oval onto that main central support beam.


The logs are going to be going the short way.
 
Mike Haasl
steward
Posts: 15511
Location: Northern WI (zone 4)
4847
7
hunting trees books food preservation solar woodworking
  • Mark post as helpful
  • send pies
    Number of slices to send:
    Optional 'thank-you' note:
  • Quote
  • Report post to moderator
Can you put a beefy log the long way and support it in the middle with a post (built into the bedroom hall)?  Then rest the rafters on it so that they only span halfway across the building?
 
pollinator
Posts: 574
Location: OK High Plains Prairie, 23" rain avg
93
cattle forest garden trees tiny house composting toilet building homestead
  • Likes 1
  • Mark post as helpful
  • send pies
    Number of slices to send:
    Optional 'thank-you' note:
  • Quote
  • Report post to moderator
Sorry to be a buzz kill, but if you want this building to withstand high winds and tornados you need an engineer to do the calculations for roof span, wall height and thickness, and tiring it all together.
 
D Nikolls
pollinator
Posts: 1781
Location: Victoria BC
315
  • Likes 4
  • Mark post as helpful
  • send pies
    Number of slices to send:
    Optional 'thank-you' note:
  • Quote
  • Report post to moderator
I neglected to welcome you to permies, so, welcome! Heck of a first post.


Denise's advice is the best available option if you can possibly afford it. I do not wish to be rude, but if you do not yet know the correct terms for the key parts of the structure, learning enough to do this is a big project in and of itself!


I have fairly high risk tolerance, and a *very* basic understanding of the relevant math. I have DIYed this stuff FOR SMALL FARM STRUCTURES. If I lived where there would be no inspection or permits, I'd do it on a house, but pay someone experienced to double check my work.


If you really want to take the VERY LARGE RISK of designing it yourself without the appropriate qualifications, here is some inadequate information that might be slightly less bad than none at all. IE, it will probably still kill you.


Google image search is your friend for getting familiar with basic terminology.

Rafters need either a ridgebeam, supported by posts, or rafter ties. Without these, the walls spread apart and everything goes to hell.


Using a rafter span calculator will help you get familiar with rough requirements for rafter strength. You will need to figure out roughly what your roof will weight, and if snow load is a thing. This doesn't do a thing for wind/weather resistance; that will be about ROBUST attachments at every possible point.


It is critical to understand that, roughly speaking, strength of a timber is directly proportional to width, but proportional to the square of height. Meanwhile, the required strength of a given span is proportional to the CUBE of the length of the span.

In other words, a beam or rafter 4" wide and 16" tall, all else being equal, is as strong as one that is 10" wide and 10" tall.


I would suggest Rob Roy's Timber Framing for the Rest of Us as an introduction to the concepts of DIY structural engineering. If you read it and don't grok the math, find someone that does to help!


I don't know much about earthbag as it would relate to the structural aspects, I am going to leave that part pretty well alone.


A green roof can be pretty complicated. The most basic possible would be waterproof layer, some sort of plant-holding/drainage layer, and plants.  My parents old tar and gravel roof became green of its own accord; the moss and sedums surely helped extend the life of that roof to about triple what it was 'supposed' to provide..

Most modern engineered green roof setups are substantially more complicated, and I hope someone with more experience will chime in here.


If you are trying to anchor your house against strong winds, what is holding you down, at the foundation level?
 
Rocket Scientist
Posts: 1809
Location: Kaslo, BC
525
building solar woodworking rocket stoves wood heat greening the desert
  • Likes 2
  • Mark post as helpful
  • send pies
    Number of slices to send:
    Optional 'thank-you' note:
  • Quote
  • Report post to moderator
Always liked the look of the reciprocal roof for a round or oval building. Not sure how well they stand up to tornado winds though.


source

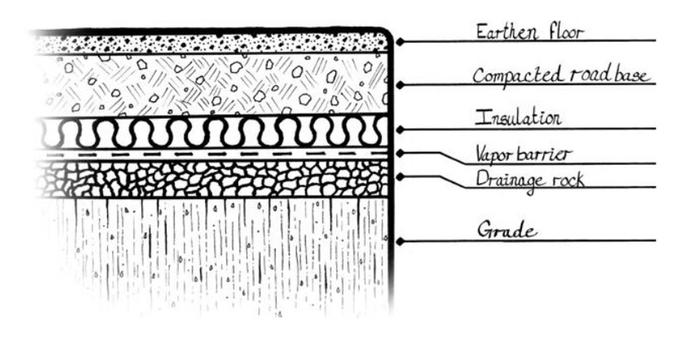
Earthen floor layers. Picture from the book Earthen floors by Sukita Crimmel and James Thompson
I would imagine if you substituted the final earthen floor layer for the stone/grout, you'd be all set.


Green roof layers: They can vary according to climate but is a general outline:


source

 
D Nikolls
pollinator
Posts: 1781
Location: Victoria BC
315
  • Likes 2
  • Mark post as helpful
  • send pies
    Number of slices to send:
    Optional 'thank-you' note:
  • Quote
  • Report post to moderator

Gerry Parent wrote:Always liked the look of the reciprocal roof for a round or oval building. Not sure how well they stand up to tornado winds though.


source

Earthen floor layers. Picture from the book Earthen floors by Sukita Crimmel and James Thompson
I would imagine if you substituted the final earthen floor layer for the stone/grout, you'd be all set.


Green roof layers: They can vary according to climate but is a general outline:


source


I also love the look of the recips, but can't envision them handling uplift terribly well; anyone have data?

I also have heard several times that they are complex in practice and best avoided by novices...

But glorious to look at!
 
Maria Arboleda
Posts: 13
5
  • Likes 2
  • Mark post as helpful
  • send pies
    Number of slices to send:
    Optional 'thank-you' note:
  • Quote
  • Report post to moderator
Good news everyone! The bulldozer showed up  up and cleared off our house site today. YAY!

I have taken the advice of all of you (thank you very much)
A few things are different now.
It’s going to be a 50’ circle and we are going to  do a reciprocal roof and an earth roof on top.

Does anyone have the answer of how to add a skylight to the top/center of a reciprocal roof with frame. And What’s the word on leaking skylight on a reciprocal roof?
 
Gerry Parent
Rocket Scientist
Posts: 1809
Location: Kaslo, BC
525
building solar woodworking rocket stoves wood heat greening the desert
  • Likes 2
  • Mark post as helpful
  • send pies
    Number of slices to send:
    Optional 'thank-you' note:
  • Quote
  • Report post to moderator
Hi Maria.   Great that your getting started!

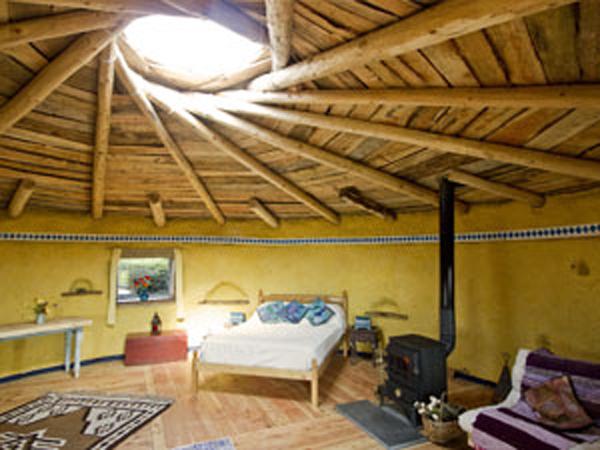
One way to add a skylight would be to construct a cupola:


source
 
Where does a nanny get ground to air missles? Protect this tiny ad:
Heat your home with the twigs that naturally fall of the trees in your yard
http://woodheat.net
reply
    Bookmark Topic Watch Topic
  • New Topic