• Post Reply Bookmark Topic Watch Topic
  • New Topic
permaculture forums growies critters building homesteading energy monies kitchen purity ungarbage community wilderness fiber arts art permaculture artisans regional education skip experiences global resources cider press projects digital market permies.com pie forums private forums all forums
this forum made possible by our volunteer staff, including ...
master stewards:
  • Nancy Reading
  • Carla Burke
  • r ranson
  • John F Dean
  • paul wheaton
  • Pearl Sutton
stewards:
  • Jay Angler
  • Liv Smith
  • Leigh Tate
master gardeners:
  • Christopher Weeks
  • Timothy Norton
gardeners:
  • thomas rubino
  • Jeremy VanGelder
  • Maieshe Ljin

RMH Chimney Planning

 
pollinator
Posts: 554
Location: Northwest Missouri
214
forest garden fungi gear trees plumbing chicken cooking ungarbage
  • Likes 2
  • Mark post as helpful
  • send pies
    Number of slices to send:
    Optional 'thank-you' note:
  • Quote
  • Report post to moderator
I’m in early planning for a RMH inside my house. Location planning first, based on chimney possibilities.

Going through the outside wall is no good, too many angles with the eve to go around. Straight up through the ceiling and roof is not great either with my attic full of asbestos.

There is an existing brick chimney through the center of the house. It is unused, just a remnant from an old basement fuel oil heater. It does not penetrate the roof anymore, but that’s not a big deal, I can punch through the metal roof easy enough.
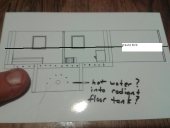
To use this chimney and avoid penetrating the asbestos covered ceiling, I’d have to bust into the chimney horizontally on the main floor and there would be two 90 degree bends. One to get into the chimney and another to turn upwards again.  

Is two 90 degree bends still too many to get a good draw? I’ll be using a 6" DRS2 or DSR3 core in an appropriate sized brick bell, with a bypass.  
Chimney.jpg
[Thumbnail for Chimney.jpg]
 
gardener
Posts: 5169
Location: Cincinnati, Ohio,Price Hill 45205
1010
forest garden trees urban
  • Likes 3
  • Mark post as helpful
  • send pies
    Number of slices to send:
    Optional 'thank-you' note:
  • Quote
  • Report post to moderator
In your drawing, the brick chimney is just being used as a chase for your 6" flue.
You could pack the space around the flue with insulation, like rockwool, to insure better Draft.

On the other hand,do you really need the second 90° bend at all?
It seems I you could skip it and use the existing brick chimney.
It's bigger than system size, but I think it would act as second bell, with a bypass that was always in effect.

You could even bring the roof penetrating system sized flue strait down the center of the brick chimney to level with the first floor, purposefully making it into a bell.

 
Matt Todd
pollinator
Posts: 554
Location: Northwest Missouri
214
forest garden fungi gear trees plumbing chicken cooking ungarbage
  • Likes 2
  • Mark post as helpful
  • send pies
    Number of slices to send:
    Optional 'thank-you' note:
  • Quote
  • Report post to moderator

William Bronson wrote: In your drawing, the brick chimney is just being used as a chase for your 6" flue.
You could pack the space around the flue with insulation, like rockwool, to insure better Draft.

On the other hand,do you really need the second 90° bend at all?
It seems I you could skip it and use the existing brick chimney.
It's bigger than system size, but I think it would act as second bell, with a bypass that was always in effect.

You could even bring the roof penetrating system sized flue strait down the center of the brick chimney to level with the first floor, purposefully making it into a bell.


Interesting thoughts. I suppose if I'm busting into the wall to put a flue penetration into the chimney, I could bust out the whole wall section to expose the chimney brick and integrate it into the design.
The hard part is that the wall is basically concrete board with a skim coat of plaster. This was the way of building things in the 1950s when we were in the time between lath-and-plaster and gypsum board.  I took out an entire wall with MUCH difficulty once. It laughed at any kind of saw blade.
 
rocket scientist
Posts: 6320
Location: latitude 47 N.W. montana zone 6A
3192
cat pig rocket stoves
  • Likes 4
  • Mark post as helpful
  • send pies
    Number of slices to send:
    Optional 'thank-you' note:
  • Quote
  • Report post to moderator
Hi Matt;
As long as your brick chimney is sound and you can cut thru the metal roof to insert  (and seal) a short section of insulated pipe.
You will not need a second ninety degree bend.
The heat will rise up the brick as is, no pipe required.
One ninety bend and a short horizontal  run into the brick will do the trick.
Your exhaust temps should only be 150F-250F.

 
Matt Todd
pollinator
Posts: 554
Location: Northwest Missouri
214
forest garden fungi gear trees plumbing chicken cooking ungarbage
  • Likes 1
  • Mark post as helpful
  • send pies
    Number of slices to send:
    Optional 'thank-you' note:
  • Quote
  • Report post to moderator

thomas rubino wrote:Hi Matt;
The heat will rise up the brick as is, no pipe required.
One ninety bend and a short horizontal  run into the brick will do the trick.


My one hangup with this is, it leaves no possibility for a bypass. Call me paranoid, but I always want a bypass option.
I guess even though the chimney is separated from the bell and will not warm up quick, it will always be ambiently warm enough to draft since it's in the center of the house.
 
Rocket Scientist
Posts: 4526
Location: Upstate NY, zone 5
574
5
  • Likes 3
  • Mark post as helpful
  • send pies
    Number of slices to send:
    Optional 'thank-you' note:
  • Quote
  • Report post to moderator
By your sketch with the stovepipe coming out of the top of the bell (or even going from the back of the bell straight into the chimney), you can put a bypass inside the bell to let it exit into the stovepipe just before that exits the bell. If you want to run the stovepipe from the bottom of the bell into the chimney low, you could add a small (4") pipe from the top of the bell into the chimney with a blast gate for secure shutoff.

I built a 4" opening near the top of my bell to allow for a bypass into my chimney, but I have such reliable draft that I am never going to actually make the bypass, and I don't even have the internal masonry chimney built yet - just a stovepipe out the wall and up.
 
Matt Todd
pollinator
Posts: 554
Location: Northwest Missouri
214
forest garden fungi gear trees plumbing chicken cooking ungarbage
  • Likes 1
  • Mark post as helpful
  • send pies
    Number of slices to send:
    Optional 'thank-you' note:
  • Quote
  • Report post to moderator
I got to thinking about burrowing a hole through the wall and into a brick chimney, and then hooking up a stove pipe inside said chimney, and then adding support under the floor for the weight of the stove in an awkward basement spot. Yuck all around.

I already have most of a "through the wall" kit (which I got a fantastic deal on) so now I'm thinking of just going out through the north wall and around the eave. Sure, it means there would be about 24 inches of horizontal run, but this design allows for an easy bypass to compensate for the cold exterior chimney and only one 90 degree bend.

I figure the stove pipe can stick right into the back wall of the bell, eliminating any elbow there.  Whatcha think?
North-Wall-Chimney.jpg
[Thumbnail for North-Wall-Chimney.jpg]
Wall-kit.jpg
[Thumbnail for Wall-kit.jpg]
 
Glenn Herbert
Rocket Scientist
Posts: 4526
Location: Upstate NY, zone 5
574
5
  • Mark post as helpful
  • send pies
    Number of slices to send:
    Optional 'thank-you' note:
  • Quote
  • Report post to moderator
I used a similar salvaged 6" insulated tee and pipes as a temporary exhaust for my 8" J-tube system as I can't build the final masonry chimney in the middle of my house now, and it has worked fine for 5 years. It was initially only 10' tall above the wood feed and 3' below the roof edge on the east (lee) side and would smoke back in the rare (early spring) instances of an easterly wind. After adding 5' of homemade insulated pipe and a cap, it is 2' above the roof and does not smoke back.
 
Matt Todd
pollinator
Posts: 554
Location: Northwest Missouri
214
forest garden fungi gear trees plumbing chicken cooking ungarbage
  • Mark post as helpful
  • send pies
    Number of slices to send:
    Optional 'thank-you' note:
  • Quote
  • Report post to moderator
Thanks Glenn, that was just the kind of testimonial I needed to hear. You got away with a 6" exhaust on an 8" system?!  How much horizontal run did you have?
 
Glenn Herbert
Rocket Scientist
Posts: 4526
Location: Upstate NY, zone 5
574
5
  • Mark post as helpful
  • send pies
    Number of slices to send:
    Optional 'thank-you' note:
  • Quote
  • Report post to moderator
The 6" stovepipe exits the bell at floor level, rises 7', goes about 6' horizontally through the wall, and rises another 8' or so outside (insulated through the wall and from there up).

I was concerned about using less than 8" pipe, and built an opening in the back of the bell to connect a bypass to the chimney if needed, but never had to unseal and use it. I have positive natural draft even when the whole house and mass has been 40 degrees for days while I was away. If your draft is not so good you might need to be more conservative with layout.

I actually run my RMH with the feed tube at least 3/4 covered all the time so I don't get too much draft through the system. As it gets to coaling stage at the end of a burn, I can shut it completely and run on the P-channel secondary air alone to finish burning to ash.
 
Matt Todd
pollinator
Posts: 554
Location: Northwest Missouri
214
forest garden fungi gear trees plumbing chicken cooking ungarbage
  • Mark post as helpful
  • send pies
    Number of slices to send:
    Optional 'thank-you' note:
  • Quote
  • Report post to moderator

Glenn Herbert wrote:The 6" stovepipe exits the bell at floor level, rises 7', goes about 6' horizontally through the wall, and rises another 8' or so outside (insulated through the wall and from there up).


Wow, if all that (including a 6 foot horizontal run) is working for you then I should have no problem! Thanks for the details.
 
I'd appreciate it if you pronounced my name correctly. Pinhead, with a silent "H". Petite ad:
2024 Permaculture Adventure Bundle
https://permies.com/w/bundle
reply
    Bookmark Topic Watch Topic
  • New Topic