• Post Reply Bookmark Topic Watch Topic
  • New Topic
permaculture forums growies critters building homesteading energy monies kitchen purity ungarbage community wilderness fiber arts art permaculture artisans regional education skip experiences global resources cider press projects digital market permies.com pie forums private forums all forums
this forum made possible by our volunteer staff, including ...
master stewards:
  • Carla Burke
  • Nancy Reading
  • r ranson
  • Jay Angler
  • John F Dean
  • Pearl Sutton
stewards:
  • Nicole Alderman
  • paul wheaton
  • Anne Miller
master gardeners:
  • Christopher Weeks
  • Timothy Norton
gardeners:
  • thomas rubino
  • Jeremy VanGelder
  • Matt McSpadden

Can one make cedar shingles without a froe-like device?

 
steward
Posts: 21729
Location: Pacific Northwest
12279
11
homeschooling hugelkultur kids art duck forest garden foraging fiber arts sheep wood heat homestead
  • Likes 1
  • Mark post as helpful
  • send pies
    Number of slices to send:
    Optional 'thank-you' note:
  • Quote
  • Report post to moderator
We have a new-to-us chicken coop. It had no siding and the foam insulation is exposed to the elements. It also currently has asphalt shingle roofing (do I try to remove it and deal with crumbles of asphalt, or just make cedar shingles to go on top?) I have LOTS of Western RedCedar. I have some axes and machetes. I was thinking I could stick a few ax heads into the cedar and smack them with another ax and and split off boards/shingles to cover over the insulation. Would that work, or would the cedar just make lots of kindling? Or maybe I could use a machete like a froe?

I've got my daughter napping right now, so I'll try to take pictures once she wakes up.
 
rocket scientist
Posts: 6476
Location: latitude 47 N.W. montana zone 6A
3319
cat pig rocket stoves
  • Likes 1
  • Mark post as helpful
  • send pies
    Number of slices to send:
    Optional 'thank-you' note:
  • Quote
  • Report post to moderator
Hi Nicole;
I would try the machete and hitting it with a hammer.  If your cedar is straight grain it should pop off.  The axe head method will probably work as well.

As far as your asphalt shingles, I would just cover them up.
 
Nicole Alderman
steward
Posts: 21729
Location: Pacific Northwest
12279
11
homeschooling hugelkultur kids art duck forest garden foraging fiber arts sheep wood heat homestead
  • Likes 1
  • Mark post as helpful
  • send pies
    Number of slices to send:
    Optional 'thank-you' note:
  • Quote
  • Report post to moderator
Awesome!

My daughter just woke up, so I ran out and got some pictures.

Here's one side that needs to be covered


(We took off the nesting box covers because they are heavy and we're still moving this thing around. The covers are also covered in asphalt shingles. I might just make new ones, as the current ones don't have hinges and are made of pressboard+shingles)

Here's the other side that's just exposed insulation.


thomas rubino
rocket scientist
Posts: 6476
Location: latitude 47 N.W. montana zone 6A
3319
cat pig rocket stoves
  • Likes 1
  • Mark post as helpful
  • send pies
    Number of slices to send:
    Optional 'thank-you' note:
  • Quote
  • Report post to moderator
Hi Nicole;
Very nice looking coop.  I do have a question though. How much snow might that coop have on it ? Would a metal roof be a better choice ?  Even the nesting box lids might be lighter using metal lids ?
I know metal is kind of ugly compared to hand split cedar...  The cedar would be beautiful as a siding alone.  


Also : Why do you not have a froe ? Are they hard to find ? Or just expensive?   I seem to recall they can be home built from a leaf spring.
Mine hasn't been used in many years.  I would have to search it out.
 
steward
Posts: 15634
Location: Northern WI (zone 4)
4894
7
hunting trees books food preservation solar woodworking
  • Likes 1
  • Mark post as helpful
  • send pies
    Number of slices to send:
    Optional 'thank-you' note:
  • Quote
  • Report post to moderator
Cedar would be gorgeous and I'd start with the machete first.  Be sure to cover every bit of that foam that the chickens can reach.  They think styrofoam is candy.
 
thomas rubino
rocket scientist
Posts: 6476
Location: latitude 47 N.W. montana zone 6A
3319
cat pig rocket stoves
  • Likes 2
  • Mark post as helpful
  • send pies
    Number of slices to send:
    Optional 'thank-you' note:
  • Quote
  • Report post to moderator
check out this Nicole;  https://binged.it/2ufcbib     home made froe from a leaf spring!
 
pollinator
Posts: 3897
Location: Kent, UK - Zone 8
712
books composting toilet bee rocket stoves wood heat homestead
  • Likes 3
  • Mark post as helpful
  • send pies
    Number of slices to send:
    Optional 'thank-you' note:
  • Quote
  • Report post to moderator
Splitting shingles is definitely one of those tasks where the correct tool is recommended. You CAN bodge it with other splitting tools, but you will have a lot less control. The froe not only gives you a nice straight split, but it lets you control the direction of the split through the grain of the wood, depending on which way you apply pressure on the handle.

It is also worth noting that good shingles need so additional processing. Typically a drawknife is used to smooth and straighten the surface and edges, so that they sit nicely against each other, as well as to reduce the weight of the finished roof. Shingles also taper from a thick end to a thinner end.

Even for the fairly small number of shingles you are looking at making I would recommend getting one.

 
Nicole Alderman
steward
Posts: 21729
Location: Pacific Northwest
12279
11
homeschooling hugelkultur kids art duck forest garden foraging fiber arts sheep wood heat homestead
  • Mark post as helpful
  • send pies
    Number of slices to send:
    Optional 'thank-you' note:
  • Quote
  • Report post to moderator

thomas rubino wrote:Also : Why do you not have a froe ? Are they hard to find ? Or just expensive?   I seem to recall they can be home built from a leaf spring.
Mine hasn't been used in many years.  I would have to search it out.


Well, I'm not terribly handy, nor good at sharpening things yet, and a drive to a junkyard to find a leaf spring and then making the leaf spring into a froe sounds like it'd take about 3+ hours. I'll probably put a froe on my Christmas/birthday list, but I'd rather get shingles made sooner than that. And, I just don't have the heart right now to spend a bunch of hours trying to make a froe--making the chicken yard and bringing the coop over and hardware clothing the coop took at least 12+ hours of both my husband and I working, over the entire course of his days off. We're both a bit tired!

And, my husbands going back to work for a bunch of days, and when he's working, I just stay home to save on gas usage, and I don't want him to have another thing to do on his way home--he's already burnt out from spending all his days off working on this chicken yard!

Mike Jay wrote:Cedar would be gorgeous and I'd start with the machete first.  Be sure to cover every bit of that foam that the chickens can reach.  They think styrofoam is candy.


We noticed that! When they were over at their previous home, we let them out to inspect their coop, and the rooster spotted some Styrofoam and ate two pieces and was less-than-pleased when I took the third before he could get it!

Thankfully, the styrofoam is only on the outside, where they can't reach it, but it's crumbing (being exposed to the elements and all. Hmmmm, come to think of it, maybe I'll wrap the crumbling insulation with metal tape as a stop-gap measure as I make the shingles....)
 
Nicole Alderman
steward
Posts: 21729
Location: Pacific Northwest
12279
11
homeschooling hugelkultur kids art duck forest garden foraging fiber arts sheep wood heat homestead
  • Likes 2
  • Mark post as helpful
  • send pies
    Number of slices to send:
    Optional 'thank-you' note:
  • Quote
  • Report post to moderator

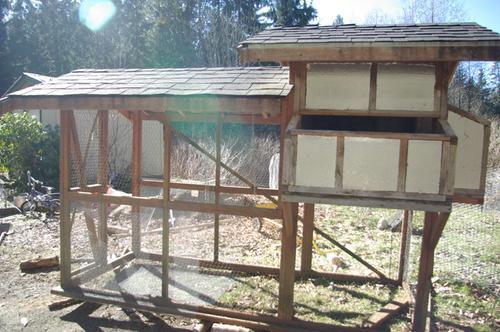
thomas rubino wrote:Hi Nicole;
Very nice looking coop.  I do have a question though. How much snow might that coop have on it ? Would a metal roof be a better choice ?  Even the nesting box lids might be lighter using metal lids ?
I know metal is kind of ugly compared to hand split cedar...  The cedar would be beautiful as a siding alone.  


This winter we had almost 2 feet of snow. That's the most I've ever seen in my life here. The coop held up fine. I'd love a metal roof, as it's probably a lot less time-intensive and the roof water will be drinkable. But, we're on a pretty limited income, so the cost of metal roofing is not something we'll probably do. The cedar is free :D
 
Nicole Alderman
steward
Posts: 21729
Location: Pacific Northwest
12279
11
homeschooling hugelkultur kids art duck forest garden foraging fiber arts sheep wood heat homestead
  • Likes 3
  • Mark post as helpful
  • send pies
    Number of slices to send:
    Optional 'thank-you' note:
  • Quote
  • Report post to moderator
Woo-whoo! I made some rough shingles ("rough" being the operative word here!)

I couldn't locate the big machete we have, so I used a long knife to smack into the wood enough to give me a straight line, and pulled it out before it got stuck. Then I used a hatchet to work my way across. I found it generally worked better to use one ax head/wedge, rather than multiple ones.  The wood split a lot when I used multiple axe heads. So, I'd smack in the ax head a few smacks, then inch it over and smack it in again a few times, over and over across the line. I found if I smacked it more than 2 inches down, it'd crack crack the shingle into thinner ones. So, I took it slow and just kept going over and over the log. Over the course of maybe an hour, I made quite a few shingles, and that was with my kids coming over to "help." (Aka, take my mallet and smack at the hatchet while I waited for them to be done so I could finish the shingle.. But, hey, they were learning and having fun!).

Figured I'd share pictures in case there's anyone else who ever needs to make a few shingles without buying/making a froe. Mine aren't the best, but for a free chicken coop, I'm hoping they'll do.

Now how do I install these things onto foam?
IMGP1298.JPG
[Thumbnail for IMGP1298.JPG]
Smacking in the long knife
IMGP1297.JPG
[Thumbnail for IMGP1297.JPG]
Inserting wedge/hatchet to smack
IMGP1299.JPG
[Thumbnail for IMGP1299.JPG]
Working my way across, over and over
IMGP1300.JPG
[Thumbnail for IMGP1300.JPG]
The board is splitting
IMGP1301.JPG
[Thumbnail for IMGP1301.JPG]
Shingle thing
IMGP1302.JPG
[Thumbnail for IMGP1302.JPG]
Not the thinnest, but hopefully use-able!
IMGP1307.JPG
[Thumbnail for IMGP1307.JPG]
Stack of shingle-things (the small ones were from before I figured out my technique)
 
Michael Cox
pollinator
Posts: 3897
Location: Kent, UK - Zone 8
712
books composting toilet bee rocket stoves wood heat homestead
  • Likes 2
  • Mark post as helpful
  • send pies
    Number of slices to send:
    Optional 'thank-you' note:
  • Quote
  • Report post to moderator
Good job.

As you are probably discovering, it isn’t as easy as it looks. A few pointers though.

1) looks like you are taking slabs off an outside face. These are prone to warping and cupping when exposed to the elements. If you split the log radially, you can then take radial slices.

2) you can probably split those down in half again. They look very thick. When they are stacked overlapping on the roof it will be very thick.

3) selecting a straight grained log in the first place will make it MUCH easier. I see a great big knot in that log.

4) if you make sure all your logs are exactly the same length to start with you will have nice uniform shingleswhen you are done.
 
thomas rubino
rocket scientist
Posts: 6476
Location: latitude 47 N.W. montana zone 6A
3319
cat pig rocket stoves
  • Likes 2
  • Mark post as helpful
  • send pies
    Number of slices to send:
    Optional 'thank-you' note:
  • Quote
  • Report post to moderator
Hi Nicole;  You either need to sheet the foam with a plywood type product or you will need "stringers" 1x2 or so that run horizontally across giving you a nailing surface at the correct heights.

Michael had some excellent pointers for you.  
Use an axe and split your wood in half, then split your shingles from the inside. The cupping will be so bad they would probably leak, on a roof.  (oh that's rite your leaving on the asphalt shingles)
Use a chunk with no or very few knots in it.
Thinner is always better but hey its your first try and I think you are doing great.

Your hand made mallet is nice but if it were me, a nice short hand held sledge hammer would be easier … and not break apart.
 
Nicole Alderman
steward
Posts: 21729
Location: Pacific Northwest
12279
11
homeschooling hugelkultur kids art duck forest garden foraging fiber arts sheep wood heat homestead
  • Likes 4
  • Mark post as helpful
  • send pies
    Number of slices to send:
    Optional 'thank-you' note:
  • Quote
  • Report post to moderator
I made the shingles that thick, because any thinner tended to make the wood crack vertically, making smaller/useless shingles. It's fun experimenting with different techniques with the tools I have, as I remember reading when the first setttlers came to Seattle, the young man who came to prepare things for the family had no froe, and so the structure he was building had no roof. It's nice to know that, slow as it may be, I at least am not without shingles even without a froe!

Tomorrow I'm going to try going radially, as I made it to the center of the log. I thought about trying to split it...but then realized I am probably not strong enough to do that (this cedar has been seasoning outside for almost 4 years now!)

After watching some videos, I had it overhang 2 inches at the bottom and overlapped the shingles. Since there was pressboard on the other side of the stryofoam insulation, I used long nails to nail through the foam to the pressboard. Most shingles got one or two nails into the wooden structure around the foam, so hopefully they'll be secure enough.

I also discovered that I stink with a hammer. Or rather, I discovered that I still stink with a hammer. I remember as a teenager, we went to Mexico to build homes, and despite practicing before hand, I could not drive a nail into the house, despite trying for an hour. I'll never forget how, when I was practicing beforehand, my 70+ year old grandmother--who weighed maybe 120 pounds--came over and pounded the nail in with a few deft strokes. Hopefully with a bunch of practice, I'll be able to wield the stinkin' hammer at least half as well as my grandmother could!
IMGP1306.JPG
[Thumbnail for IMGP1306.JPG]
My daughter, "helping"
IMGP1321.JPG
[Thumbnail for IMGP1321.JPG]
They're rough and they need another row, but this is what I got done today!
IMGP1323.JPG
[Thumbnail for IMGP1323.JPG]
Definitely needs another row on top...and a LOT more shingles :O
 
thomas rubino
rocket scientist
Posts: 6476
Location: latitude 47 N.W. montana zone 6A
3319
cat pig rocket stoves
  • Mark post as helpful
  • send pies
    Number of slices to send:
    Optional 'thank-you' note:
  • Quote
  • Report post to moderator
Awesome Nicole ! That looks outstanding!   Great job for a first timer!
 
Michael Cox
pollinator
Posts: 3897
Location: Kent, UK - Zone 8
712
books composting toilet bee rocket stoves wood heat homestead
  • Likes 1
  • Mark post as helpful
  • send pies
    Number of slices to send:
    Optional 'thank-you' note:
  • Quote
  • Report post to moderator
Found a particularly nice video on shingle making...


Notice at the end how thin his finished shingles are!
 
Michael Cox
pollinator
Posts: 3897
Location: Kent, UK - Zone 8
712
books composting toilet bee rocket stoves wood heat homestead
  • Likes 1
  • Mark post as helpful
  • send pies
    Number of slices to send:
    Optional 'thank-you' note:
  • Quote
  • Report post to moderator
And this second one is good as well. He shows how the froe can be used to control the direction of split.

 
Rocket Scientist
Posts: 1810
Location: Kaslo, BC
525
building solar woodworking rocket stoves wood heat greening the desert
  • Likes 2
  • Mark post as helpful
  • send pies
    Number of slices to send:
    Optional 'thank-you' note:
  • Quote
  • Report post to moderator
The only problem with 'fixing' your shakes with a hatchet is that it now exposes the cells structure of the wood to the elements and tends to rot easier. Anytime I have needed to do this though, I have always installed them that side down to minimize the premature rotting. The beauty of shakes is that the wood cells are all kept intact because the wood is pulled apart along its natural growth lines and are therefore naturally better at protecting itself. Commercial shingles are cut on both sides (tapered) and are reccomended for an undercourse or for siding only. If you look closely (or just feel them) they are rough from all the broken fibers increasing the surface area which easily suck up water. You can also get shakes that are the best of both worlds though: cut on one side (to produce a nice flat surface which would face downwards) and split on the other which faces the elements. Just a few tidbits to share....
 
A feeble attempt to tell you about our stuff that makes us money
turnkey permaculture paradise for zero monies
https://permies.com/t/267198/turnkey-permaculture-paradise-monies
reply
    Bookmark Topic Watch Topic
  • New Topic