• Post Reply Bookmark Topic Watch Topic
  • New Topic
permaculture forums growies critters building homesteading energy monies kitchen purity ungarbage community wilderness fiber arts art permaculture artisans regional education skip experiences global resources cider press projects digital market permies.com pie forums private forums all forums
this forum made possible by our volunteer staff, including ...
master stewards:
  • Carla Burke
  • John F Dean
  • Timothy Norton
  • Nancy Reading
  • r ranson
  • Jay Angler
  • Pearl Sutton
stewards:
  • paul wheaton
  • Tereza Okava
  • AndrĂ©s Bernal
master gardeners:
  • Christopher Weeks
gardeners:
  • Jeremy VanGelder
  • M Ljin
  • Matt McSpadden

Idea - making a steep sided berm from sod

 
steward
Posts: 15873
Location: Northern WI (zone 4)
5040
8
hunting trees books food preservation solar woodworking
  • Likes 1
  • Mark post as helpful
  • send pies
    Number of slices to send:
    Optional 'thank-you' note:
  • Quote
  • Report post to moderator
Not sure if this is a good or bad idea.  I'm working on starting a community garden.  We'll be renting a sod cutter to remove 9600 square feet of sod where the rental plots will go.  To upcycle them, I'd like to construct a berm that doubles as a sun trap and maybe shady spot.  

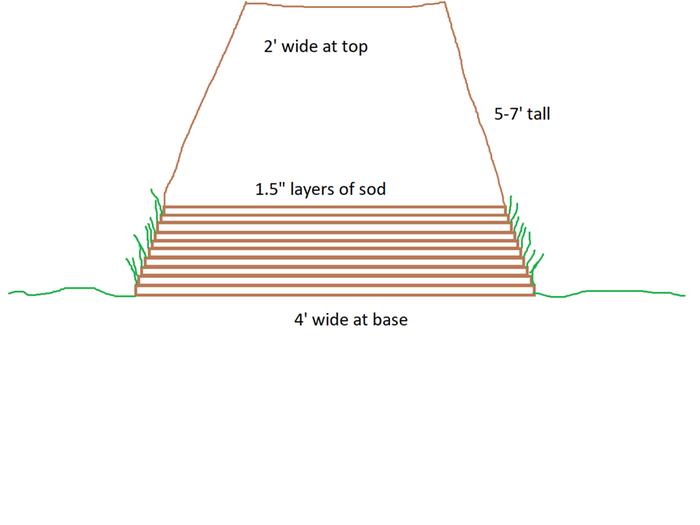
The sod would be a consistent thickness, say 1.5".  I think we could cut the sod into chunks and build the berm by stacking the sod in a deliberate pattern.  Each layer of sod would be slightly smaller than the layer below, say 1/2".  That way a tuft of grass will stick out at the edge of each layer.  I think the dying roots of the sod inside the pile will hold it together while the tufts of grass along the edges can root through the structure to hold it together.  I'd aim for a quarter inch of barter for each 1.5" of height.  So in 6' of height it would slope back 1 foot.  If the berm is 4' wide at the base it would be 2' wide at the top.  

I'd attempt a curved shape so it can be a sun trap.  Maybe a sinuous pattern to give alternating shade and sun spots.

So...  Crazy?  Brilliant?

Ideas to make it better?

Here's a crappy graphic of the cross section of the berm.  I got sick of making rectangles after a while so approximated the slope of the berm with a simple brown line...
Hey-let-s-hire-this-guy-as-our-graphic-designer-.png
Hey, let's hire this guy as our graphic designer!
 
author & steward
Posts: 7371
Location: Cache Valley, zone 4b, Irrigated, 9" rain in badlands.
3579
  • Mark post as helpful
  • send pies
    Number of slices to send:
    Optional 'thank-you' note:
  • Quote
  • Report post to moderator

With my soil, and ecosystem, an berm like that would keep it's integrity for years. It would slowly crumble with the freeze/thaw cycles, and eventually become a mound with a gentler slope.
 
pollinator
Posts: 255
Location: Saskatchewan
99
2
  • Mark post as helpful
  • send pies
    Number of slices to send:
    Optional 'thank-you' note:
  • Quote
  • Report post to moderator
I can see the berm completely made of sod slowly slumping every year and getting shorter and wider as the organic material that holds the sod together decomposes.

Adding woody materials and making a hugelkultur seems like a good idea and would hold up well. It might take a year or two for the sod to decompose enough to be friable enough to use though.
 
Mike Haasl
steward
Posts: 15873
Location: Northern WI (zone 4)
5040
8
hunting trees books food preservation solar woodworking
  • Mark post as helpful
  • send pies
    Number of slices to send:
    Optional 'thank-you' note:
  • Quote
  • Report post to moderator
For this site, we're not allowed to do hugelkultur yet...  So this is my next best idea.  I figure we'll try to lay the blocks of sod in alternating patterns so they hold themselves together a bit.

The soil is more sandy than anything else but it has decent texture and quality for growing a garden.  

Thanks gents!
 
pollinator
Posts: 5696
Location: Bendigo , Australia
515
plumbing earthworks bee building homestead greening the desert
  • Likes 1
  • Mark post as helpful
  • send pies
    Number of slices to send:
    Optional 'thank-you' note:
  • Quote
  • Report post to moderator
That is an interesting use of sod, please keep us informed about it please.
 
Mike Haasl
steward
Posts: 15873
Location: Northern WI (zone 4)
5040
8
hunting trees books food preservation solar woodworking
  • Mark post as helpful
  • send pies
    Number of slices to send:
    Optional 'thank-you' note:
  • Quote
  • Report post to moderator
Will do!  
 
pollinator
Posts: 508
Location: Longview, WA - USA
68
7
cattle forest garden trees earthworks food preservation
  • Likes 2
  • Mark post as helpful
  • send pies
    Number of slices to send:
    Optional 'thank-you' note:
  • Quote
  • Report post to moderator
That looks like it should work.  I have had success on a much smaller scale with the sod about 6 layers high and 2 feet wide.  I found planting potatoes into the flipped sod worked pretty well.  I also poked larger hardwood cuttings like pear and plum into these and those rooted better than soil and could easily be pushed deep.
 
Mike Haasl
steward
Posts: 15873
Location: Northern WI (zone 4)
5040
8
hunting trees books food preservation solar woodworking
  • Likes 3
  • Mark post as helpful
  • send pies
    Number of slices to send:
    Optional 'thank-you' note:
  • Quote
  • Report post to moderator
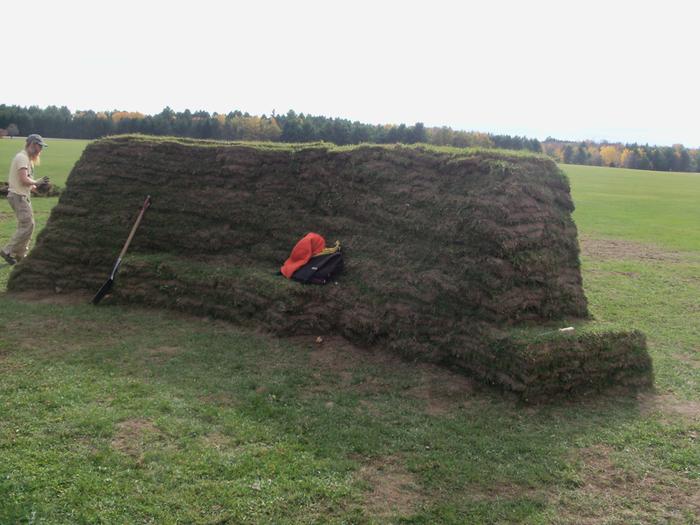
So far it looks like it has worked!  We used a sod cutter to loosen the sod and then cut them to "pickupable size" and wheelbarrowed them to the site to lay out the pattern.  After that got annoying, we got a skidsteer and started rolling up the sod and carting it over in the bucket.  Then we could unroll it onto the structure and bend its path to where we wanted.  Every other layer we laid the sod roll on the ground and cut pieces to go across the structure (vs lengthwise) to help hold it together.  

It ended up 5.5' high and very steep sided.  It helped to have about 4 serrated knives to cut off excess sod around the edges.  It's been built for about 3 weeks and has settled about 3" so far.
Initial-layers-made-from-smaller-pieces.jpg
Initial layers made from smaller pieces
Started-using-the-skidsteer-about-at-bench-height-(not-me-standing-in-picture).jpg
Started using the skidsteer about at bench height (not me standing in picture)
Almost-full-height.jpg
Almost full height
Almost full height
Sun-trap-side-with-nook-for-a-tender-tree-shrub.jpg
Sun trap side with nook for a tender tree/shrub
Shady-sitting-bench-for-in-the-morning.jpg
Shady sitting bench for in the morning
Afternoon-shade-bench-with-bonus-bench-on-the-end.jpg
Afternoon shade bench with bonus bench on the end
 
I agree. Here's the link: http://stoves2.com
reply
    Bookmark Topic Watch Topic
  • New Topic