• Post Reply Bookmark Topic Watch Topic
  • New Topic
permaculture forums growies critters building homesteading energy monies kitchen purity ungarbage community wilderness fiber arts art permaculture artisans regional education skip experiences global resources cider press projects digital market permies.com pie forums private forums all forums
this forum made possible by our volunteer staff, including ...
master stewards:
  • Nancy Reading
  • Carla Burke
  • r ranson
  • John F Dean
  • paul wheaton
  • Pearl Sutton
stewards:
  • Jay Angler
  • Liv Smith
  • Leigh Tate
master gardeners:
  • Christopher Weeks
  • Timothy Norton
gardeners:
  • thomas rubino
  • Jeremy VanGelder
  • Maieshe Ljin

Experimenting with biochar in a pit

 
pollinator
Posts: 219
Location: Clackamas County, OR (zone 7)
126
  • Likes 7
  • Mark post as helpful
  • send pies
    Number of slices to send:
    Optional 'thank-you' note:
  • Quote
  • Report post to moderator
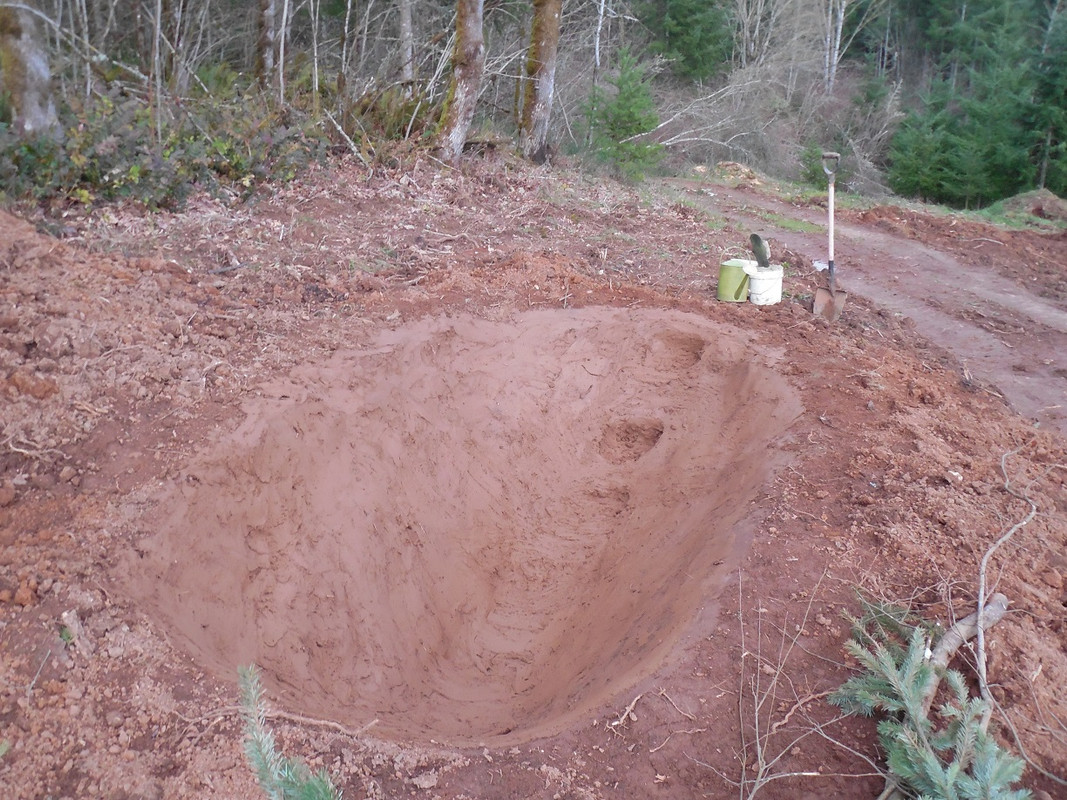
Hey everyone, I have been thinking a lot about how to burn up large amounts of forestry slash and sequester the carbon as biochar. I have made a lot of charcoal in a clay lined barrel, but now I am thinking bigger...

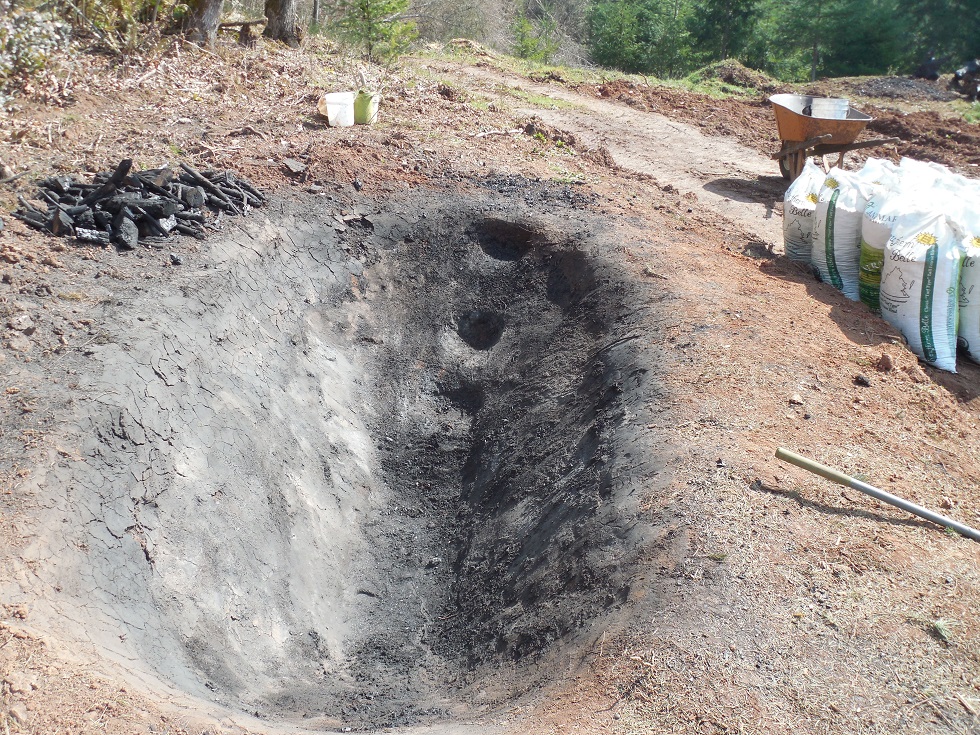
Kinda hard to get a sense of the size of the hole, but it is at least 10 feet long and about 4 feet deep. I tossed buckets of sand and water in the bottom and churned up cob with my boots which I slapped on the walls with a pool trowel. Its not very thick, and will probably crack like crazy, but I am hoping it will keep most of the dirt out. And I can always just mix more and plug the cracks between batches.

My goal is to make 600lbs of charcoal, which would offset all the fossil fuels I burned in 2020. I have basically endless amounts of forestry waste, and digging and lining the pit took me all of a couple hours (I did use my mini excavator, so i need to make at least 6 lbs of char to offset a gallon of diesel).

Would love to hear if anyone else has tried anything similar, and also share any insights I discover. I do not have any illusions about capturing enough carbon to make any real difference, but it would feel good to at least say I tried.
 
pollinator
Posts: 3844
Location: Kent, UK - Zone 8
703
books composting toilet bee rocket stoves wood heat homestead
  • Likes 1
  • Mark post as helpful
  • send pies
    Number of slices to send:
    Optional 'thank-you' note:
  • Quote
  • Report post to moderator
I've not done it on that scale, but I love using trench systems. Works an absolute treat for me, burning long lengths of low grade brash. I trimmed the material, dragged it into huge piles and let it air dry for a month or two over the summer, before burning it.

How do you intend to do the final quench? In my smaller trench I used a a separate metal bath tub, full of water, and shovelled out hot embers periodically as the trench filled up. That way I could carry on burning in the trench without having to start again from a trench full of water.

I wouldn't be overly worried about dirt etc ending up in the biochar. I would say with my crude system I had less than 1% non-char in the finished product, which just gets put on the garden at the end anyway.
 
pollinator
Posts: 1345
Location: Virginia USDA 7a/b
356
4
hugelkultur forest garden hunting chicken food preservation bee
  • Likes 1
  • Mark post as helpful
  • send pies
    Number of slices to send:
    Optional 'thank-you' note:
  • Quote
  • Report post to moderator
I did a yard at a time. I would recommend making a big pile of clay/soil at the beginning for a fresh cap each burn. Maybe two...link here
 
pollinator
Posts: 701
Location: Sierra Nevada Foothills, Zone 7b
154
dog forest garden fish fungi trees hunting books food preservation building wood heat homestead
  • Mark post as helpful
  • send pies
    Number of slices to send:
    Optional 'thank-you' note:
  • Quote
  • Report post to moderator
What is the clay siding for? I have never seen that. I need to dig a new trench but in the past I just burned slash in a hole and thought the product to be pretty good?
 
pollinator
Posts: 990
270
5
tiny house food preservation cooking rocket stoves homestead
  • Mark post as helpful
  • send pies
    Number of slices to send:
    Optional 'thank-you' note:
  • Quote
  • Report post to moderator
Yes I have done the same thing,   I just made a 55 gal barrel and 1/2 of charcoal and I was processing it today.

David the Good has done a video on this method,  on youtube it is called "the cone"  method.

 
master pollinator
Posts: 1745
Location: Ashhurst New Zealand (Cfb - oceanic temperate)
533
duck trees chicken cooking wood heat woodworking homestead
  • Likes 1
  • Mark post as helpful
  • send pies
    Number of slices to send:
    Optional 'thank-you' note:
  • Quote
  • Report post to moderator
Pits are great, Carl. Yours looks very fit for purpose and you'll find that cob coating bakes into a nice terra cotta shell. Yes, it will crack, and yes, you can just mud over the cracks and it works great. If you're able to quench with water, that has the added benefits of expanding the pore structure of your biochar and making it hydrophilic. Can you get your hand on an IBC tote? One of those should be plenty to put that baby out.

Looking forward to photos of the maiden burn!
 
Carl Nystrom
pollinator
Posts: 219
Location: Clackamas County, OR (zone 7)
126
  • Mark post as helpful
  • send pies
    Number of slices to send:
    Optional 'thank-you' note:
  • Quote
  • Report post to moderator

Michael Cox wrote:How do you intend to do the final quench?


I have not quite decided yet - but I am thinking of hosing it down to make it bearable to approach, and then maybe laying some old sheet metal over the top and sealing it up with dirt.

Dan Fish wrote:What is the clay siding for?


Well, so this is really my second attempt at making charcoal on a large scale. For my first attempt I simply dug a trench with the excavator that was about 8 feet long and 3 feet deep, and maybe 2 feet wide. I picked up a brush pile with the bucket, set it on top of the trench, and lit it. It actually filled the trench with charcoal, and there was a lot less unburnt wood in there than I had anticipated. I dug it out once it had cooled, and it filled a 6 foot by 2 by 2 foot stock tank.  There was quite a lot of dirt mixed in though, so I am trying to refine my process a little bit. Excavators are amazing (if somewhat lacking in the sustainability department) but they make a hell of a mess. This pit will be hand-fed and emptied by hand, so moving less dirt seems like a goal worth pursuing. Also, part of my motivation is to sequester carbon, so keeping it clean will make it easier to weigh. The subsoil is very dense, though, so if I had spent an extra 10 minutes on the machine I could have stripped the topsoil away and dug the whole pit in the hard red clay we have around here.

I am hoping to try firing it up later this week, and I will post some pictures of it in action. Thanks for all the links, cool projects all around.
 
Dan Fish
pollinator
Posts: 701
Location: Sierra Nevada Foothills, Zone 7b
154
dog forest garden fish fungi trees hunting books food preservation building wood heat homestead
  • Mark post as helpful
  • send pies
    Number of slices to send:
    Optional 'thank-you' note:
  • Quote
  • Report post to moderator
Oh ok, cool. I thought maybe it was somehow improving the product directly.

Yep, there's nothing I dream about more than a mini-X! And like you point out, the good you can do with it can offset it's impact. But I guess the trade off is that by shoveling by hand I don't get but a touch of dirt into my char. Yay? Hahaha.
 
Posts: 20
5
  • Mark post as helpful
  • send pies
    Number of slices to send:
    Optional 'thank-you' note:
  • Quote
  • Report post to moderator

Michael Cox wrote:I used a a separate metal bath tub, full of water, and shovelled out hot embers periodically as the trench filled up. That way I could carry on burning in the trench without having to start again from a trench full of water.


That is a genius idea. I now need another 50 gallon drum

 
gardener
Posts: 4273
637
7
forest garden fungi trees food preservation bike medical herbs
  • Mark post as helpful
  • send pies
    Number of slices to send:
    Optional 'thank-you' note:
  • Quote
  • Report post to moderator
I got a free one from Craigs list.
John S
PDX OR
 
Carl Nystrom
pollinator
Posts: 219
Location: Clackamas County, OR (zone 7)
126
  • Likes 5
  • Mark post as helpful
  • send pies
    Number of slices to send:
    Optional 'thank-you' note:
  • Quote
  • Report post to moderator
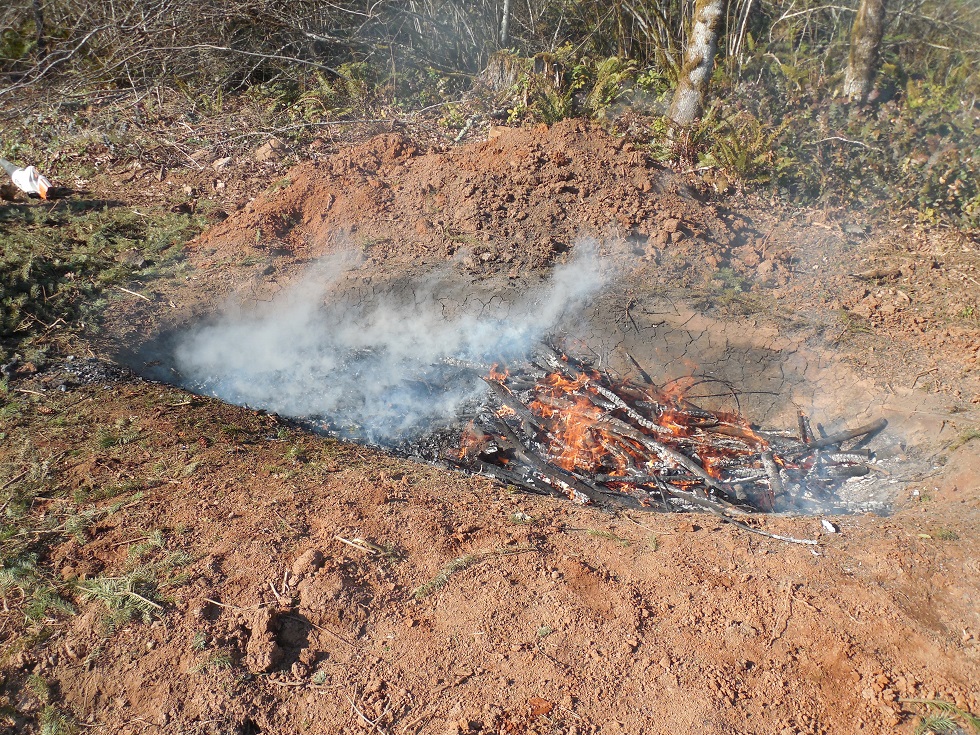
Okay, it was a lovely day, and burning was allowed from 1-4pm, so I decided to fire up my pit. I started with a wheelbarrow load of dry scrap wood. An electric leaf blower is great for getting burn piles going, I cant get over how great they are (and it charges on solar!)

At first I fed it slowly, and used the blower to get a good bed of coals going. It was terrible material - wet doug fir boughs, so there was way too much smoke at first. Really, this should be done in the fall, after leaving the wood to dry all summer. Once it got going, the smoke lessened considerably. I basically fed it non-stop for about two and a half hours. I did not agitate it, and I am starting to think I should have, as I felt some sticks down in the char that will need to be sorted out.


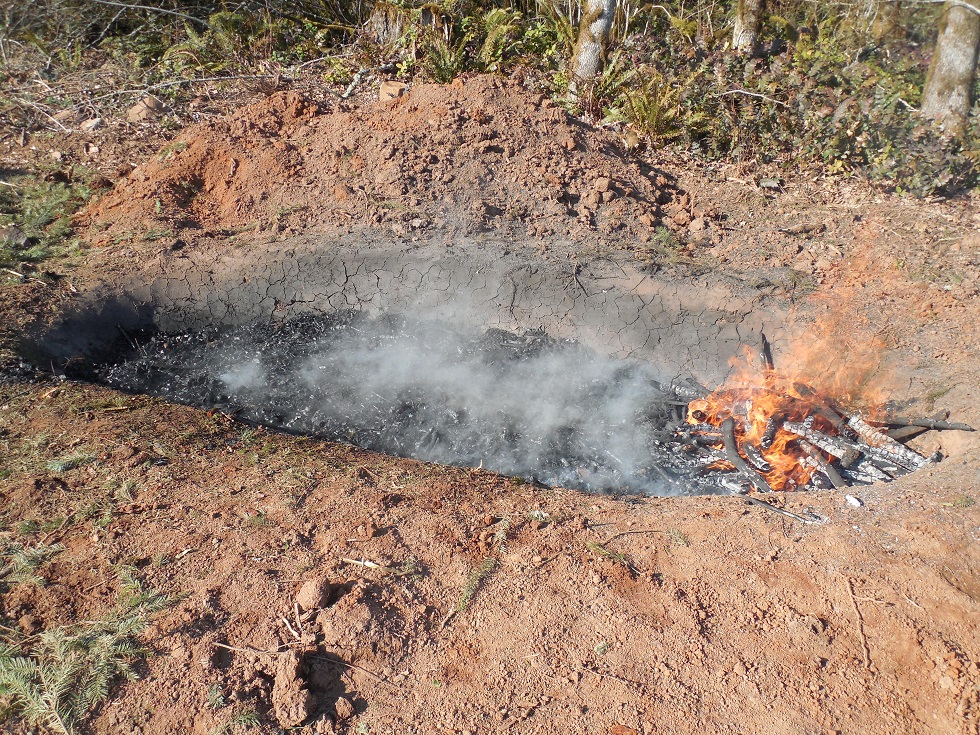
I basically ran out of fuel at about 3:30pm anyway, but I started wrapping up by raking out the top layer. Before all the coals I had exposed could ignite, I quickly raked the stuff that was still burning to one side. I could then start dousing the other side with water from a hose. To the left in the image, you can see the steam.


I kept working the burning wood to one side, and quenching behind it. I doubt I used more than 10 gallons of water - and I bet I could have accomplished this with a watering can. The key was to work quickly, and not let it catch a bunch of the coals on fire, or it would have been extremely hot. This way was hardly unpleasant, and I was able to walk on the coals within minutes of quenching.


Once I was down to a small pile of burning sticks, I just lifted them up over the side, and let them burn down on their own. I stirred the top layers of char, and compacted it to exclude air from getting down into the pit. I kept sprinkling on water, but really very little. I will keep checking it periodically, and stir and put water on any spots that show smoke or white ash. And there you have it, A giant pit full of biochar!


It looks like my liner held up better than I thought it would, but we will see when I got to unload the pit if it really makes enough difference to be worth the extra work. I dug a smaller pit that I can leave unlined as a comparison. Anyway, I am feeling pretty confident. I will report back once I dig it out.


also, a few takeaways:
1)Dry fuel is strongly encouraged!
2)Stir the pile as you are adding wood - I might make a special rake with like a 10 foot handle.
3)Raking the burn to one side and quenching it worked really well.

 
master pollinator
Posts: 4991
Location: Canadian Prairies - Zone 3b
1352
  • Likes 5
  • Mark post as helpful
  • send pies
    Number of slices to send:
    Optional 'thank-you' note:
  • Quote
  • Report post to moderator
Nice job! But are you sure it's out? I have had piles reignite after 48 hours. Be warned.
 
John Suavecito
gardener
Posts: 4273
637
7
forest garden fungi trees food preservation bike medical herbs
  • Likes 1
  • Mark post as helpful
  • send pies
    Number of slices to send:
    Optional 'thank-you' note:
  • Quote
  • Report post to moderator
Good point, Douglas.

Carl, I also live in the Portland area, so the climate is the same. I put my wood in piles according to when I cut it, so that I know which batch is ready to be dried out.  I don't worry until they are almost next to be burned in the biochar. Then I cover them so they are very dry when I burn them.

I don't have acreage. I live in the suburbs, so I can't use your format.  I think one of the things we're doing is to show many examples so people can see what will work for them.

I love how you show the pictures, so people can visualize if this will work for them.

Also, I'm Norwegian, not Swedish, although I think that will have very little effect on how the biochar works. :)

John S
PDX OR
 
Carl Nystrom
pollinator
Posts: 219
Location: Clackamas County, OR (zone 7)
126
  • Likes 4
  • Mark post as helpful
  • send pies
    Number of slices to send:
    Optional 'thank-you' note:
  • Quote
  • Report post to moderator

Douglas Alpenstock wrote:Nice job! But are you sure it's out? I have had piles reignite after 48 hours. Be warned.


I have made enough charcoal now to know that you can never be sure it is out

I have been checking on it a few times this evening, and pouring on a little water for good measure. It needs heat and air to relight, so as long as the top stays moist, and the inside of the pit stays sealed off from the air, it should stay out. Its when you dont wait for all the heat to escape before you go stirring it up that I find it is most likely to start glowing again. And with a pit this size, that is probably going to take some time. Charcoal is a pretty good insulator.

Yeah, I am thinking about this as a bit of open-source R&D for biochar making. I think the trench method is nice because it is so flexible - you could dig a 6" deep trench and feed it twigs, or one the size of a shipping container, and the basic approach is the same.

For smaller scale, I have had really good success burning wood in a cob-lined barrel. It started its life as a steel charcoal retort, and when it burned through I just lined it. You start a fire and then slowly feed it wood until it is full. I capped mine off with a piece of sheet steel because i wanted dry charcoal, but it could also pretty easily be doused with water. I always thought about making a free-standing version without the steel barrel, but never got around to it. It would be sort of like a cob version of a cone kiln. I feel like being up and away from the ground - unlike a trench - makes it burn a little hotter. If you are trying to make char without smoke, it is the best system I have tried yet.

I sort of hope I can inspire people to start making char. The whole state seems to be on fire lately, with all the downed limbs from the big ice storm we had. If people were willing to make small changes to the way they burned brush, we could lock up quite a bit of carbon without really doing much extra work.
 
Carl Nystrom
pollinator
Posts: 219
Location: Clackamas County, OR (zone 7)
126
  • Likes 1
  • Mark post as helpful
  • send pies
    Number of slices to send:
    Optional 'thank-you' note:
  • Quote
  • Report post to moderator
No change on the pit this morning, no smoke or ash was visible, and the surface was warm, but not hot. Out of curiosity I stuck a compost thermometer in there, and I got readings of about 120 to 150 degrees! I am going to let it sit for another day to finish cooling off before I go digging into it. I will probably wet it slightly as I dig it out to cut down on the dust. I will try and estimate yield once its dug.
 
Carl Nystrom
pollinator
Posts: 219
Location: Clackamas County, OR (zone 7)
126
  • Likes 4
  • Mark post as helpful
  • send pies
    Number of slices to send:
    Optional 'thank-you' note:
  • Quote
  • Report post to moderator
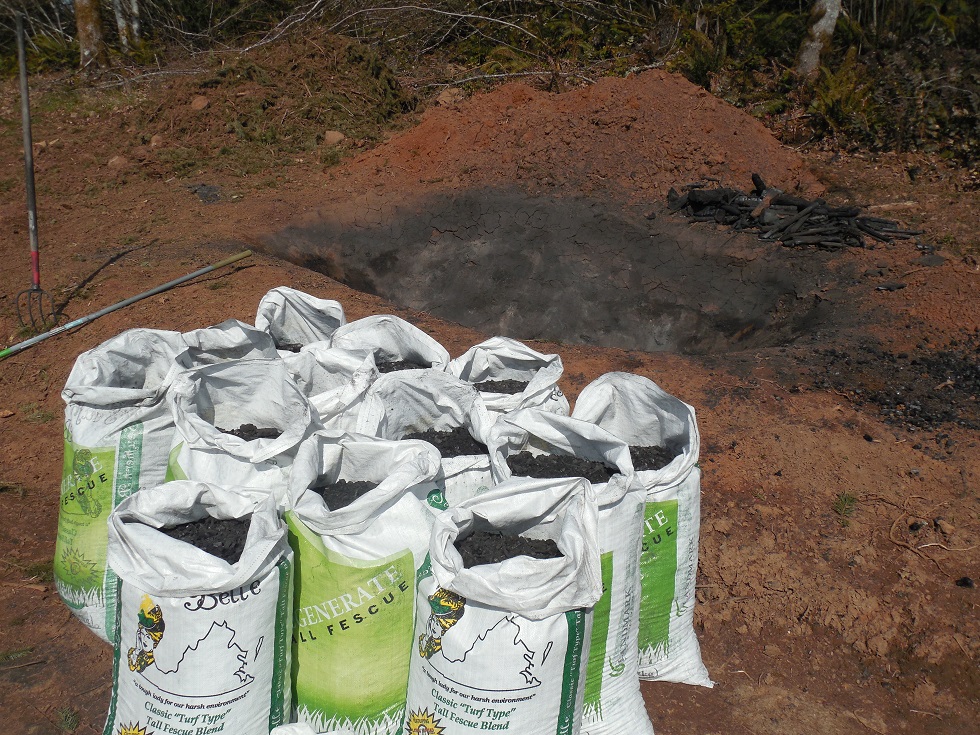
Alright, I was really curious about how much much char I had made, so I went ahead and dug it out this morning. It was still pretty warm deeper down in the pit, so if I had wanted all the char dry, I think I would have had to wait for another day or two. Warm char can relight quite easily. I scooped some out dry to get an idea of its dry density, but then I took a hose and stirred and wet the pile as I went. This really cuts down on the dust, so I would suggest it. Regardless, a good half-face respirator is a good call.

There was not nearly as much unburnt wood as I had thought, so I just tossed it aside as I went. There are some larger chunks mixed in to the char, and some that I assume are not fully charred. In general, though, it is really quite well cooked. The liner did a great job keeping the dirt out - there is very little soil included.


Each of those bags is 45lbs wet (about 30lbs dry weight) and holds about 18 gallons. My total yield was about 450lbs dry weight, or about 280 gallons. I spent maybe three and half hours tending the fire, and 2 hours digging it out. The pit also took me maybe 3 hours to make, but now I can refurbish it and use it again. Basically all of the liner survived, and I was sort of surprised to see that the bottom half of the liner didnt even bake - it is still wet clay.


Anyway, how did I do on carbon offsetting? One gallon of diesel releases about 6.1 lbs of carbon, 1 gallon of gasoline gives off 5.4lbs, and a gallon of propane only 3.5lbs. So, 450lbs of carbon is enough to offset 73 gallons of diesel fuel, 84 gallons of gas, or 130 gallons of propane (just shy of 30 bbq sized bottles). Basically with how little driving I did last year, this one pit recaptured more than half of my emissions from fuel! Anyway, its a good start. Time to cut more firewood and pile up more branches.
 
Carl Nystrom
pollinator
Posts: 219
Location: Clackamas County, OR (zone 7)
126
  • Likes 2
  • Mark post as helpful
  • send pies
    Number of slices to send:
    Optional 'thank-you' note:
  • Quote
  • Report post to moderator
I thought I would post a quick update, as I managed to make the time to do another batch of char. This time I just dug another trench, about 8 feet long and maybe just 2 feet deep (my pile of branches was a lot smaller this time around). I cleaned it up a bit with a shovel, and evened out the slope on the sides. I tamped the soil by foot a bit and that was it. I think it took me all of 15 minutes to get it ready. I used the same approach, only I let the wood in the bottom burn down a little longer, and that reduced the number of charred sticks quite a bit. Once the fire gets going, it can be fed at a steady clip. I did not really do much stirring once the fire was going, and it does not really seem like it is necessary. I also decided to try using watering cans to put the fire out, and that worked fine. I used 16 gallons of water to douse the pit, then another 8 gallons to dampen it for bagging. There were still some warm spots, so a little more water stirred in after dousing might not have been a bad idea. It made about 200 lbs of biochar in maybe 3 hours of work. There was definitely more dirt mixed into this batch, but overall, it seemed like a very small percentage.

I have now burned up all the limbs from the trees that were too close to my buildings, so any more that I cut will get piled up and left to dry over the summer. I think with relatively dry wood, this process will go even quicker, and generate basically no smoke. Doing it with green limbs works, but the smoke is rather unpleasant.

Now I need to figure out how to best go about inoculating 2 cubic yards of biochar! I have a possible source for fresh sheep manure, but what do you all think is a good ratio to aim for, and how long would you think it should be left to compost? I have put large quantities of fresh char in the garden before, and the I can attest to the fact that it soaks up nutrients at first. The plants did not like it. I might also try and sell some, as I am not feeling like I am going to have as much time for gardening this year as I would like.
 
John Suavecito
gardener
Posts: 4273
637
7
forest garden fungi trees food preservation bike medical herbs
  • Likes 1
  • Mark post as helpful
  • send pies
    Number of slices to send:
    Optional 'thank-you' note:
  • Quote
  • Report post to moderator
I agree that uninoculated char is not optimal.  I always inoculate, for the same reasons you had.

I would think that sheep manure would be an effective inoculant. You might want to leave it for awhile, especially if you have to handle it very much.   Mixing it with other inoculants would probably be more effective and more pleasant.

Part of the question is, does your pit hold water?  Compost tea is a  very common inoculant.  It could work in a pit that mostly holds water, because it is usually sprayed.

Urine is also a very common inoculant, and I think that it would need to be in a pit that holds water.  You don't live far from the sea, but I don't know if you go that way for other reasons. I am thinking that some kind of ratio between 1/5th and 1/2 should work for your inoculant, with less being fine with a longer duration inoculation, but I would wait and listen to other responses. I will learn from them as well.

John S
PDX OR
 
Carl Nystrom
pollinator
Posts: 219
Location: Clackamas County, OR (zone 7)
126
  • Likes 4
  • Mark post as helpful
  • send pies
    Number of slices to send:
    Optional 'thank-you' note:
  • Quote
  • Report post to moderator
I have been cleaning up limbs and brush that I cut near my place in anticipation of fire season (there was already a brush fire near here in April this year!). I decided to haul it up the hill to my pit and on the tractor, which I decided was a still a net benefit if I could capture more carbon that I released. I filled to overflowing about half a dozen 5x6 trailer loads of brush, about half of which had been cut and and drying since last winter sometime.

Dry sticks made a huge difference. The fire was roaring in no time at all, and the smoke was reduced to almost nothing even though half of the fuel was green. This will probably be my last open burn this season, as it is starting to get too dry to feel comfortable. My pile of brush was consumed in about an hour, and only filled about half of the pit. Putting the fire out was a bit harder with the charcoal level being lower, as the sides of the pit had soaked up a lot of heat, and made it feel like an oven when I was tamping down the coals while putting them out. Also, I found that fuel should be uniform in size. Trying to throw in 3 inch pieces of wood led to a bunch of half-burnt pieces at the end that were half buried in the coals. The system seems to be most efficient with stuff that is approximately an inch thick or less.

I wetted and bagged up the char today, and produced about another 140 gallons. I have decided to just spread it out on my field-crop garden, which is going to be mostly fallow this year anyway. It seemed like so much char until I started spreading it out. I am shooting for an inch on about a quarter of an acre. So I will need about three or four thousand gallons, so this years production will get me about 1/8th of the way there. I will till it in this weekend, and probably end up planting buckwheat as a cover crop on most of it.

Time permitting, I will cut more brush this summer, and just chop it into easily handled pieces and leave it dry in the woods. In the fall I will then haul it in and burn it. I might also set up some satellite pits where I am cutting firewood, and make brush piles with the excavator if it is too far to haul to a central location. I think with a little forethought, I should be able to make about 1000 gallons a year in about a week of half-days.
 
Douglas Alpenstock
master pollinator
Posts: 4991
Location: Canadian Prairies - Zone 3b
1352
  • Likes 1
  • Mark post as helpful
  • send pies
    Number of slices to send:
    Optional 'thank-you' note:
  • Quote
  • Report post to moderator
Fantastic! I like my barrel char burner for the portability, but I will absolutely get a burn pit set up for next winter. I can't keep up.!
 
Michael Cox
pollinator
Posts: 3844
Location: Kent, UK - Zone 8
703
books composting toilet bee rocket stoves wood heat homestead
  • Likes 1
  • Mark post as helpful
  • send pies
    Number of slices to send:
    Optional 'thank-you' note:
  • Quote
  • Report post to moderator
Nice work.

A few thought/questions.

It looks from your pictures that some of the fuel is fairly thick timber. How well is that charring for you? I prefer to reserve that stuff for recreational fire-pit burns by the house, because I found the char produced to be quite coarse, and I don't want to have to crush it up.

I agree that letting the fuel dry, even if only for a few months, makes a big difference. You can immediately tell the difference from the near total lack of smoke. If I have green to burn then I always try to add it gradually with plenty of properly dry fuel.

You say that you have spread it, and are planning on tilling it in. Would you be tilling anyway, or is this specifically to get the char buried? I have found in my vegetable garden area that deliberate tilling is unnecessary, assuming that I haven't gone nuts and put down a really thick layer of char in a small area. After a couple of years of normal gardening the char seems well incorporated via worms, moles, further layers of mulch, and few light touches with the hoe to deal with weeds. Given the essentially "permanent" nature of the char in the soil it just seemed an unnecessary investment of time/fuel/labour to till it in, when nature does a good enough job  when given some time. Similarly, I don't both to inoculate because nature will figure that out for me given some time.

In practice these days all my biochar gets dumped in the deep litter of the chicken run, they break it up a bit more, mix it with the woodchip mulch and droppings. Then I spread the mulch an inch or so deep on the growing beds.
 
Carl Nystrom
pollinator
Posts: 219
Location: Clackamas County, OR (zone 7)
126
  • Likes 3
  • Mark post as helpful
  • send pies
    Number of slices to send:
    Optional 'thank-you' note:
  • Quote
  • Report post to moderator

Michael Cox wrote:Nice work.

A few thought/questions.

It looks from your pictures that some of the fuel is fairly thick timber. How well is that charring for you? [...]

You say that you have spread it, and are planning on tilling it in. Would you be tilling anyway, or is this specifically to get the char buried? I have found in my vegetable garden area that deliberate tilling is unnecessary, assuming that I haven't gone nuts and put down a really thick layer of char in a small area. After a couple of years of normal gardening the char seems well incorporated via worms, moles, further layers of mulch, and few light touches with the hoe to deal with weeds. [...]

Similarly, I don't both to inoculate because nature will figure that out for me given some time.


Hey I missed this post this spring, and after having gone a full season, I thought I would share some results.

So yeah, thick timber is not great. Ideal size seems to be about an inch and under. I will say that it doesnt really end up making too much difference. I probably end up with like a wheelbarrow load of charred sticks at the end of each batch, and I just use those to start the next one.

As for tilling, that was the plan for the soil anyway. I put on a solid inch of char, and since the soil is very thick clay, getting the char worked in quickly seemed like a good call. I was able to treat about a quarter of my field-crop garden, and the soil color and texture are quite changed now. It seems to be a lot more friable with the char, although it still gets sticky when its wet.

I really only planted beans in the biocharred beds this year, including one bed that was only half-covered, and I did not see any indication that skipping the "charging" made any difference in yield. Then again, beans are nitrogen fixers, so maybe that was able to counter-act any negative effects that the biochar would have had. Next year I plan on growing some other crops, so I will try and do some further experiments.

Anyway, I wanted to report that I have hauled in another monster pile of slash and filled up my pit with another batch of char. I cut brush over the summer and left it to dry on the ground, and it burned really cleanly. I even found that I could load more on with the excavator. Getting the feedstock is clearly going to be my only limitation - otherwise I think I could churn out a ton or more every week.
 
Posts: 366
Location: Eastern Washington
97
  • Likes 2
  • Mark post as helpful
  • send pies
    Number of slices to send:
    Optional 'thank-you' note:
  • Quote
  • Report post to moderator
Here, we see a hundred acres of apple or cherry taken down and burned every year, to replace the orchard with the latest and greatest variety. I've tried to talk a friend into taking an unused corner of the circle and dig a pit for making charcoal to till into the fields.  It would go a long ways to treating the sandy soil.

My dream would be to add zeolite to that and watch the water bill cut from $20,000.00 down to, maybe, $15,000.00.
 
I wasn't selected to go to mars. This tiny ad got in ahead of me:
rocket mass heater risers: materials and design eBook
https://permies.com/w/risers-ebook
reply
    Bookmark Topic Watch Topic
  • New Topic