• Post Reply Bookmark Topic Watch Topic
  • New Topic
permaculture forums growies critters building homesteading energy monies kitchen purity ungarbage community wilderness fiber arts art permaculture artisans regional education skip experiences global resources cider press projects digital market permies.com pie forums private forums all forums
this forum made possible by our volunteer staff, including ...
master stewards:
  • Nancy Reading
  • Carla Burke
  • r ranson
  • John F Dean
  • paul wheaton
  • Pearl Sutton
stewards:
  • Jay Angler
  • Liv Smith
  • Leigh Tate
master gardeners:
  • Christopher Weeks
  • Timothy Norton
gardeners:
  • thomas rubino
  • Jeremy VanGelder
  • Maieshe Ljin

Rocket newbie advice

 
gardener
Posts: 1871
Location: Japan, zone 9a/b, annual rainfall 2550mm, avg temp 1.5-32 C
930
2
kids home care trees cooking bike woodworking ungarbage
  • Likes 2
  • Mark post as helpful
  • send pies
    Number of slices to send:
    Optional 'thank-you' note:
  • Quote
  • Report post to moderator
I built this rocket stove from plans in a diy book from the library. It functions, but not as well as the hype says it should. I get a lot of smoke and it doesn't seem to get as hot as it should. I also don't get that jet sound that gives it the name.

I'm assuming a major part of the problem is air flow. I've seen a few other similar designs, but most have a sort of shelf to put the fuel on so the air can pass unobstructed. This design doesn't have that.

I usually put wood in the top hole of the side pipe as per illustrations in the diy book.

Am I using it wrong it do I need to make some modifications?
original-design-of-portable-metal-rocket-stove.jpg
original design of portable metal rocket stove
burn-chamber-from-front.jpg
burn chamber from front
 
L. Johnson
gardener
Posts: 1871
Location: Japan, zone 9a/b, annual rainfall 2550mm, avg temp 1.5-32 C
930
2
kids home care trees cooking bike woodworking ungarbage
  • Likes 1
  • Mark post as helpful
  • send pies
    Number of slices to send:
    Optional 'thank-you' note:
  • Quote
  • Report post to moderator
Reading through other posts in this forum i was surprised to see metal as a not recommended material.

I suppose there are trade offs for everything, but all of the outdoor stoves I've seen for sale on line billed as rocket cook stoves were made out of metal. I don't see how you could get portability with earth ware.
 
Rocket Scientist
Posts: 1809
Location: Kaslo, BC
525
building solar woodworking rocket stoves wood heat greening the desert
  • Likes 3
  • Mark post as helpful
  • send pies
    Number of slices to send:
    Optional 'thank-you' note:
  • Quote
  • Report post to moderator
Hi Lew,   Not sure which DIY book your using but I see a few things that may be your problem. 1) Your heat riser is really short. I bet if you put a pipe to extend it at least a few feet, your stove should rocket a lot better. 2) That air flow device you mentioned is also important to make this L style rocket work properly. A simple plate that sits on the bottom of the feed tube (leaving about 1/4 of the pipes csa as an opening) is all that's needed.

Metal has a limited lifespan in the high temperatures experienced with a well functioning rocket stove. Great for certain areas but still often considered an expendable item that will need replacing, especially anywhere near the core.

Good luck, and let us know how it goes.
 
Rocket Scientist
Posts: 4526
Location: Upstate NY, zone 5
574
5
  • Likes 4
  • Mark post as helpful
  • send pies
    Number of slices to send:
    Optional 'thank-you' note:
  • Quote
  • Report post to moderator
Portable rocket cooking stoves like the one you built are a very different animal from rocket mass heaters like what we talk about most here. The small rocket stoves will never get as hot as a rocket mass heater combustion core, so the metal will not deteriorate as fast. They will also not get as efficient as an RMH can, but they can still be much more efficient than a campfire or firepit.

The vertical leg of the fuel feed as you show it is not going to work well, because air can be drawn in the lower opening and the fire can burn up in the vertical fuel feed instead of being drawn strongly into the core. I think you will get much better results if you either eliminate the vertical feed and just use the horizontal feed (with the divider shelf as Gerry mentioned for a separate air supply), or block off the lower opening and feed all the fuel and air through the vertical feed tube. The lower opening would only be for cleaning ash after a fire.

The riser as shown is on the short side, but with free air movement it may work well enough once proper draft is established. The way the grate is sitting directly on top of the riser, though, when a pot is sitting on it, the airflow will be almost cut off and you will not get a good fire. The grate needs legs an inch or so longer so there is space for flames to flow all around the pot.
 
L. Johnson
gardener
Posts: 1871
Location: Japan, zone 9a/b, annual rainfall 2550mm, avg temp 1.5-32 C
930
2
kids home care trees cooking bike woodworking ungarbage
  • Likes 2
  • Mark post as helpful
  • send pies
    Number of slices to send:
    Optional 'thank-you' note:
  • Quote
  • Report post to moderator
Thanks to both of you! I will consider some modifications to the design.

The horizontal feed does have a cap, I took it off to take the picture and forgot to show it.
 
L. Johnson
gardener
Posts: 1871
Location: Japan, zone 9a/b, annual rainfall 2550mm, avg temp 1.5-32 C
930
2
kids home care trees cooking bike woodworking ungarbage
  • Likes 7
  • Mark post as helpful
  • send pies
    Number of slices to send:
    Optional 'thank-you' note:
  • Quote
  • Report post to moderator
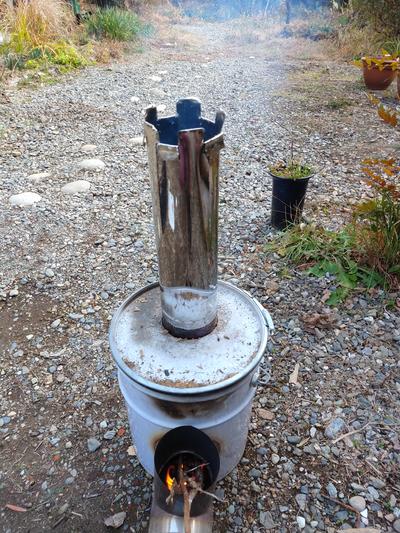
I finally extended the riser on this contraption and... oh my. Rockets away!

The draft is SO obvious. I had no idea it would pull like that.

I started it with some newspaper and that got spit out the exhaust end in ashy flakes... otherwise VERY minimal smoke. I'm blown away (almost literally)

rocket stove with extended riser


I also cut some flanges and curled the edges and corners of the sheet metal back with some pliers. Still seems a little sharp, so I'm probably going to go in with a file and round it out.

I look forward to boiling a pot of water on there.
 
L. Johnson
gardener
Posts: 1871
Location: Japan, zone 9a/b, annual rainfall 2550mm, avg temp 1.5-32 C
930
2
kids home care trees cooking bike woodworking ungarbage
  • Likes 3
  • Mark post as helpful
  • send pies
    Number of slices to send:
    Optional 'thank-you' note:
  • Quote
  • Report post to moderator
I've been thinking about this stove again recently. Since I extended the riser, I can't very safely put any cookware on top.

The original design had the riser cut off just above the top of the barrel, with a metal pot holder set to give it a stable base to put a kettle or a pot.

Now I'm trying to wrap my head around a way to make use of this thing without having the pot of boiling water fall off the awkward flanged top of the riser.

I'm going to go ahead and assume it's probably best not to try to make an extended pot holder out of wood. But I do not have any real metal working skills or tools other than clippers, hammers, heavy leather gloves, and a soldering iron.

I suppose if I could find a wider metal pipe and wrap it around the riser and but some kind of grill on top of it that would be best... but I'm not sure where I could find a wider pipe, most of the chimney hardware around here is standardized to what I've got on here.... maybe I could cut a line down some and open it up to give me a wider diameter to put a grill on...

That's about the best thought I have. I'm hoping someone else has a better idea though.
 
Glenn Herbert
Rocket Scientist
Posts: 4526
Location: Upstate NY, zone 5
574
5
  • Likes 3
  • Mark post as helpful
  • send pies
    Number of slices to send:
    Optional 'thank-you' note:
  • Quote
  • Report post to moderator
Can you get snap-together stovepipe or ducting there? (It comes unfastened so lots of pieces can nest in a stack, and you snap the seam together to lock it into a pipe.) If you take two pieces of that and carefully pound the curve to be wider, you can snap two pieces together to make a pipe twice the diameter. It doesn't need to be heavy-duty for this purpose.
 
L. Johnson
gardener
Posts: 1871
Location: Japan, zone 9a/b, annual rainfall 2550mm, avg temp 1.5-32 C
930
2
kids home care trees cooking bike woodworking ungarbage
  • Likes 1
  • Mark post as helpful
  • send pies
    Number of slices to send:
    Optional 'thank-you' note:
  • Quote
  • Report post to moderator
Unfortunately I can't seem to find any snap together pipe on the net. After browsing lots of different designs I think the easiest solution is probably going to be to take some kind of sheet metal, cut out two strips about 2-3 inches tall and 8-10 inches long rectangles, cut a slot half-way to center in two pieces, put them together as an X and create a slot for the X flanges in the top of the stovepipe. This seems to be how a lot of them are designed, and I might be able to bend some left-over pipe to make it work.
 
L. Johnson
gardener
Posts: 1871
Location: Japan, zone 9a/b, annual rainfall 2550mm, avg temp 1.5-32 C
930
2
kids home care trees cooking bike woodworking ungarbage
  • Likes 3
  • Mark post as helpful
  • send pies
    Number of slices to send:
    Optional 'thank-you' note:
  • Quote
  • Report post to moderator
I think that probably, had I built this with the pipe inlet as low as possible in the side of the barrel, it would have given the riser enough length to rocket properly with the top cut just above the top of the barrel. So another 3 inches or so of rise. Alas.

If I were to do it again I would try to create as much rise as possible INSIDE the barrel. That way I could just use a pot holder sitting on the barrel and still get a good rocket effect.

It was only like 50 bucks or less to build the thing with new parts, and would've been cheaper if I could have scrounged the barrel.

I don't think I mentioned yet, The inside is insulated with perlite.

edit: grammar
 
Glenn Herbert
Rocket Scientist
Posts: 4526
Location: Upstate NY, zone 5
574
5
  • Likes 3
  • Mark post as helpful
  • send pies
    Number of slices to send:
    Optional 'thank-you' note:
  • Quote
  • Report post to moderator
If you can get lightweight sheetmetal, a piece say 80cm wide x your exposed riser high could be bent and screwed together and filled with perlite to make a full height insulated riser with a wide top for pot stability.
 
L. Johnson
gardener
Posts: 1871
Location: Japan, zone 9a/b, annual rainfall 2550mm, avg temp 1.5-32 C
930
2
kids home care trees cooking bike woodworking ungarbage
  • Likes 1
  • Mark post as helpful
  • send pies
    Number of slices to send:
    Optional 'thank-you' note:
  • Quote
  • Report post to moderator

Glenn Herbert wrote:If you can get lightweight sheetmetal, a piece say 80cm wide x your exposed riser high could be bent and screwed together and filled with perlite to make a full height insulated riser with a wide top for pot stability.


I like this idea a lot. I'll start looking for usable sheet metal. I have some corrugated roofing metal on hand.  I'm doubting it will be up to the task.
 
Glenn Herbert
Rocket Scientist
Posts: 4526
Location: Upstate NY, zone 5
574
5
  • Likes 2
  • Mark post as helpful
  • send pies
    Number of slices to send:
    Optional 'thank-you' note:
  • Quote
  • Report post to moderator
I am sure that corrugated metal roofing would do the job fine. The ribs plus rolling it into a cylinder will make it stiff in the vertical direction, and it doesn't need strength in other directions.
 
L. Johnson
gardener
Posts: 1871
Location: Japan, zone 9a/b, annual rainfall 2550mm, avg temp 1.5-32 C
930
2
kids home care trees cooking bike woodworking ungarbage
  • Mark post as helpful
  • send pies
    Number of slices to send:
    Optional 'thank-you' note:
  • Quote
  • Report post to moderator
Also, this is the book with the plans I followed: https://amzn.asia/d/annV9JJ

It's a Japanese book of course, so just posting here since there was a question earlier about what book I followed.

It's called "やさしく学ぶ菜園DIY入門" or yasashiku manabu saien DIY nyumon. It has various DIY projects for a home garden DIYer like a basic chicken tractor, spinning compost, etc.
 
pioneer
Posts: 337
34
chicken wood heat rocket stoves
  • Likes 1
  • Mark post as helpful
  • send pies
    Number of slices to send:
    Optional 'thank-you' note:
  • Quote
  • Report post to moderator
Not sure if anyone else mentioned this, but plug off the horizontal hole in the front.  Use it only for cleaning out ash.  If you have both holes open while you are running it, you will have too much air flow.
 
I agree. Here's the link: https://woodheat.net
reply
    Bookmark Topic Watch Topic
  • New Topic