• Post Reply Bookmark Topic Watch Topic
  • New Topic
permaculture forums growies critters building homesteading energy monies kitchen purity ungarbage community wilderness fiber arts art permaculture artisans regional education skip experiences global resources cider press projects digital market permies.com pie forums private forums all forums
this forum made possible by our volunteer staff, including ...
master stewards:
  • Nancy Reading
  • Carla Burke
  • r ranson
  • John F Dean
  • paul wheaton
  • Pearl Sutton
stewards:
  • Jay Angler
  • Liv Smith
  • Leigh Tate
master gardeners:
  • Christopher Weeks
  • Timothy Norton
gardeners:
  • thomas rubino
  • Jeremy VanGelder
  • Maieshe Ljin

Best design for a simple outdoor wood stove for maple sugaring

 
Posts: 142
12
2
  • Likes 3
  • Mark post as helpful
  • send pies
    Number of slices to send:
    Optional 'thank-you' note:
  • Quote
  • Report post to moderator
I want to construct a simple wood burning stove so I can boil sap for syrup. I did this last year for the first time, just resting a metal sheet over an open fire, putting a pot on the sheet, and boiling. This actually worked, but I probably used way more wood than needed AND the syrup tasted smoky.

This year, I want to build something like this thing:


Seems simple enough and the firebox is contained (so I imagine the burn is more efficient) and there's a stovepipe (so the smoke is exhausted away from the cooking surface and not get in the syrup).

But from these forums I know that this can be subtle and a lot of stove designs are actually pretty bad, for reasons that are not obvious until you try it, and then it's literally set in stone.

Can anyone recommend a simple stove design of this kind that is known to work well?
 
pollinator
Posts: 221
Location: South Shore of Lake Superior
66
homeschooling hugelkultur home care forest garden foraging trees chicken fiber arts medical herbs writing wood heat
  • Likes 4
  • Mark post as helpful
  • send pies
    Number of slices to send:
    Optional 'thank-you' note:
  • Quote
  • Report post to moderator
The stove in that video was fancy! The best stove set up I've experienced is an evaporator meant for sugaring. The fire is enclosed and the smoke is exhausted up, but the surface area for the boil is huge - basically the top of the stove/evaporator is a big (but shallow) steel pan so evaporation happens more quickly. It also has a spigot (I don't know the right word) to empty the syrup into containers.

What I did last year, my first year sugaring on my own, was somewhat like you did but a little more enclosed to hopefully keep the fire more efficient. I enclosed my (level, square) fire pit with cinder block walls on three sides. One side was open so I could feed the fire, but I'd then cover most of it with a stray cookie sheet / big flat baking pan the rest of the time. Across the top, I laid two old oven racks to hold my pans. The pans I boiled in were stainless steel rectangular pans, like for catering. I used those to again try to close up the fire and capture the heat efficiently, as well as maximizing my sap's surface area to evaporate quickly. The pans were kind of expensive, but the blocks were really cheap and the racks were free.

Personally, I like the smoky taste of home-boiled maple syrup. I think that's part of what makes it so good.
 
Marisa Lee
pollinator
Posts: 221
Location: South Shore of Lake Superior
66
homeschooling hugelkultur home care forest garden foraging trees chicken fiber arts medical herbs writing wood heat
  • Likes 3
  • Mark post as helpful
  • send pies
    Number of slices to send:
    Optional 'thank-you' note:
  • Quote
  • Report post to moderator
I forgot - here's a link to a DIY version of the kind of evaporator stove I was talking about. Not quite as fancy as the one I got to use once, but still pretty slick.
https://www.instructables.com/Maple-Sap-Evaporator-for-Under-100-and-Finished-in/
 
Joshua Frank
Posts: 142
12
2
  • Mark post as helpful
  • send pies
    Number of slices to send:
    Optional 'thank-you' note:
  • Quote
  • Report post to moderator
I kind of liked the smoky taste too, but no one else did

Thanks for the links and ideas. Will keep thinking about how to do this.
 
steward
Posts: 15505
Location: Northern WI (zone 4)
4846
7
hunting trees books food preservation solar woodworking
  • Likes 5
  • Mark post as helpful
  • send pies
    Number of slices to send:
    Optional 'thank-you' note:
  • Quote
  • Report post to moderator
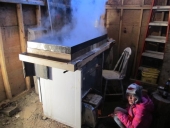
The way I recommend people get into it is with a cinder block arch (arch is the part that holds the fire and supports the pan).  And I use buffet table steam pans for the boiling.  Here are some pics but the idea is to just stack blocks up and set them the right distance apart to rest the pans on them.  As the arch heats up and melts the frost, the blocks will gradually shift a bit so make sure the pans don't fall down into the fire.  Give it a chimney (more cinder blocks or metal) and it will draw nicely.  Blocks won't last too many seasons and if used for the chimney they may fail during their first season so keep an eye on them.  You only need a fire near the front and the draft will pull the heat back under the rear pans and out the chimney.  A two pan rig is enough to get started with a handful of trees.

Once you get that figured out, the next step is a door on the front.  Then you're officially semi-pro :)


Posts: 2
2
  • Likes 2
  • Mark post as helpful
  • send pies
    Number of slices to send:
    Optional 'thank-you' note:
  • Quote
  • Report post to moderator
Not quite what you were asking, but I'd recommend getting a small reverse osmosis setup as a preprocessing step. You can get preassembled systems for about $300, or put together one of your own for about half that. It gets rid of half the water in just a few hours, which cuts your burn time (and wood use) in half.
 
Joshua Frank
Posts: 142
12
2
  • Likes 1
  • Mark post as helpful
  • send pies
    Number of slices to send:
    Optional 'thank-you' note:
  • Quote
  • Report post to moderator
@mike: Thanks, this is exactly what I was looking for! Do you think it's worth trying to be clever about chambers to get rocket action going?
 
Joshua Frank
Posts: 142
12
2
  • Likes 1
  • Mark post as helpful
  • send pies
    Number of slices to send:
    Optional 'thank-you' note:
  • Quote
  • Report post to moderator

Jen Alm wrote:Not quite what you were asking, but I'd recommend getting a small reverse osmosis setup as a preprocessing step. You can get preassembled systems for about $300, or put together one of your own for about half that. It gets rid of half the water in just a few hours, which cuts your burn time (and wood use) in half.


I've been reading about this and it does seem super clever. My hesitation is the greater complexity (and thus time) and the expense. My scale is necessarily small and I'm trying not to violate the rule of "don't spend more money trying to make syrup than it would cost to just buy syrup".
 
Mike Haasl
steward
Posts: 15505
Location: Northern WI (zone 4)
4846
7
hunting trees books food preservation solar woodworking
  • Mark post as helpful
  • send pies
    Number of slices to send:
    Optional 'thank-you' note:
  • Quote
  • Report post to moderator

Joshua Frank wrote:@mike: Thanks, this is exactly what I was looking for! Do you think it's worth trying to be clever about chambers to get rocket action going?


I wouldn't worry about it for the first few years.  I've used cinder blocks (with lots of upgrades) for the past decade and haven't wanted/needed to change the burn action.  I might do something rocketey some day but this is working and is easy.  
 
Mike Haasl
steward
Posts: 15505
Location: Northern WI (zone 4)
4846
7
hunting trees books food preservation solar woodworking
  • Likes 1
  • Mark post as helpful
  • send pies
    Number of slices to send:
    Optional 'thank-you' note:
  • Quote
  • Report post to moderator
Oh, as for the reverse osmosis, I have a silly belief that syrup needs to be cooked/evaporated all the way from sap to syrup for it to be "real syrup".  That is "real syrup according to Mike".  I know reverse osmosis is an industry standard but I do think there's something about caramelizing the sugars and cooking it the whole time that is important to me.   For what that's worth.....
 
Joshua Frank
Posts: 142
12
2
  • Likes 1
  • Mark post as helpful
  • send pies
    Number of slices to send:
    Optional 'thank-you' note:
  • Quote
  • Report post to moderator

Mike Haasl wrote:Oh, as for the reverse osmosis, I have a silly belief that syrup needs to be cooked/evaporated all the way from sap to syrup for it to be "real syrup".  That is "real syrup according to Mike".  I know reverse osmosis is an industry standard but I do think there's something about caramelizing the sugars and cooking it the whole time that is important to me.   For what that's worth.....


I sort of hope that's true, but I don't really see how it could be, because the caramelization can't happen until the temperature gets into the 300s, and that can't happen when it's mostly water still boiling. But it does feel right somehow.
 
Marisa Lee
pollinator
Posts: 221
Location: South Shore of Lake Superior
66
homeschooling hugelkultur home care forest garden foraging trees chicken fiber arts medical herbs writing wood heat
  • Mark post as helpful
  • send pies
    Number of slices to send:
    Optional 'thank-you' note:
  • Quote
  • Report post to moderator
I also love learning about old-school maple sugaring! I'm not sure what kind of vessel the sap was boiled in, but it was boiled with rocks that had been heated in a fire (rather than putting the sap directly over a fire). And then after boiling it down, the syrup was granulated into sugar in a long wooden trough and pushing it with a paddle. The sugar was stored in birch bark containers, and little candies or sugar cakes were sometimes made in duck bills. It's pretty much brilliant.
 
steward
Posts: 10760
Location: South Central Kansas
2988
9
kids purity fungi foraging trees tiny house medical herbs building woodworking wood heat homestead
  • Likes 1
  • Mark post as helpful
  • send pies
    Number of slices to send:
    Optional 'thank-you' note:
  • Quote
  • Report post to moderator
For boiling my walnut syrup, I made a setup similar to what Mike pictured above, but with regular red bricks, a brick chimney, and it only supports 1 stainless hotel pan. Works great for volumes up to 20-30 gallons in a day.

I often finish mine in an instant pot on sauté so I can better control the final reduction. I have also done small experimental batches entirely in an instant pot.
 
pollinator
Posts: 201
Location: Mid-Michigan, USA
74
2
chicken food preservation medical herbs building wood heat homestead
  • Mark post as helpful
  • send pies
    Number of slices to send:
    Optional 'thank-you' note:
  • Quote
  • Report post to moderator
I only do very small home batches of syrup (I tap 3 or 4 black walnut trees) and found quite by happy accident that the top of my Woodstock soapstone woodstove (in the living room) is perfect for evaporating syrup.  It does not actually boil, although I have seen tiny bubbles form on the bottom of my large steel stock pot while processing the sap.  Since I don't do huge volumes, the water vapor just makes the house pleasantly humid for winter dry weather.  Evaporating it this way also makes it highly unlikely that my sap will scorch or caramelize, as long as I keep half an eye on it once the volume reduces enough.
 
pollinator
Posts: 174
Location: northern lower peninsula of Michigan
57
5
homeschooling forest garden foraging chicken wood heat homestead
  • Likes 1
  • Mark post as helpful
  • send pies
    Number of slices to send:
    Optional 'thank-you' note:
  • Quote
  • Report post to moderator
Similar to reverse osmosis if you let your sap freeze about halfway down you can lift the water which is now ice off the top of the sap on the bottom of your tank or tub and toss it. The remaining sap will be more concentrated. So your boiling time will be less.
 
the force is strong in this tiny ad
turnkey permaculture paradise for zero monies
https://permies.com/t/267198/turnkey-permaculture-paradise-monies
reply
    Bookmark Topic Watch Topic
  • New Topic