|

|

|

|

|

|
|
|
|
|
|
|
|

|

|

|

|

|
 1
1


 4
4
Phil Stevens wrote:
1) That long horizontal run of the flue is not a good idea. The fewer bends and departures from vertical in your chimney the better it will draw. Ideally, you'd go out the back of the mass and straight up through the roof. You probably won't need the fan if you build everything according to fully tested and debugged plans.
Phil Stevens wrote:I'm referring to the horizontal section from the 90-degree bend after the dampener and leading to the tee with the fan.
Consider a Consider a stratification chamber (a bell) instead of the piped mass. (a bell) instead of the piped mass.
6
6
3
Silence is Golden
For all your RMH needs:
dragontechrmh.com
Glenn Herbert wrote:
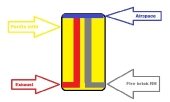
A nitpick: I see your drawing shows flame in the burn tunnel/riser base, then smoke in the riser, then more flame in the donut at the top of the riser. I know people have talked about a "reburn" at the top of the riser, but from my experience that is not how it happens. The air and fuel gases mix in the burn tunnel and more in the riser, and all of the combustion happens there. Sometimes the flames end well before reaching the top of the riser, sometimes they do reach the top depending on conditions, but they do not burn again after leaving the riser.
You don't mention the space this system is intended to heat. A 6" J-tube system can heat a small house or large room in a real winter climate, while an 8" J-tube can heat an average house that is compact and not chopped up into little rooms. This is assuming the structure is reasonably well insulated. Some more information will help us give the best advice here.
1
Fox James wrote:Hi Rick, there are hundred of detailed builds on this forum thread, some feature very basic construction methods others use the latest high tech materials.
So the best know workable formula for a J tube design is based on a 1-2-4 format ie the feed tube is 1 foot the burn tunnel is 2 feet and the riser is 4 feet.
We try to avoid any deviation from the system size, so if you build a six inch diameter feed tube then the burn tunnel, riser and chimney will also be six inch diameter.
You want to avoid as many bends as possible and ideally there would not be any elbows or bends after the barrel exit.
You will get a better performance using a bell rather than a piped mass.
It is possible to deviate from the tried and tested dimensions but not recommended especially for a first build.

 3
1
3
1
Rick A. Lawrence wrote:I have seen this talked about in many of the sites I have done research at before I drew up my plans. I'm not sure one could prove or disprove this theory without making one out of glass, so you can see what happens. I was just assuming it was a fact due to my lack of knowledge on the subject. .
Invasive plants are Earth's way of insisting we notice her medicines. Stephen Herrod Buhner
Everyone learns what works by learning what doesn't work. Stephen Herrod Buhner
 1
3
1
3
Devoured by giant spiders without benefit of legal counsel isn't called "justice" where I come from!
-Amazon Women On The Moon

| I agree. Here's the link: http://stoves2.com |