• Post Reply Bookmark Topic Watch Topic
  • New Topic
permaculture forums growies critters building homesteading energy monies kitchen purity ungarbage community wilderness fiber arts art permaculture artisans regional education skip experiences global resources cider press projects digital market permies.com pie forums private forums all forums
this forum made possible by our volunteer staff, including ...
master stewards:
  • Carla Burke
  • Nancy Reading
  • John F Dean
  • r ranson
  • Jay Angler
  • paul wheaton
stewards:
  • Pearl Sutton
  • Leigh Tate
  • Devaka Cooray
master gardeners:
  • Christopher Weeks
  • Timothy Norton
gardeners:
  • thomas rubino
  • Matt McSpadden
  • Jeremy VanGelder

Semi underground house build

 
Posts: 38
Location: Bulgaria
10
  • Likes 12
  • Mark post as helpful
  • send pies
    Number of slices to send:
    Optional 'thank-you' note:
  • Quote
  • Report post to moderator
We bought an abandoned house and half acre of land next door. I've spent two years on and off dismantling it, saved lots of fired bricks, roof tiles, oak beams, cob bricks, Mediterranean type roof tiles. I've saved the cellar and part of the exterior walls and have started to dig in through the front to create a passageway which will step down to the cellar, making a T junction into another room yet to be dug out.

I have covered the cellar with beams and plastic sheeting to keep out the rain ( if it ever will do again here in Bulgaria!)

The back room I filled in with soil and broken cobb over a year ago. The front room I intend digging down to the foundation stones and it will be half as deep underground as the cellar.
There is a gentle slope down, away from the front door.

I wanted to make a living roof but am unsure of the strength ( load bearing) requirements so I may go with a tiled roof but I will post a photo of the problem with that on top of beams which aren't dead straight.

I think I'll build an outdoor shower room and maybe vermiculture toilet.

Anyway, nice to be on here and any tips or advice will be greatly appreciated.

IMG_20230929_135724.jpg
So I started with a house similar to this.
IMG_20230929_134944.jpg
remainder of a brick wall that is being demolished
This is what is left
IMG_20230929_134950.jpg
Will be the front
Will be the front
IMG_20230929_135001.jpg
Front door goes here into stepped down hallway
IMG_20230929_135021.jpg
Turn right and down to the existing cellar room
IMG_20230929_135037.jpg
T junction, left into the other room
IMG_20230929_135109.jpg
The 'left' room from the back, filled in room
IMG_20230929_135124.jpg
Left room needs digging out to the foundation
IMG_20230929_135147.jpg
I have limitless tiles like these
IMG_20230929_135214.jpg
The door entrance and window in the cellar
IMG_20230929_135233.jpg
Down into the cellar
IMG_20230929_135253.jpg
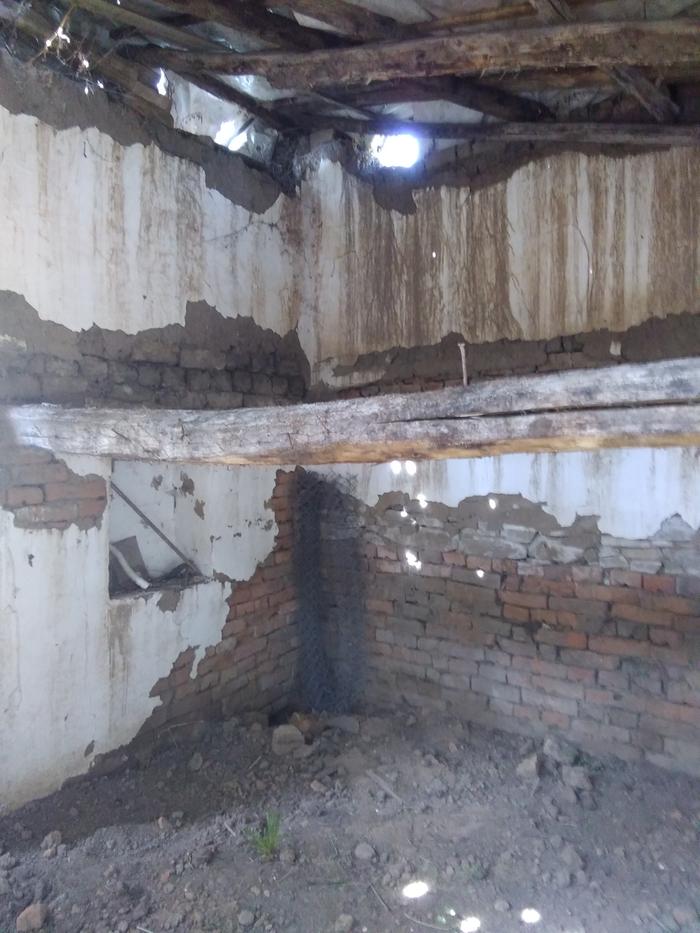
The back wall in cellar. The big beam supported the original upper room floor
IMG_20230929_135248.jpg
The doorway out to the T junction and main front door and other 'left' room
 
gardener
Posts: 705
Location: Geraldton, Ontario -Zone 1b
274
hugelkultur forest garden foraging tiny house wood heat
  • Likes 1
  • Mark post as helpful
  • send pies
    Number of slices to send:
    Optional 'thank-you' note:
  • Quote
  • Report post to moderator
That sounds fun. You've certainly got a lot of building materials to work with at the best price possible.
 
pollinator
Posts: 992
270
5
tiny house food preservation cooking rocket stoves homestead
  • Likes 7
  • Mark post as helpful
  • send pies
    Number of slices to send:
    Optional 'thank-you' note:
  • Quote
  • Report post to moderator
Growing up we lived in a basement that was 1/2 way out of the ground.

The biggest thing I would suggest is MAKE SURE that you have good drainage...      we put in drainage pipe and it clogged,  each spring when the snow melted we would wake with 1/2 inch of ice cold water on the floor......

That said the basement was awesome to goto when you wanted to be cool in the summer, there are real advantages of being partly underground.

Thanks for sharing your journey.
 
gardener
Posts: 1883
Location: Trochu, near Calgary, Canada
269
2
homeschooling forest garden books
  • Likes 1
  • Mark post as helpful
  • send pies
    Number of slices to send:
    Optional 'thank-you' note:
  • Quote
  • Report post to moderator
This is so cool! But I'm having trouble understanding what is what since the pics don't have any description. Any chance you could label them?
 
Adam Mercer
Posts: 38
Location: Bulgaria
10
  • Likes 2
  • Mark post as helpful
  • send pies
    Number of slices to send:
    Optional 'thank-you' note:
  • Quote
  • Report post to moderator

Monica Truong wrote:This is so cool! But I'm having trouble understanding what is what since the pics don't have any description. Any chance you could label them?


Yes. If you can tell me how to label them. I did it on the first photograph but I'm only learning how to use this
 
Monica Truong
gardener
Posts: 1883
Location: Trochu, near Calgary, Canada
269
2
homeschooling forest garden books
  • Likes 2
  • Mark post as helpful
  • send pies
    Number of slices to send:
    Optional 'thank-you' note:
  • Quote
  • Report post to moderator

Adam Mercer wrote:

Monica Truong wrote:This is so cool! But I'm having trouble understanding what is what since the pics don't have any description. Any chance you could label them?


Yes. If you can tell me how to label them. I did it on the first photograph but I'm only learning how to use this


You can change the filename of your images on your computer before you load them. Then when you load them onto permies, it will have the descriptive file name on top of the picture instead of img12345.jpeg
 
master steward
Posts: 7009
Location: southern Illinois, USA
2559
goat cat dog chicken composting toilet food preservation pig bee solar wood heat homestead
  • Likes 3
  • Mark post as helpful
  • send pies
    Number of slices to send:
    Optional 'thank-you' note:
  • Quote
  • Report post to moderator
Click onto β€œSet Caption” on the bottom of the frame of each picture.  That should work for all but the first 2 pictures.
 
Adam Mercer
Posts: 38
Location: Bulgaria
10
  • Likes 2
  • Mark post as helpful
  • send pies
    Number of slices to send:
    Optional 'thank-you' note:
  • Quote
  • Report post to moderator

John F Dean wrote:Click onto β€œSet Caption” on the bottom of the frame of each picture.  That should work for all but the first 2 pictures.


Thanks
 
Adam Mercer
Posts: 38
Location: Bulgaria
10
  • Likes 7
  • Mark post as helpful
  • send pies
    Number of slices to send:
    Optional 'thank-you' note:
  • Quote
  • Report post to moderator
Some more pictures to help you get an idea
IMG_20230929_135317.jpg
view of cellar room from back wall
IMG_20230929_135341.jpg
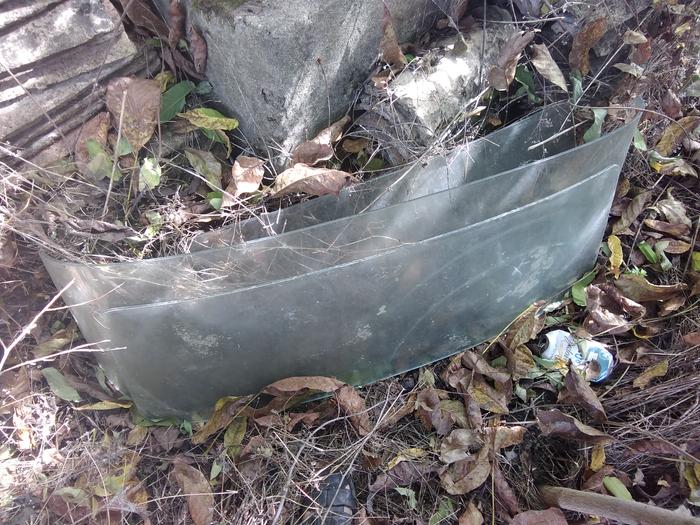
I want to use these old communist era car windows as a side window in the left room
IMG_20230929_135352.jpg
I also have limitless Mediterranean roof tiles like these
IMG_20230929_135404.jpg
And a gorgeous, tile lined water well
IMG_20230929_135530.jpg
Picked up this old hand cart someone was throwing away
IMG_20230929_142618.jpg
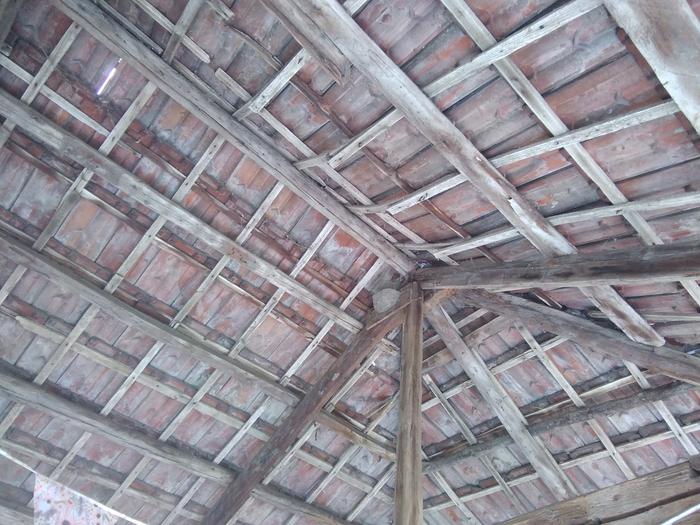
This is what the interior of our roof looks like. Definitely not root proof nor airtight
 
Adam Mercer
Posts: 38
Location: Bulgaria
10
  • Likes 5
  • Mark post as helpful
  • send pies
    Number of slices to send:
    Optional 'thank-you' note:
  • Quote
  • Report post to moderator

Michael Helmersson wrote:That sounds fun. You've certainly got a lot of building materials to work with at the best price possible.


So true. Can't beat free stuff. I have access to a large derelict barn which has a broken roof with three five metre plus rough tree beams just lying around inside and numerous lengths of oak type wood from the roof itself. The old wood is so hard I can't drive nails into it
 
Adam Mercer
Posts: 38
Location: Bulgaria
10
  • Likes 3
  • Mark post as helpful
  • send pies
    Number of slices to send:
    Optional 'thank-you' note:
  • Quote
  • Report post to moderator
As I'm not sure about the green roof I was wondering if this would work:

Build a tiles roof using the available materials.
Cover it with thick plastic ( the local agri businessman throws away thousands of square metres of thick UV protected plastic every year!)
Cover that with old carpets then some kind of cement slurry.
Cover that with a thin layer of soil or cob and let nature take its course.

There is a huge walnut tree beside the building which is covered with ivy which I had to also strip off the old house before dismantling it. I know how fast ivy grows and it'd be covered really quickly.

What do you think?
 
Rocket Scientist
Posts: 4531
Location: Upstate NY, zone 5
576
5
  • Likes 9
  • Mark post as helpful
  • send pies
    Number of slices to send:
    Optional 'thank-you' note:
  • Quote
  • Report post to moderator
I think that is likely to work as long as the roof slope is enough for the tiles to function properly by themselves, just in case water does get through the plastic. You would be building up a thicker layer of material turning to soil if you let ivy grow over it, as that will effectively trap leaves and twigs, so make sure the framing is extra sturdy.
 
pollinator
Posts: 1596
Location: Root, New York
318
forest garden foraging trees fiber arts building medical herbs
  • Likes 8
  • Mark post as helpful
  • send pies
    Number of slices to send:
    Optional 'thank-you' note:
  • Quote
  • Report post to moderator
if you have access to free large pieces of plastic, you might consider using the "umbrella" design that many underground houses use.

this means laying the plastic out on the outside of the structure on the ground, leveling the ground (with a slight slope) around the outside of the structure, going out some 5-10 feet or more....from the outer walls of your underground parts.
you can either dig down a bit, lay the plastic flat going outwards from your walls..... and then use what you dug out to cover the plastic, or laying it out at its current level, and add dirt from some other area you are digging out, so to increase the depth a good 6-12 inches by adding a thick layer of dirt on top of the plastic sheets.
the point of this is that the land around the exterior underground walls will be very dry, so thats less moisture that will in contact with your underground parts.

this may or may not be one of your top concerns, i do not know what your climate is like....in a dry climate this may not be as much a priority, but its a good idea in wet places like where i have lived.

i like the levels, it gives you good options for heating, where your heater or hearth/woodstove/etc can be on the lower level and will make the above areas nice and warm.
as for green roof, yes it is very heavy and if you want to do that you want to overbuild it a bit, you will want to make sure your supports can bear the weight.
 
pollinator
Posts: 5378
Location: Bendigo , Australia
488
plumbing earthworks bee building homestead greening the desert
  • Likes 5
  • Mark post as helpful
  • send pies
    Number of slices to send:
    Optional 'thank-you' note:
  • Quote
  • Report post to moderator
Adam, can I can I ask why you went for demolition?
Also, if you go the green roof path, the structure will need to be very strong and allow for the weight of sodden soil and plant matter.
The concept is great, the execution may be hard.
 
Adam Mercer
Posts: 38
Location: Bulgaria
10
  • Likes 3
  • Mark post as helpful
  • send pies
    Number of slices to send:
    Optional 'thank-you' note:
  • Quote
  • Report post to moderator
The back and sides are underground except for the top three feet of the back wall. Would the back wall be the best place to build a stove and have an air vent?
Screenshot_20231003-083935_1.png
This is the plan showing windows, doors and steps.
 
Adam Mercer
Posts: 38
Location: Bulgaria
10
  • Likes 1
  • Mark post as helpful
  • send pies
    Number of slices to send:
    Optional 'thank-you' note:
  • Quote
  • Report post to moderator

Adam Mercer wrote:The back and sides are underground except for the top three feet of the back wall. Would the back wall be the best place to build a stove and have an air vent?

Screenshot_20231003-084735_1.png
Floor plan of a semi-underground house
 
Adam Mercer
Posts: 38
Location: Bulgaria
10
  • Likes 1
  • Mark post as helpful
  • send pies
    Number of slices to send:
    Optional 'thank-you' note:
  • Quote
  • Report post to moderator
The 3.81m grey area is the room back filled with rubble and broken cob bricks.
The 3.82m area is a roof crawl space/ storage area with a small back window, higher than the hallway.
 
Adam Mercer
Posts: 38
Location: Bulgaria
10
  • Likes 8
  • Mark post as helpful
  • send pies
    Number of slices to send:
    Optional 'thank-you' note:
  • Quote
  • Report post to moderator
Small progress but trying out roof beams for size
IMG_20231003_145721.jpg
Playing around with roof beams, nothing fixed in place yet
IMG_20231003_145804.jpg
Note the pile of cob bricks I took out of the wall. I'm going to reuse them, add more straw and make a cob floor
IMG_20231003_150023.jpg
Collected a few more roof tiles for free
 
Glenn Herbert
Rocket Scientist
Posts: 4531
Location: Upstate NY, zone 5
576
5
  • Likes 3
  • Mark post as helpful
  • send pies
    Number of slices to send:
    Optional 'thank-you' note:
  • Quote
  • Report post to moderator
The smaller of the roof beams you show look suitable only for a very light roof. Even tiles plus insulation and ceiling materials would likely overload them and make them flex (ceiling cracking) if not break eventually.
 
Adam Mercer
Posts: 38
Location: Bulgaria
10
  • Likes 4
  • Mark post as helpful
  • send pies
    Number of slices to send:
    Optional 'thank-you' note:
  • Quote
  • Report post to moderator

Glenn Herbert wrote:The smaller of the roof beams you show look suitable only for a very light roof. Even tiles plus insulation and ceiling materials would likely overload them and make them flex (ceiling cracking) if not break eventually.


Hi Glenn.

This is a trial run to see what kind of slope I have, though all the roofs here are made with this kind of wood. It's black locust ( false acacia) and is hard as iron and really strong. After 80 years in the roof of this house I pulled down, the wood is impossible to drive a nail into. I'm going to have to pre drill every one.
Having said that I will be using bigger beams than the ones shown. Only the top plates will be milled pine timber. I also have access to a few dead straight six metre plus black locusts, easier to nail up, so the rafters will be big and beefy.
 
Adam Mercer
Posts: 38
Location: Bulgaria
10
  • Likes 2
  • Mark post as helpful
  • send pies
    Number of slices to send:
    Optional 'thank-you' note:
  • Quote
  • Report post to moderator
I have been thinking:
Do I really need to put roof tiles on if I'm going to cover it with cardboard, plastic, carpet ( or mesh) with latex stucco.
The roof would be much lighter without the tiles.
 
Glenn Herbert
Rocket Scientist
Posts: 4531
Location: Upstate NY, zone 5
576
5
  • Likes 6
  • Mark post as helpful
  • send pies
    Number of slices to send:
    Optional 'thank-you' note:
  • Quote
  • Report post to moderator
The kind of wood does make a difference, and if you are using black locust, somewhat larger beams than shown should work just fine.

Using roof tiles will provide an extra layer of security, and to keep your roof from leaking, I think they are totally warranted, especially as you already have them and don't have to buy them.
 
master pollinator
Posts: 1030
Location: East of England/ Northeast Bulgaria
390
5
cat forest garden trees tiny house books writing
  • Likes 4
  • Mark post as helpful
  • send pies
    Number of slices to send:
    Optional 'thank-you' note:
  • Quote
  • Report post to moderator

John C Daley wrote:Adam, can I can I ask why you went for demolition?
Also, if you go the green roof path, the structure will need to be very strong and allow for the weight of sodden soil and plant matter.
The concept is great, the execution may be hard.


John, I am guessing the top level was already semi-demolished on its own, and Adam just collected up the building materials and tidied it up. Bulgaria is full of cheap abandoned old houses left to decompose. Most have at least one semi-underground room, which was the old root cellar and storage room. We have a ruin up the hill behind our house, made of stone, which would have been a fine old house in its day. The cellar is intact, but the roof is collapsed along with most of the upper floor walls above window sill level. I would love to have a go at rebuilding something there, though I doubt it will ever happen as the main house and garden will keep me plenty busy enough! But if rebuilt, a semi-underground design like Adam's would work best as it's very windy up there. I'm guessing that's why the old house was originally abandoned. maybe even lost the roof in a gale. They built a newer house in the 1950s further down the hill which is much more sheltered.

Adam, it's a fascinating project and a lot of work! I look forward to seeing how it progresses. Our part of Bulgaria has been exceptionally dry this summer, too, after a very wet spring. Does your well still have water? The water table has dropped too low in my village and all the wells are dry. And yes, those old black locust beams are amazing. So strong for a diameter that looks way too thin to support much weight!  Over a short span (with a bigger support beam or two running widthways across the house, and far more closely spaced than in the original roof, they might do the job. Depends how much soil you intend to use on your green roof. Maybe lots of perlite in the soil to lighten the load?
 
Adam Mercer
Posts: 38
Location: Bulgaria
10
  • Likes 5
  • Mark post as helpful
  • send pies
    Number of slices to send:
    Optional 'thank-you' note:
  • Quote
  • Report post to moderator

John C Daley wrote:Adam, can I can I ask why you went for demolition?
Also, if you go the green roof path, the structure will need to be very strong and allow for the weight of sodden soil and plant matter.
The concept is great, the execution may be hard.


Hi John

Jane is correct, the lower part of the house was already starting to deteriorate and as I have always wanted a Hobbit type house I decided to make one. A hobby really. Our own house next door is ' normal' and we have guests stay in part of it as it's an Airbnb.

I'm thinking of covering only the lower part of the roof, berming it up shallowly so the house roof looks like it's pushing out of the ground. I have lots of big old beams for the structure, six inch diameter and more. Manhandling everything by myself is difficult but a great workout.

 
Adam Mercer
Posts: 38
Location: Bulgaria
10
  • Likes 5
  • Mark post as helpful
  • send pies
    Number of slices to send:
    Optional 'thank-you' note:
  • Quote
  • Report post to moderator

Jane Mulberry wrote:

John C Daley wrote:Adam, can I can I ask why you went for demolition?
Also, if you go the green roof path, the structure will need to be very strong and allow for the weight of sodden soil and plant matter.
The concept is great, the execution may be hard.


John, I am guessing the top level was already semi-demolished on its own, and Adam just collected up the building materials and tidied it up. Bulgaria is full of cheap abandoned old houses left to decompose. Most have at least one semi-underground room, which was the old root cellar and storage room. We have a ruin up the hill behind our house, made of stone, which would have been a fine old house in its day. The cellar is intact, but the roof is collapsed along with most of the upper floor walls above window sill level. I would love to have a go at rebuilding something there, though I doubt it will ever happen as the main house and garden will keep me plenty busy enough! But if rebuilt, a semi-underground design like Adam's would work best as it's very windy up there. I'm guessing that's why the old house was originally abandoned. maybe even lost the roof in a gale. They built a newer house in the 1950s further down the hill which is much more sheltered.

Adam, it's a fascinating project and a lot of work! I look forward to seeing how it progresses. Our part of Bulgaria has been exceptionally dry this summer, too, after a very wet spring. Does your well still have water? The water table has dropped too low in my village and all the wells are dry. And yes, those old black locust beams are amazing. So strong for a diameter that looks way too thin to support much weight!  Over a short span (with a bigger support beam or two running widthways across the house, and far more closely spaced than in the original roof, they might do the job. Depends how much soil you intend to use on your green roof. Maybe lots of perlite in the soil to lighten the load?


Hi Jane

It's been seriously dry here too and the water table has dropped though we still have well water. Our village spring has run dry for the first time ever.

I have two more big beams to drop in widthways before placing any other rafters on. Getting hem on there should be fun.
 
Jane Mulberry
master pollinator
Posts: 1030
Location: East of England/ Northeast Bulgaria
390
5
cat forest garden trees tiny house books writing
  • Likes 8
  • Mark post as helpful
  • send pies
    Number of slices to send:
    Optional 'thank-you' note:
  • Quote
  • Report post to moderator
Maybe try and rope in some of the village men for a building party with beer and barbecue afterwards?

I know there have been some threads on the forum about lifting heavy beams and other objects when working alone, some ingenenious solutions to save wrecking your back!

I'm glad you still have well water.
 
Adam Mercer
Posts: 38
Location: Bulgaria
10
  • Likes 4
  • Mark post as helpful
  • send pies
    Number of slices to send:
    Optional 'thank-you' note:
  • Quote
  • Report post to moderator
So I cut down some black locust for roof beams 4-6 inch diameter. Is it alright to leave the bark on or should I strip them? They will be exposed inside the rooms.
Thanks
 
Jane Mulberry
master pollinator
Posts: 1030
Location: East of England/ Northeast Bulgaria
390
5
cat forest garden trees tiny house books writing
  • Likes 4
  • Mark post as helpful
  • send pies
    Number of slices to send:
    Optional 'thank-you' note:
  • Quote
  • Report post to moderator
They didn't strip the bark from the black locust beams in my house (late 50s construction date), the only stripped beam is a big one I think is pine, so my guess is it doesn't effect the longevity of locust.

If they'll be exposed, you might want to strip them to stop bits of bark falling off or just for appearance. And if you want to dry the wood first, I think it would dry faster if stripped.

It looks as if the older beams might be stripped, if so, maybe that's best practice for your area.
 
Adam Mercer
Posts: 38
Location: Bulgaria
10
  • Likes 1
  • Mark post as helpful
  • send pies
    Number of slices to send:
    Optional 'thank-you' note:
  • Quote
  • Report post to moderator

Jane Mulberry wrote:They didn't strip the bark from the black locust beams in my house (late 50s construction date), the only stripped beam is a big one I think is pine, so my guess is it doesn't effect the longevity. If they'll be exposed, you might want to strip them to stop bits of bark falling off or just for appearance. And if you want to dry the wood first, I think it would dry faster if stripped.

Are the beams in your house stripped?


Cool
I think I'll leave it on. If I starts to come off as it dries it'll give me something to do one winters day in ten years time
 
Jane Mulberry
master pollinator
Posts: 1030
Location: East of England/ Northeast Bulgaria
390
5
cat forest garden trees tiny house books writing
  • Likes 3
  • Mark post as helpful
  • send pies
    Number of slices to send:
    Optional 'thank-you' note:
  • Quote
  • Report post to moderator
The only thing I noticed when I went back to check your pics is that the older beams in your place do seem stripped. If so, it might be best practice for your region.
 
Adam Mercer
Posts: 38
Location: Bulgaria
10
  • Likes 4
  • Mark post as helpful
  • send pies
    Number of slices to send:
    Optional 'thank-you' note:
  • Quote
  • Report post to moderator
Oh wow.
Today I enlisted help from a local and sourced me three black locust beams. Basically they have been lying in an empty barn for years since they were chopped down as trees. Ok they're not dead straight and the bark is kind of dry and dusty but the interiors are so strong. The shortest is six metres and none are under eight inches at the bigger end narrowing down to minimum of four inches.
I'll post pictures when I have them cleaned up.
So happy 😁
 
Jane Mulberry
master pollinator
Posts: 1030
Location: East of England/ Northeast Bulgaria
390
5
cat forest garden trees tiny house books writing
  • Likes 3
  • Mark post as helpful
  • send pies
    Number of slices to send:
    Optional 'thank-you' note:
  • Quote
  • Report post to moderator
I'm grinning for you, Adam! Those beams sound amazing!
 
Adam Mercer
Posts: 38
Location: Bulgaria
10
  • Likes 1
  • Mark post as helpful
  • send pies
    Number of slices to send:
    Optional 'thank-you' note:
  • Quote
  • Report post to moderator

Jane Mulberry wrote:I'm grinning for you, Adam! Those beams sound amazing!


I'm putting them in the left room, the bedroom. I'm notorious for banging my head... watch this space lol
 
Jane Mulberry
master pollinator
Posts: 1030
Location: East of England/ Northeast Bulgaria
390
5
cat forest garden trees tiny house books writing
  • Mark post as helpful
  • send pies
    Number of slices to send:
    Optional 'thank-you' note:
  • Quote
  • Report post to moderator
LOL! Start practicing ducking now!
 
John C Daley
pollinator
Posts: 5378
Location: Bendigo , Australia
488
plumbing earthworks bee building homestead greening the desert
  • Likes 7
  • Mark post as helpful
  • send pies
    Number of slices to send:
    Optional 'thank-you' note:
  • Quote
  • Report post to moderator
Adam, can I suggest you look at using even simple devises to move logs.
I will bang on about safety issues, but the issue of not being about to progress because your body is stressed.
IE;
pulled muscles
blisters
weariness
exhaustion.
These can be reduced with pulleys, wheels, rollers and skids.
Lifting tripods.
I developed this scheme because of my own mistakes, and when I would visit other owner builders I would hear of the downtime and injury.
So I would design simple process to help.
My best was a stone house, which stopped regularly because of body stress or even damage, progress was slow.
2 yeras work when I called in, with 20 % complete..
He was lifting rocks by hand up ladders and ramps, with a trolley sometimes.
I drilled holes in each rock and fitted a ramset eye bolt, which are reusable and hold very well.
I set up a lifting pulley system with chains, so he could stop if he wanted to.
Then carts that suited his scaffolding were created.
And a beam system with 2 inch pipes whereby rocks could be lifted, slid along the beam, swung sideways a limited distance and lowered onto a wall with minimal effort.
The remainder of the rock work was done on the house in 8 months with no injury time.
The rocks were drilled at the dump site and moved with gear that had car tyres which were easy to move.
 
Adam Mercer
Posts: 38
Location: Bulgaria
10
  • Likes 1
  • Mark post as helpful
  • send pies
    Number of slices to send:
    Optional 'thank-you' note:
  • Quote
  • Report post to moderator
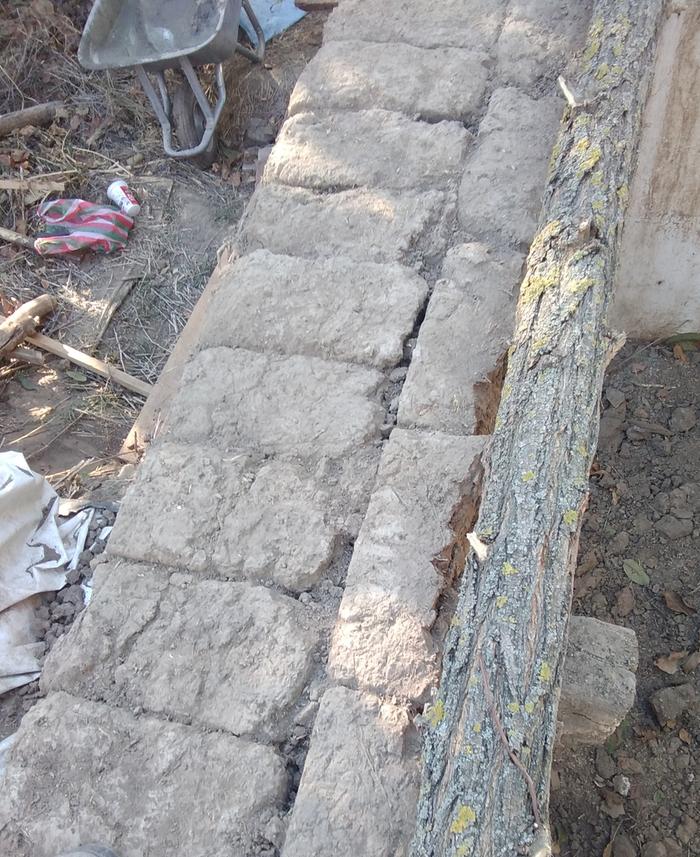
Gotta love these communist era handmade cob brick built houses. Such a shame they are falling into disrepair unless someone puts a hat back onto them.
 
Adam Mercer
Posts: 38
Location: Bulgaria
10
  • Likes 1
  • Mark post as helpful
  • send pies
    Number of slices to send:
    Optional 'thank-you' note:
  • Quote
  • Report post to moderator

Adam Mercer wrote:Gotta love these communist era handmade cob brick built houses. Such a shame they are falling into disrepair unless someone puts a hat back onto them.


Part of the wall
IMG_20231012_094944_1.jpg
Big cob bricks make up a lot of these houses. This one has an out brick wall ( not shown here)
Big cob bricks make up a lot of these houses. This one has an outer brick wall ( not shown here)
 
Glenn Herbert
Rocket Scientist
Posts: 4531
Location: Upstate NY, zone 5
576
5
  • Likes 6
  • Mark post as helpful
  • send pies
    Number of slices to send:
    Optional 'thank-you' note:
  • Quote
  • Report post to moderator
Good on sourcing more locust beams I would strip the bark off any that are going to be exposed or you will have crumbs falling on you forever. The heartwood of locust will not rot, but the sapwood if kept moist by bark will start to rot in a few years. Bark also gives a good place for insects to live.
 
Adam Mercer
Posts: 38
Location: Bulgaria
10
  • Likes 5
  • Mark post as helpful
  • send pies
    Number of slices to send:
    Optional 'thank-you' note:
  • Quote
  • Report post to moderator
I think I've enough beams and rafters now to complete the roof frame. Some old roof beams, some newly felled trees, all black locust
 
I do some of my very best work in water. Like this tiny ad:
Free Heat movie
https://freeheat.info
reply
    Bookmark Topic Watch Topic
  • New Topic