posted 1 year ago
Short version: let the fire die down to coals, then put your baking inside the firebox on an elevated rack, and check on it sooner than you expect!
My household and I have baked this way for a few years as pretty much our only oven during the woodstove months (September/October - April/May). Using this method, we've successfully baked bread, cornbread, buns, biscuits, crackers, pizza, pitas, cookies, muffins, cakes, pies, casseroles, whole potatoes, squash, chopped mixed roots, cuts of meat, and soybeans (really tasty salted as a snack or ground and put in stew). And popped amaranth, corn, and squash seeds.
Figuring out the trick of baking in the firebox opened up the repertoire of baked dishes using the tools I had available. Complementary to this technique, it's helpful to know that some foods tolerate stovetop "baking" on cast iron better than you might guess: biscuits/buns and pitas on a griddle, cornbread and shortcake in a frying pan, and squash on a rack inside a cast Dutch oven. This gives a bit of flexibility to bake in or on, depending on where the fire's at. But for more detail about how I bake inside the stove, read on.
Tools:
-Wood stove big enough to fit what you want to bake.
-Wire rack (around here it's called a "cooling rack," but in this case it's for baking on).
-Metal stand. This is quite possibly the only thing you need to fabricate. Make it just short enough that you can put your tallest baking dish on top of it without hitting the "ceiling" of the stove. In a pinch you can just balance the wire rack on three rocks, but a purpose-built stand is faster to use, more stable, and gets whatever you're baking a little farther from the coals, which is a good thing. Catie suggests (below) that firebricks would be another option - definitely more stable than rocks.
-Baking sheet for a heat reflector. This will be hard on it. Don't use your favourite.
-Oven mitts if you're worried about reaching into a tight space without getting burnt.
Compared to a conventional oven, this method has a significant learning curve. It's a bit of an art to hit the sweet spot between scorched and raw. But it can definitely be done; just don't make your first experiments when you're under time pressure or there's company coming. It's all about developing your eye for when the coals are burnt down far enough, and managing radiant heat, as I'll explain in a minute.
My stove has firebricks built into the walls. I haven't tried baking in a stove that lacks these, but I imagine it would both bake even more extremely from the bottom and lose baking temperature faster. With a decent fire beforehand to preheat the bricks and make a nice layer of coals, I can usually bake two or three things back-to-back. If there's just one thing to bake and it's not a cold enough day to justify a larger fire, a quick "woofing fire" suffices. Part of developing your eye for a bed of coals is compensating for how much heat is stored in the firebricks: if it was a short fire, you need to bake on slightly higher coals, whereas if it was a long fire, bake on lower coals to avoid burning.
Compared to, say, an electric oven, I think a lot more of the heat comes radiantly up from the coals rather than convectively from all sides when baking inside a wood stove. This can lead to scorching on the bottom, even if the average temperature in there isn't too bad. A way to work with this is to put a baking sheet under the cooling rack to reflect some of the radiant heat (I think that's what it's doing).Two other tricks for moderating heat from the bottom involve ash blocking a bit of the radiant heat. Flip the coals over with a little stove shovel, bringing ash to the top (this will probably lead to a bit more charcoal formation, which you could see as a waste of firewood or, I suppose, a potential resource as biochar or blacksmithing fuel). Or to stir the coals up, open the damper, leave it for 10 minutes or so to form an even layer of ash on the surface of the coals, then damp it again and put in your baking.
Besides managing excessive carbonization, the other big learning curve is timing. If you're trying to bake for a set meal time, you have to be able to gauge when to build a fire and how big to make it, then manage it with the damper and stirring the coals (and without others' tampering) to burn down at the right time to bake - not too early or too late for the meal.
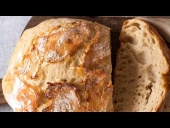
You're always racing the coals, trying to fling through everything that needs baking before you run out of heat. If you start a little early, you end up with much higher temperature than most recipes recommend. To some extent you can compensate with shorter baking time, and it all works out. Some foods might scorch before they get done on the inside, but most just need a little more attention than you might be used to - 3 minute cookies, or stirring chopped roots every 10 minutes. Usually with a 4"x8" loaf pan, it takes a minimum of 22 minutes to bake the centre of the loaf, no matter how scorched the outside is getting. Baking hot and fast like this makes for incredible texture in bread. I don't like wasting food, but even if it gets a little dark you can just rasp off the burnt outside of the crust (maybe 1/8") with a table knife.
---
An bonus trick which I don't have a picture for is baking bread inside an outdoor rocket cookstove. Specifically, this firebrick one. Once the fire has died down to coals (maybe 3 cups or so of lively coals, but no active burning, or it will smoke), push half of them to the far end (under the chimney, and pull the other half back against the close end of the feed chamber. Then take out the end brick and slide a loaf pan into the burn chamber. Replace the brick at the end, and cover both the feed opening and the chimney opening with something heat resistant that will seal most of the air in - baking sheets work fine. Flip the bread end-for-end half way through the baking time, which will be pretty short.
This is a great way to make use of post-cooking heat that would otherwise be wasted.
Have fun, and don't get burnt!
cooking-on-indoor-wood-stove.JPG

baking-stand-with-heat-shield-and-rack.JPG

backing-stand-with-rack.JPG
![[Thumbnail for backing-stand-with-rack.JPG]](/t/275082/a/260920/thumb-backing-stand-with-rack.JPG "Filename: backing-stand-with-rack.JPG
Description:")
baking-stand.JPG
![[Thumbnail for baking-stand.JPG]](/t/275082/a/260921/thumb-baking-stand.JPG "Filename: baking-stand.JPG
Description:")
wood-stove-bread-.JPG

wild-grape-apple-sauce-pie.JPG

roasted-mixed-roots.JPG
![[Thumbnail for roasted-mixed-roots.JPG]](/t/275082/a/260924/thumb-roasted-mixed-roots.JPG "Filename: roasted-mixed-roots.JPG
Description:")
a-couple-loaves-of-bread-baking-in-the-wood-stove.JPG

summer-kitchen-rocket-stove-with-pot-skirt.JPG


 10
10


![[Thumbnail for backing-stand-with-rack.JPG]](/t/275082/a/260920/backing-stand-with-rack.JPG "Filename: backing-stand-with-rack.JPG
Description:")
![[Thumbnail for baking-stand.JPG]](/t/275082/a/260921/baking-stand.JPG "Filename: baking-stand.JPG
Description:")


![[Thumbnail for roasted-mixed-roots.JPG]](/t/275082/a/260924/roasted-mixed-roots.JPG "Filename: roasted-mixed-roots.JPG
Description:")


Skill verified by gir bot")