• Post Reply Bookmark Topic Watch Topic
  • New Topic
permaculture forums growies critters building homesteading energy monies kitchen purity ungarbage community wilderness fiber arts art permaculture artisans regional education skip experiences global resources cider press projects digital market permies.com pie forums private forums all forums
this forum made possible by our volunteer staff, including ...
master stewards:
  • r ranson
  • Nancy Reading
  • Carla Burke
  • John F Dean
  • Jay Angler
  • paul wheaton
stewards:
  • Nicole Alderman
  • Pearl Sutton
  • Anne Miller
master gardeners:
  • Christopher Weeks
  • Timothy Norton
gardeners:
  • Nina Surya
  • Matt McSpadden
  • thomas rubino

At Last. My RMH Is a Reality

 
author & steward
Posts: 5409
Location: Southeastern U.S. - Zone 7b
3138
5
goat cat forest garden foraging food preservation fiber arts medical herbs writing solar wood heat homestead
  • Likes 30
  • Mark post as helpful
  • send pies
    Number of slices to send:
    Optional 'thank-you' note:
  • Quote
  • Report post to moderator
It's hard to believe that it was almost 4 years ago that I started an inquiry thread ->  Best rocket heater for this situation? We were in the exploratory phase, researching and trying to figure out whether we could use our wood heater alcove to build a RMH.


Dan built the alcove 14 years ago to replace the original 100 year old back-to-back fireplaces that were there. He built the lower part of the walls in brick and the upper part with cement board. At the time, he built in the clearances, so for the RMH, the challenge was working within what we already had in place, including the 6-inch chimney flue in the alcove ceiling. With good feedback from the permies rocket scientists and a lot of brainstorming, we decided on a DSR2 and finally made a start this summer.

Originally, I planned to post photos as we built, but I haven't been on the computer much this summer. So here it is, the photo highlights of our summer's work.


UPDATE: I removed the oven floor. See this post for more information - https://permies.com/t/269879/RMH-Reality#2842085


The secondary air tube is from Dragon Tech and the doors are from Firespeaking


Breaking in fire was very smokey! But once we got a good draft the smoke leaks stopped and i was amazed at how even a small fire heated the bell and heated the house. The primary leak culprits were around the doors, and various places in the mortar. Dan re-mortared the doors for a better seal and filled as many potential smoke leaks in the mortar. I confess to being a bit nervous about that next fire. I used our little space heater to heat the chimney and the second burn was entirely smoke free. What a relief!

We are already saving on wood and it's amazing how long the bell warms the house after the fire is out. It's lovely to not wake up to a cold house in the morning. I am extremely happy with our stove!
 
Rocket Scientist
Posts: 805
Location: Guernsey a small island near France.
304
  • Likes 8
  • Mark post as helpful
  • send pies
    Number of slices to send:
    Optional 'thank-you' note:
  • Quote
  • Report post to moderator
Well done, it looks fantastic!
 
rocket scientist
Posts: 6531
Location: latitude 47 N.W. montana zone 6A
3400
cat pig rocket stoves
  • Likes 13
  • Mark post as helpful
  • send pies
    Number of slices to send:
    Optional 'thank-you' note:
  • Quote
  • Report post to moderator
Leigh & Dan;  Outstanding job guys!
That looks great!
As you have now experienced, they are amazing at holding heat for over 24 hrs or longer.
The first start-up fire can be smokey, but as soon as it warms up, the smoke goes out the chimney.

It's been a few years in the planning, but you finally have an RMH!
Enjoy!
Oh and now you can start showing all your friends and neighbors!
You can be the new experts in your area and spread the good word.
 
master pollinator
Posts: 5075
Location: Due to winter mortality, I stubbornly state, zone 7a Tennessee
2157
6
forest garden foraging books food preservation cooking fiber arts bee medical herbs
  • Likes 6
  • Mark post as helpful
  • send pies
    Number of slices to send:
    Optional 'thank-you' note:
  • Quote
  • Report post to moderator
Wow!
 
Posts: 5
4
  • Likes 11
  • Mark post as helpful
  • send pies
    Number of slices to send:
    Optional 'thank-you' note:
  • Quote
  • Report post to moderator
Very neat build! Looks great!
Actually, I asked my wife who's always trying to see improved aesthetics for RMH'S
"hmm that's actually the best one I've seen" she says!

I'm curious about the oven portion (is that what it is?) - it'd be neat to see updates on temperature and use

 
gardener
Posts: 1068
Location: +52° 1' 47.40", +4° 22' 57.80"
455
woodworking rocket stoves wood heat
  • Likes 9
  • Mark post as helpful
  • send pies
    Number of slices to send:
    Optional 'thank-you' note:
  • Quote
  • Report post to moderator
Nice implementation of a DSR2 core, the way how the combination with an oven is done in particular.

I know how the core should perform, of course, but not sure about this one. Any smoke from the chimney to be seen? That is to say, real smoke, not the white-ish water vapor that dissolves in the air within a few yards.

Love to hear how it all work out for you!
 
rocket scientist
Posts: 178
Location: Sangre de Cristo Mountains, CO - Lat 38°14' - Zone 5b
136
hunting earthworks solar wood heat rocket stoves homestead
  • Likes 8
  • Mark post as helpful
  • send pies
    Number of slices to send:
    Optional 'thank-you' note:
  • Quote
  • Report post to moderator
Fantastic build! Congrats on executing on your dream and the joy of enjoying the comfort of long lasting radiant heat. Bravo!
 
Leigh Tate
author & steward
Posts: 5409
Location: Southeastern U.S. - Zone 7b
3138
5
goat cat forest garden foraging food preservation fiber arts medical herbs writing solar wood heat homestead
  • Likes 8
  • Mark post as helpful
  • send pies
    Number of slices to send:
    Optional 'thank-you' note:
  • Quote
  • Report post to moderator
Isaac, that's a wonderful compliment. Thank you so much.

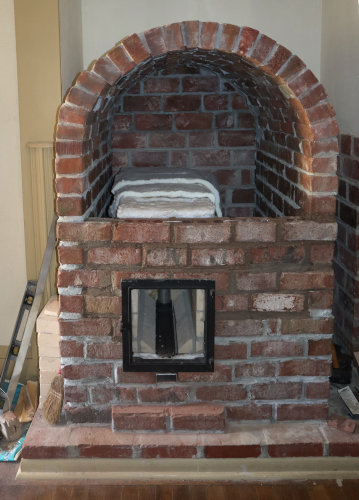
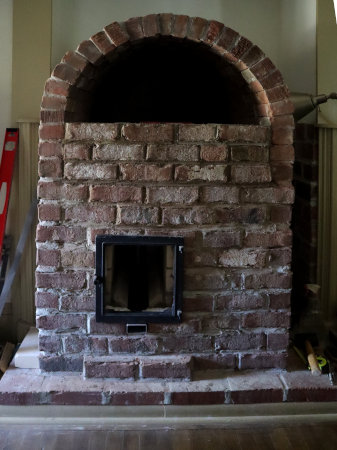
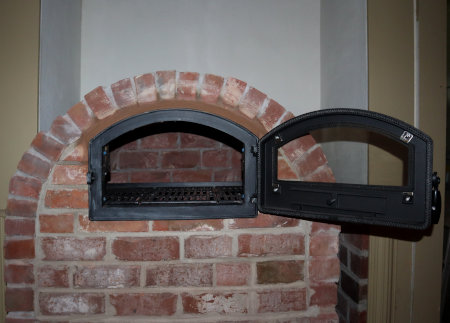
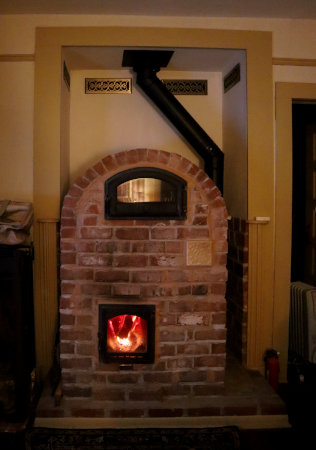
Isaac Workman wrote:I'm curious about the oven portion (is that what it is?) - it'd be neat to see updates on temperature and use


I will do that. We're still getting used to the stove, so I haven't delved into oven temps and trial use yet. But soon.
 
Leigh Tate
author & steward
Posts: 5409
Location: Southeastern U.S. - Zone 7b
3138
5
goat cat forest garden foraging food preservation fiber arts medical herbs writing solar wood heat homestead
  • Likes 9
  • Mark post as helpful
  • send pies
    Number of slices to send:
    Optional 'thank-you' note:
  • Quote
  • Report post to moderator

Peter van den Berg wrote:I know how the core should perform, of course, but not sure about this one. Any smoke from the chimney to be seen? That is to say, real smoke, not the white-ish water vapor that dissolves in the air within a few yards.

Love to hear how it all work out for you!


Peter, you've got me curious about your question!

The only time we saw real smoke was the first breaking-in fire. Initially, all the smoke went into the house, but once we got a draft, the first smoke out of the chimney was dark smokey smoke. I assumed it was because I had grabbed some damp wood from the wrong wood bin. Once we got it going good with dry wood (and since then), the smoke has been white or invisible, as in neighbors wouldn't know we're using it.

With our design, what would cause it to smoke? I'm thinking we got it right, but what could improve it?
 
Peter van den Berg
gardener
Posts: 1068
Location: +52° 1' 47.40", +4° 22' 57.80"
455
woodworking rocket stoves wood heat
  • Likes 11
  • Mark post as helpful
  • send pies
    Number of slices to send:
    Optional 'thank-you' note:
  • Quote
  • Report post to moderator

Leigh Tate wrote:With our design, what would cause it to smoke?


For one, the DSR2 core is picky about restrictions, all batchrockets are. You say visible smoke is white, that's a good thing, although white smoke actually doesn't exist unless a pope is chosen. So what you are watching is a well-behaving heater. The only reason what could cause it to smoke is overfuelling. In short, there could be a situation (sometimes) that the core is producing such large quatities of burnable wood smoke that the afterburner function can't cope with it anymore, resulting in thick black smoke.

The bell is quite spaciously I understand, especially right in the spot where the exhaust is, so no problem to be expected there.
I'd like to know what the internal dimensions of the bell are, what the floor area and the spacing from the side and rear walls, all internal of course. What I try to do is building up a knowledge base of what size the bell could be and, more important, the shape. The plan is to edit the website accordingly.

Leigh Tate wrote:I'm thinking we got it right, but what could improve it?


As long as it seems to burn well, no smoke from the chimney and the rocket purring like a giant cat, then you were doing an excellent job building this one. Nothing left to improve.
In case you are using a stove pen-thermometer in the pipe, what are its readings while running flat out?
 
Posts: 319
Location: North East Iowa, USA
91
  • Likes 8
  • Mark post as helpful
  • send pies
    Number of slices to send:
    Optional 'thank-you' note:
  • Quote
  • Report post to moderator
Leigh,  
   I am curious, with your off set stove, (in the bell)  are you noticing any difference of bell temp on bell side closest to the stove vs the opposing side?  

Sure looks great.   Well done!

 And your black oven, have you run it long enough to predict "time to X temp and/or time at a somewhat consistent temp for baking"?.  Such as 350 F for X amount of  hours or anything like that.   AS far as that goes, I have never baked in a black oven, Does bread have a completely different look and taste? I presume, but only guessing this would be done, after the fire is out?

Did you install any temp sensors just to watch differences in locations?

thanks ahead of time.
 
Leigh Tate
author & steward
Posts: 5409
Location: Southeastern U.S. - Zone 7b
3138
5
goat cat forest garden foraging food preservation fiber arts medical herbs writing solar wood heat homestead
  • Likes 9
  • Mark post as helpful
  • send pies
    Number of slices to send:
    Optional 'thank-you' note:
  • Quote
  • Report post to moderator
Peter, thank you for the explanation. More good information. We're still learning, so it's helpful.

Peter van den Berg wrote:I'd like to know what the internal dimensions of the bell are, what the floor area and the spacing from the side and rear walls, all internal of course.


Inner dimensions in inches
    sides - 36" by 39"
    front and back - 31" by 39"
    floor - 36" by 31"
    arch - 31" by 49"

The arch is something of a semicircle, so 49" is the circumference.

Those are probably not technically precise. I worked it out on graph paper and Dan did the brickwork as close as possible. We were aiming for an ISA of 57 sq. ft., but the arch stumped me.

Also, the oven bottom is only 18 inches in depth, so that the back is open from the floor to the top of the arch.

In case you are using a stove pen-thermometer in the pipe, what are its readings while running flat out?


I don't have a pen thermometer, but I do have a magnetic stove top thermometer. We're in a warm spell right now and so not using the stove, but I'll check that out when the next cold front pushes through.
 
Leigh Tate
author & steward
Posts: 5409
Location: Southeastern U.S. - Zone 7b
3138
5
goat cat forest garden foraging food preservation fiber arts medical herbs writing solar wood heat homestead
  • Likes 7
  • Mark post as helpful
  • send pies
    Number of slices to send:
    Optional 'thank-you' note:
  • Quote
  • Report post to moderator

Scott Weinberg wrote:Leigh,  
   I am curious, with your off set stove, (in the bell)  are you noticing any difference of bell temp on bell side closest to the stove vs the opposing side?  


Scott, it's hard to tell because we have less clearance on the bell side than on the chimney side. So I can't really get a good feel for it. It seems that both sides heat up about the same.

And your black oven, have you run it long enough to predict "time to X temp and/or time at a somewhat consistent temp for baking"?.  Such as 350 F for X amount of  hours or anything like that.   AS far as that goes, I have never baked in a black oven, Does bread have a completely different look and taste? I presume, but only guessing this would be done, after the fire is out?


I'll let you know! So far we've been concentrating on fire building and how it runs. I am anxious to see what the oven does, but it's one step at a time.

Did you install any temp sensors just to watch differences in locations?


No, although that would have been a good idea. We were mostly just thinking "I hope this works" rather than the tech aspects. For now, I'm just using the touch method to monitor. Probably not surprising, the center heats up first and then the base and arch.
 
thomas rubino
rocket scientist
Posts: 6531
Location: latitude 47 N.W. montana zone 6A
3400
cat pig rocket stoves
  • Likes 5
  • Mark post as helpful
  • send pies
    Number of slices to send:
    Optional 'thank-you' note:
  • Quote
  • Report post to moderator
Hi Leigh;
Did Dan use clay mortar or cement on the bell bricks?
 
Scott Weinberg
Posts: 319
Location: North East Iowa, USA
91
  • Likes 9
  • Mark post as helpful
  • send pies
    Number of slices to send:
    Optional 'thank-you' note:
  • Quote
  • Report post to moderator

Leigh Tate wrote:

Scott Weinberg wrote:Leigh,  
   I am curious, with your off set stove, (in the bell)  are you noticing any difference of bell temp on bell side closest to the stove vs the opposing side?  

  We were mostly just thinking "I hope this works" rather than the tech aspects. For now, I'm just using the touch method to monitor. Probably not surprising, the center heats up first and then the base and arch.


thanks for your quick reply, and again, excellent show casing of your new stove.

I did a quick check on your internal dimensions given to calculate the ISA  and came up with 56.3 ft square, I did not convert to meters square, but easy enough to do.  This of course is subject to my interpretation of your numbers given.

 I don't know if this is a valid observation, but  only when my exterior bell temp goes over 150 degree F,  does my exit flue pipe start to rise above this number.  i.e. if I go for 175 degrees, my exit can go up to 165 Degrees F.  Always with zero smoke,  some noticeable steam   This works for me, other results may vary of course.  

On another thread it was talked about "what it takes to inspire others to build this type of stoves"  all kinds of ideas of course. Even name changes.  But I strongly feel it will be work like yours, showcased with photos and someday published results, like Tom (the dragon slayer) and Glenn L, high in the mountains have done.  

I feel things like this will do more to promote than just about anything else.   Toss in Peter V's excellent math calculations with backed up testing, only improve the end results for all.

Well done.
 
Rocket Scientist
Posts: 1810
Location: Kaslo, BC
525
building solar woodworking rocket stoves wood heat greening the desert
  • Likes 5
  • Mark post as helpful
  • send pies
    Number of slices to send:
    Optional 'thank-you' note:
  • Quote
  • Report post to moderator
Great job!
Very nice to see (and feel) your dream finally come true
 
Leigh Tate
author & steward
Posts: 5409
Location: Southeastern U.S. - Zone 7b
3138
5
goat cat forest garden foraging food preservation fiber arts medical herbs writing solar wood heat homestead
  • Likes 6
  • Mark post as helpful
  • send pies
    Number of slices to send:
    Optional 'thank-you' note:
  • Quote
  • Report post to moderator

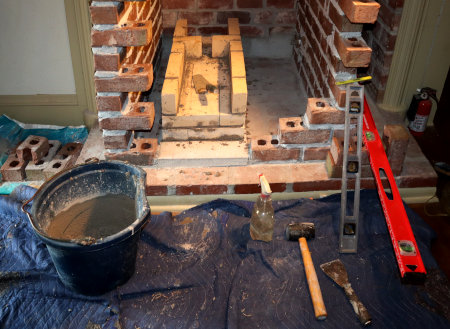
thomas rubino wrote:Did Dan use clay mortar or cement on the bell bricks?


Tom, I think he used the same mix that he did on our Walker masonry stove: fire clay, sand, and cement.
 
Leigh Tate
author & steward
Posts: 5409
Location: Southeastern U.S. - Zone 7b
3138
5
goat cat forest garden foraging food preservation fiber arts medical herbs writing solar wood heat homestead
  • Likes 4
  • Mark post as helpful
  • send pies
    Number of slices to send:
    Optional 'thank-you' note:
  • Quote
  • Report post to moderator
Scott thank you for your calculations and your observations. I will have to do some monitoring of the various temps during operation, once we are up and running regularly.
 
thomas rubino
rocket scientist
Posts: 6531
Location: latitude 47 N.W. montana zone 6A
3400
cat pig rocket stoves
  • Likes 11
  • Mark post as helpful
  • send pies
    Number of slices to send:
    Optional 'thank-you' note:
  • Quote
  • Report post to moderator
Hey Leigh;
I asked about the mortar because I was thinking about how easy it is to install temperature probes.
An all-clay & sand mortar would be easy to "drill" through with an awl.  With cement added you might need a masonry drill.
A cheap temperature meter with one to four channels comes with sensors and costs around $30.
They are no larger than 1/8", so you do not need much room to install them.
Insert one at the top of the bell; another might go in your new oven. The chimney temperature is important to know.

Certainly a luxury, monitoring temps but kind of geeky fun as well.


https://www.amazon.com/DANOPLUS-Thermocouple-Thermometer-50-1300%C2%B0C-Temperature/dp/B09836Y2CT/ref=sr_1_14_sspa?sr=8-14-spons&sp_csd=d2lkZ2V0TmFtZT1zcF9tdGY&psc=1

20241109_094637.jpg
[Thumbnail for 20241109_094637.jpg]
 
Peter van den Berg
gardener
Posts: 1068
Location: +52° 1' 47.40", +4° 22' 57.80"
455
woodworking rocket stoves wood heat
  • Likes 7
  • Mark post as helpful
  • send pies
    Number of slices to send:
    Optional 'thank-you' note:
  • Quote
  • Report post to moderator
Thanks for the measurements.
I checked the Internal Surface Area and I think Scott is right. I made a small drawing without front for this purpose and it looks surprisingly small.


Posts: 59
8
  • Likes 5
  • Mark post as helpful
  • send pies
    Number of slices to send:
    Optional 'thank-you' note:
  • Quote
  • Report post to moderator
Can I just say how I love the fact you have used an arch to form the top of the bell. I personally think it looks really great. compare this to the 'regular' way of closing the top of the bell, (steel Ts, superwool and firebricks), this just 'feels right'. Likely harder to build, but in essence a simpler construction. Thanks again for highlighting this is another option!
 
Leigh Tate
author & steward
Posts: 5409
Location: Southeastern U.S. - Zone 7b
3138
5
goat cat forest garden foraging food preservation fiber arts medical herbs writing solar wood heat homestead
  • Likes 6
  • Mark post as helpful
  • send pies
    Number of slices to send:
    Optional 'thank-you' note:
  • Quote
  • Report post to moderator

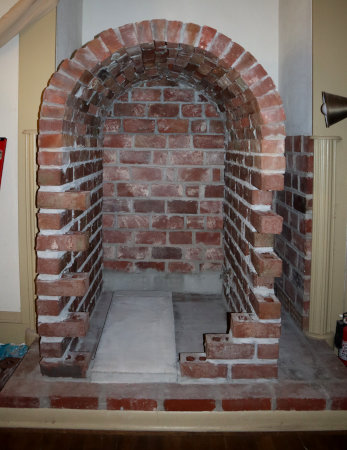
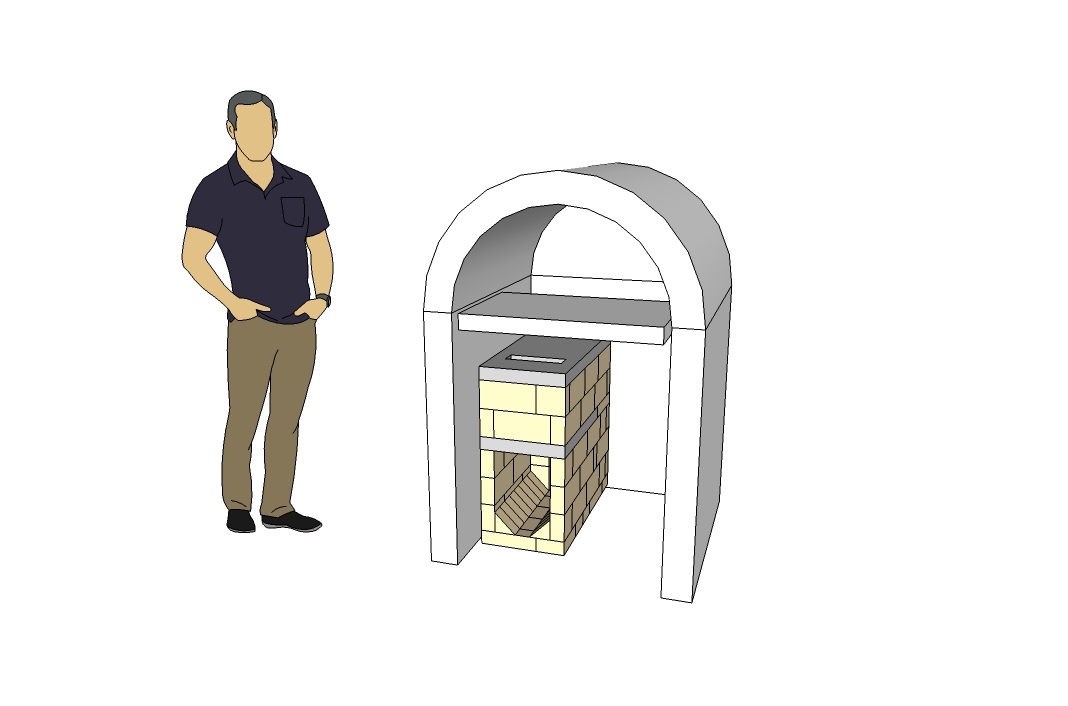
Peter van den Berg wrote: I made a small drawing without front for this purpose and it looks surprisingly small.


Peter, yes, that it! It does look small compared the the human figure, which surprised me. I think that's because we didn't build it directly on the floor, but our brick alcove floor is about a 6-inch step-up. So it seems taller to me.

Our challenge was the small space we had to work with, so that was limiting in some ways, but it worked out well. Looking at the numbers here, I'm thinking we probably could have made it a little taller. It kind of evolved as we went along.
 
Leigh Tate
author & steward
Posts: 5409
Location: Southeastern U.S. - Zone 7b
3138
5
goat cat forest garden foraging food preservation fiber arts medical herbs writing solar wood heat homestead
  • Likes 8
  • Mark post as helpful
  • send pies
    Number of slices to send:
    Optional 'thank-you' note:
  • Quote
  • Report post to moderator
UPDATE! I removed the oven floor.

This was an experiment because somehow, Dan felt we weren't getting the best performance out of our RMH in terms of heat and rocketyness. Of the oven, I was only getting it to about 250 degrees F. This was fine for things like heating soups and cooking beans, but not what I was expecting.

We analyzed possible reasons, and the other day I pulled out the cast iron grates and the oven firebrick floor. That must have been it because what a difference. It burns better and hotter now, and Dan's happy with it.

The angle iron frame remains for the oven, so I will try it again with just the grates and no firebrick.
 
Fox James
Rocket Scientist
Posts: 805
Location: Guernsey a small island near France.
304
  • Likes 7
  • Mark post as helpful
  • send pies
    Number of slices to send:
    Optional 'thank-you' note:
  • Quote
  • Report post to moderator
You could try replacing the oven floor with a kiln shelf or ceramic glass!
The fire brick floor might of been OK if you were running the fire flat out several hours, as an example, a pizza oven floor will take 2-3 hours to heat  the floor fire bricks.


Leigh Tate
author & steward
Posts: 5409
Location: Southeastern U.S. - Zone 7b
3138
5
goat cat forest garden foraging food preservation fiber arts medical herbs writing solar wood heat homestead
  • Likes 4
  • Mark post as helpful
  • send pies
    Number of slices to send:
    Optional 'thank-you' note:
  • Quote
  • Report post to moderator
I'm definitely interested in some experimentation. I wonder though, if the bricks somehow interfered with the air/heat circulation for the core.
 
Posts: 629
Location: Sierra Nevada foothills, 350 m, USDA 8b, sunset zone 7
109
  • Likes 4
  • Mark post as helpful
  • send pies
    Number of slices to send:
    Optional 'thank-you' note:
  • Quote
  • Report post to moderator
Is your intention to bake when the firebox is burning or after the coals died out?
Black ovens in rocket heaters are made by connecting the top of the riser to the bottom of the oven's floor. The oven would be fully encased in firebricks and have sufficient outlet openings to route the hot gases to the bell. The same in Kuznetsov heater/oven configuration.However in Kuznetsov heater the oven is the burn chamber - like the riser in the rocket stove, so the true comparison would be to have an oven in the riser.  In case of rocket heater with oven at the riser top, it will affect the draft and general performance of the heater. It's difficult to have all-in-one, as specialized devices work better than multifunctional.

In you case you don't get enough localized heat - first it's being absorbed by the top roof of the DSR firebox, then the firebricks absorb the heat to such an extent that's it too cold for baking. Even a regular thin (high alumina) kiln shelf is quite a barrier for the heat transfer. In my gas kiln the differences between shelf temperatures is around 100 C - the first shelf is the hottest (with the propane  burner under it), then the second is cooler and the top one is the coldest. Cast iron or sheet of steel would work better in your heater. White oven inserts - available in Europe are made from sheet metal with cast iron door, but they are not considered to be ovens - just reheaters or used for boiling soups, stews.

Your best bet would be to bake in the firebox which is sufficiently hot, because it's heated from WITHIN like all pizza ovens and professional wood fired bread ovens. It looks that you have some form of insulation under the firebox and it will be your best friend, because when baking you want to have more heat at the bottom.
The top "oven" space can be used for reheating/cooking.
 
Leigh Tate
author & steward
Posts: 5409
Location: Southeastern U.S. - Zone 7b
3138
5
goat cat forest garden foraging food preservation fiber arts medical herbs writing solar wood heat homestead
  • Likes 7
  • Mark post as helpful
  • send pies
    Number of slices to send:
    Optional 'thank-you' note:
  • Quote
  • Report post to moderator

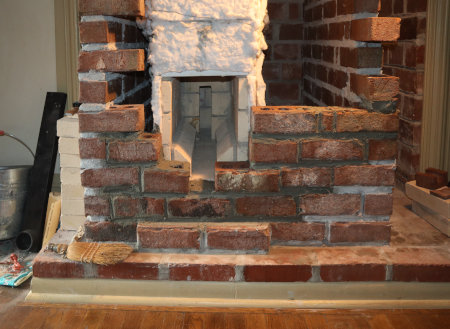
Cristobal Cristo wrote:Is your intention to bake when the firebox is burning or after the coals died out?


That was to be determined by checking oven temp in at various stages of the fire process. I did that for awhile and concluded that 250F was the best I could get after the bell had heated up.

In case of rocket heater with oven at the riser top, it will affect the draft and general performance of the heater. It's difficult to have all-in-one, as specialized devices work better than multifunctional.


That was our conclusion. With the firebricks removed, the performance is much better.

I also removed the cast iron grate above the firebricks, so my next experiment will be to put the grates back and see what kind of oven temps I get.

In our case, the primary objective was the heater. The oven was an add-on because why not? So no matter how the oven functions, nothing lost.
 
steward
Posts: 16584
Location: USDA Zone 8a
4342
dog hunting food preservation cooking bee greening the desert
  • Likes 6
  • Mark post as helpful
  • send pies
    Number of slices to send:
    Optional 'thank-you' note:
  • Quote
  • Report post to moderator
I am a little late to the party so I just want to say ... that is a beautiful RMH!
 
Posts: 144
28
cat purity dog home care trees books chicken food preservation cooking wood heat homestead
  • Likes 5
  • Mark post as helpful
  • send pies
    Number of slices to send:
    Optional 'thank-you' note:
  • Quote
  • Report post to moderator
Leigh!  Wow!  That is absolutely beautiful!  I don't know the first thing about RMH but I know beauty when I see it!  When I get my house built, I decided to have a masonry heater built to heat the house (with an oven and a nook for pet beds).  Without having looked into it yet, it looks like a RMH is similar, but for heating smaller spaces?

Thanks for posting the pictures!  They're definitely inspiring!
 
If you believe you can tell me what to think, I believe I can tell you where to go. Go read this tiny ad!
A PDC for cold climate homesteaders
http://permaculture-design-course.com
reply
    Bookmark Topic Watch Topic
  • New Topic