• Post Reply Bookmark Topic Watch Topic
  • New Topic
permaculture forums growies critters building homesteading energy monies kitchen purity ungarbage community wilderness fiber arts art permaculture artisans regional education skip experiences global resources cider press projects digital market permies.com pie forums private forums all forums
this forum made possible by our volunteer staff, including ...
master stewards:
  • r ranson
  • Nancy Reading
  • Carla Burke
  • John F Dean
  • Jay Angler
  • paul wheaton
stewards:
  • Nicole Alderman
  • Pearl Sutton
  • Anne Miller
master gardeners:
  • Christopher Weeks
  • Timothy Norton
gardeners:
  • Nina Surya
  • Matt McSpadden
  • thomas rubino

Rammed earth core construction

 
Posts: 1670
Location: Fennville MI
83
  • Mark post as helpful
  • send pies
    Number of slices to send:
    Optional 'thank-you' note:
  • Quote
  • Report post to moderator
Working on a variation on the cast core theme, I tried something over the weekend. Mixing roughly one part bentonite clay to three parts sand and one part perlite, adding enough water to mix it up and get a reasonably stiff ball, I then packed it into my mold form and rammed it home firmly.

For the first attempt, I planned a two piece casting, with one mold to produce two identical (and symmetrical) halves. The first phase went well enough, but when I removed the casting from the mold and tried to get it set upright, I had catastrophic failure. Uncertain whether it would have fared better had I given it more time to dry and set.

After due consideration, I'll be making a form along the lines of Matt's Youtube video for casting a core, and setting it in its final place before loading it up

This way I eliminate the issues of unmolding and moving the casting...

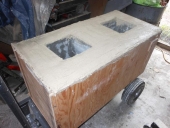
So, I've got a bed of sand, leveled off and a few inches thick. I'll make a bottomless box of appropriate size, pack in a few inches of my mix and then set the form on that and finish filling. Tamp everything thoroughly and forget it exists for a week or two so it has some chance to cure. Remove the box and forget about it for another week Then a test run. And then cob it up, get the heat riser formed up, seat the barrel over that and run out the bench.

All of this is going in a seasonal greenhouse structure off the back of my house.

You may be able to imagine my disappointment when that casting came apart... This time, no such problem - I hope

Any thoughts? Am I making a terrible mistake with the bentonite clay?

 
Peter Ellis
Posts: 1670
Location: Fennville MI
83
  • Mark post as helpful
  • send pies
    Number of slices to send:
    Optional 'thank-you' note:
  • Quote
  • Report post to moderator
Well, mod 2 was constructed and had a test burn Sunday. Burned out the wood of the mold and seemed to have some issues getting the draft going the right way, in part due to the wood at the top of the feed tube burning. Seems if you have fire right there at the top of the feed tube, it tends to counter the draw of the heat riser a bit

In any event, the core appears to be viable. Now to build an actual insulated heat riser and get the mass portion constructed.

Because my land has zero clay in the soil (USGS says in my area it's 100% sand, and they are not wrong), I'm planning not to use cob for the bench, but will go with a sand filled wooden frame. The sand ought to work fine as thermal mass and the wood will provide the structure.

Still wrestling a bit with what to use to make the ductwork, because I'm not finding much in the way of sources. I am considering a bell option also, instead of ducting.
 
gardener
Posts: 5258
Location: Cincinnati, Ohio,Price Hill 45205
1042
forest garden trees urban
  • Mark post as helpful
  • send pies
    Number of slices to send:
    Optional 'thank-you' note:
  • Quote
  • Report post to moderator
Tin cans maybe?
 
Peter Ellis
Posts: 1670
Location: Fennville MI
83
  • Mark post as helpful
  • send pies
    Number of slices to send:
    Optional 'thank-you' note:
  • Quote
  • Report post to moderator
Curious. The only comment is a suggestion to use tin cans?

Should I bother reporting on progress when no one has any feedback?

 
Posts: 9002
Location: Victoria British Columbia-Canada
708
  • Mark post as helpful
  • send pies
    Number of slices to send:
    Optional 'thank-you' note:
  • Quote
  • Report post to moderator
With so much photographic information available, I suspect that most are waiting to see it.

For ducting, I would contact scrap guys and intercept useful materials before they make it to a recycling facility.
 
rocket scientist
Posts: 6524
Location: latitude 47 N.W. montana zone 6A
3394
cat pig rocket stoves
  • Mark post as helpful
  • send pies
    Number of slices to send:
    Optional 'thank-you' note:
  • Quote
  • Report post to moderator
Hi peter; Home depot has 5' pieces of hvac pipe at reasonable prices use regular black wood stove pipe to start from your transition area then switch to hvac pipe after that. all your pipe should be covered with a cob mixture to create a clay tunnel that your heat travels down, if you cannot find any clay in your area buying bentonite or fireclay in bags may be possible. Or maybe a roadtrip to someplace clay would be available. County road crews are an excellent place to find out if they have any clay pockets in their area. If you do not cover your pipe with cob your mass will fall in your pipes when the metal rots away.
rocket-heater_021_070.JPG
[Thumbnail for rocket-heater_021_070.JPG]
rocket-heater_023_072.JPG
[Thumbnail for rocket-heater_023_072.JPG]
 
Posts: 24
Location: Providence, United States
2
  • Mark post as helpful
  • send pies
    Number of slices to send:
    Optional 'thank-you' note:
  • Quote
  • Report post to moderator
I am extremely interested in learning how rammed earth interacts with rocket mass heaters.  I live in Maine and it can be tough to find refractory bricks, hard fire bricks, etc. without spending a small fortune.

If you could ram a core out of local earth (I live on a sand dune) and mix some clay and some kind of vermiculite or something like that with a binder like refractory cement or something, then that would be pretty cool.

Then you could build the outer walls of the bell from local sand and clay and the top you could use the mix you made for the core.  Voila!
 
Posts: 525
Location: Northern Germany (Zone 8a)
27
  • Mark post as helpful
  • send pies
    Number of slices to send:
    Optional 'thank-you' note:
  • Quote
  • Report post to moderator
my thoughts (just planning, no actual experience) is to make a rectangular box from rammed earth (RE). maybe 4-6 inches wide. this will be the "casing" for a core from clay-perlite-mix. then fill the bottom of the RE-box with clay-perlite (1-2 inches would be enough?), set a J-tube box from wood as sacrificial inner mold and put the clay-perlite around and above it (2 inches thick or more?). then cob above it, put heat riser on top and the bell etc.

i d like to make the bell and bench (no ducting just RE-channels) from RE. Our dug up subsoil is very clay rich, it makes solid stuff with just a little tampering

probably you could do other cast-core recipies in a RE-casing/box, when you would be able to get the inner form out. drying out the cast core could be an issue.
 
Rocket Scientist
Posts: 4574
Location: Upstate NY, zone 5
599
5
  • Mark post as helpful
  • send pies
    Number of slices to send:
    Optional 'thank-you' note:
  • Quote
  • Report post to moderator
If you make the inner form from thin scrap wood or plywood, it can burn out with no problems.

I have done this with an all-cob rocket core more than once with good results.

Mty experience with native clay in three different areas of the northeast is that it can be (carefully) fired even while the cob is damp with no ill effects.
 
What do you have to say for yourself? Hmmm? Anything? And you call yourself a tiny ad.
Free Seed Starting ebook!
https://permies.com/t/274152/Orta-Guide-Seed-Starting-Free
reply
    Bookmark Topic Watch Topic
  • New Topic