• Post Reply Bookmark Topic Watch Topic
  • New Topic
permaculture forums growies critters building homesteading energy monies kitchen purity ungarbage community wilderness fiber arts art permaculture artisans regional education skip experiences global resources cider press projects digital market permies.com pie forums private forums all forums
this forum made possible by our volunteer staff, including ...
master stewards:
  • Carla Burke
  • John F Dean
  • Timothy Norton
  • Nancy Reading
  • r ranson
  • Jay Angler
  • Pearl Sutton
stewards:
  • paul wheaton
  • Tereza Okava
  • Andrés Bernal
master gardeners:
  • Christopher Weeks
gardeners:
  • Jeremy VanGelder
  • M Ljin
  • Matt McSpadden

Cob and brick oven with rocket technology

 
Rocket Scientist
Posts: 762
Location: Province of Granada, Andalucía, Spain
525
6
cooking rocket stoves woodworking wood heat
  • Likes 12
  • Mark post as helpful
  • send pies
    Number of slices to send:
    Optional 'thank-you' note:
  • Quote
  • Report post to moderator
I have, after way too much pondering, finally started the construction of my cob and brick oven powered by rocket technology.

It will be a black oven.
A big clay tile will be positioned over the riser and act as a pizza stone.

The power will come from a 6" J-tube built in dense firebrick and a "5-Minute"-riser.
Dimensions (inside) are feed 27 cm, burn tunnel 62 cm, riser 85 cm.
Exhaust will be 150 mm pipe.


I have an open ear for any questions and suggestions!


Yesterday I put down some foundation to keep the construction off the ground (there's sometimes rainwater washing down that path).


Then a layer of expanded clay bound with lime.
Then sand for an extra level bed for the core.


Then I built the core, sticking everything with some clay slip and adding some cob (actually more clay mortar, no fiber) on some of the joints.


I also researched how to use my laptops webcam to take time lapse photos (1 every 5 s). So I'll compile a time lapse of the build. Unfortunately I took a single photo the first day instead of starting the time lapse.
 
master rocket scientist
Posts: 6753
Location: latitude 47 N.W. montana zone 6A
3630
cat pig rocket stoves
  • Likes 9
  • Mark post as helpful
  • send pies
    Number of slices to send:
    Optional 'thank-you' note:
  • Quote
  • Report post to moderator
Hi Ben;
A good-looking start!
I'm curious to see how you will go about the rest of your build.

Have you studied Matt Walker's riser-less core?
Check out my oven build.
https://permies.com/t/164923/rocket-ovens/Build-Black-White-Rocket-Oven
 
Benjamin Dinkel
Rocket Scientist
Posts: 762
Location: Province of Granada, Andalucía, Spain
525
6
cooking rocket stoves woodworking wood heat
  • Likes 8
  • Mark post as helpful
  • send pies
    Number of slices to send:
    Optional 'thank-you' note:
  • Quote
  • Report post to moderator
Hi Thomas,
I've seen your oven and it's really cool. Black and white function especially.

I have also seen Matt's riserless cores, but wanted to first go more traditional.  

One of my design goals was a pizza stone and a round cupola.
 
Rocket Scientist
Posts: 826
Location: Guernsey a small island near France.
327
  • Likes 8
  • Mark post as helpful
  • send pies
    Number of slices to send:
    Optional 'thank-you' note:
  • Quote
  • Report post to moderator
5 min riser and a black oven, that is quite likely to pollute your food, I would look for a safer option?
 
thomas rubino
master rocket scientist
Posts: 6753
Location: latitude 47 N.W. montana zone 6A
3630
cat pig rocket stoves
  • Likes 6
  • Mark post as helpful
  • send pies
    Number of slices to send:
    Optional 'thank-you' note:
  • Quote
  • Report post to moderator
Hi Ben;

I had not considered the use of a five-minute riser in a black oven.
Fox is correct; you should consider using firebricks or a riserless core for black oven use.
 
Benjamin Dinkel
Rocket Scientist
Posts: 762
Location: Province of Granada, Andalucía, Spain
525
6
cooking rocket stoves woodworking wood heat
  • Likes 6
  • Mark post as helpful
  • send pies
    Number of slices to send:
    Optional 'thank-you' note:
  • Quote
  • Report post to moderator
Hey guys,

good point. Would you care to elaborate what the difference is? Why does it work for a stove but not an oven?

As I understand it the carcinogens come from breathing in very small particle things?
 
thomas rubino
master rocket scientist
Posts: 6753
Location: latitude 47 N.W. montana zone 6A
3630
cat pig rocket stoves
  • Likes 9
  • Mark post as helpful
  • send pies
    Number of slices to send:
    Optional 'thank-you' note:
  • Quote
  • Report post to moderator
Small particles may be released by the riser during operation.
These would tend to settle on your food.
Is that unhealthy? I'm not sure how bad it is, but it can't be good for you.

In a bell/ bench, those loose particles would settle to the floor; a few might travel up the chimney pipe and get outside, but not enough to be concerned with.

Use dense bricks and wrap them with rockwool; then, there are no worries.
 
Benjamin Dinkel
Rocket Scientist
Posts: 762
Location: Province of Granada, Andalucía, Spain
525
6
cooking rocket stoves woodworking wood heat
  • Likes 7
  • Mark post as helpful
  • send pies
    Number of slices to send:
    Optional 'thank-you' note:
  • Quote
  • Report post to moderator
Ok, will do.
I’ll keep you posted on the progress.
Thanks for watching out!
 
Benjamin Dinkel
Rocket Scientist
Posts: 762
Location: Province of Granada, Andalucía, Spain
525
6
cooking rocket stoves woodworking wood heat
  • Likes 10
  • Mark post as helpful
  • send pies
    Number of slices to send:
    Optional 'thank-you' note:
  • Quote
  • Report post to moderator
Yesterday I went and harvested some clay from a site a friend of mine, being a geologist, was happy to point out to me.


Cracked soil is a good indicator for high clay content


The clay soil was really hard to dig, hard as a rock almost


It's good clay though, and after re moisturizing is nice to work with and has almost no stones.


thomas rubino
master rocket scientist
Posts: 6753
Location: latitude 47 N.W. montana zone 6A
3630
cat pig rocket stoves
  • Likes 9
  • Mark post as helpful
  • send pies
    Number of slices to send:
    Optional 'thank-you' note:
  • Quote
  • Report post to moderator
Excellent find, Ben!
A whole hilltop of material for your builds.
Is it a hike to get to or near a road?
Having knowledgeable friends is sure useful.
Keep up the good work, apprentice. You are quickly becoming a full-fledged Rocket Scientist!
Upon graduation, your lab coat, pocket protector, and certificate will be mailed as soon as we have them. Don't hold your breath, though.


Posts: 32
7
  • Likes 8
  • Mark post as helpful
  • send pies
    Number of slices to send:
    Optional 'thank-you' note:
  • Quote
  • Report post to moderator
I was thinking of doing a cob oven powered by the shorty core.

The top is the batchbox would be the floor of the oven with the opening of the riser in the back or side of the oven.
 
Benjamin Dinkel
Rocket Scientist
Posts: 762
Location: Province of Granada, Andalucía, Spain
525
6
cooking rocket stoves woodworking wood heat
  • Likes 8
  • Mark post as helpful
  • send pies
    Number of slices to send:
    Optional 'thank-you' note:
  • Quote
  • Report post to moderator
Today I made some more cob with the harvested clay, replaced the 5-minutue-riser with a riser made from dense firebrick and raised a layer of (insulative) cob around the core.
Also I had the idea to put a tile with a cutout on top of the feed tube to give it some stability.


Benjamin Dinkel
Rocket Scientist
Posts: 762
Location: Province of Granada, Andalucía, Spain
525
6
cooking rocket stoves woodworking wood heat
  • Likes 8
  • Mark post as helpful
  • send pies
    Number of slices to send:
    Optional 'thank-you' note:
  • Quote
  • Report post to moderator
Added RockWool insulation around the riser, more insulative cob around the core and started building up regular cob around the perimeter.


Used broken roof tiles as support and "urbanite" as a fill in.


thomas rubino
master rocket scientist
Posts: 6753
Location: latitude 47 N.W. montana zone 6A
3630
cat pig rocket stoves
  • Likes 9
  • Mark post as helpful
  • send pies
    Number of slices to send:
    Optional 'thank-you' note:
  • Quote
  • Report post to moderator
Hi Ben;
It's starting to look like a Rocket Stove!
You will be cooking in no time!

I have a suggestion for utilizing urbanite in future builds.
Rather than the easy method of pouring your fill, use the lasagna method.
A thin layer of cob and a layer of urbanite continue up until filled.
This eliminates air space and holds heat longer.
On an outdoor stove build, this is not an issue.
On an indoor stove, you want as few air gaps as possible in your mass.
 
Benjamin Dinkel
Rocket Scientist
Posts: 762
Location: Province of Granada, Andalucía, Spain
525
6
cooking rocket stoves woodworking wood heat
  • Likes 9
  • Mark post as helpful
  • send pies
    Number of slices to send:
    Optional 'thank-you' note:
  • Quote
  • Report post to moderator
Hi Tom,
thank you for the suggestion.
If a thermal mass was my goal, I would have put more cob. Here I am almost going for the opposite. Air gaps are very welcome as long as the base is sturdy enough to support the oven on top.
 
Benjamin Dinkel
Rocket Scientist
Posts: 762
Location: Province of Granada, Andalucía, Spain
525
6
cooking rocket stoves woodworking wood heat
  • Likes 10
  • Mark post as helpful
  • send pies
    Number of slices to send:
    Optional 'thank-you' note:
  • Quote
  • Report post to moderator
Today I only got a little bit done, about 1h of work.
Added on to both types of cob walls and started the weird sculpting, overhang phase with the help of some broken roof tiles. The base of the actual oven will/should extend over the feed tube, hence overhanging cob.


Benjamin Dinkel
Rocket Scientist
Posts: 762
Location: Province of Granada, Andalucía, Spain
525
6
cooking rocket stoves woodworking wood heat
  • Likes 11
  • Mark post as helpful
  • send pies
    Number of slices to send:
    Optional 'thank-you' note:
  • Quote
  • Report post to moderator
The past few days I made less progress.
I had to get more clay.
Then I fixed an appearing crack and added another row of cob, interior (around the riser) and exterior.
And I used another clay tile to finish the "roof" over the burn tunnel.


I'm realizing that it takes very long, as I can only build up around 20cm (8") per day.
If I was to sell this to a costumer, I would need to use blocks and mortar.
 
Rocket Scientist
Posts: 1814
Location: Kaslo, BC
530
building solar woodworking rocket stoves wood heat greening the desert
  • Likes 12
  • Mark post as helpful
  • send pies
    Number of slices to send:
    Optional 'thank-you' note:
  • Quote
  • Report post to moderator
Adding chunks of dense materials (like rocks, broken bricks etc) that are all hidden away between the cob will save you a fair amount of time making it and will allow more structure to build higher each day.
Like the clay tiles your using, these dense materials of various shapes can also provide a formwork to support the wet cob and produce shapes that would otherwise be more difficult (and slow) to do with just cob.

 
Benjamin Dinkel
Rocket Scientist
Posts: 762
Location: Province of Granada, Andalucía, Spain
525
6
cooking rocket stoves woodworking wood heat
  • Likes 10
  • Mark post as helpful
  • send pies
    Number of slices to send:
    Optional 'thank-you' note:
  • Quote
  • Report post to moderator
Thanks Gerry.
Even with the support of the tile or the canes I used on the riser it is a challenge to rise it more than 8" at a time. I hope to get a morning and evening row done today.
 
Benjamin Dinkel
Rocket Scientist
Posts: 762
Location: Province of Granada, Andalucía, Spain
525
6
cooking rocket stoves woodworking wood heat
  • Likes 10
  • Mark post as helpful
  • send pies
    Number of slices to send:
    Optional 'thank-you' note:
  • Quote
  • Report post to moderator
Today was a good day. Added a big chunk of cob, filled in some sand, and have the base almost ready for the actual oven. Also I have a good idea of how to start it, so I'm excited about tomorrow and the actual oven part of the  build.


The exhaust pipe and tiles are in place for me to better envision the next steps.
 
Benjamin Dinkel
Rocket Scientist
Posts: 762
Location: Province of Granada, Andalucía, Spain
525
6
cooking rocket stoves woodworking wood heat
  • Likes 9
  • Mark post as helpful
  • send pies
    Number of slices to send:
    Optional 'thank-you' note:
  • Quote
  • Report post to moderator
And I'm also getting super excited about the time lapse I'm taking of (almost) the whole process.

 
thomas rubino
master rocket scientist
Posts: 6753
Location: latitude 47 N.W. montana zone 6A
3630
cat pig rocket stoves
  • Likes 9
  • Mark post as helpful
  • send pies
    Number of slices to send:
    Optional 'thank-you' note:
  • Quote
  • Report post to moderator
Ben, that is coming along nicely!
Immaculate build, very professional looking!
Your time-lapse video has come out well, I like it.
We should order your diploma, lab coat, and pocket protector as soon as possible.
Your graduation to full rocket scientist is coming up quickly.
 
Benjamin Dinkel
Rocket Scientist
Posts: 762
Location: Province of Granada, Andalucía, Spain
525
6
cooking rocket stoves woodworking wood heat
  • Likes 8
  • Mark post as helpful
  • send pies
    Number of slices to send:
    Optional 'thank-you' note:
  • Quote
  • Report post to moderator
I have to admit I'm dreading the next steps.
The bottom of the oven and the transition into the actual oven build. I'm probably overthinking it and will come up with solutions once I'm building. But I took it slow the past couple of days.
Got some horse manure to make a finer cob for the interior and later to cover the whole oven structure.

I added an insulating layer of shiv and clay (roughly 4:1,5 ratio) under the oven floor. Roughly 2" thick. The same material will also be wrapped around the bricks and cob that will make the inside of the oven.

Suddenly, I realized I almost forgot to put the temperature probe in. So I dug a little bit, cut a brick of the riser and fitted it in to measure in the middle of the riser. And the cable leads out to where I can put the digital thermometer.


What do you think about the position of the probe?

Would the  exhaust temperature be interesting or just the riser and the inside of the oven?
 
thomas rubino
master rocket scientist
Posts: 6753
Location: latitude 47 N.W. montana zone 6A
3630
cat pig rocket stoves
  • Likes 9
  • Mark post as helpful
  • send pies
    Number of slices to send:
    Optional 'thank-you' note:
  • Quote
  • Report post to moderator
Hi Ben;
A couple of things I learned on Shorty Core.
Peter suggested the temperature probe should only protrude into the riser path 20mm or so.
The actual flame path is on the outside edges of the riser
Even though we bought "good" ones, my riser probe and Glenn's riser probe had a relatively short lifespan.  
Both had quit working reliably within a month...
It is fun to see how hot your riser is getting.

Looking good!
.

 
Benjamin Dinkel
Rocket Scientist
Posts: 762
Location: Province of Granada, Andalucía, Spain
525
6
cooking rocket stoves woodworking wood heat
  • Likes 7
  • Mark post as helpful
  • send pies
    Number of slices to send:
    Optional 'thank-you' note:
  • Quote
  • Report post to moderator
Good to know. Then I'll get it to the side a bit. Although a life span of a month makes me think I should find a way to measure only sporadically and not permanently install the probe.
 
Benjamin Dinkel
Rocket Scientist
Posts: 762
Location: Province of Granada, Andalucía, Spain
525
6
cooking rocket stoves woodworking wood heat
  • Likes 8
  • Mark post as helpful
  • send pies
    Number of slices to send:
    Optional 'thank-you' note:
  • Quote
  • Report post to moderator
Had some visitors and took some days to think about how to actually build the oven part.

The oven base tiles cut and layed out


Transition from riser to oven without the tile floor


Tile floor in final position


Built a wooden support for the brick arch and started the brick laying with clay mortar

 
Benjamin Dinkel
Rocket Scientist
Posts: 762
Location: Province of Granada, Andalucía, Spain
525
6
cooking rocket stoves woodworking wood heat
  • Likes 8
  • Mark post as helpful
  • send pies
    Number of slices to send:
    Optional 'thank-you' note:
  • Quote
  • Report post to moderator
I was able to raise the arch almost allthe way, when I noticed that the weight moved the stones to the outside. So I stopped and added some "thermal" cob first.
Then completed the arch and the layer of thermal cob.


The tile will become the door later.


I then applied shiv with clay as an insulating layer. It'll also provide some structural strength.


I waited a day and dared to take out the support. It worked! My first ever brick arch! It is very satisfying.


Benjamin Dinkel
Rocket Scientist
Posts: 762
Location: Province of Granada, Andalucía, Spain
525
6
cooking rocket stoves woodworking wood heat
  • Likes 6
  • Mark post as helpful
  • send pies
    Number of slices to send:
    Optional 'thank-you' note:
  • Quote
  • Report post to moderator

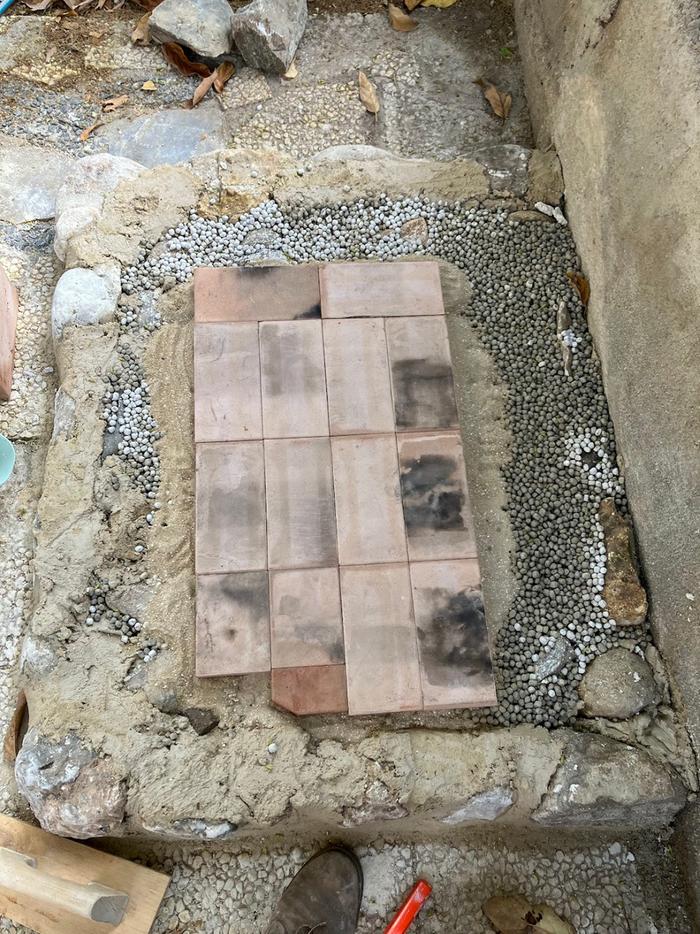
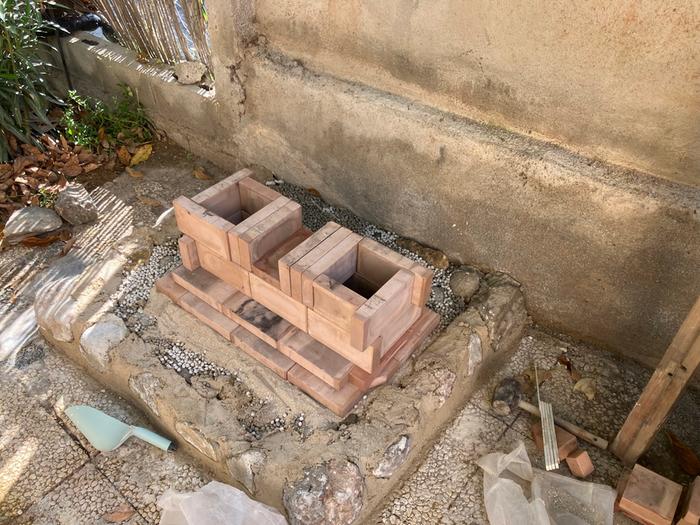
thomas rubino wrote:
We should order your diploma, lab coat, and pocket protector as soon as possible.
Your graduation to full rocket scientist is coming up quickly.


I didn't realize till now that there was a parcel waiting ;) And with it a brand new title!
Thank you so much Thomas. And to all the other fellow scientists too. I'm happy to join, experiment and pass on the knowledge. As all of y'all are doing.
 
Benjamin Dinkel
Rocket Scientist
Posts: 762
Location: Province of Granada, Andalucía, Spain
525
6
cooking rocket stoves woodworking wood heat
  • Likes 9
  • Mark post as helpful
  • send pies
    Number of slices to send:
    Optional 'thank-you' note:
  • Quote
  • Report post to moderator
Yesterday was a good and productive one.
I got more clay and could almost finish the oven.


I hope I'll find the time to finish the last layer of cob today. Then in a couple of days a layer of lime plaster and that's it.


How long do y'all think I should let it dry before firing the fist time? Or can I go right ahead and speed up the drying with some minor firings?
 
thomas rubino
master rocket scientist
Posts: 6753
Location: latitude 47 N.W. montana zone 6A
3630
cat pig rocket stoves
  • Likes 6
  • Mark post as helpful
  • send pies
    Number of slices to send:
    Optional 'thank-you' note:
  • Quote
  • Report post to moderator
Looking good Ben!
Light her off!
I never wait for the cob to dry.
 
Benjamin Dinkel
Rocket Scientist
Posts: 762
Location: Province of Granada, Andalucía, Spain
525
6
cooking rocket stoves woodworking wood heat
  • Likes 10
  • Mark post as helpful
  • send pies
    Number of slices to send:
    Optional 'thank-you' note:
  • Quote
  • Report post to moderator
Thanks Thomas!
I did. The rocket took off pretty instantaneously. Temperatures rose quickly and then staggered, I guess from all the water evaporating.

This is the (almost final) result, just missing some decorative tiles and some lime and clay plaster.


Here's a video just after lighting the stove for the very first time:


And here it is a couple of minutes into the burn:


thomas rubino
master rocket scientist
Posts: 6753
Location: latitude 47 N.W. montana zone 6A
3630
cat pig rocket stoves
  • Likes 9
  • Mark post as helpful
  • send pies
    Number of slices to send:
    Optional 'thank-you' note:
  • Quote
  • Report post to moderator
Superb Job, Ben!
That is beautiful!
As it dries, you will be even more pleased with its performance.

On to the next!

 
pollinator
Posts: 1090
Location: Greybull WY north central WY zone 4 bordering on 3
328
hugelkultur trees solar woodworking composting homestead
  • Likes 5
  • Mark post as helpful
  • send pies
    Number of slices to send:
    Optional 'thank-you' note:
  • Quote
  • Report post to moderator
So how it it working longer term?  Was your clay good enough over the long haul.

Lesson learned here is that my clay will take cone 6 levels for bisque fire fine but cone 10 fire levels melts it into something sort of looking like lumpy oatmeal.  So temperature rating of the clay matters.
 
Benjamin Dinkel
Rocket Scientist
Posts: 762
Location: Province of Granada, Andalucía, Spain
525
6
cooking rocket stoves woodworking wood heat
  • Likes 7
  • Mark post as helpful
  • send pies
    Number of slices to send:
    Optional 'thank-you' note:
  • Quote
  • Report post to moderator
Hi C,
I just finished the oven so I can’t speak long term yet.
Also I don’t really understand what you’re asking.
In the core I used firebrick, that’s the only place a rocket would reach kiln temperature. Outside the core I used normal brick and cob, like in any other rocket mass heater build for the bench or bell.
If it doesn’t get rained on I expect this oven to outlast me.
 
steward and tree herder
Posts: 10940
Location: Isle of Skye, Scotland. Nearly 70 inches rain a year
5289
5
transportation dog forest garden foraging trees books food preservation woodworking wood heat rocket stoves ungarbage
  • Likes 7
  • Mark post as helpful
  • send pies
    Number of slices to send:
    Optional 'thank-you' note:
  • Quote
  • Report post to moderator
Well done Benjamin and thanks for sharing your build!
I imagine that will be very practical over the summer for you - I'm looking forwards to hearing how the oven works. It certainly looks nice already snug against your wall like that.
 
Benjamin Dinkel
Rocket Scientist
Posts: 762
Location: Province of Granada, Andalucía, Spain
525
6
cooking rocket stoves woodworking wood heat
  • Likes 12
  • Mark post as helpful
  • send pies
    Number of slices to send:
    Optional 'thank-you' note:
  • Quote
  • Report post to moderator
Thanks Nancy.
Yes, no baking allowed inside June, July and August.

I lit the oven up the second time today. And it seems fairly dry already.
Riser temperature surpassed 500°C and the oven went up to 210°C or something.
Baked 2 loads of bread and made some lentils.
I reached baking temp at 175°C within 12 minutes, at least air temperature.
Once the oven is hot it stays hot quite a lot longer than the other one. As expected with more thermal mass.
Heat loss mainly through the door and the front.
Some smoke, but I also used some sappy pine.
I’m quite happy with the performance so far.
 
Benjamin Dinkel
Rocket Scientist
Posts: 762
Location: Province of Granada, Andalucía, Spain
525
6
cooking rocket stoves woodworking wood heat
  • Likes 12
  • Mark post as helpful
  • send pies
    Number of slices to send:
    Optional 'thank-you' note:
  • Quote
  • Report post to moderator
Finally got around to do the last bit of plastering and beautification.
First I scratched the deeper cracks and then sprayed them with water. Then refilled them with cob.

Then I added a strip of turquoise tiles around. "Glued" with clay mortar (1 part clay : 3 parts sand).


Then I sprayed the whole oven and applied a thin coat of plaster (0,5 parts lime : 0,5 parts clay : 1 part horse manure : 3 parts sand (sifted)).


The difference in tone is because this was done in 2 days after work. The upper half is mostly dry and matches the wall behind. The lower half will look very similar.
 
thomas rubino
master rocket scientist
Posts: 6753
Location: latitude 47 N.W. montana zone 6A
3630
cat pig rocket stoves
  • Likes 7
  • Mark post as helpful
  • send pies
    Number of slices to send:
    Optional 'thank-you' note:
  • Quote
  • Report post to moderator
Outstanding job, Ben, looking great!
Keep up the good work!
 
Benjamin Dinkel
Rocket Scientist
Posts: 762
Location: Province of Granada, Andalucía, Spain
525
6
cooking rocket stoves woodworking wood heat
  • Likes 8
  • Mark post as helpful
  • send pies
    Number of slices to send:
    Optional 'thank-you' note:
  • Quote
  • Report post to moderator
The time lapse if finished.
Compressing around 50 h of work into 12 minutes.

 
thomas rubino
master rocket scientist
Posts: 6753
Location: latitude 47 N.W. montana zone 6A
3630
cat pig rocket stoves
  • Likes 6
  • Mark post as helpful
  • send pies
    Number of slices to send:
    Optional 'thank-you' note:
  • Quote
  • Report post to moderator
Superb Job, Ben!
Keep up the good work.
You will have to try your hand at Batchbox building next!
 
I agree. Here's the link: http://stoves2.com
reply
    Bookmark Topic Watch Topic
  • New Topic