|

|
|
|
|

|

|

|

|

|
 3
3


Peter said, When you are planning to build the thing out of insulative fire bricks there's no need to insulate. That's to say, in case you mean the white insulative bricks, very lightweight. More insulation could be added around using perlite, vermiculite, lightweight expanded clay aggregate like Leca, the kind which is used for agriculture among others. Anything combustible in one way or another isn't suitable.
Invasive plants are Earth's way of insisting we notice her medicines. Stephen Herrod Buhner
Everyone learns what works by learning what doesn't work. Stephen Herrod Buhner
6
4
 5
4
5
4
Glenn Herbert wrote:A metal heat shield by code has to have 1" clear to the wall, not just corrugations that give air channels. If spaced correctly, sure, corrugated metal would work fine.
5
Brandon Hands wrote:I'm having a bit of trouble visualizing exactly what your setup is like. Do you mean heat shielding between the bell to the wall, like this: https://www.highschimney.com/wp-content/uploads/2011/08/2990346-W.jpg
I would use corrugated metal for the purpose since it has an air gap behind.
6
"You must be the change you want to see in the world." "First they ignore you, then they laugh at you, then they fight you, then you win." --Mahatma Gandhi
"Preach the Gospel always, and if necessary, use words." --Francis of Assisi.
"Family farms work when the whole family works the farm." -- Adam Klaus


 5
5
Christ is Risen!

Skill verified by gir bot")

Skill verified by Nikki Roche")

Skill verified by Alexandra Malecki") 4
4
4
4
Brandon Hands wrote:I think it is important to ask: is the goal to meet US code? The minimum spacing of 1in and minimum thickness of metal is way overkill so if you're not building your rocket mass heater to code to begin with, don't worry that much about the gap or the thickness of metal.
5
Douglas Alpenstock wrote:
Brandon Hands wrote:I think it is important to ask: is the goal to meet US code? The minimum spacing of 1in and minimum thickness of metal is way overkill so if you're not building your rocket mass heater to code to begin with, don't worry that much about the gap or the thickness of metal.
Well maybe code doesn't matter to some. I have pushed the boundaries here and there. But for many folks it's about the ability to get home insurance, and insurability tends to reference code.
6
3
Glenn Herbert wrote:Many styles of RMH can be made to comply with the code for masonry heaters (sometimes parts more reasonably fall under wood stove clearances), so the more things you can point to that follow code to the letter, the more likely insurance inspectors inclined to be reasonable will be able to approve an installation. Insurers not inclined to be reasonable can always find an excuse to disapprove something.
8
2
Rico Loma wrote:Brandon, we have a resident master of the craft here, one Thomas R. In an earlier post he detailed how his insurance company approved of the RMH that was homemade
3
Glenn Herbert wrote:Many styles of RMH can be made to comply with the code for masonry heaters (sometimes parts more reasonably fall under wood stove clearances), so the more things you can point to that follow code to the letter, the more likely insurance inspectors inclined to be reasonable will be able to approve an installation. Insurers not inclined to be reasonable can always find an excuse to disapprove something.
2
Brandon Hands wrote:I think it is important to ask: is the goal to meet US code? The minimum spacing of 1in and minimum thickness of metal is way overkill so if you're not building your rocket mass heater to code to begin with, don't worry that much about the gap or the thickness of metal.
1
Trayc Smith wrote:
Glenn Herbert wrote:Many styles of RMH can be made to comply with the code for masonry heaters (sometimes parts more reasonably fall under wood stove clearances), so the more things you can point to that follow code to the letter, the more likely insurance inspectors inclined to be reasonable will be able to approve an installation. Insurers not inclined to be reasonable can always find an excuse to disapprove something.
Hi
We are really just wanting to protect the timber wall framing from becoming flammable. I had read this can happen over time. Code as not our focus as we don't have or want insurance.
Our coldest temperatures range from 48F daytime down to 24F night time with a fair amount of wind over winter .
7
Hi
We are really just wanting to protect the timber wall framing from becoming flammable. I had read this can happen over time. Code as not our focus as we don't have or want insurance.
2
Terry Byrne wrote:
Hi
We are really just wanting to protect the timber wall framing from becoming flammable. I had read this can happen over time. Code as not our focus as we don't have or want insurance.
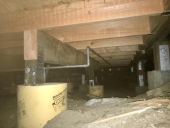
Wood is always flammable. Continually subjecting wood to high temperatures just makes it more flammable over time.
By having a metal heat shield that is spaced away from the wood allows the flow of CONSTANT room temperature air
over the wood which creates the situation of it never being exposed to high temps, just room temps
So to emphasize - the best heat shield is metal with an air space. Just putting insulation
against a combustible material is NOT good. You get heat transfer by conduction and if it is tight
to the material there is no "chimney effect cooling" the material just keeps getting hotter.
The point of an air space with openings bottom and top will allow/create/cause a draft effect, like a
chimney, moving air which removes the heat that is being transferred to the material thru whatever material
that is being used as the heat shield.
Put another way, it is best to create the natural mechanism of hot air [chimney effect] pulling cool/cooler
air [room air temperature] over the material being heated which will perpetually cool that area.
2
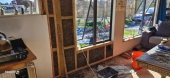
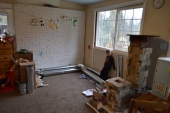
Trayc Smith wrote:Im looking for advice on a heat shield.
We are building the RMH in a cabin with timber framing in the walls . I've removed the drywall and cobbed between the framing for insulation. From what I've read just cob over the wood is not enough protection.
I have rocks, ceramic tiles and red brick to possibly use somehow?
Can these be used with a thick layer of cob?
Can there be gaps of cob in between the stone or tiles ?
Also has anyone tried using wool in their cob mix instead of straw?
.
Trayc Smith wrote:
Thanks makes perfect sense. 😀
1

|
This is what a tiny ad looks like buck naked
Homesteading and Permaculture Bundle - More than 35 Things
https://permies.com/w/235626/Homesteading-Permaculture-Bundle
|