• Post Reply Bookmark Topic Watch Topic
  • New Topic
permaculture forums growies critters building homesteading energy monies kitchen purity ungarbage community wilderness fiber arts art permaculture artisans regional education skip experiences global resources cider press projects digital market permies.com pie forums private forums all forums
this forum made possible by our volunteer staff, including ...
master stewards:
  • Carla Burke
  • Nancy Reading
  • r ranson
  • John F Dean
  • Timothy Norton
  • paul wheaton
  • Jay Angler
stewards:
  • Pearl Sutton
  • Anne Miller
  • Tereza Okava
master gardeners:
  • Christopher Weeks
gardeners:
  • M Ljin
  • Matt McSpadden
  • Megan Palmer

shorty core replacing bbr with sidewinder

 
Posts: 90
Location: Suceava, Romania
6
  • Likes 8
  • Mark post as helpful
  • send pies
    Number of slices to send:
    Optional 'thank-you' note:
  • Quote
  • Report post to moderator
hello, The old build worked ok - ish , but I hope for better with shorty , done wright. I would like if possible to adopt a base number of 12 even if it means more cuts , I have enough bricks, and a grider saw, would like to get the maximum out of this system , as it is 16.5 to 17 square . Also a new bell is in my plans . now I am at simulations stage , so it is highly adjustable
 
gardener
Posts: 507
Location: Victor, Montana; Zone 5b
231
hugelkultur forest garden composting toilet building rocket stoves
  • Likes 5
  • Mark post as helpful
  • send pies
    Number of slices to send:
    Optional 'thank-you' note:
  • Quote
  • Report post to moderator
Hello, could I get some clarification about the size of the system? 16.5 to 17 square? What measurements are you using "inches, millimeter, etc."? Is it a 12" batch box or am I completely lost?

What is your current sidewinder size and bell sizes as well?

 
Cerbu Ulea
Posts: 90
Location: Suceava, Romania
6
  • Likes 6
  • Mark post as helpful
  • send pies
    Number of slices to send:
    Optional 'thank-you' note:
  • Quote
  • Report post to moderator
I mean 16 .5 centimeters, maybe 17 , that would be  about 6.5 inch, the bell now it's like a tower , more like a downward channel 5 times the CSA but only on one side , I want it the way Thomas  made it at his log cabin but without the arch, a simple cube, an covered in a second layer of clay splits
 
gardener
Posts: 1134
Location: +52° 1' 47.40", +4° 22' 57.80"
529
woodworking rocket stoves wood heat
  • Likes 6
  • Mark post as helpful
  • send pies
    Number of slices to send:
    Optional 'thank-you' note:
  • Quote
  • Report post to moderator
Hi Cerbu,

As it is, the firebricks available to you are 114 mm wide. When you use that number as "B", the system size would be already 159 mm. This is including about one mm as the seam between the bricks, so to calculate I used 115 mm as B. It's downright silly to try to make the core larger since the chimney isn't smooth, insulating and circular to begin with.

The core picture you showed in another thread is not entirely correct. It is a Shorty sidewinder core, yes, but it happens to be a modified one that is built in France last May. Now a question: are you able to view SketchUp drawings or did you find this picture on the web?

If you want to build a normal sidewinder Shorty core, I am able to provide you with a SketchUp drawing or pictures of every layer for you to print. Especially that last option is what I do regularly, having all the layers visible pinned to the walls at the build site. By the way, stick to the numbers and layout, this is what works and by inventing a better mousetrap (thanks, Scott!) you run a massive risk of a core that's working sub-standard or not at all.

For now: I answered the question about exact proportions based on your brick size on Donkey's already.
 
Cerbu Ulea
Posts: 90
Location: Suceava, Romania
6
  • Likes 4
  • Mark post as helpful
  • send pies
    Number of slices to send:
    Optional 'thank-you' note:
  • Quote
  • Report post to moderator
yes , I have installed skp 2021, send it if you can, also the layers . the dimensions you provided there, i will copy them here , very easy to adjust now , you also said I can go away with a bigger firebox length, as my wood is cut longish , at about 50 cm tops. what I still don't know is the exit port , ok 23 by 11.4 , and another eleven.5 to the riser roof?

quote PvdB: 'The measurements of the Shorty core should be as follows: firebox 228x342x456 mm. Depth could be around 25% more without repercussions. Port 239x57 mm, depth isn't a fixed number. Lower part of the riser should be 158x158 mm, the 170 mm you mention is too wide. Higher part of the riser should be 228x228 mm, internal riser height something around 5.5B. Most measurements can have a tolerance of a couple of mm's plus and minus.'
 
Peter van den Berg
gardener
Posts: 1134
Location: +52° 1' 47.40", +4° 22' 57.80"
529
woodworking rocket stoves wood heat
  • Likes 5
  • Mark post as helpful
  • send pies
    Number of slices to send:
    Optional 'thank-you' note:
  • Quote
  • Report post to moderator

Cerbu Ulea wrote:yes , I have installed skp 2021, send it if you can, also the layers . the dimensions you provided there, i will copy them here , very easy to adjust now , you also said I can go away with a bigger firebox length, as my wood is cut longish , at about 50 cm tops. what I still don't know is the exit port , ok 23 by 11.4 , and another eleven.5 to the riser roof?


The lower part of the riser is 159x159 mm, nominal. That is equivalent to a circular riser of 159 mm, aerodynamically speaking. The cross section area of such a riser is 19856 cm², the exhaust of the core should be as wide as the firebox. The height of the opening should be 86 mm, the cross section area of the core exhaust is equal to the projected system size then. From the opening to the roof of the riser 86 mm again. This pattern has been done quite a number of builds in different formats, and the result is always the same.

I will amend a Shorty sidewinder drawing, a different brick size but you should be able to use the showed pattern with the bricks you have.
 
Cerbu Ulea
Posts: 90
Location: Suceava, Romania
6
  • Likes 4
  • Mark post as helpful
  • send pies
    Number of slices to send:
    Optional 'thank-you' note:
  • Quote
  • Report post to moderator
understood now ,I can cut custom bricks from splits for the upper riser , I wait for the files. About the roofs , 4 plates of 360 x 160 , and two for the riser will do? some I already have , the rest can be bought , their  thickness  is 25 mm,  https://www.utilul.ro/constructii/produse-zidarie/caramida-refractara/caramida-refractara-samota-brick-490-360x160x25-mm-p25490/
 
Peter van den Berg
gardener
Posts: 1134
Location: +52° 1' 47.40", +4° 22' 57.80"
529
woodworking rocket stoves wood heat
  • Likes 5
  • Mark post as helpful
  • send pies
    Number of slices to send:
    Optional 'thank-you' note:
  • Quote
  • Report post to moderator

Cerbu Ulea wrote:understood now ,I can cut custom bricks from splits for the upper riser , I wait for the files. About the roofs , 4 plates of 360 x 160 , and two for the riser will do? some I already have , the rest can be bought , their  thickness  is 25 mm,  https://www.utilul.ro/constructii/produse-zidarie/caramida-refractara/caramida-refractara-samota-brick-490-360x160x25-mm-p25490/


It looks like sturdy material, it should be doable although a little thin.
The upper riser is built out of full bricks, the liner in the lower riser part is cut from full bricks as well. Have a look at the drawing and you'll see what I mean. The drawn construction for the liner is very stable, this will never starts to cave in.
Here is where the files are to be found. I could link or upload these to permies but there's no need to.
It isn't the most beautiful pattern, but there's one built like this two? years ago and is still functioning without so much as a hiccup.
 
Cerbu Ulea
Posts: 90
Location: Suceava, Romania
6
  • Likes 2
  • Mark post as helpful
  • send pies
    Number of slices to send:
    Optional 'thank-you' note:
  • Quote
  • Report post to moderator
TY, i'll try my best , superwool on the outside of the core it's of any help?
 
Peter van den Berg
gardener
Posts: 1134
Location: +52° 1' 47.40", +4° 22' 57.80"
529
woodworking rocket stoves wood heat
  • Likes 6
  • Mark post as helpful
  • send pies
    Number of slices to send:
    Optional 'thank-you' note:
  • Quote
  • Report post to moderator

Cerbu Ulea wrote:TY, i'll try my best , superwool on the outside of the core it's of any help?


Yes, it is.
A recommendation about the bell: for a Shorty core, the bell's Internal Surface Area should be 15% less than the numbers of the table. This is because the very powerful top end of the first-generation batchrocket is tuned down in this core. Don't worry about this, the burn will be as efficient as always but it will be spread over a bit more time.
Calculation of the ISA can be done by ignoring the core completely, since it's insulated by the superwool.
And a bypass higher up in the bell would be very convenient, especially when the heater is still wet from the build.
 
Cerbu Ulea
Posts: 90
Location: Suceava, Romania
6
  • Likes 5
  • Mark post as helpful
  • send pies
    Number of slices to send:
    Optional 'thank-you' note:
  • Quote
  • Report post to moderator
I rather not do the bypass , i'll wait about a month to partly dry without fire , than a big fire to harden the clay and sand mortar , it's ok ? Done that in the past , but still a smokey  first run
 
Cerbu Ulea
Posts: 90
Location: Suceava, Romania
6
  • Likes 3
  • Mark post as helpful
  • send pies
    Number of slices to send:
    Optional 'thank-you' note:
  • Quote
  • Report post to moderator
I removed the old core and the under substrate  , what should I fill it  with to get to the floor level?
e053890b-b2ab-47e8-bc49-470b0e19fab7.jpg
[Thumbnail for e053890b-b2ab-47e8-bc49-470b0e19fab7.jpg]
 
Peter van den Berg
gardener
Posts: 1134
Location: +52° 1' 47.40", +4° 22' 57.80"
529
woodworking rocket stoves wood heat
  • Likes 5
  • Mark post as helpful
  • send pies
    Number of slices to send:
    Optional 'thank-you' note:
  • Quote
  • Report post to moderator

Cerbu Ulea wrote:I removed the old core and the under substrate  , what should I fill it  with to get to the floor level?


Best to use perlite and a tiny bit of cement mixed in it. Alternatively, Leca pellets mixed with clay or cement. Or, but for this you need to level it out, Air Entrained Concrete blocks, the light insulating kind.

It would be a good thing to elevate the core from ground level. Using a footing of normal bricks or a support frame.
 
Cerbu Ulea
Posts: 90
Location: Suceava, Romania
6
  • Likes 4
  • Mark post as helpful
  • send pies
    Number of slices to send:
    Optional 'thank-you' note:
  • Quote
  • Report post to moderator
to elevate the core two bricks high , about 13 cm ,on an old  cast iron cooking plate with 10 cm rock wool / or all 13 cm of air would do? it will remain space behind the bell even for a 100 120 mm bypass if it's a must , which I can remove when it is dry and warm
 
Peter van den Berg
gardener
Posts: 1134
Location: +52° 1' 47.40", +4° 22' 57.80"
529
woodworking rocket stoves wood heat
  • Likes 6
  • Mark post as helpful
  • send pies
    Number of slices to send:
    Optional 'thank-you' note:
  • Quote
  • Report post to moderator

Cerbu Ulea wrote:to elevate the core two bricks high , about 13 cm ,on an old  cast iron cooking plate with 10 cm rock wool / or all 13 cm of air would do? it will remain space behind the bell even for a 100 120 mm bypass if it's a must , which I can remove when it is dry and warm


Best to have no insulation but just 13 cm of air beneath the combustion core instead.

The bypass could be just a permanent horizontal slit of 10x170 mm. In effect, 10 % of the projected chimney cross section area. While the burn is ramping up, the main stream will choose the path of least resistance anyway.
 
Cerbu Ulea
Posts: 90
Location: Suceava, Romania
6
  • Likes 8
  • Mark post as helpful
  • send pies
    Number of slices to send:
    Optional 'thank-you' note:
  • Quote
  • Report post to moderator
this is the last layer in the pit , refractory mortar to level , now after it dries I can build the core and the bell
241a0a42-51b3-4dc2-bb6d-a5c07a47225e.jpg
[Thumbnail for 241a0a42-51b3-4dc2-bb6d-a5c07a47225e.jpg]
 
Cerbu Ulea
Posts: 90
Location: Suceava, Romania
6
  • Likes 4
  • Mark post as helpful
  • send pies
    Number of slices to send:
    Optional 'thank-you' note:
  • Quote
  • Report post to moderator
this is a way I start the bell after one week drying of the substrate, about 2.3 meters, 25 square foot ISU. Please help me calculate the ISU of the next bel, a vertical wall  of terra cotta in two rooms, an external area of 1.5 square meters each room
aa0c02cb-7be0-4071-b149-56c853a01f6b.jpg
[Thumbnail for aa0c02cb-7be0-4071-b149-56c853a01f6b.jpg]
 
Peter van den Berg
gardener
Posts: 1134
Location: +52° 1' 47.40", +4° 22' 57.80"
529
woodworking rocket stoves wood heat
  • Likes 5
  • Mark post as helpful
  • send pies
    Number of slices to send:
    Optional 'thank-you' note:
  • Quote
  • Report post to moderator

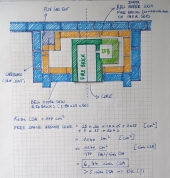
Cerbu Ulea wrote:this is a way I start the bell after one week drying of the substrate, about 2.3 meters, 25 square foot ISU. Please help me calculate the ISU of the next bel, a vertical wall  of terra cotta in two rooms, an external area of 1.5 square meters each room


Before you do anything else, the hole I see in the wall does lead to the terra cotta wall? I would enlarge that hole as much as possible to ensure free flow of gasses to the second bell. What is the depth of that 1.5 m² void in the wall? Plus height and width please, otherwise I am unable to calculate the Internal Surface Area. This would be close to 5 m², assuming you are going to build a 160 mm system.
 
Cerbu Ulea
Posts: 90
Location: Suceava, Romania
6
  • Likes 3
  • Mark post as helpful
  • send pies
    Number of slices to send:
    Optional 'thank-you' note:
  • Quote
  • Report post to moderator
there is a second hole , square ,aprox 110 mm wide , it can be seen covered with a cloth in the previous picture, they both enter to the wall, the round one has 170-180 mm in diameter, is that enough? wall's depth it's about 23 cm, the exterior is 1,5 m 2 , the interior is something like 1.2 max  ; from the dimensions you gave me 159 would be the CSA, I cannot make the bell smaller for this core , but if there is too much ISA it counts if the roof is insulated ?
 
Peter van den Berg
gardener
Posts: 1134
Location: +52° 1' 47.40", +4° 22' 57.80"
529
woodworking rocket stoves wood heat
  • Likes 4
  • Mark post as helpful
  • send pies
    Number of slices to send:
    Optional 'thank-you' note:
  • Quote
  • Report post to moderator

Cerbu Ulea wrote:there is a second hole , square ,aprox 110 mm wide , it can be seen covered with a cloth in the previous picture, they both enter to the wall, the round one has 170-180 mm in diameter, is that enough? wall's depth it's about 23 cm, the exterior is 1,5 m 2 , the interior is something like 1.2 max  ; from the dimensions you gave me 159 would be the CSA, I cannot make the bell smaller for this core , but if there is too much ISA it counts if the roof is insulated ?


You want me to help you with calculating the bell's ISA? I can do that, but I need straight answers before I am able to. The m² figure isn't enough, just the asked for dimensions please. Otherwise, it would be just guessing and something tells me that isn't good enough.

So, again, I  am asking for the height, width and depth of the void that is in the wall, as accurate as possible. To be clear, a void is the open space in the wall, *not* the wall itself on the outside.
Once the ISA of the second bell is known, the first bell can be calculated and following that, the opening between first and second bell also.
 
Cerbu Ulea
Posts: 90
Location: Suceava, Romania
6
  • Likes 4
  • Mark post as helpful
  • send pies
    Number of slices to send:
    Optional 'thank-you' note:
  • Quote
  • Report post to moderator
sorry , the space in the wall it's about 1.1 m high ,and 1.2 m wide , the depth is 20-23 cm max ,  this space  was already here, I just cleaned and modified the insides trough the hatches to be simpler, less friction
https://www.youtube.com/shorts/X8EIJAjYDYw this is filmed inside the top horizontal channel that leads to the chimney , it is also in the wall, maybe this counts too?  its internals is like that
3-(1).png
[Thumbnail for 3-(1).png]
 
Peter van den Berg
gardener
Posts: 1134
Location: +52° 1' 47.40", +4° 22' 57.80"
529
woodworking rocket stoves wood heat
  • Likes 5
  • Mark post as helpful
  • send pies
    Number of slices to send:
    Optional 'thank-you' note:
  • Quote
  • Report post to moderator
Hmmm... The hanging wall in the middle of the void, could that be taken out? It's in the way, causing quite a lot of friction which, incidentally, batchrockets are very picky about.
And yes, the horizontal channel inside the wall is also counting as Internal Surface Area. So, I want to know the length, height and width also.
 
Cerbu Ulea
Posts: 90
Location: Suceava, Romania
6
  • Likes 2
  • Mark post as helpful
  • send pies
    Number of slices to send:
    Optional 'thank-you' note:
  • Quote
  • Report post to moderator
yes , the red line 2 it's two thin clay splits, I can break them out through the cleaning hatch, channell's dimensions 150 /18 /23 cm
 
Peter van den Berg
gardener
Posts: 1134
Location: +52° 1' 47.40", +4° 22' 57.80"
529
woodworking rocket stoves wood heat
  • Likes 4
  • Mark post as helpful
  • send pies
    Number of slices to send:
    Optional 'thank-you' note:
  • Quote
  • Report post to moderator
Right, all dimensions are there now, thank you. I'll do the ISA calculation tomorrow. Some parts won't count, like the vertical channel, the horizontal channel just for about the top half.
 
Cerbu Ulea
Posts: 90
Location: Suceava, Romania
6
  • Likes 4
  • Mark post as helpful
  • send pies
    Number of slices to send:
    Optional 'thank-you' note:
  • Quote
  • Report post to moderator
thank you, now simulation for the bell's wall
https://www.youtube.com/shorts/QELmcZtOnfI 90/90/90 cm give or take , too much isu?
 
Peter van den Berg
gardener
Posts: 1134
Location: +52° 1' 47.40", +4° 22' 57.80"
529
woodworking rocket stoves wood heat
  • Likes 6
  • Mark post as helpful
  • send pies
    Number of slices to send:
    Optional 'thank-you' note:
  • Quote
  • Report post to moderator

Cerbu Ulea wrote:thank you, now simulation for the bell's wall
https://www.youtube.com/shorts/QELmcZtOnfI 90/90/90 cm give or take , too much isu?


Far too much, I'd say. The calculation of the void in the wall amounts to 3.99 m² already. So from a grand total of 5.1 m² you've roughly 1 m² left. The 90x90x90 cm bell's internals aren't possible, that is totalling up to 4.05 m². You would need a 20 cm system to serve this size of ISA.

The choice for a larger core isn't available, due to the chimney size. In my mind, there are two possibilities:
1) bypassing a large part or all of the bell in the wall, or
2) keep the wall and build the core in such a way that it will feed the wall directly, much like the workshop in France this spring.

Option 1) would involve bypassing half of the wall void, at least. That could be done by keeping the hanging wall number 2, and making a new hole on the right side of it. I don't know whether this is possible and I need to calculate some more.

Option 2) would be my choice, the core will get mighty hot on the outside and a brick wall surrounding it will get warm, no doubt about that.
Building a straight Shorty core that exhausts at the back isn't any more difficult as compared to a normal one. I could provide you with a drawing that reflects the correct pattern, your bricks being a bit larger won't be a problem. You have to close the existing holes to the wall void and cut a new one somewhat higher up. The normal bricks around the core need to be without contact with the core itself, whatsoever. The core will expand during heating up and the bricks around it will lagging behind. Just a space would be OK, something between 1 cm and 10 cm would be adequate.
In case the hanging wall number 2 in the void is still there, I would keep it for now, just in case. Taking it out can be done later, if necessary.

Let me know what you would like to build, I need to amend an existing drawing, specifically for option 2).
 
Cerbu Ulea
Posts: 90
Location: Suceava, Romania
6
  • Likes 7
  • Mark post as helpful
  • send pies
    Number of slices to send:
    Optional 'thank-you' note:
  • Quote
  • Report post to moderator
I am thinking now what to do .
1  Stretch the limits of the core to 17 cm ,
2  a 100 mm bypass from the bell's top to mid channel ,
3 or a much simpler bypass of 120 mm from bell's middle to the other bell's middle ,
4  make the  bell as small as possible ,
5 make the  bell partly or totally blind as you said, more like a protection ,
6 make the eternal chimney taller ,
7 insulate the chimney
maybe combining some of this solutions, there is time, no rush here yet, substrate is still drying . Where should I mount a temperature probe?
ps: I am confident it will be better than before with your advices
 
Cerbu Ulea
Posts: 90
Location: Suceava, Romania
6
  • Likes 4
  • Mark post as helpful
  • send pies
    Number of slices to send:
    Optional 'thank-you' note:
  • Quote
  • Report post to moderator
i made a new simulation considering what you said, the smallest bell that can be done in order to allow room to breathe for the 160 mm dragon(more than five times csa ) and some stratification is 60/70 /65 cm with thickly insulated roof , it leads to 1.7 m2 ISA if only 4 walls are active?
 
Peter van den Berg
gardener
Posts: 1134
Location: +52° 1' 47.40", +4° 22' 57.80"
529
woodworking rocket stoves wood heat
  • Likes 3
  • Mark post as helpful
  • send pies
    Number of slices to send:
    Optional 'thank-you' note:
  • Quote
  • Report post to moderator

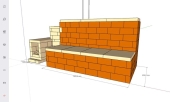
Cerbu Ulea wrote:i made a new simulation considering what you said, the smallest bell that can be done in order to allow room to breathe for the 160 mm dragon(more than five times csa ) and some stratification is 60/70 /65 cm with thickly insulated roof , it leads to 1.7 m2 ISA if only 4 walls are active?


Sorry, this won't work, the upper limit is a firm upper limit. And still questionable due to the absence of a proper bypass. I need to think about this particular problem and I have some questions.

How important is the warmth at the other side of the wall? What room is there?

Is there a possibility to build an adequate larger bell and ignore the wall in its entirety? Assuming the bell is built against the wall, this same wall will get warm but not hot.
Reaching the chimney could be done with a bare chimney pipe? And installing a bypass using a simple T-piece.

Think it over, is there enough space for such a larger footprint and higher heater? You could build a sidewinder version in order to make the bell less deep but wider instead.
 
Cerbu Ulea
Posts: 90
Location: Suceava, Romania
6
  • Likes 4
  • Mark post as helpful
  • send pies
    Number of slices to send:
    Optional 'thank-you' note:
  • Quote
  • Report post to moderator
that room is small, a hallway , not very important , as it is already the hottest in the house , it has no windows, just doors to all the other chambers  , just a dressing room  , are you saying to partly blind that wall portion ?  Ex a clothes hanger , good idea.
i am already building it sidewinder ; where number 5 is in the picture there is a round cleaning hatch of 100 mm about in the middle of the horizontal channel, i could fit there a pipe with a damper , but where should be the other end? i take some pictures , and film .
for now the small bell and bypassing part of the 2 nd bell in two ways sounds best, but i am open to other solutions
 
Cerbu Ulea
Posts: 90
Location: Suceava, Romania
6
  • Likes 2
  • Mark post as helpful
  • send pies
    Number of slices to send:
    Optional 'thank-you' note:
  • Quote
  • Report post to moderator
https://www.youtube.com/shorts/VLLH3NM85_k a simulation, I still do not grasp the top of the riser
https://www.youtube.com/shorts/PBvCXGUJsmY the empty place for the bell
IMG_20250820_185241.jpg
[Thumbnail for IMG_20250820_185241.jpg]
IMG_20250820_185430.jpg
[Thumbnail for IMG_20250820_185430.jpg]
IMG_20250820_185506.jpg
[Thumbnail for IMG_20250820_185506.jpg]
IMG_20250820_185623.jpg
[Thumbnail for IMG_20250820_185623.jpg]
 
Cerbu Ulea
Posts: 90
Location: Suceava, Romania
6
  • Likes 5
  • Mark post as helpful
  • send pies
    Number of slices to send:
    Optional 'thank-you' note:
  • Quote
  • Report post to moderator
sorry for the triple post, another solution came on, inside the horizontal channel there is o hole  used to bypass 3 quarters of the wall to power an old oven which I removed as it was useless to me, one can see the hole in this short , it is roughly 10 /10 cm , now it is covered with a plate, if i move the plate by hand trough the round hatch the stream rises directly from the input towards the chimney , i modify the drawing seen from the small room side
https://www.youtube.com/shorts/X8EIJAjYDYw
3-(1).png
10 cm built-in hidden by-pass
 
pollinator
Posts: 5744
Location: Bendigo , Australia
521
plumbing earthworks bee building homestead greening the desert
  • Mark post as helpful
  • send pies
    Number of slices to send:
    Optional 'thank-you' note:
  • Quote
  • Report post to moderator
Cerbu, I am confused!
Did you make something different from an existing design?
 
Cerbu Ulea
Posts: 90
Location: Suceava, Romania
6
  • Likes 4
  • Mark post as helpful
  • send pies
    Number of slices to send:
    Optional 'thank-you' note:
  • Quote
  • Report post to moderator
this is an old part of the stove that I bought the house with 3 years ago , I kept the wall part, modified inside, and made a bbr than , now I am still keeping the wall part, but partly by-passed ,I want to  power it with  a shorty core in a  bell , all sized well with the help of Peter
 
Peter van den Berg
gardener
Posts: 1134
Location: +52° 1' 47.40", +4° 22' 57.80"
529
woodworking rocket stoves wood heat
  • Likes 4
  • Mark post as helpful
  • send pies
    Number of slices to send:
    Optional 'thank-you' note:
  • Quote
  • Report post to moderator
OK, the drawing is seen from the hallway, where all the doors are! Now this opens possibilities, the second bell could be bypassed for a large part. And equipped with a valve that can be operated from outside the bell will make it a viable setup together!
Cerbu, is that bypass valve possible, one way or the other?

Now we can concentrate on the layout of the first bell, containing the Shorty sidewinder core. It would be wise to make the first bell somewhat smaller than the maximum of 5.1 m², so it would be easy to start with the bypass open. Maybe the 90x90x90 cm internally would be a good one, but a narrower and higher one could also be an option.
When the whole of the core and first bell is heated up, the bypass could be closed in steps.
Is this an acceptable solution?
 
Cerbu Ulea
Posts: 90
Location: Suceava, Romania
6
  • Likes 4
  • Mark post as helpful
  • send pies
    Number of slices to send:
    Optional 'thank-you' note:
  • Quote
  • Report post to moderator
yes, excellent solution, i can remove the round teracota cork and carefully drill a hole in it to operate the plate from the outside with a simple steel cable , today i made the triangular pieces of fire brick for the floor ; next on the list while the substrate is drying is the airframe , 6/4 cm is ok?
b64e6aa3-082d-42f9-940e-4b1ea38db97b.jpg
[Thumbnail for b64e6aa3-082d-42f9-940e-4b1ea38db97b.jpg]
 
Peter van den Berg
gardener
Posts: 1134
Location: +52° 1' 47.40", +4° 22' 57.80"
529
woodworking rocket stoves wood heat
  • Likes 4
  • Mark post as helpful
  • send pies
    Number of slices to send:
    Optional 'thank-you' note:
  • Quote
  • Report post to moderator

Cerbu Ulea wrote:yes, excellent solution, i can remove the round teracota cork and carefully drill a hole in it to operate the plate from the outside with a simple steel cable , today i made the triangular pieces of fire brick for the floor ; next on the list while the substrate is drying is the airframe , 6/4 cm is ok?


Yes, that's OK. The 4 cm to the front. Here's a link to a SketchUp drawing of the airframe and door. This is tailored to a 150 mm system, so for yours it would be best to have it slightly higher and wider. To be precise: 310 mm wide and 425 mm high, measured on the outside of the airframe. Please check whether or not that is the correct value.
 
Cerbu Ulea
Posts: 90
Location: Suceava, Romania
6
  • Likes 5
  • Mark post as helpful
  • send pies
    Number of slices to send:
    Optional 'thank-you' note:
  • Quote
  • Report post to moderator
very helpful, thanks . A flying threshold it's ok? I mean a 2-3 centimeters high bar of thin fire brick just under the front of the roof , So when the door is open the roof does not open directly to the room, I had it in previous build and reduces smells when refueling

The front of my core will look like that, 36/44 cm measures the contour for the frame
IMG_20250822_091958.jpg
upper thershold ?
upper thershold ?
 
Peter van den Berg
gardener
Posts: 1134
Location: +52° 1' 47.40", +4° 22' 57.80"
529
woodworking rocket stoves wood heat
  • Likes 4
  • Mark post as helpful
  • send pies
    Number of slices to send:
    Optional 'thank-you' note:
  • Quote
  • Report post to moderator

Cerbu Ulea wrote:A flying threshold it's ok? I mean a 2-3 centimeters high bar of thin fire brick just under the front of the roof , So when the door is open the roof does not open directly to the room, I had it in previous build and reduces smells when refueling


I am not sure about a flying threshold, it could potentially disrupt the air stream from the top of the air frame. This should stream along the ceiling of the firebox to the rear end, before bending down to the port. This threshold wasn't in the development model and absent in any of the other builds of the Shorty core, so far. I have physically been involved in four builds to date and nothing indicates one of those is releasing smoke into the room while refueling.

In your previous build the second bell was connected all the time, which won't be the case with this new system. The bypass could be opened each and every time before opening the door, although I'm inclined to think this won't be necessary.

Now for the bell: this shouldn't be any larger than 90x90x90 cm, or 4m² ISA in a different shape. The opening between the first and second bell should be quite a bit wider, preferably done as a horizontal letter box. Twice as large as the system's cross section area, in your case about 400 cm², 10 cm high and 40 cm wide would be ideal. Of course this could be implemented as two separate openings, in that case the combined cross section area should be a little larger.

I noticed the circular opening to the second bell is a little below the floor of the bell, this isn't a good situation, aerodynamically speaking. All of the opening should be above the bell floor in order to prevent friction at that point. Also, the horizontal distance between the exhaust opening and the core should be at *least* 10 cm, preferably more.

I hope you are able to work with these requirements.
gift
 
Justin Rhodes 45 minute video tour of wheaton labs basecamp
will be released to subscribers in: soon!
reply
    Bookmark Topic Watch Topic
  • New Topic