gift
Collection of 14 Permaculture/Homesteading Cheat-Sheets, Worksheets, and Guides
will be released to subscribers in: soon!
  • Post Reply Bookmark Topic Watch Topic
  • New Topic
permaculture forums growies critters building homesteading energy monies kitchen purity ungarbage community wilderness fiber arts art permaculture artisans regional education skip experiences global resources cider press projects digital market permies.com pie forums private forums all forums
this forum made possible by our volunteer staff, including ...
master stewards:
  • r ranson
  • Nancy Reading
  • Carla Burke
  • John F Dean
  • Jay Angler
  • paul wheaton
stewards:
  • Nicole Alderman
  • Pearl Sutton
  • Anne Miller
master gardeners:
  • Christopher Weeks
  • Timothy Norton
gardeners:
  • Nina Surya
  • Matt McSpadden
  • thomas rubino

DSR3 With Beehive Dome Build

 
Rocket Scientist
Posts: 804
Location: Guernsey a small island near France.
304
  • Likes 4
  • Mark post as helpful
  • send pies
    Number of slices to send:
    Optional 'thank-you' note:
  • Quote
  • Report post to moderator
Well that is fantastic to see you have fired it up and it is working but….. the construction will be holding moisture and it will take several fires to completely dry out .
Even the ceramic fibre will hold moisture but the bricks can be really stubborn and take an age before they are allowed to operate at max efficiency.
It is always best to do this slowly to avoid cracking any bricks!
 
pollinator
Posts: 556
Location: Northwest Missouri
215
forest garden fungi gear trees plumbing chicken cooking ungarbage
  • Likes 4
  • Mark post as helpful
  • send pies
    Number of slices to send:
    Optional 'thank-you' note:
  • Quote
  • Report post to moderator

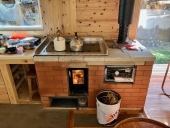
April Wickes wrote:Yay! It works!


Wow wow WOW! I'm so happy for you. And your masonry skills are just amazing!
I was just wondering this week how your build was going.

One question: Is your big piece of flue liner essentially serving the same function as a metal drum would for quick heat? If so, that is a rather brilliant way to solve the tricky issue of how to build a bell top.
 
gardener
Posts: 1068
Location: +52° 1' 47.40", +4° 22' 57.80"
455
woodworking rocket stoves wood heat
  • Likes 2
  • Mark post as helpful
  • send pies
    Number of slices to send:
    Optional 'thank-you' note:
  • Quote
  • Report post to moderator

Fox James wrote:Well that is fantastic to see you have fired it up and it is working but….. the construction will be holding moisture and it will take several fires to completely dry out .
Even the ceramic fibre will hold moisture but the bricks can be really stubborn and take an age before they are allowed to operate at max efficiency.
It is always best to do this slowly to avoid cracking any bricks!


I'll second that, moisture need to be driven out. Careful running in of such a construction: upto 6 weeks.
 
Posts: 160
91
  • Likes 3
  • Mark post as helpful
  • send pies
    Number of slices to send:
    Optional 'thank-you' note:
  • Quote
  • Report post to moderator
Thanks, guys, I'm much relieved!
Fox and Peter: Yup. I gave the real brickwork several days at least to dry out, and do intend to fire gently for a while. The wet mud you're looking at there is just a quick and dirty cob to seal the test run. I expected that to crack, and also to be taken apart again pretty soon. First because, I have enough materials leftover now to mock up a DSR2 as well so I'd like to try a head to head test with the same set up, see if one of them really behaves better than the other, plus decide whether that beautiful afterburner flame is worth living with CFB in my house. Will try to get that done in the next week or so. After that I probably will still stick the Fisher back in place for the winter, because I haven't got to welding doors yet (or, more accurately, suckering a neighbor into trading jobs, since I have zero welding skills) and also because I just filled my shed with 16" wood.

Matt, funny you should compliment my masonry since I have spent most of this project cussing and grumbling as I realize I know a lot less about masonry than I thought I did! But I guess it's together, so far. Haven't got to the complicated bit yet.
Yes, the flue liner released heat a lot more quickly than the brick, but slower than metal. I could touch it last night, but not for more than a second or two. (Chimney pipe thermometer was reading 140*F, by the way, but that maybe doesn't mean much until all the brick dries.) I definitely don't get credit for that idea, I've seen lots of flue liner bells! They're nice, but the bigger they are the more exponentially heavy they get. This one, 13"x18", is about as much as I want to wrestle around solo and I asked for help to place it precisely last night. I have an 18x18 for the original plan that must be more like 150 lbs, and you can get them up to 24x24 but then you're talking about 300 lbs so a lot to lift into a raised place.

I did get a fair amount of soot mucking up my nice clean afterburner during the coaling phase last night. Like I said, I'd appreciate a link to a good thread on End Of Fire Care For Dummies, if anyone has one.

Will be looking forward to not living in a construction site soon....
 
April Wickes
Posts: 160
91
  • Likes 3
  • Mark post as helpful
  • send pies
    Number of slices to send:
    Optional 'thank-you' note:
  • Quote
  • Report post to moderator
So I built another three or four fires with the DSR3 core in place. All of these were harder lighting than I am used to and some of them were not spectacular, but I’d say okay. All had some vortex forming, and most had it for the majority of the burn. I could do with advice on getting the thing lit. I could do with advice on coaling, as that was universally sooty. But generally it ran reasonably well.

The exception was the last fire I built. The day outside was warm enough that I would not have had a fire at all except I wanted a last test. It was a tropical storm blowing in, even temps outside and inside and extremely low atmospheric pressure, very soggy. Previously the stove had been running fine without priming the chimney stack, so I tried to skip that step on this day too and it was a disaster. Huge greasy clouds of yellow smoke pouring out the door and into my living space. Smoke alarm going nuts. It was a good fifteen or twenty minutes of cussing and fussing and coughing before, by some combination of shoving paper in the priming cap and desperately rearranging the “door,” including closing it up as tight as possible, before I finally got it going the right direction. Ironically, when I finally did, it was one of the best burns I’ve had. Pretty sure the problem was that the low sky was just shoving all gases down to ground level, including outdoor smoke and fog. Would probably not have had the problem if I had primed it first. But eww!
dsr3_nastysmoke.jpg
[Thumbnail for dsr3_nastysmoke.jpg]
dsr3_nice-burn.jpg
[Thumbnail for dsr3_nice-burn.jpg]
 
April Wickes
Posts: 160
91
  • Likes 2
  • Mark post as helpful
  • send pies
    Number of slices to send:
    Optional 'thank-you' note:
  • Quote
  • Report post to moderator
Then I took the DSR3 apart and mocked up a DSR2 in the same space.
Attempt #1 went pretty badly. Sluggish, sooty, hard to light, lots of smokeback, essentially no secondary combustion whatsoever. After an hour’s burn the kettle on the cooktop still had not boiled. Top box dead sooty black. The chimney was drawing this time so that wasn’t it (but the smokeback wasn’t big greasy clouds either, it just wasn’t great. Enough to get a sore throat).

Here are the problems I know it had:
The stove was damp, obviously. Some of the bricks had been out in the rain so quite damp.
Because I was trying to do a mockup without cutting bricks, I built a 158 mm system for a 152 mm chimney stack. I had really hoped that would be within reasonable tolerances!
Again, trying not to cut bricks, the port into the stub riser was about 1” low.
I didn’t have enough insulative soft brick to do the entire top box, so the stub riser is insulated and about half the top box walls but not the lower layer (hardbrick) and not the ceiling (kiln shelf). So that would rob some heat.
Maaaybe there is a restriction around the back of the core passing into the brick exit channel? I didn’t think so but I will have to look again when I take it apart.
dsr2_firebox.jpg
[Thumbnail for dsr2_firebox.jpg]
dsr2_topbox.jpg
[Thumbnail for dsr2_topbox.jpg]
dsr2_topboxcap.jpg
[Thumbnail for dsr2_topboxcap.jpg]
dsr2_smokechannel.jpg
[Thumbnail for dsr2_smokechannel.jpg]
dsr2_finishedmockup.jpg
[Thumbnail for dsr2_finishedmockup.jpg]
dsr2_smokechannel-behind.jpg
[Thumbnail for dsr2_smokechannel-behind.jpg]
 
April Wickes
Posts: 160
91
  • Likes 3
  • Mark post as helpful
  • send pies
    Number of slices to send:
    Optional 'thank-you' note:
  • Quote
  • Report post to moderator
Attempt #2, 12 hours later. Took out the port and gave it an extra inch on top to meet spec. Uglier but pretty much just right as math. Stove is much drier than yesterday. Primed the chimney even though I thought it unnecessary, it’s a good drawing roar. So chimney is fine. Wood is dry mixed hardwoods, ash and red maple, chopped up stupid small. Wood should be fine.

7:25  I just can’t get these things lit. Not any of the DSR models I have tried yet. All of them seem air starved on startup. I see some guys on the forums talking about using a propane torch or boughten firestarters, but I really feel like both of these fail the simplicity test. I do my level best not to buy anything!  Anyway, smoke is definitely passing through the port but still a lot of smokeback.
*A note for any and all open DSR2s: I do think they need a top lip. Hence the T-shaped thingy of Matt’s Sherman Tank, but it feels like the top lip should just be built into the box as a matter of course for an open system. Propping a cookie sheet “door” to be closed at top, out at bottom helped a little. Smoke still coming around the sides.
7:44 Fire well started and some little tongues of afterburner flame visible in top box. Smokeback has stopped, finally. You can hear the fire drawing.
7:52 It’s a burn. I wouldn’t call it a rocket.
8:00 Yeah. This is just a fire. There is no secondary combustion. At least not smoking back.
8:20 Added a couple sticks in hope that fresh fuel in a warm, well-started stove would suddenly make it take off. Nope. Still just a fire.
8:25 Kettle boils, 1 hour after startup. Dull glow in afterburner with occasional tongues. So very slight secondary combustion, still hardly a rocket. Disappointing all round.

Possibilities:
1) You can’t run a 158mm system through a 152mm pipe? That would be frustrating if so, since this is the size you can build without cutting bricks. Haven’t other people tried this uncut firebrick layout on a 6” pipe and done okay? I feel like I’ve seen that done successfully elsewhere.
2) You can’t run a system this size built of 2.5” thick hardbrick without it robbing all heat from the secondary combustion? Insulative soft brick and some CFB scraps in the stub riser but not so much in top box.
3) There is a restriction in the smoke channel? Like I said, can’t check that without taking it apart, but I didn’t think there was.
dsr2_improved_port.jpg
[Thumbnail for dsr2_improved_port.jpg]
dsr2_bestigot.jpg
[Thumbnail for dsr2_bestigot.jpg]
 
Peter van den Berg
gardener
Posts: 1068
Location: +52° 1' 47.40", +4° 22' 57.80"
455
woodworking rocket stoves wood heat
  • Likes 4
  • Mark post as helpful
  • send pies
    Number of slices to send:
    Optional 'thank-you' note:
  • Quote
  • Report post to moderator
Oh dear, oh dear. After looking at all the pictures and reading the posts I think I understand what went wrong. In one sentence: every part outside the core is too cramped. That's the single reason why the burn won't do what is promised. It's much harder to describe the point where the restriction spots are but I'll give it a try. Most points can be applicable about your DSR2 and DSR3 alike.

Above the entire core there should be at least a height of one time the diameter of the chimney, preferably more. The planned beehive bell could well be serving for that purpose. As it is now, the space above the core is far too low.

Down around the core preferably on three sides, wide enough to represent 5 times the chimney cross section area, at the very minimum. Better make that 10 times or more. A really frictionless setup, like my own, is around 20 times. The slit where the smoke is expected to go is waaay too small, that's the second pinch point. I also noticed you have space on two sides only, better to have more.

Another point is the exhaust opening to the chimney pipe. This is higher than wide, which is a mistake. The warm air want to stay at the top of the opening, it isn't willing to go lower at all. Better to make that opening quite a bit wider, say twice, all the gases need to go through that opening, A large part of the stream is coming from above, so it'll go through a 90 degree bend. In order to do that without much friction, the opening need to be wider. Not vertically as explained, but horizontally instead. This is the third pinch point.

A fourth point in the DSR2 is the port, which isn't centered, both in the firebox and the riser. The riser is too wide and also probably too deep, the specs say that both measurements should be smaller than the firebox' width.

Although it might look like spaciously enough, in the sense of aerodynamics it isn't. For example, a square opening that is the same cross section area as the circular stove pipe is way too small to transport the same amount of gases as the pipe. Reason: the wall area of the square tunnel is larger, so there's more friction. The corners aren't really beneficial for streaming gases. Couple this to the tendency os the gases to stay high and about half of the opening isn't in use, forming unexpected restrition points. So, in the end it's best to make the openings as wide as you can.

It can be done in such a way that the heater will perform much better but it'll mean lots more work, in order to bring it up to specs.
I am sorry to be the bringer of bad news.
 
April Wickes
Posts: 160
91
  • Likes 3
  • Mark post as helpful
  • send pies
    Number of slices to send:
    Optional 'thank-you' note:
  • Quote
  • Report post to moderator
Peter, thank you again for your help. I did wonder if it was simply that the 158mm DSR2 mockup was just too big for a system that ran the 140mm DSR3 reasonably well. The DSR2’s added depth did restrict the back quite a bit. I measured more carefully as I took it down and it came out like this:
158mm DSR2 (the size that can be put together without cutting bricks) with a 152mm chimney
30.44 in2 CSA
channel above top box and below cooking griddle: 4.5x8 = 36 in2 or 118% CSA but shallow height, as Peter notes
expansion bell 11x15.5 =170.5 in2 or 560% CSA
throat going down 6.5x11 = 71.5 in2 or 234% CSA
turning corner towards smoke channel 5.5” wide x 24” vertical so 132 in2 or 433% CSA but a long upright slot
chimney exit 5x8 = 40 in2 or 131% CSA but taller than wide.
The DSR2 riser stub, being lined with CFB and insulated brick, was 6x7, not 9x9 (I really do read the directions 😄), although it’s true the port was off center.

To be fair to the DSR2, it might have started burning better later in the week, after things were well dried. The top box glass got so badly sooted at first that I couldn’t really see what was going on ever after, since the exit gases turned out the top exit before they burned it clean. But it was drawing well without smokeback and making a nice little roar fairly often, and I could see and feel secondary air getting sucked under the angled splits I had propped to make a floor V. It did do an adequate job of heating my home for a week (not that it’s true winter cold yet) and it did seem to get a good heat harvest, chimney pipe never above 120*F.
By the way, I think the open system DSR2 smokeback problem was solved most of all by putting a brick horizontally across the top of the door to form an upper lip. Beyond that, it hardly seemed to matter whether the rest of the space was blocked or not. The upper lip was the key.

Frustratingly, I can’t do anything to change the chimney exit at this point. Seeing as I built the thing out of bricks, and am constrained by the space I have to work with, I could maybe have designed a little differently at the outset but now I am well mortared in!

I have put the DSR3 back in, scooched forward so it’s easy to access the top box. Now the measurements are more like this:
140mm DSR3 system size going into a 150 mm chimney
23.9 in2 CSA
exit slot directly into expansion bell 11x15.5 =170.5 in2 or 713% CSA
throat going down 6.5x15.5 = 100.75 in2 or 421% CSA
space behind core 12x16 = 192 in2 or 803% CSA
chimney exit 5x8 = 40 in2 or 167% CSA but yes, still the wrong direction

Today’s burn had a good draft without priming (I could even feel it with my hand at the port before lighting) and it lit very easily, one match. Yay! It took off well but then overfuelled and was quite sooty for quite a while. I did eventually get it straightened out. I think it might have been too-big chunks of wood stacked too closely. Adding small sticks to the top seemed to correct the problem and I had overall a reasonably good but not spectacular burn. I worry about getting a winter-long supply of such tiny little sticks. I am used to burning logs and since I burn whatever gnarly wood comes my way, it often does not split easily!
I do note that even though the cook griddle is directly the ceiling of the top box, it is still taking an hour for the tea kettle to boil.
The DSR3 is burning fine now without any door. Fooling around with a cookie sheet door during the overfueling didn’t seem to make any difference.

Appreciate everyone’s help. We’ll get this thing sorted eventually!
 
April Wickes
Posts: 160
91
  • Likes 2
  • Mark post as helpful
  • send pies
    Number of slices to send:
    Optional 'thank-you' note:
  • Quote
  • Report post to moderator
10/14/23 Fired the DSR3 in its current, standard configuration, taking care to use wee chopped, carefully laid wood, lots of air between sticks, no sticks much bigger than my own lady wrist. The thought of filling my entire woodshed with such perfection does give me a headache. However. Lit with one match. No smokeback. Burned very nicely indeed! I’m pleased and impressed.

One very important note: I think part of the burn quality might have been the casserole dish “door” blocking 70% or so of the entrance. About half an hour into the burn, this went ka-boom, luckily with not much force since I was sitting right in front of it. Yes it was “pyrex” but probably only soda-lime. 1.5” of airflow on both sides clearly not sufficiently cooling. So no one else try that!!

That may have ruined my coffee, but I am now well and truly awake….

Tea kettle boiled at about the same time.

Burn lost force rapidly after that but it might also just have been down to coaling. Propped a cookie sheet in place instead, which is, ¾” air gap across top, comparable triangles to either side, and added a few more sticks to see how it runs. Got a nice vortex this way too, and kept it with the door off entirely although I think formation is best with the partial restriction. So the core definitely functions, but really, it needs a proper door!

My house is toasty warm now. Chimney pipe still 130*F.
IMG_20231014_dsr2_nice-burn.jpg
[Thumbnail for IMG_20231014_dsr2_nice-burn.jpg]
IMG_20231014_dsr2_casserole-glass.jpg
[Thumbnail for IMG_20231014_dsr2_casserole-glass.jpg]
 
April Wickes
Posts: 160
91
  • Likes 3
  • Mark post as helpful
  • send pies
    Number of slices to send:
    Optional 'thank-you' note:
  • Quote
  • Report post to moderator
My buddy with the welding shop has kindly loaned me a nice hunk of steel for a less lethal "door."

So next I plan to test two variations on non-tubular afterburners, as Matt and Peter were discussing here:
https://donkey32.proboards.com/thread/4005/foxtatics-new-dsr3-build

1). The standard Vortex core on 152mm system is 4.5x9x12, plus upper box 3x9x16. This makes the afterburner 143% CSA
I am now trying 4.5x7.6x12 on 140 mm system, 143% CSA, which is bigger than the 114% of the DSR3, but then it’s a rectangle, not a tube.
Exterior afterburner dimensions 10.1x5.25.
3” height above afterburner matches Trevor’s, more or less, but wider. Barely any space to either side, ½ inch. Most negative space going right over the top.
8.2x11.5 =94.3in2 top box
minus 53 in2 of total afterburner
= 41.3 in2 negative space, 172% CSA.

2.) Peter’s suggested dimensions to Matt, with a taller afterburner and more circulation on the sides:
5.5x5.5x12 square afterburner. = 30.5 in2 CSA or 126%. This because square and not tube, which at 6” diameter would have been 114%, as DSR3 specs recommend.
Total area of afterburner 7.5x6.5=48.75 in2
To get 44.2 negative space, or 185%, I need a total top box area of 92.95
Which is 8.1” high x 11.5” wide. So I’m leaving it at the original 8.2”, making 190%. Close enough.
This leaves 1.7” top gap rather than 3” as Trevor’s design did, but also a 1.5” gap to each side to force some turbulence. In theory.

Sound about right?
 
Peter van den Berg
gardener
Posts: 1068
Location: +52° 1' 47.40", +4° 22' 57.80"
455
woodworking rocket stoves wood heat
  • Likes 3
  • Mark post as helpful
  • send pies
    Number of slices to send:
    Optional 'thank-you' note:
  • Quote
  • Report post to moderator
I get the impression you want to alter the core design to the space you have available. And on top of that, you are planning to use a non-round afterburner space.
Of course you can do that, I didn't check all the dimensions you mention. May I recommend to stay as close to the design parameters as you are able? A top gap above the afterburner of just 1.7" is way too small, in your case I'd use 6" for that, at least. And a square afterburner won't work as well, of course I tried that quite a few times. My design is based on a full year's extensive research aided by an expensive gas analizer. If you want to do that all over again, be my guest.

It's your house, your heater, your decision. If you follow my design parameters closely, I will be able to give you advise. If you don't, I can't.
 
April Wickes
Posts: 160
91
  • Likes 3
  • Mark post as helpful
  • send pies
    Number of slices to send:
    Optional 'thank-you' note:
  • Quote
  • Report post to moderator
Peter, of course I respect your design and have followed the DSR3 specs as closely as possible. The DSR3, made following your directions exactly, fits and runs quite well in the space I built for it, but the DSR2 could not because of its added depth. That cramped the back of the bell much more.

As for the square afterburner, I believe your round one probably does work best! Problem is, remember, we were unable to source the kind of refractory tube you used over on this side of the pond. That is why you and Matt were discussing the square test over on the other forum last November – because the CFB octagon I have fabricated might not hold up over time and we just can’t get the part your design depends on for any reasonable price. At that time, November 2022, these were the square tube proportions you recommended trying.

I expect that unless these extra tests are just marvelous, I will then go back to using the round tube as per your specs when I finally mortar the whole thing in for good. But I have it set up so it’s easy to test right now, and I would feel better about the future if I knew I had another option in case this funky glued octagon crumbles some day.

The 1.7” top gap, 1.5” sides was negative space *inside* the top box, around the afterburner ‘tube’. Of course from there it is expanding out the exit port into the same 24” tall 13x18 chunk of flue liner. No restriction after the exit port! 185% negative space in top box, as per specs. I can also raise that up an additional inch, as I had to do to accommodate the wider-walled octagon.
 
Peter van den Berg
gardener
Posts: 1068
Location: +52° 1' 47.40", +4° 22' 57.80"
455
woodworking rocket stoves wood heat
  • Likes 4
  • Mark post as helpful
  • send pies
    Number of slices to send:
    Optional 'thank-you' note:
  • Quote
  • Report post to moderator

April Wickes wrote:The 1.7” top gap, 1.5” sides was negative space *inside* the top box, around the afterburner ‘tube’. Of course from there it is expanding out the exit port into the same 24” tall 13x18 chunk of flue liner. No restriction after the exit port!


Sorry to say, I am not convinced. As you mention, the flue liner on top of the exit port is large enough. True, true, but the gases are going down in the same flue liner as well, isn't it? So all the upstreaming gases need to go up in the flue liner and also down. Normally, the gases going up in a much wider bell, streaming down left, right and back around the core.

Now you don't have that, the flue liner is now the restriction because of the two streams rubbing along each other. There's just 3.9 times csa available for each stream, not 5 times which is already the absolute minimum. It could work though, with a second flue liner as down channel. With all restrictions out of the way, the DSR3 is able to deal with quite big pieces of fuel, in my development model it did, so don't worry about that.

The way you are trying this now, making it near impossible to get a realistic figure how it would work with a spacious bell over it. I find it quite remarkable that the thing is able to run as it is.
All my opinion, of course.
 
April Wickes
Posts: 160
91
  • Likes 1
  • Mark post as helpful
  • send pies
    Number of slices to send:
    Optional 'thank-you' note:
  • Quote
  • Report post to moderator
Okay. I see what you’re saying, that the 13x18 flue liner is still a restriction point, and that opening into the final dome bell should solve sluggish burns. I do believe these less than perfect tests have something to teach, though. For one thing, the summer yard tests helped me realize that the octagon’s flat upper surface restricted the exit slot too much and I needed to leave room to raise the top box ceiling an inch. That was worth knowing before I bricked it in! Also it was valuable to know that the DSR2 is just too deep to leave enough circulation space in the lower part of this bell. Thank you for your help troubleshooting both of those.

So I ran a test with something very close to Trevor’s original Vortex, just to see what would happen. It had a wider top shelf (full DSR3 top box width, 11.5”) which, because I didn’t want to cut up any of the pieces I need for the DSR3 design, also had a stair-step in the ceiling. So the top shelf was 4” tall at the front, then dropped down to 3” tall, then went out the standard DSR3 design exit port and up to expand into the same flue liner array. But other than those two small tweaks to fit the materials on hand, essentially it was the Vortex.

The first test ran GREAT! It was the cleanest and liveliest burn I have seen yet, yellow-white, two perfect ram’s horns with secondary ram’s horns curling upwards in the corners. Really beautiful. Zero smoke visible in the afterburner until coaling. I was wonderfully excited and theorizing about that cramped post-core bell being just the trick to stabilizing the Vortex … and then I ran the second burn. Same weather. Same wood. Floppy overexcited dull monster vortex racing forward and out of its place to stream around the front in an intimidating and not very clean looking gush. Not at all stable. No idea what the difference between the two tests might have been. Guess that unpredictability always was the problem the DSR3 was meant to solve.

Then my flue liner bell cracked. It was mortared in with soft cob, which I thought wouldn’t be a hard enough seal to prevent movement, but maybe I should have used loose blankie. Or maybe it would have happened anyway. It leaves me wondering whether a flue liner as my white oven is going to work. I don’t think a black oven with CFB is a good idea. I don’t want to firebrick in an oven because I might need to slide it out again for access. This is a large design problem.

Maybe if I pre-cut an expansion joint?

Anyway, without the flue I guess I’m done testing for the year. Time to put the Fisher back in place and have reliable if smoky heat for the winter. Sorry, Matt, you’re gonna have to run the square test yourself.
 
April Wickes
Posts: 160
91
  • Likes 1
  • Mark post as helpful
  • send pies
    Number of slices to send:
    Optional 'thank-you' note:
  • Quote
  • Report post to moderator
One other shot-in-the-dark brainstorm about round afterburners outside of Europe:
Obviously a terracotta flue liner could not take the heat on its own, since it couldn’t even handle it in the bell. So just how good is ITC-100 / Heat-Guard? I have no idea. Only throwing it out there for someone else to play with or shoot down.
 
gardener
Posts: 3471
Location: Southern alps, on the French side of the french /italian border 5000ft elevation
194
  • Mark post as helpful
  • send pies
    Number of slices to send:
    Optional 'thank-you' note:
  • Quote
  • Report post to moderator
Just popping around.

A daft idea. Can't the stub riser be made five minute riser style ? May be rigidized superwool made with waterglass. Or something along those lines.
 
April Wickes
Posts: 160
91
  • Likes 1
  • Mark post as helpful
  • send pies
    Number of slices to send:
    Optional 'thank-you' note:
  • Quote
  • Report post to moderator
Hello, Satamax, thanks for looking in.
The question you ask was debated at length in last year’s development thread, as referenced at the beginning of this one. The upshot was:
*Peter believes the turbulence induced by the oddly shaped negative space between a round horizontal afterburner and a square top box is the key to the DSR3 producing a stable burn.
*The refractory tube which can be had for $70 in the EU is $250 here, and that only if you buy a full pallet of 40 at a time.
*The concern with rigidizing soft blanket is that, since the tube is horizontal, it would not be truly “rigid” but just collapse inward. The manufacturer of blanket and rigidizer so confirmed.
*So the best anyone could think of was my glued-up ceramic fiber board octagon. This does actually seem to be working. But since I appear to have been the first person to have tried it, no one knows how long it will last.

Several other afterburner ideas were thrown around and shot down on that prior thread. No one had yet mentioned the one I just threw out above. It may well be “daft,” but could you please state your reasoning?
Appreciate your thoughts.
 
Satamax Antone
gardener
Posts: 3471
Location: Southern alps, on the French side of the french /italian border 5000ft elevation
194
  • Likes 2
  • Mark post as helpful
  • send pies
    Number of slices to send:
    Optional 'thank-you' note:
  • Quote
  • Report post to moderator
April, the stub riser i thought about was the one on your DSR2.

On the DSR3, may be rigidized superwool held by inconel  inner "springs" There some ten inch scraps on ebay.

You could ask those guys too https://www.industrialceramic.com/foundry/#foundry-tubes

I'm a batch guy. Never delved into the DSR types.

 
April Wickes
Posts: 160
91
  • Likes 2
  • Mark post as helpful
  • send pies
    Number of slices to send:
    Optional 'thank-you' note:
  • Quote
  • Report post to moderator
All right! Sitting here in 18” of soggy snow with the power out, dreaming of spring. Which will happen someday soon-ish, so I’d like to have the door built by then. To that end, I’m hoping someone can confirm my dimensions for the air frame.

Last October, on this thread:
https://donkey32.proboards.com/thread/4040/dsr3-build-large-bench-fed
there was the following discussion of dimensions.

“The front opening is 48% of system csa, proportion 1 to 4 [...]. The csa of the rectangular ducts left and right of the door **together** [emphasis mine] is 30% of system csa. The 4 supply vents in the door frame together are about 50% again. There might be some slack in these numbers, but the target has been specified as 50%, 30%, 50%.”

So as I understand it, on a 140mm/ 5.5” system with system CSA of 23.9 in2, that works out to:
Primary air intake of 1.75”x7” for a CSA of 12.25 in2 or 51% system CSA.
Side channels of 2x2 square steel each with an interior CSA of 3.52 in2 each, together adding up to 7 in2 which is a bit shy of 30% (7.2 in2) but pretty close.
Supply vent slots: 2 of .75”x4” on upper sides, 2 of .75”x5” across top of airframe.

If I have understood correctly that this 30% number is for *both side channels added together* then 2x2 square stock should be about right (and I believe that is where “iau461” got off in his initial calculations, by counting each side as 30% individually, which he then revised downward).
… Right?

What I’m not so much understanding is the bottom member of the doorframe. If it is simply that it needs to have a CSA equivalent to both side channels added together, then I could simply use a piece of 2x4 square stock with a 1.75x7” slot cut in the front, but on that other thread, Peter says,
“the front opening is leading into a box that is the same csa as both the left and right doorposts together. So that is 60% csa both left and right, resulting in less friction in the feed trajectory of the air.”

Am I misunderstanding the 30%/60% thing entirely? Because that would seem to suggest that the bottom member on a 140mm system would need to be 2x7.5!! Ouch, definitely would not fit!

Last question for today: What are some good ways to attach this sort of frame to brickwork?

Appreciate all of you!
 
Peter van den Berg
gardener
Posts: 1068
Location: +52° 1' 47.40", +4° 22' 57.80"
455
woodworking rocket stoves wood heat
  • Likes 3
  • Mark post as helpful
  • send pies
    Number of slices to send:
    Optional 'thank-you' note:
  • Quote
  • Report post to moderator

April Wickes wrote:If I have understood correctly that this 30% number is for *both side channels added together* then 2x2 square stock should be about right (and I believe that is where “iau461” got off in his initial calculations, by counting each side as 30% individually, which he then revised downward).
… Right?


Entirely correct, both channels together should be 30% of chimney csa. The idea is about 50% inlet, 30% in door posts and 50% for the slits together in sides and top.

April Wickes wrote:What I’m not so much understanding is the bottom member of the doorframe. If it is simply that it needs to have a CSA equivalent to both side channels added together, then I could simply use a piece of 2x4 square stock with a 1.75x7” slot cut in the front, but on that other thread, Peter says,
“the front opening is leading into a box that is the same csa as both the left and right doorposts together. So that is 60% csa both left and right, resulting in less friction in the feed trajectory of the air.”
Am I misunderstanding the 30%/60% thing entirely? Because that would seem to suggest that the bottom member on a 140mm system would need to be 2x7.5!! Ouch, definitely would not fit!


My wording was a bit off, sorry for that. The front air box is meant to be as large as the left and right doorposts together, which is 30% of chimney csa again. In fact, the bottom member of the door frame is made out of two U-profiles with the open sides of the U facing each other. Together they are forming a 'box', where the air streams in to the left and right simultaneously. Since the ends of that 'box' are open to the door posts, there's lots of space to go through the 90º bends.

April Wickes wrote:Last question for today: What are some good ways to attach this sort of frame to brickwork?


Good question. For surface mounting: flanges to the sides and plugs and screws to attach to the brickwork. Some don't mount the frame to the front but incorporate it in the brickwork. For this, the frame is placed first and the bricks are laid around. Fixing is done with bolts screwed into the sides at the height of the seams between bricks.
 
April Wickes
Posts: 160
91
  • Mark post as helpful
  • send pies
    Number of slices to send:
    Optional 'thank-you' note:
  • Quote
  • Report post to moderator
Welp, I have gone and done it.
Final thread here
https://permies.com/t/266494/DSR-Beehive-Dome-Completed
 
What do you have in that there bucket? It wouldn't be a tiny ad by any chance ...
Learn Permaculture through a little hard work
https://wheaton-labs.com/bootcamp
reply
    Bookmark Topic Watch Topic
  • New Topic