|

|

|

|

|

|
|
|
|
|
|
|
|

|

|

|

|

|
 3
3


Visit Redhawk's soil series: https://permies.com/wiki/redhawk-soil
How permies.com works: https://permies.com/wiki/34193/permies-works-links-threads

Skill verified by Nicole Alderman")

Skill verified by Mike Haasl") 5
5
Jay Angler wrote:so consider the electricity to run the dehumidifier " a building expense"!
Jay Angler wrote:
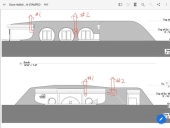
Secondly, have you done the earth berming on the upper walls on any sides of the house yet ?
Jay Angler wrote:
Have you allowed for some sort of air-to-air heat exchange system ?
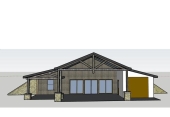
Build it because they say you can't.
18 different architect's that said " you can't do that "
Google " undergroundandlovinit "
3
Dave Lotte wrote:
Jay Angler wrote:so consider the electricity to run the dehumidifier " a building expense"!
Yes, but will only run the dehumidifier when absolutely necessary instead of for a heat source.
Visit Redhawk's soil series: https://permies.com/wiki/redhawk-soil
How permies.com works: https://permies.com/wiki/34193/permies-works-links-threads
4
Jay Angler wrote: We use ours as a clothes dryer, but we're in a much wetter climate than you are.
Ecosystem is everything!
Build it because they say you can't.
18 different architect's that said " you can't do that "
Google " undergroundandlovinit "
7

Build it because they say you can't.
18 different architect's that said " you can't do that "
Google " undergroundandlovinit "
6


![[Thumbnail for 20250121_103547.jpg]](/t/180629/a/257743/20250121_103547.jpg "Filename: 20250121_103547.jpg
Description:")

Build it because they say you can't.
18 different architect's that said " you can't do that "
Google " undergroundandlovinit "
2
Visit Redhawk's soil series: https://permies.com/wiki/redhawk-soil
How permies.com works: https://permies.com/wiki/34193/permies-works-links-threads
4
Jay Angler wrote: if you can believe the internet ....
Build it because they say you can't.
18 different architect's that said " you can't do that "
Google " undergroundandlovinit "
4
![[Thumbnail for 20250121_233016.jpg]](/t/180629/a/257819/20250121_233016.jpg "Filename: 20250121_233016.jpg
Description:")

![[Thumbnail for 20250122_002002.jpg]](/t/180629/a/257821/20250122_002002.jpg "Filename: 20250122_002002.jpg
Description:")
![[Thumbnail for 20250122_002022.jpg]](/t/180629/a/257822/20250122_002022.jpg "Filename: 20250122_002022.jpg
Description:")
![[Thumbnail for 20250122_010614.jpg]](/t/180629/a/257823/20250122_010614.jpg "Filename: 20250122_010614.jpg
Description:")
![[Thumbnail for 20250122_011508.jpg]](/t/180629/a/257824/20250122_011508.jpg "Filename: 20250122_011508.jpg
Description:")
![[Thumbnail for 20250122_042519.jpg]](/t/180629/a/257825/20250122_042519.jpg "Filename: 20250122_042519.jpg
Description:")
![[Thumbnail for 20250122_071857.jpg]](/t/180629/a/257826/20250122_071857.jpg "Filename: 20250122_071857.jpg
Description:")
Build it because they say you can't.
18 different architect's that said " you can't do that "
Google " undergroundandlovinit "
4
![[Thumbnail for 20250122_142852.jpg]](/t/180629/a/257827/20250122_142852.jpg "Filename: 20250122_142852.jpg
Description:")
Build it because they say you can't.
18 different architect's that said " you can't do that "
Google " undergroundandlovinit "
4
![[Thumbnail for Screenshot_20250126-194951.jpg]](/t/180629/a/258118/Screenshot_20250126-194951.jpg "Filename: Screenshot_20250126-194951.jpg
Description:")
![[Thumbnail for Screenshot_20250126-194937.jpg]](/t/180629/a/258119/Screenshot_20250126-194937.jpg "Filename: Screenshot_20250126-194937.jpg
Description:")
![[Thumbnail for 20250125_145134.jpg]](/t/180629/a/258120/20250125_145134.jpg "Filename: 20250125_145134.jpg
Description:")
Build it because they say you can't.
18 different architect's that said " you can't do that "
Google " undergroundandlovinit "
5
![[Thumbnail for 20250126_112628.jpg]](/t/180629/a/258121/20250126_112628.jpg "Filename: 20250126_112628.jpg
Description:")
![[Thumbnail for 20250126_113447.jpg]](/t/180629/a/258122/20250126_113447.jpg "Filename: 20250126_113447.jpg
Description:")
![[Thumbnail for 20250126_124401.jpg]](/t/180629/a/258123/20250126_124401.jpg "Filename: 20250126_124401.jpg
Description:")
![[Thumbnail for 20250126_112717.jpg]](/t/180629/a/258124/20250126_112717.jpg "Filename: 20250126_112717.jpg
Description:")
![[Thumbnail for 20250126_124942.jpg]](/t/180629/a/258125/20250126_124942.jpg "Filename: 20250126_124942.jpg
Description:")
![[Thumbnail for 20250126_125737.jpg]](/t/180629/a/258126/20250126_125737.jpg "Filename: 20250126_125737.jpg
Description:")
![[Thumbnail for 20250126_125629.jpg]](/t/180629/a/258127/20250126_125629.jpg "Filename: 20250126_125629.jpg
Description:")
Build it because they say you can't.
18 different architect's that said " you can't do that "
Google " undergroundandlovinit "
6

![[Thumbnail for 20250201_120722.jpg]](/t/180629/a/258641/20250201_120722.jpg "Filename: 20250201_120722.jpg
Description:")
![[Thumbnail for 20250201_120736.jpg]](/t/180629/a/258642/20250201_120736.jpg "Filename: 20250201_120736.jpg
Description:")
![[Thumbnail for 20250201_120859.jpg]](/t/180629/a/258643/20250201_120859.jpg "Filename: 20250201_120859.jpg
Description:")
![[Thumbnail for 20250201_122031.jpg]](/t/180629/a/258644/20250201_122031.jpg "Filename: 20250201_122031.jpg
Description:")
![[Thumbnail for 20250201_122102.jpg]](/t/180629/a/258645/20250201_122102.jpg "Filename: 20250201_122102.jpg
Description:")
![[Thumbnail for 20250201_122010.jpg]](/t/180629/a/258646/20250201_122010.jpg "Filename: 20250201_122010.jpg
Description:")
Build it because they say you can't.
18 different architect's that said " you can't do that "
Google " undergroundandlovinit "
5
![[Thumbnail for 20250201_180237.jpg]](/t/180629/a/258647/20250201_180237.jpg "Filename: 20250201_180237.jpg
Description:")
![[Thumbnail for 20250201_180406.jpg]](/t/180629/a/258648/20250201_180406.jpg "Filename: 20250201_180406.jpg
Description:")
Build it because they say you can't.
18 different architect's that said " you can't do that "
Google " undergroundandlovinit "
6
![[Thumbnail for 20250217_114427.jpg]](/t/180629/a/259925/20250217_114427.jpg "Filename: 20250217_114427.jpg
Description:")
![[Thumbnail for 20250217_114420.jpg]](/t/180629/a/259926/20250217_114420.jpg "Filename: 20250217_114420.jpg
Description:")
![[Thumbnail for 20250217_110732.jpg]](/t/180629/a/259927/20250217_110732.jpg "Filename: 20250217_110732.jpg
Description:")
Build it because they say you can't.
18 different architect's that said " you can't do that "
Google " undergroundandlovinit "
6
![[Thumbnail for 20250302_161222.jpg]](/t/180629/a/261526/20250302_161222.jpg "Filename: 20250302_161222.jpg
Description:")
![[Thumbnail for 20250302_161247.jpg]](/t/180629/a/261527/20250302_161247.jpg "Filename: 20250302_161247.jpg
Description:")
![[Thumbnail for 20250302_164425.jpg]](/t/180629/a/261528/20250302_164425.jpg "Filename: 20250302_164425.jpg
Description:")
![[Thumbnail for 20250316_113658.jpg]](/t/180629/a/261529/20250316_113658.jpg "Filename: 20250316_113658.jpg
Description:")
![[Thumbnail for 20250316_112752.jpg]](/t/180629/a/261530/20250316_112752.jpg "Filename: 20250316_112752.jpg
Description:")
![[Thumbnail for 20250316_171151.jpg]](/t/180629/a/261531/20250316_171151.jpg "Filename: 20250316_171151.jpg
Description:")
![[Thumbnail for 20250314_151733-1.jpg]](/t/180629/a/261532/20250314_151733-1.jpg "Filename: 20250314_151733-1.jpg
Description:")
![[Thumbnail for 20250314_151740.jpg]](/t/180629/a/261533/20250314_151740.jpg "Filename: 20250314_151740.jpg
Description:")
![[Thumbnail for 20250307_104702.jpg]](/t/180629/a/261534/20250307_104702.jpg "Filename: 20250307_104702.jpg
Description:")
Build it because they say you can't.
18 different architect's that said " you can't do that "
Google " undergroundandlovinit "
6
![[Thumbnail for 20250320_114127.jpg]](/t/180629/a/261698/20250320_114127.jpg "Filename: 20250320_114127.jpg
Description:")
Build it because they say you can't.
18 different architect's that said " you can't do that "
Google " undergroundandlovinit "
4
Dave Lotte wrote:Underslab sewer pipe installed and inspected.
Now to level the floor.... again.
Blazing trails in disabled homesteading
4
Matthew Nistico wrote: My own house has a concrete slab foundation that I am finishing as a floor....
Build it because they say you can't.
18 different architect's that said " you can't do that "
Google " undergroundandlovinit "
4
Dave Lotte wrote:
Matthew Nistico wrote: My own house has a concrete slab foundation that I am finishing as a floor....
What type of house ? How thick is the pad ? Below grade ?
This house is 5 feet below grade and super insulated. It takes at least 3 days to see any kind of temperature change inside the house. So the concrete floor will be very temperature stable.
That being said....
I will be talking to one of the largest concrete companies in this area, and will mention this to him at length. If he says wrap - we wrap.
Will be posting updates as i go.


Blazing trails in disabled homesteading
5
Matthew Nistico wrote:
it is best to physically separate the pipe from the concrete. You can do that by wrapping the pipe in a foam material that will absorb movement
![[Thumbnail for 20250324_141928.jpg]](/t/180629/a/261897/20250324_141928.jpg "Filename: 20250324_141928.jpg
Description:")
Build it because they say you can't.
18 different architect's that said " you can't do that "
Google " undergroundandlovinit "
5
![[Thumbnail for 20250322_173247.jpg]](/t/180629/a/261898/20250322_173247.jpg "Filename: 20250322_173247.jpg
Description:")
![[Thumbnail for 20250322_173043.jpg]](/t/180629/a/261899/20250322_173043.jpg "Filename: 20250322_173043.jpg
Description:")
![[Thumbnail for 20250323_140437.jpg]](/t/180629/a/261900/20250323_140437.jpg "Filename: 20250323_140437.jpg
Description:")
![[Thumbnail for 20250322_173206.jpg]](/t/180629/a/261901/20250322_173206.jpg "Filename: 20250322_173206.jpg
Description:")
Build it because they say you can't.
18 different architect's that said " you can't do that "
Google " undergroundandlovinit "
5
![[Thumbnail for 20250323_132043.jpg]](/t/180629/a/261902/20250323_132043.jpg "Filename: 20250323_132043.jpg
Description:")
![[Thumbnail for 20250323_131952.jpg]](/t/180629/a/261903/20250323_131952.jpg "Filename: 20250323_131952.jpg
Description:")
Build it because they say you can't.
18 different architect's that said " you can't do that "
Google " undergroundandlovinit "
5
![[Thumbnail for 20220530_134127-1.jpg]](/t/180629/a/262309/20220530_134127-1.jpg "Filename: 20220530_134127-1.jpg
Description:")
![[Thumbnail for 20231007_080641.jpg]](/t/180629/a/262310/20231007_080641.jpg "Filename: 20231007_080641.jpg
Description:")
![[Thumbnail for 20240608_135417.jpg]](/t/180629/a/262311/20240608_135417.jpg "Filename: 20240608_135417.jpg
Description:")
![[Thumbnail for 20240622_114235.jpg]](/t/180629/a/262312/20240622_114235.jpg "Filename: 20240622_114235.jpg
Description:")
![[Thumbnail for 20250331_114724.jpg]](/t/180629/a/262313/20250331_114724.jpg "Filename: 20250331_114724.jpg
Description:")
Build it because they say you can't.
18 different architect's that said " you can't do that "
Google " undergroundandlovinit "
4
![[Thumbnail for 20250402_195859.jpg]](/t/180629/a/262461/20250402_195859.jpg "Filename: 20250402_195859.jpg
Description:")
![[Thumbnail for 20250402_195902.jpg]](/t/180629/a/262462/20250402_195902.jpg "Filename: 20250402_195902.jpg
Description:")
![[Thumbnail for 20250402_195907.jpg]](/t/180629/a/262463/20250402_195907.jpg "Filename: 20250402_195907.jpg
Description:")
![[Thumbnail for 20250402_195937.jpg]](/t/180629/a/262464/20250402_195937.jpg "Filename: 20250402_195937.jpg
Description:")
Build it because they say you can't.
18 different architect's that said " you can't do that "
Google " undergroundandlovinit "
4
![[Thumbnail for 20250402_200040.jpg]](/t/180629/a/262465/20250402_200040.jpg "Filename: 20250402_200040.jpg
Description:")
![[Thumbnail for 20250402_200123.jpg]](/t/180629/a/262466/20250402_200123.jpg "Filename: 20250402_200123.jpg
Description:")
![[Thumbnail for 20250402_200739.jpg]](/t/180629/a/262467/20250402_200739.jpg "Filename: 20250402_200739.jpg
Description:")
![[Thumbnail for 20250402_200847.jpg]](/t/180629/a/262468/20250402_200847.jpg "Filename: 20250402_200847.jpg
Description:")
![[Thumbnail for 20250402_200503.jpg]](/t/180629/a/262469/20250402_200503.jpg "Filename: 20250402_200503.jpg
Description:")
Build it because they say you can't.
18 different architect's that said " you can't do that "
Google " undergroundandlovinit "
5
![[Thumbnail for 20250405_130827.jpg]](/t/180629/a/262942/20250405_130827.jpg "Filename: 20250405_130827.jpg
Description:")
![[Thumbnail for 20250405_130916.jpg]](/t/180629/a/262943/20250405_130916.jpg "Filename: 20250405_130916.jpg
Description:")
![[Thumbnail for 20250405_124629.jpg]](/t/180629/a/262944/20250405_124629.jpg "Filename: 20250405_124629.jpg
Description:")
![[Thumbnail for 20250405_132628.jpg]](/t/180629/a/262945/20250405_132628.jpg "Filename: 20250405_132628.jpg
Description:")
![[Thumbnail for 20250405_133023.jpg]](/t/180629/a/262946/20250405_133023.jpg "Filename: 20250405_133023.jpg
Description:")
![[Thumbnail for 20250405_141609-1.jpg]](/t/180629/a/262947/20250405_141609-1.jpg "Filename: 20250405_141609-1.jpg
Description:")
![[Thumbnail for 20250405_185339.jpg]](/t/180629/a/262948/20250405_185339.jpg "Filename: 20250405_185339.jpg
Description:")
![[Thumbnail for 20250405_142729-1.jpg]](/t/180629/a/262949/20250405_142729-1.jpg "Filename: 20250405_142729-1.jpg
Description:")
![[Thumbnail for 20250405_142738-1.jpg]](/t/180629/a/262950/20250405_142738-1.jpg "Filename: 20250405_142738-1.jpg
Description:")
![[Thumbnail for 20250405_142933-1.jpg]](/t/180629/a/262951/20250405_142933-1.jpg "Filename: 20250405_142933-1.jpg
Description:")
![[Thumbnail for 20250405_185311.jpg]](/t/180629/a/262952/20250405_185311.jpg "Filename: 20250405_185311.jpg
Description:")
![[Thumbnail for 20250405_185329.jpg]](/t/180629/a/262953/20250405_185329.jpg "Filename: 20250405_185329.jpg
Description:")
Build it because they say you can't.
18 different architect's that said " you can't do that "
Google " undergroundandlovinit "
4
![[Thumbnail for 20250419_113303.jpg]](/t/180629/a/263802/20250419_113303.jpg "Filename: 20250419_113303.jpg
Description:")
![[Thumbnail for 20250419_120610.jpg]](/t/180629/a/263803/20250419_120610.jpg "Filename: 20250419_120610.jpg
Description:")
![[Thumbnail for 20250419_120545.jpg]](/t/180629/a/263804/20250419_120545.jpg "Filename: 20250419_120545.jpg
Description:")
![[Thumbnail for 20250419_122716.jpg]](/t/180629/a/263805/20250419_122716.jpg "Filename: 20250419_122716.jpg
Description:")
![[Thumbnail for 20250419_120510.jpg]](/t/180629/a/263806/20250419_120510.jpg "Filename: 20250419_120510.jpg
Description:")
![[Thumbnail for 20250420_132512.jpg]](/t/180629/a/263807/20250420_132512.jpg "Filename: 20250420_132512.jpg
Description:")
![[Thumbnail for 20250420_132017.jpg]](/t/180629/a/263808/20250420_132017.jpg "Filename: 20250420_132017.jpg
Description:")
Build it because they say you can't.
18 different architect's that said " you can't do that "
Google " undergroundandlovinit "
4
Dave Lotte wrote:Time to start shopping for a utility pole. New 200 amp service has to go in before i can finish the radon system.
Blazing trails in disabled homesteading
5
Matthew Nistico wrote:
I don't recall if this was a code requirement or just a recommendation; probably a requirement.
Build it because they say you can't.
18 different architect's that said " you can't do that "
Google " undergroundandlovinit "
4
Dave Lotte wrote:I have not bothered getting a radon test either, building inspector says i HAVE TO install it, so i install it.
Are you getting yours inspected at some point ? I would talk to your inspector if you are.
Easier and cheaper to install it now rather than later.
Dave Lotte wrote:Another point i would like to make - try not to upset your inspector any more than you have to. He is the one person that can make your life miserable...
Blazing trails in disabled homesteading
4
![[Thumbnail for HM20250422223937.jpeg]](/t/180629/a/264022/HM20250422223937.jpeg "Filename: HM20250422223937.jpeg
Description:")
![[Thumbnail for HM20250422223946.jpeg]](/t/180629/a/264023/HM20250422223946.jpeg "Filename: HM20250422223946.jpeg
Description:")
![[Thumbnail for HM20250422223956.jpeg]](/t/180629/a/264024/HM20250422223956.jpeg "Filename: HM20250422223956.jpeg
Description:")
![[Thumbnail for HM20250422223407.jpeg]](/t/180629/a/264025/HM20250422223407.jpeg "Filename: HM20250422223407.jpeg
Description:")
![[Thumbnail for HM20250422223350.jpeg]](/t/180629/a/264026/HM20250422223350.jpeg "Filename: HM20250422223350.jpeg
Description:")
![[Thumbnail for HM20250422223313.jpeg]](/t/180629/a/264027/HM20250422223313.jpeg "Filename: HM20250422223313.jpeg
Description:")
![[Thumbnail for HM20250422223619.jpeg]](/t/180629/a/264028/HM20250422223619.jpeg "Filename: HM20250422223619.jpeg
Description:")
![[Thumbnail for HM20250422223638.jpeg]](/t/180629/a/264029/HM20250422223638.jpeg "Filename: HM20250422223638.jpeg
Description:")
![[Thumbnail for HM20250422223645.jpeg]](/t/180629/a/264030/HM20250422223645.jpeg "Filename: HM20250422223645.jpeg
Description:")
![[Thumbnail for HM20250422224025.jpeg]](/t/180629/a/264031/HM20250422224025.jpeg "Filename: HM20250422224025.jpeg
Description:")
![[Thumbnail for HM20250422223054.jpeg]](/t/180629/a/264032/HM20250422223054.jpeg "Filename: HM20250422223054.jpeg
Description:")
![[Thumbnail for HM20250422223059.jpeg]](/t/180629/a/264033/HM20250422223059.jpeg "Filename: HM20250422223059.jpeg
Description:")
Build it because they say you can't.
18 different architect's that said " you can't do that "
Google " undergroundandlovinit "
5
![[Thumbnail for 20250426_152721.jpg]](/t/180629/a/264473/20250426_152721.jpg "Filename: 20250426_152721.jpg
Description:")
![[Thumbnail for 20250426_152712.jpg]](/t/180629/a/264474/20250426_152712.jpg "Filename: 20250426_152712.jpg
Description:")
![[Thumbnail for 20250426_153036.jpg]](/t/180629/a/264475/20250426_153036.jpg "Filename: 20250426_153036.jpg
Description:")
![[Thumbnail for 20250426_133727.jpg]](/t/180629/a/264476/20250426_133727.jpg "Filename: 20250426_133727.jpg
Description:")
![[Thumbnail for 20250426_133713.jpg]](/t/180629/a/264477/20250426_133713.jpg "Filename: 20250426_133713.jpg
Description:")
![[Thumbnail for 20250427_151707.jpg]](/t/180629/a/264478/20250427_151707.jpg "Filename: 20250427_151707.jpg
Description:")
![[Thumbnail for 20250426_174737.jpg]](/t/180629/a/264479/20250426_174737.jpg "Filename: 20250426_174737.jpg
Description:")
![[Thumbnail for 20250427_185453.jpg]](/t/180629/a/264480/20250427_185453.jpg "Filename: 20250427_185453.jpg
Description:")
![[Thumbnail for 20250427_185502.jpg]](/t/180629/a/264481/20250427_185502.jpg "Filename: 20250427_185502.jpg
Description:")
![[Thumbnail for 20250427_185515.jpg]](/t/180629/a/264482/20250427_185515.jpg "Filename: 20250427_185515.jpg
Description:")
![[Thumbnail for 20250426_174417.jpg]](/t/180629/a/264483/20250426_174417.jpg "Filename: 20250426_174417.jpg
Description:")
![[Thumbnail for 20250426_174237.jpg]](/t/180629/a/264484/20250426_174237.jpg "Filename: 20250426_174237.jpg
Description:")
![[Thumbnail for 20250427_190131.jpg]](/t/180629/a/264485/20250427_190131.jpg "Filename: 20250427_190131.jpg
Description:")
Build it because they say you can't.
18 different architect's that said " you can't do that "
Google " undergroundandlovinit "
4
![[Thumbnail for 20250503_130124.jpg]](/t/180629/a/264936/20250503_130124.jpg "Filename: 20250503_130124.jpg
Description:")
![[Thumbnail for 20250503_160158.jpg]](/t/180629/a/264937/20250503_160158.jpg "Filename: 20250503_160158.jpg
Description:")
![[Thumbnail for 20250503_160255.jpg]](/t/180629/a/264938/20250503_160255.jpg "Filename: 20250503_160255.jpg
Description:")
Build it because they say you can't.
18 different architect's that said " you can't do that "
Google " undergroundandlovinit "
5
![[Thumbnail for 20250504_132013.jpg]](/t/180629/a/265037/20250504_132013.jpg "Filename: 20250504_132013.jpg
Description:")
![[Thumbnail for 20250504_185650.jpg]](/t/180629/a/265038/20250504_185650.jpg "Filename: 20250504_185650.jpg
Description:")
![[Thumbnail for 20250504_185706.jpg]](/t/180629/a/265039/20250504_185706.jpg "Filename: 20250504_185706.jpg
Description:")
![[Thumbnail for 20250504_185635.jpg]](/t/180629/a/265040/20250504_185635.jpg "Filename: 20250504_185635.jpg
Description:")
Build it because they say you can't.
18 different architect's that said " you can't do that "
Google " undergroundandlovinit "
6
![[Thumbnail for 20250508_175243.jpg]](/t/180629/a/265310/20250508_175243.jpg "Filename: 20250508_175243.jpg
Description:")
![[Thumbnail for 20250508_180834.jpg]](/t/180629/a/265311/20250508_180834.jpg "Filename: 20250508_180834.jpg
Description:")
![[Thumbnail for 20250509_053322.jpg]](/t/180629/a/265312/20250509_053322.jpg "Filename: 20250509_053322.jpg
Description:")
![[Thumbnail for 20250508_181211.jpg]](/t/180629/a/265313/20250508_181211.jpg "Filename: 20250508_181211.jpg
Description:")
![[Thumbnail for 20250508_181252.jpg]](/t/180629/a/265314/20250508_181252.jpg "Filename: 20250508_181252.jpg
Description:")
![[Thumbnail for 20250508_181149.jpg]](/t/180629/a/265315/20250508_181149.jpg "Filename: 20250508_181149.jpg
Description:")
![[Thumbnail for 20250508_181341.jpg]](/t/180629/a/265316/20250508_181341.jpg "Filename: 20250508_181341.jpg
Description:")
Build it because they say you can't.
18 different architect's that said " you can't do that "
Google " undergroundandlovinit "
4
Visit Redhawk's soil series: https://permies.com/wiki/redhawk-soil
How permies.com works: https://permies.com/wiki/34193/permies-works-links-threads
2
Jay Angler wrote: Your stack of foam blocks would have been very useful!
Build it because they say you can't.
18 different architect's that said " you can't do that "
Google " undergroundandlovinit "
2
![[Thumbnail for 20250521_153542.jpg]](/t/180629/a/266361/20250521_153542.jpg "Filename: 20250521_153542.jpg
Description:")
![[Thumbnail for 20250521_153656.jpg]](/t/180629/a/266362/20250521_153656.jpg "Filename: 20250521_153656.jpg
Description:")
![[Thumbnail for 20250521_153817.jpg]](/t/180629/a/266363/20250521_153817.jpg "Filename: 20250521_153817.jpg
Description:")
![[Thumbnail for 20250521_154828.jpg]](/t/180629/a/266364/20250521_154828.jpg "Filename: 20250521_154828.jpg
Description:")
![[Thumbnail for 20250521_155002.jpg]](/t/180629/a/266365/20250521_155002.jpg "Filename: 20250521_155002.jpg
Description:")
![[Thumbnail for 20250521_155056.jpg]](/t/180629/a/266366/20250521_155056.jpg "Filename: 20250521_155056.jpg
Description:")
Build it because they say you can't.
18 different architect's that said " you can't do that "
Google " undergroundandlovinit "
2
![[Thumbnail for 20250524_215633.jpg]](/t/180629/a/266469/20250524_215633.jpg "Filename: 20250524_215633.jpg
Description:")
![[Thumbnail for 20250524_215648.jpg]](/t/180629/a/266470/20250524_215648.jpg "Filename: 20250524_215648.jpg
Description:")
![[Thumbnail for 20250524_215854.jpg]](/t/180629/a/266471/20250524_215854.jpg "Filename: 20250524_215854.jpg
Description:")
![[Thumbnail for 20250524_215849.jpg]](/t/180629/a/266472/20250524_215849.jpg "Filename: 20250524_215849.jpg
Description:")
![[Thumbnail for 20250524_220626.jpg]](/t/180629/a/266473/20250524_220626.jpg "Filename: 20250524_220626.jpg
Description:")
![[Thumbnail for 20250524_221506.jpg]](/t/180629/a/266474/20250524_221506.jpg "Filename: 20250524_221506.jpg
Description:")
![[Thumbnail for 20250524_221829.jpg]](/t/180629/a/266475/20250524_221829.jpg "Filename: 20250524_221829.jpg
Description:")
![[Thumbnail for 20250524_222017.jpg]](/t/180629/a/266476/20250524_222017.jpg "Filename: 20250524_222017.jpg
Description:")
![[Thumbnail for 20250524_215748.jpg]](/t/180629/a/266477/20250524_215748.jpg "Filename: 20250524_215748.jpg
Description:")
![[Thumbnail for 20201010_222035.jpg]](/t/180629/a/266478/20201010_222035.jpg "Filename: 20201010_222035.jpg
Description:")
![[Thumbnail for 20201016_182906.jpg]](/t/180629/a/266479/20201016_182906.jpg "Filename: 20201016_182906.jpg
Description:")
![[Thumbnail for 20250524_223910.jpg]](/t/180629/a/266480/20250524_223910.jpg "Filename: 20250524_223910.jpg
Description:")
![[Thumbnail for 20250524_225517.jpg]](/t/180629/a/266481/20250524_225517.jpg "Filename: 20250524_225517.jpg
Description:")
![[Thumbnail for 20250524_225429.jpg]](/t/180629/a/266482/20250524_225429.jpg "Filename: 20250524_225429.jpg
Description:")
![[Thumbnail for 20250524_225335.jpg]](/t/180629/a/266483/20250524_225335.jpg "Filename: 20250524_225335.jpg
Description:")
Build it because they say you can't.
18 different architect's that said " you can't do that "
Google " undergroundandlovinit "

|
Skool. Stay in. Smartness. Tiny ad:
Escape to gardens and natural buildings (for free-ish) in Montana
https://wheaton-labs.com/bootcamp
|