

|

|

|

|
.png)
|

|
|
|
|
|
|
|
|

|

|

|

|

|
 6
6


Best to shape it with cob and lots of straw. Th render is just for looks then.
" All that is gold does not glitter; not all those who wander are lost; the old that is strong does not wither; deep roots are not reached by the frost. " J. R. R. TOLKIEN
10
sara ventura wrote:I've finally managed to draw something that makes sense with sketchup.
Firebrick - 230x114x64 mm
IFB - 230x114x64 & 230x114x30 mm
I'm I going in the right direction? Are there any crucial mistakes?
regards, Peter
7
What I usually do with this size (150 mm) of core is this: I'll take the width of the bricks, in your case 114 mm, and use that as the Base figure.
Don't worry too much about it, I'll draw you a core that is the right size and proportions, based on the bricks that are available to you.
Yes, this is right direction and yes, there are some crucial mistakes.
Namely: the liner opposite the port shouldn't be there, the top half of the riser box should be square, sides equal to 2B.
" All that is gold does not glitter; not all those who wander are lost; the old that is strong does not wither; deep roots are not reached by the frost. " J. R. R. TOLKIEN
7
sara ventura wrote:I've read somewhere that a 20% increase is the usual to add to the amount needed of bricks, is that correct?
sara ventura wrote:Also, I've realized while drawing I forgot there are 2 types of brick, not sure that I can lay both between them as I've done? Different expansion rates, perhaps?
sara ventura wrote:I've drawn the top's firebox using the refractory slab G-23, which leaves three joints on the top. Would it be better to have a single piece instead?
sara ventura wrote:And the single piece that doubles as top exit riser's port and base of the riser's top, should be from the same material as the rest of the riser? Can I use a cut from the G-23 slab?
regards, Peter
6
I am unsure what type of insulating firebricks you have there. Better to use just hard firebricks for the entire core. The riser is the part that's heat stressed most of all, especially the liner in the lower half. Thin strips of insulating firebrick, I feel scary about its durability.
I"ve had a look at your drawing of the core, and question arose. The depth of the firebox, is that a fixed figure because of the bell depth?
" All that is gold does not glitter; not all those who wander are lost; the old that is strong does not wither; deep roots are not reached by the frost. " J. R. R. TOLKIEN
7
sara ventura wrote:I'm trying to avoid ceramic wool as much as possible, I was going with the insulated firebrick for the riser, so I don't have to add extra insulation outside. Keeping the ceramic blanket at minimum when directly exposed to gases.
regards, Peter
3
" All that is gold does not glitter; not all those who wander are lost; the old that is strong does not wither; deep roots are not reached by the frost. " J. R. R. TOLKIEN
10
Peter van den Berg wrote:This core type can do very nicely without insulation at all.
regards, Peter
5
Using hard firebricks seems to be the logical way to go, then.sara ventura wrote:That's good news, indeed! IFB are 1€ plus per piece than Firebrick😅
regards, Peter
6
Peter van den Berg wrote:The numbers doesn't look like fixed figures, it could be that the figures are at least partly interchangable. Maybe, with an awful lot of turbulence induced both the other two T's, time and temperature, could be smaller.
Actually, I am convinced this could be the case, although I am unable to prove it.
Silence is Golden
For all your RMH needs:
dragontechrmh.com
6
regards, Peter
6
Gerry Parent wrote:I was under the impression that a person could cheat and use a fan and/or a heater to decrease the amount of time before a smokeless fire is achieved.
If so, wouldn't using such devices be able to prove that these numbers are not fixed but are interchangable as you mention?
regards, Peter
6
sara ventura wrote:
I am unsure what type of insulating firebricks you have there. Better to use just hard firebricks for the entire core. The riser is the part that's heat stressed most of all, especially the liner in the lower half. Thin strips of insulating firebrick, I feel scary about its durability.
I have located a high temp materials factory that offers:
Insulating firebrick G-26 -
Dimensions: 230 x 114 x 64 mm
Maximum temperature: 1430ºC
Alumina: 56%
Characteristics:
Excellent insulating qualities.
Mechanical and temperature resistance superior to group 23 bricks.
High purity.
Thermal shock resistance.
Firebrick AL40-
Dimensions: 230 x 114 x 64 / 76 / 20 / 30 / 40 mm
Maximum temperature: 1420ºC
Alumina: 39-41%
Characteristics:
High purity.
Low iron content.
Good mechanical resistance.
Excellent resistance to thermal shock.
I'm trying to avoid ceramic wool as much as possible, I was going with the insulated firebrick for the riser, so I don't have to add extra insulation outside. Keeping the ceramic blanket at minimum when directly exposed to gases.
I"ve had a look at your drawing of the core, and question arose. The depth of the firebox, is that a fixed figure because of the bell depth?
I've drawn 50 cm because the depth is the lenght that has more tolerance, and I'm thinking in the type of wood I'll be using.
Most of the times the horitzontal cuts of the wood are at an angle, length is always irregular. So extra depth to make sure I can fit any kind of cuts in the box load.
6
Peter van den Berg wrote:
This core type can do very nicely without insulation at all.
Maybe I should explain a bit what happens inside this Shorty core.
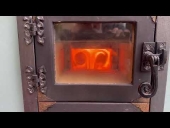
In order to obtain complete combustion or close to this state of affairs, the three T's are important. In no particular order: temperature, turbulence and time. Some mainstream knowledge say smoke should disappear as soon as a temperature of 850 ºC (1560 ºF) is reached. There's even a German group by the name of 850 Grad, which is promoting this idea. Of course, nobody specified where that temperature should be reached and accompanied by which amount of turbulence and during which amount of time. Since I've seen numerous times smoke disappearing within 5 to 10 minutes into a burn after a cold start, I started wondering. The numbers doesn't look like fixed figures, it could be that the figures are at least partly interchangeable. Maybe, with an awful lot of turbulence induced both the other two T's, time and temperature, could be smaller.
I used what I thought was the best "insulating fire brick" I could get my hands on in the states. And after a few years these have started to break down, while the hard fire brick has NOT SHOWN any problems. (same stove)
" All that is gold does not glitter; not all those who wander are lost; the old that is strong does not wither; deep roots are not reached by the frost. " J. R. R. TOLKIEN
4
Scott Weinberg wrote:But I am hear to say, I used what I thought was the best "insulating fire brick" I could get my hands on in the states. And after a few years these have started to break down
5
Cristobal Cristo wrote:
Scott Weinberg wrote:[But I am hear to say, I used what I thought was the best "insulating fire brick" I could get my hands on in the states. And after a few years these have started to break down
Scott, do you remember what brand and model of IFB you have used?
The insulating bricks in my gas kiln do not show any wear, but at the same time I use it sporadically, but at higher temperatures. I always inquire if IFBs that I purchase can work in flame path.
9
9
sara ventura wrote:As it is now, I'm at 6m2 ISA and I need to reduce it a little.
sara ventura wrote:-Space between riser's top and bell's top ---> I have now 30 cm, could it be reduced to 20cm?
sara ventura wrote:-Lowering the core 5cm ---> Core 5 cm lower than the bench's top, but still 25 cm above the floor, is it feasible? Would it compromise the gases flow too much?
sara ventura wrote:-Bench height and width ---> Height is now at 30 cm, I can't go lower. Width is at 60 cm, could I make it 50 cm and add this in mass to the exterior to keep 60 cm depth for the bench seat? It could be done either with brick or cob this extra thickness outside? I assume this would lower also the temp of the wall outside, but the idea of keeping the calfs fresher than the rest of the body sounds good to me.
sara ventura wrote:So I could go for a core made all from firebrick, without covering it with ceramic blanket to keep the maximum heat in, and still have a clean combustion that guarantees the optimal functioning of the heater.
regards, Peter
6
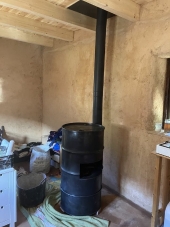
I am unsure whether or not I mentioned this, but there shouldn't be a wall between the main bell and the bench at all, just a few columns. Try to view the whole of it as a strangely shaped bell.
The accepted bell size for a 150 mm first generation batchrocket is 5.3 m². However, the top combustion rate of a Shorty core is somewhat tuned down, in order to create a much more reliable core. So, for a 150 mm Shorty, that ISA should be 15% less, being 4.5 m².
However... you could have an oversized bell ISA although a bypass is a must in that case.
sara ventura wrote:
-Space between riser's top and bell's top ---> I have now 30 cm, could it be reduced to 20cm?
Top gap could be zero, but for safeties' sake, let's say 10 cm or 4" would be sufficient.
" All that is gold does not glitter; not all those who wander are lost; the old that is strong does not wither; deep roots are not reached by the frost. " J. R. R. TOLKIEN
4
sara ventura wrote:The bybass was already in my to do list. How much below the exit riser's port should it be placed? Should the opening of the bypass be facing the floor or the wall?
sara ventura wrote:I can squash 20 cm from the top, leave the core aligned with the bench top and lower my ISA to 5'2.
Will I get away with that ISA and the bypass?
regards, Peter
4
How much below the exit riser's port should it be placed? Should the opening of the bypass be facing the floor or the wall?
sara ventura wrote:
I can squash 20 cm from the top, leave the core aligned with the bench top and lower my ISA to 5'2.
Will I get away with that ISA and the bypass?
Hard to tell, as long as the chimney is of good quality, it might, since the ISA oversize is now roughly 15%.
" All that is gold does not glitter; not all those who wander are lost; the old that is strong does not wither; deep roots are not reached by the frost. " J. R. R. TOLKIEN
8
sara ventura wrote:I used the riser's exit port as reference as I imagine the bypass is best placed close to it, so the hot gases find an exit before going down to the floor and bench. I know the bypass is placed in the exit pipe, and the shape is a T section, in my case I'll use a butterfly flap that will be operated through the bell's top.
sara ventura wrote:From the lowest point of the exit flue to the exterior top: 5 meters with 1 35º turn exiting the bell and another to enter the masonry chimney that the pipe will go through up to the exterior. Pipe will be double walled.
regards, Peter
8
" All that is gold does not glitter; not all those who wander are lost; the old that is strong does not wither; deep roots are not reached by the frost. " J. R. R. TOLKIEN
7
![[Thumbnail for Shorty-Vista-Rica.jpg]](/t/280192/a/287438/Shorty-Vista-Rica.jpg "Filename: Shorty-Vista-Rica.jpg
Description:")
" All that is gold does not glitter; not all those who wander are lost; the old that is strong does not wither; deep roots are not reached by the frost. " J. R. R. TOLKIEN
9
regards, Peter
7
" All that is gold does not glitter; not all those who wander are lost; the old that is strong does not wither; deep roots are not reached by the frost. " J. R. R. TOLKIEN
8
sara ventura wrote:My fault, I've drawn a 20cm exit flue because I'll use a double walled pipe, 15cm exit inside. Also, will have a reducer from 20 to 15 at the base so I simplified the drawing, a lot😅
sara ventura wrote:Noted on the bypass, even better for me, construction wise.
That means the bypass flap will endure maximum temps coming from the core, anyone has experience on how does the flap behave after a long time period?
sara ventura wrote:I'll add a bit more ISA, would you say the best place to add space is between the exit core and facing wall?
To have more space for the gases to move easily to the bench?
Or increase the clear space around exit pipe, wall and core? as it is now I have 4 cm on each side.
regards, Peter
6
Peter van den Berg wrote: in the drawing the flue is drawn as a 200 mm diameter one, while the core and ISA is for a 150 mm system. You won't need a 200 mm chimney, any particular reason to have one?
.
6
Your concern would be justified in the case of a 1st generation batchrocket build. The Shorty core however, is radically different in this respect. Maximum temperatures won't be at the top of the bell anymore, but opposite the core exit instead. This is better in more than one way, the most obvious one: people tend to live at a lower level than the top of a high bell.
" All that is gold does not glitter; not all those who wander are lost; the old that is strong does not wither; deep roots are not reached by the frost. " J. R. R. TOLKIEN
8
Scott Weinberg wrote:Would this oversizing of the flue, effect the performance or workings of a stove
I am thinking about those that may have aquired a place that hard a large flue, but don't need that much stove size for the needed heat value that the flue could provide for.
regards, Peter
7
sara ventura wrote:I still struggle to imagine the behavior of the hot air coming from the riser to "open air" inside the bell.
Has it the speed enough to project like a beam to the front wall, and from this first contact with mass ( and heat transfer) bounce and spread upwards?
sara ventura wrote:Is it l like the air coming from an A/C unit, that you can freeze yourself if you're straight in front of the beam, but move away from there and the air becomes slightly fresh but quiet? I hope I pictured the example correctly : )
sara ventura wrote:Another question, when drawing the airframe and door adapted to my firebox (scaled to fit the size of my bricks), I just have to scale the air inlets accordingly, right?
regards, Peter
5
“The most important decision we make is whether we believe we live in a friendly or hostile universe.”― Albert Einstein

|
A wop bop a lu bob a womp bam boom. Tutti frutti ad:
It's like being on a deserted island - only with gardens and natural buildings in Montana
https://wheaton-labs.com/bootcamp
|


![[Download Shorty-6_-Vistarica.skp]](https://permies.com/templates/default/betaview/images/download-attachment.gif)


